一、条件找房界面分为4个部分,搜索部分、条件检索部分、房屋列表和底部。搜索部分和底部用之前封装好的组件即可,条件检索部分如图所示,将所有的条件检索封装到父组件Filter,而四个部分封装到各个组件之中
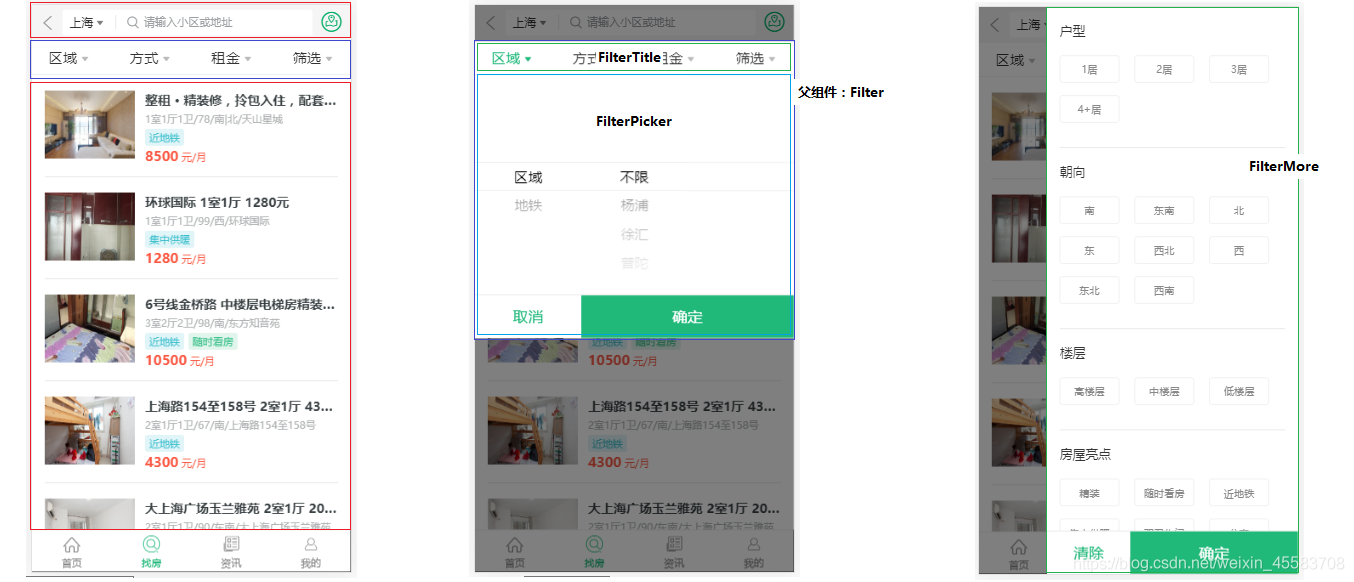

1.渲染Filter组件,onFilter传递获取的数据,Filter组件中包含了FilterMore、FilterPicker、FilterTitle。FilterTitle 标题菜单组件。FilterPicker 前三个菜单对应的内容组件。FilterMore 最后一个菜单对应的内容组件
FilterTilte
根据标题菜单数据,渲染标题列表,标题可以被点击,点击时高亮
有筛选条件选中时标题高亮状态,提升至父组件Filter中,由父组件提供高亮状态,子组件通过props接受状态来实现高亮
原则:单一数据源,也就是说,状态只应该有一个组件提供并且提供操作状态的方法,其他组件直接使用组件中状态和操作状态的方法即可
-
// 条件筛选栏标题数组: const titleList = [ { title: '区域', type: 'area' }, { title: '方式', type: 'mode' }, { title: '租金', type: 'price' }, { title: '筛选', type: 'more' } ] export default function FilterTitle(props) { const { titleSelectedStatus, onTitleClick } = props; return ( <Flex align="center" className={styles.root}> { titleList.map((item) => <Flex.Item onClick={() => onTitleClick(item.type)} key={item.type}> {/* 根据选中的类名高亮: selected */} <span className={[styles.dropdown, titleSelectedStatus[item.type] ? styles.selected : ''].join(' ')}> <span>{item.title}</span> <i className="iconfont icon-arrow" /> </span> </Flex.Item>) } - 更新titleSelectStatus,调用父组件的方法onTitleClick,将status传给父组件
  // 传递给子组件控制状态的方法
  onTitleClick = (type) => {
    this.setState({
      titleSelectedStatus: { ...titleSelectedStatus, [type]: true },
      openType: type
    })
FilterPicker
点击前三个标题展示该组件,点击取消的时候隐藏
使用PickerView组件来实现页面效果,获取到PickerView组件中,选中的筛选条件值
点击确定按钮,隐藏该组件,将获取到的筛选条件值传递给父组件,展示或隐藏对话框的状态:由父组件提供,通过props传递给子组件
筛选条件数据:由父组件提供(因为所有筛选条件是通过一个接口来获取的),通过props传递给子组件
-
// 设置当前选中状态 state = { value: this.props.value } componentDidMount() { console.log('重新初始化!') } handlerChange = (value) => { this.setState({ value }) } render() { const { onCancel, onOk, data, cols } = this.props; const { value } = this.state; return ( <> {/* 选择器组件: */} <PickerView value={value} onChange={this.handlerChange} data={data} cols={cols} /> {/* 底部按钮 */} <FilterFooter onCancel={onCancel} onOk={() => { onOk(value) }} /> </> ) -
  // 给Picker组件提供数据
  renderFilterPicker = () => {
    if (this.isShow()) {
      const { openType } = this.state;
      const { area, subway, rentType, price } = this.filterData;
      let data, cols = 1;
      switch (openType) {
        case 'area':
          data = [area, subway];
          cols = 3
          break;
        case 'mode':
          data = rentType;
          cols = 1
          break;
        default:
          data = price;
          cols = 1
      }
      console.log('n-sel:', this.selectedValues[openType])
      return <FilterPicker key={openType} data={data} value={this.selectedValues[openType]} cols={cols} onCancel={this.onCancel} onOk={this.onOk} />

    }
  }
FilterMore
能够渲染FilterMore组件
能够实现 清除按钮和确定按钮 的逻辑
能够实现 FilterMore的默认选中
父组件封装renderFilterMore方法,渲染FilterMore组件从filtersData中,获取数据(roomType,oriented,floor,characteristic),通过props传递给FilterMore组件
-
// 父组件中渲染和处理FilterMore组件 renderFilterMore = () => { const { openType } = this.state; if (openType === 'more') { console.log(this.filterData); const { roomType, oriented, floor, characteristic } = this.filterData; const data = { roomType, oriented, floor, characteristic } console.log('n-sel:', this.selectedValues[openType]); return <FilterMore data={data} value={this.selectedValues[openType]} onOk={this.onOk} onCancel={this.onCancel} /> } return null } -
// 设置选中值状态
  state = {
    selected: this.props.value
  }

  // 获取选中数据
  handlerSel = (val) => {
    const { selected } = this.state;
    const newSelected = [...selected]
    // 没有该值,新增(高亮显示)
    let index = newSelected.indexOf(val);
    if (index < 0) {
      newSelected.push(val)
    } else {
      //有,删除(取消高亮)
      newSelected.splice(index, 1)
    }
    console.log('选中:', newSelected);
    this.setState({
      selected: newSelected
    })
  }

  // 渲染标签
  renderFilters(data) {
    // 高亮类名: styles.tagActive
    // return (
    //   <span className={[styles.tag, styles.tagActive].join(' ')}>东北</span>
    // )
    const { selected } = this.state;
    return data.map((item) => <span
      onClick={() => this.handlerSel(item.value)}
      key={item.value}
      className={[styles.tag, selected.includes(item.value) ? styles.tagActive : ''].join(' ')}>
      {item.label}
2.获取房屋列表,封装筛选条件对象,根据筛选对象获取到房屋列表数据,将数据返回到条件找房界面,在条件找房界面使用HouseItem组件渲染房屋列表数据在页面中

 // 处理后台需要的筛选条件数据,组装起来
  handlerFilters = (selectedValues) => {
    // 筛选条件数据
    const { area, mode, price, more } = selectedValues;
    // 组装数据
    const filters = {};
    // area | subway
    let areaKey = area[0], aval;
    if (area.length === 2) {
      aval = area[1]
    } else {
      if (area[2] !== 'null') {
        aval = area[2]
      } else {
        aval = area[1]
      }
    }
    filters[areaKey] = aval;
    // mode
    filters.rentType = mode[0]
    // price
    filters.price = price[0]
    // more
    filters.more = more.join(',')
    console.log('filters:', filters);
    return filters
  }
- 加载传输的数据,传入HouseItem组件进行渲染
-
// 加载房屋列表数据 getHouseList = async () => { // 加载提示 // 第二个参数为0,不自动关闭 // Toast.loading('加载中...', 0) let res = await getHouseByFilters(this.cityId, this.filters, 1, 20); console.log(res); // 调用hide关闭 // Toast.hide(); const { list, count } = res.data; if (count !== 0) { Toast.success(`获取到${count}条房源信息`, 2) } this.setState({ list, count }) } // 渲染列表项 renderHouseItem = ({ key, // Unique key within array of rows index, // Index of row within collection isScrolling, // The List is currently being scrolled isVisible, // This row is visible within the List (eg it is not an overscanned row) style, // Style object to be applied to row (to position it) }) => { const { list } = this.state const item = list[index] // 处理暂时没有加载到数据情况 if (!item) { return ( <div style={style} key={key}> <p className={styles.loading}></p> </div> ) }; // console.log(this.props.history) // 处理图片地址 item.src = BASE_URL + item.houseImg; // console.log(item); return <HouseItem {...item} key={key} onClick={() => { this.props.history.push({ pathname: `/detail/${item.houseCode}` }, { id: item.houseCode }) }} style={style} /> } - HouseItem组件
-
function HouseItem({ src, title, desc, tags, price, onClick, style }) { return ( <div className={styles.house} onClick={onClick} style={style}> <div className={styles.imgWrap}> <img className={styles.img} src={src} alt="" /> </div> <div className={styles.content}> <h3 className={styles.title}>{title}</h3> <div className={styles.desc}>{desc}</div> <div> {/* ['近地铁', '随时看房'] */} {tags.map((tag, index) => { const tagClass = 'tag' + (index + 1) return ( <span className={[styles.tag, styles[tagClass]].join(' ')} key={tag} > {tag} </span> ) })} </div> <div className={styles.price}> <span className={styles.priceNum}>{price}</span> 元/月 </div> </div> </div> ) } -
在将加载出的列表使用List组件渲染数据,InfiniteLoader滚动房屋列表时候,动态加载更多房屋数据
-
 // 渲染列表
  renderHouseList = () => {
    const { count } = this.state;
    // 没有数据渲染NoHouse组件
    return count === 0 ? this.renderNoHouse() : (
      <InfiniteLoader
        isRowLoaded={this.isRowLoaded}
        loadMoreRows={this.loadMoreRows}
        // 远程数据总条数
        rowCount={this.state.count}
      >
        {({ onRowsRendered, registerChild }) => (
          <AutoSizer>
            {({ height, width }) => (
              <List
                className={styles.houseList}
                height={height}
                rowCount={this.state.count}
                rowHeight={130}
                rowRenderer={this.renderHouseItem}
                onRowsRendered={onRowsRendered}
                ref={registerChild}
                width={width}
              />
            )}
          </AutoSizer>
        )}
      </InfiniteLoader>
    )
  }