Configuration类专门用于描述手机设备上的配置信息,这些配置信息既包括用户特定的配置项,也包括系统的动态设置配置。
程序可调用Activity的如下方法来获取系统的Configuration对象:
Configuration cfg=getResources().getConfiguration();
一旦获得了系统的Configuration对象,该对象提供了如下常用属性来获取系统的配置信息。
- public float fontScale:获取当前用户设置的字体的缩放因子。
- public int keyboard:获取当前设备所关联的键盘类型。该属性可能返回如下值:KEYBOARD_NOKEYS、KEYBOARD_QWERTY(普通电脑键盘)、KEYBOARD_12KEY(只有12个键的小键盘)。
- public int keyboardHidden:该属性返回一个boolean值用于标识当前键盘是否可用。该属性不仅会判断系统的硬键盘,也会判断系统的软键盘(位于屏幕上)。如果系统的硬键盘不可用,但软键盘可用,该属性也会返回KEYBOARDHIDDEN_NO;只有当两个键盘都可用时才返回KEYBOARDHIDDEN_YES。
- public Locale locale:获取用户当前的Locale。
- public int mcc:获取移动信号的国家码。
- public int mnc:获取移动信号的网络码。
- public int navigation:判断系统上方向导航设备的类型。该属性可能返回如NAVIGATION_NONAV(无导航)、NAVIGATION_DPAD(DPAD导航)、NAVIGATION_TRACKBALL(轨迹球导航)、NAVIGATION_WHEEL(滚轮导航)等属性值。
- public int orientation:获取系统屏幕的方向,该属性可能返回ORIENTATION_LANDSCAPE(横向屏幕)、ORIENTATION_PORTRAIT(竖向屏幕)、ORIENTATION_SQUARE(方形屏幕)等属性值。
- public int touchscreen:获取系统触摸屏的触摸方式。该属性可能返回TOUCHSC_REEN_NOTOUCH(无触摸屏)、TOUCHSCREEN_STYLUS(触摸笔式的触摸屏)、TOUCHSCREEN_FINGER(接受手指的触摸屏)。
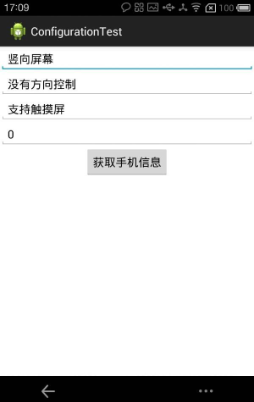
下面以一个实例来介绍Configuration的用法,该程序可以获取系统的屏幕方向、触摸屏方式等。
实例:获取系统设备状态
该程序的界面布局比较简单,程序只是提供了4个文本框来显示系统的屏幕方向、触摸屏方式等状态,故此处不再给出界面布局文件。
该程序的Java代码主要可分为两步:
①获取屏幕的Configuration对象。
②调用Configuration对象的属性来获取设备状态。
该程序的界面布局文件如下:
<LinearLayout xmlns:android="http://schemas.android.com/apk/res/android"
    android:orientation="vertical"
    android:layout_width="fill_parent"
    android:layout_height="fill_parent"
    android:gravity="center_horizontal"
    >
<EditText
    android:id="@+id/ori"
    android:layout_width="fill_parent"
    android:layout_height="wrap_content"
    android:editable="false"
    android:cursorVisible="false"
    android:hint="显示屏幕方向"
    />
<EditText
    android:id="@+id/navigation"
    android:layout_width="fill_parent"
    android:layout_height="wrap_content"
    android:editable="false"
    android:cursorVisible="false"
    android:hint="显示手机方向控制设备"
    />
<EditText
    android:id="@+id/touch"
    android:layout_width="fill_parent"
    android:layout_height="wrap_content"
    android:editable="false"
    android:cursorVisible="false"
    android:hint="显示触摸屏状态"
    />
<EditText
    android:id="@+id/mnc"
    android:layout_width="fill_parent"
    android:layout_height="wrap_content"
    android:editable="false"
    android:cursorVisible="false"
    android:hint="显示移动网络代号"
    />
<Button
    android:id="@+id/bn"
    android:layout_width="wrap_content"
    android:layout_height="wrap_content"
    android:text="获取手机信息"
    />
</LinearLayout>
下面是该程序的Java代码。
package com.example.studyevent;

import android.os.Bundle;
import android.app.Activity;
import android.content.res.Configuration;
import android.view.Menu;
import android.view.View;
import android.view.View.OnClickListener;
import android.widget.Button;
import android.widget.EditText;

public class ConfigurationTest extends Activity {
     EditText ori;
     EditText navigation;
     EditText touch;
     EditText mnc;
    @Override
    protected void onCreate(Bundle savedInstanceState) {
        super.onCreate(savedInstanceState);
        setContentView(R.layout.activity_configuration_test);
        //获取应用界面中的界面组件
        ori=(EditText)findViewById(R.id.ori);
        navigation=(EditText)findViewById(R.id.navigation);
        touch=(EditText)findViewById(R.id.touch);
        mnc=(EditText)findViewById(R.id.mnc);
        Button bn=(Button)findViewById(R.id.bn);
        bn.setOnClickListener(new OnClickListener(){
            //为按钮绑定事件监听器
            @Override
            public void onClick(View v) {
                // TODO Auto-generated method stub
                //获取系统的Configuration对象
                Configuration cfg=getResources().getConfiguration();
                String screen=cfg.orientation==Configuration.ORIENTATION_LANDSCAPE?
                        "横向屏幕":"竖向屏幕";
                String mncCode=cfg.mnc+"";
                String naviName=cfg.orientation==Configuration.NAVIGATION_NONAV?
                        "没有方向控制":cfg.orientation==Configuration.NAVIGATION_WHEEL?
                                "滚轮控制方向":cfg.orientation==Configuration.NAVIGATION_DPAD?
                                        "方向键控制方向":"轨迹球控制方向";
                navigation.setText(naviName);
                String touchName=cfg.touchscreen==Configuration.TOUCHSCREEN_NOTOUCH?
                        "无触摸屏":"支持触摸屏";
                ori.setText(screen);
                mnc.setText(mncCode);
                touch.setText(touchName);


            }
        });

    }

    @Override
    public boolean onCreateOptionsMenu(Menu menu) {
        // Inflate the menu; this adds items to the action bar if it is present.
        getMenuInflater().inflate(R.menu.configuration_test, menu);
        return true;
    }

}
上面的程序中粗体字代码用于获取系统的Configuration对象,一旦获得了系统的Configuration之后,程序就可以通过它来了解系统的设备状态了。运行上面的程序将看到下图所示效果:
