Express 官方介绍:
1.Express 是一个简洁而灵活的 node.js Web应用框架, 提供一系列强大特性帮助你创建各种Web应用
2.丰富的HTTP工具以及来自Connect框架的中间件随取随用,创建强健、友好的API变得快速又简单
1.创建一个web服务
首先安装express:
cnpm install express --save //开发依赖
创建一个express应用程序
var express = require('express'); //引入express
var app = express(); //实例化

app.get('/', function(req, res){ //接受一个get请求
  res.send('hello world');
});

app.listen(3000); //监听3000端口,这个随便换,一般建议3000,5000,8000,8080,8800等
启动:node hello.js
浏览器输入;http://localhost:3000/ 返回信息:hello world
2.express 项目生成器
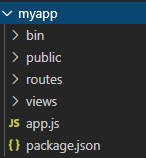
通过应用生成器工具 express-generator 可以快速创建一个应用的骨架。
全局安装
npm install -g express-generator
使用express 快速生成应用骨架:
express --view=ejs myapp

生成骨架后,必须执行下列操作,不然找不到依赖包:
然后安装所有依赖包:
$ cd myapp
$ npm install
在 Windows 命令行中,使用如下命令:
set DEBUG=myapp:* & npm start
在 MacOS 或 Linux 中,通过如下命令启动此应用:
$ DEBUG=myapp:* npm start
启动浏览器:http://localhost:3000/

3.基本路由
get请求
app.get('/', function (req, res) {
  res.send('Hello World!')
})
post请求
app.post('/', function (req, res) {
  res.send('Got a POST request')
})
put请求
app.put('/user', function (req, res) {
  res.send('Got a PUT request at /user')
})
delete请求
app.delete('/user', function (req, res) {
  res.send('Got a DELETE request at /user')
})
上面有四种http请求方式,get,post,delete,put。只是请求方式不同而已,经历了多年的使用,还是get和post 请求方式使用最多。
4.中间件app.use()
app.all('/', function (req, res, next) {
  console.log('Accessing the secret section ...')
  next() // pass control to the next handler
})
这里面有3点需要注意:
1.以上“/”这种方式,任何请求都会优先到这里,在这里面我们可以进行一些初始化验证,权限验证,规则校验等
2.第三个参数next, 必须显示next(),请求才会向后传递,否则一直在等待,或者之前返回。
3.app.use() 放在所有路由开始,可以进行权限等问题验证,放到所有路由末尾,可以进行收尾工作,如:退出登录,注销session
5.参数传递
a).restful方式参数(具体实例)
app.get('/user/:id', function (req, res, next) {
  res.end(req.params.id)
})
b).传递参数3种方法:
Get方式:Checks route params (req.params), ex: /user/:id
Get方式:Checks query string params (req.query), ex: ?id=12
Post方式:Checks urlencoded body params (req.body), ex: id=
以上就是展示如何传递和如何接收,都很简单。
6.路由中间件
路由中间件使用起来更加灵活,cb0,cb1 都是我们在“//user/:id”之前进行的业务操作。
比如:在获取用户数据之前,cb0查看用户是否有权限,cb1查看访问规则是否正确
var cb0 = function (req, res, next) {
  console.log('CB0')
  next()
}

var cb1 = function (req, res, next) {
  console.log('CB1')
  next()
}

app.get('/user/:id', [cb0, cb1], function (req, res, next) {
  console.log('the response will be sent by the next function ...')
  next()
}, function (req, res) {
  res.send('Hello from D!')
})
7.Response methods
res.download()	//下载文件
res.end()	//结束返回.
res.json()	//以json方式返回.
res.jsonp()	//以jsonp方式返回
res.redirect()	//res跳转.
res.render()	//解析模板文件.
res.send()	//返回
res.sendFile()	//返回文件
res.sendStatus()//设置返回状态
以上返回,只需要有印象,知道用的时候在哪查。
8.app.route()
这种方式也是比较简洁,我个人还是很喜欢的:实现了增删改查,为以后的模块式开发提供条件。
app.route('/book')
  .get(function (req, res) {
    res.send('Get a random book')
  })
  .post(function (req, res) {
    res.send('Add a book')
  })
  .put(function (req, res) {
    res.send('Update the book')
  })
  .delete(function (req, res) {
    res.send('deletethe book')
  }
)
9.express托管静态文件
例如,通过如下代码就可以将 public 目录下的图片、CSS 文件、JavaScript 文件对外开放访问了:
app.use(express.static('public'))
现在,你就可以访问 public 目录中的所有文件了:
http://localhost:3000/images/kitten.jpg
http://localhost:3000/css/style.css
http://localhost:3000/js/app.js
http://localhost:3000/images/bg.png
http://localhost:3000/hello.html
如果要使用多个静态资源目录,请多次调用 express.static 中间件函数:
app.use(express.static('public'))
app.use(express.static('files'))
起个别名:
app.use('/static', express.static('public'))
现在,你就可以通过带有 /static 前缀地址来访问 public 目录中的文件了。
http://localhost:3000/static/images/kitten.jpg
http://localhost:3000/static/css/style.css
http://localhost:3000/static/js/app.js
http://localhost:3000/static/images/bg.png
http://localhost:3000/static/hello.html
由于环境问题,导致路径找不到,大招来了,自动获取路径信息:
app.use('/static', express.static(path.join(__dirname, 'public')))
好了,今天先到这吧。express上面的这些内容,你了解了就可以说入门了,后面无非就是,多个模块的拆分和组合,路由中间件的使用,保证项目的高复用性,还有很多其他中间件,仅此而已。
古稀话痨:我们不知道,我们努力是为了什么,只是在回头看时,不因我荒废光阴,而自责。其实官方文档,我看着就完全OK,没必要在总结一套,我这方式可能就和史记一样,岁岁时光,留下点回忆。