集成Spring
- 加入Spring 和Shiro的jar 包
- 配置Spring 及SpringMVC
- 参照:1.3.2shiro-root-1.3.2-source-releaseshiro-root-1.3.2samplesspring 配置web.xml 文件和Spring 的配置文件
加入Spring和springMVC
1.加入Spring的jar包

2.配置ContextLoaderListener
在web.xml中加入
<!-- needed for ContextLoaderListener -->
    <context-param>
        <param-name>contextConfigLocation</param-name>
        <param-value>classpath:applicationContext.xml</param-value>
    </context-param>

    <!-- Bootstraps the root web application context before servlet initialization -->
    <listener>
        <listener-class>org.springframework.web.context.ContextLoaderListener</listener-class>
    </listener>
配置SpringMVC的 DispatcherServlet,在web.xml中加入
<!-- The front controller of this Spring Web application, responsible for handling all application requests -->
    <servlet>
        <servlet-name>spring</servlet-name>
        <servlet-class>org.springframework.web.servlet.DispatcherServlet</servlet-class>
        <load-on-startup>1</load-on-startup>
    </servlet>

    <!-- Map all requests to the DispatcherServlet for handling -->
    <servlet-mapping>
        <servlet-name>spring</servlet-name>
        <url-pattern>/</url-pattern>
    </servlet-mapping>
在WEB-INF下新建一个spring-servlet.xml配置文件,并加入springMVC 的基本配置
<context:component-scan base-package="com.java.shiro"></context:component-scan>

    <bean class="org.springframework.web.servlet.view.InternalResourceViewResolver">
        <property name="prefix" value="/"></property>
        <property name="suffix" value=".jsp"></property>
    </bean>

    <!-- 两个基本配置 -->
    <mvc:annotation-driven></mvc:annotation-driven>
    <mvc:default-servlet-handler/>
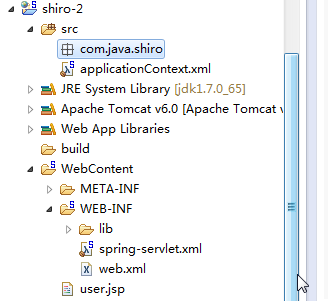
新建一个 user.jsp 在webContent目录下
此时的目录结构为
页面可以正常访问,配置成功

3.加入shiro
3.1 加入shiro的jar包
- shiro-all-1.3.2.jar
- log4j-1.2.15.jar
- slf4j-api-1.6.1.jar
- slf4j-log4j12-1.6.1.jar
3.2 加入shiro的配置
web.xml中加入 Shiro Filter 可以参照shiro的sample中的例子
shiro-root-1.3.2-source-releaseshiro-root-1.3.2samplesspringsrcmainwebappWEB-INF中web.xml中的配置
<!-- Shiro Filter is defined in the spring application context: -->
     <!--
         1.配置Shiro Filter
         2.DelagatingFilterProxy 实际上是Filter 的一个代理对象,默认情况下,Spring会到IOC容器中查找和
         <filter-name> 对应的filter bean.也可以通过targetBeanName 的初始化参数来配置filter bean的id
      -->
    <filter>
        <filter-name>shiroFilter</filter-name>
        <filter-class>org.springframework.web.filter.DelegatingFilterProxy</filter-class>
        <init-param>
            <param-name>targetFilterLifecycle</param-name>
            <param-value>true</param-value>
        </init-param>
        <!-- <init-param>
            <param-name>targetBeanName</param-name>
            <param-value>aaa</param-value>
        </init-param> -->
    </filter>

    <filter-mapping>
        <filter-name>shiroFilter</filter-name>
        <url-pattern>/*</url-pattern>
    </filter-mapping>
在spring配置文件中加入shiro
即applicationContext.xml文件变为:
<?xml version="1.0" encoding="UTF-8"?>
<beans xmlns="http://www.springframework.org/schema/beans"
    xmlns:xsi="http://www.w3.org/2001/XMLSchema-instance"
    xsi:schemaLocation="http://www.springframework.org/schema/beans http://www.springframework.org/schema/beans/spring-beans.xsd">

    <!-- 数据源配置,暂时不考虑数据源,做一些静态的数据 -->
    <!-- Sample RDBMS data source that would exist in any application - not Shiro related. -->
    <!-- <bean id="dataSource" class="org.springframework.jdbc.datasource.DriverManagerDataSource">
        <property name="driverClassName" value="org.hsqldb.jdbcDriver"/>
        <property name="url" value="jdbc:hsqldb:mem:shiro-spring"/>
        <property name="username" value="sa"/>
    </bean> -->
    <!-- Populates the sample database with sample users and roles. -->
    <!-- <bean id="bootstrapDataPopulator" class="org.apache.shiro.samples.spring.BootstrapDataPopulator">
        <property name="dataSource" ref="dataSource"/>
    </bean> -->

    <!-- Simulated business-tier "Manager", not Shiro related, just an example -->
    <!-- <bean id="sampleManager" class="org.apache.shiro.samples.spring.DefaultSampleManager"/> -->

    <!-- =========================================================
         Shiro Core Components - Not Spring Specific
         ========================================================= -->
    <!-- Shiro's main business-tier object for web-enabled applications
         (use DefaultSecurityManager instead when there is no web environment)-->
    <!--
        1.配置SecurityManager!
    -->
    <bean id="securityManager" class="org.apache.shiro.web.mgt.DefaultWebSecurityManager">
        <property name="cacheManager" ref="cacheManager"/>
        <!-- Single realm app.  If you have multiple realms, use the 'realms' property instead. -->
        <!-- 配置session的管理方式 -->
        <!-- <property name="sessionMode" value="native"/> -->
        <property name="realm" ref="jdbcRealm"/>
    </bean>

    <!-- Let's use some enterprise caching support for better performance.  You can replace this with any enterprise
         caching framework implementation that you like (Terracotta+Ehcache, Coherence, GigaSpaces, etc -->
    <!--
        2.配置CacheManager,实例上可以用企业的缓存产品来提升性能
        2.1需要加入ehcache的jar包及配置文件
     -->
    <bean id="cacheManager" class="org.apache.shiro.cache.ehcache.EhCacheManager">
        <!-- Set a net.sf.ehcache.CacheManager instance here if you already have one.  If not, a new one
             will be creaed with a default config:
             <property name="cacheManager" ref="ehCacheManager"/> -->
        <!-- If you don't have a pre-built net.sf.ehcache.CacheManager instance to inject, but you want
             a specific Ehcache configuration to be used, specify that here.  If you don't, a default
             will be used.: -->
        <property name="cacheManagerConfigFile" value="classpath:ehcache.xml"/>
    </bean>

    <!-- Used by the SecurityManager to access security data (users, roles, etc).
         Many other realm implementations can be used too (PropertiesRealm,
         LdapRealm, etc. -->
    <!--
        3.配置Realm
        3.1 自己写一个Realm,需要实现Realm接口
     -->
    <bean id="jdbcRealm" class="com.java.shiro.realms.ShiroRealm"></bean>

    <!-- =========================================================
         Shiro Spring-specific integration
         ========================================================= -->
    <!-- Post processor that automatically invokes init() and destroy() methods
         for Spring-configured Shiro objects so you don't have to
         1) specify an init-method and destroy-method attributes for every bean
            definition and
         2) even know which Shiro objects require these methods to be
            called. -->

    <!--
        4.配置 LifecycleBeanPostProcessor,可以自动的调用配置在spring IOC容器中Shiro bean的声明周期方法
     -->
    <bean id="lifecycleBeanPostProcessor" class="org.apache.shiro.spring.LifecycleBeanPostProcessor"/>

    <!-- Enable Shiro Annotations for Spring-configured beans.  Only run after
         the lifecycleBeanProcessor has run: -->
    <!--
        5.启用 IOC 容器中使用 shiro 注解,但必须在配置了LifecycleBeanPostProcessor 之后才可以使用。
     -->
    <bean class="org.springframework.aop.framework.autoproxy.DefaultAdvisorAutoProxyCreator"
          depends-on="lifecycleBeanPostProcessor"/>
    <bean class="org.apache.shiro.spring.security.interceptor.AuthorizationAttributeSourceAdvisor">
        <property name="securityManager" ref="securityManager"/>
    </bean>

    <!-- Secure Spring remoting:  Ensure any Spring Remoting method invocations can be associated
         with a Subject for security checks. -->
    <!-- 远程调用,暂时不需要 -->
    <!-- <bean id="secureRemoteInvocationExecutor" class="org.apache.shiro.spring.remoting.SecureRemoteInvocationExecutor">
        <property name="securityManager" ref="securityManager"/>
    </bean> -->

    <!-- Define the Shiro Filter here (as a FactoryBean) instead of directly in web.xml -
         web.xml uses the DelegatingFilterProxy to access this bean.  This allows us
         to wire things with more control as well utilize nice Spring things such as
         PropertiesPlaceholderConfigurer and abstract beans or anything else we might need: -->

    <!--
        6.配置ShiroFilter
        6.1 id 必须和web.xml 中配置的 DelegatingFilterProxy 的 <filter-name> 一致
            若不一致,则会抛出:NoSuchBeanDefinitionException.因为Shiro会来IOC容器中查找和<filter-name> 名字对应的filter bean.
     -->
    <bean id="shiroFilter" class="org.apache.shiro.spring.web.ShiroFilterFactoryBean">
        <property name="securityManager" ref="securityManager"/>
        <property name="loginUrl" value="/login.jsp"/><!-- 登录页面 -->
        <property name="successUrl" value="/list.jsp"/><!-- 登录成功页面 -->
        <property name="unauthorizedUrl" value="/unauthorized.jsp"/><!-- 没有权限的页面 -->
        <!-- The 'filters' property is not necessary since any declared javax.servlet.Filter bean
             defined will be automatically acquired and available via its beanName in chain
             definitions, but you can perform overrides or parent/child consolidated configuration
             here if you like: -->
        <!-- <property name="filters">
            <util:map>
                <entry key="aName" value-ref="someFilterPojo"/>
            </util:map>
        </property> -->
        <!--
            配置哪些页面需要受保护
            以及访问这些页面需要的权限
            1). anon(anonymous) 可以被匿名访问,即不需要登录就可以访问
            2). authc(authentication) 必须认证之后,即登录后才可以访问
            3). URL 权限采取第一次匹配优先的方式,即从开头使用第一个匹配的url模式对应的拦截器链。
         -->
        <property name="filterChainDefinitions">
            <value>
                /login.jsp= anon
                # everything else requires authentication:
                /list.jsp = anon

                /** = authc
            </value>
        </property>
    </bean>

</beans>
启动tomcat服务器
只有http://localhost:8080/shiro-2/login.jsp可以匿名访问,其他页面访问时会自动重定向到login.jsp
ShiroFilter 的工作原理
由于在web.xml中配置了一个 shiroFilter 的 Filter 拦截的资源为所有请求 /*
其中两种可以通过拦截器
1.在FilterChainDefinitions 中配置了 anon权限的页面。
2.另一种是不被拦截的页面。
