将ORM模型映射到数据库中
1. 用`declarative_base`根据`engine`创建一个ORM基类。
from sqlalchemy.ext.declarative import declarative_base
engine = create_engine(DB_URI)
Base = declarative_base(engine)
2. 用这个`Base`类作为基类来写自己的ORM类。要定义`__tablename__`类属性,来指定这个模型映射到数据库中的表名。
class Person(Base):
  __tablename__ = 'person'
3. 创建属性来映射到表中的字段,所有需要映射到表中的属性都应该为Column类型:
class Person(Base):
__tablename__ = 'person'
# 2. 在这个ORM模型中创建一些属性,来跟表中的字段进行一一映射。这些属性必须是sqlalchemy给我们提供好的数据类型。
id = Column(Integer,primary_key=True,autoincrement=True)
name = Column(String(50))
age = Column(Integer)
4. 使用`Base.metadata.create_all()`来将模型映射到数据库中。
5. 一旦使用`Base.metadata.create_all()`将模型映射到数据库中后,即使改变了模型的字段,也不会重新映射了。
用session做数据的增删改查操作
1. 构建session对象:
所有和数据库的ORM操作都必须通过一个叫做`session`的会话对象来实现,通过以下代码来获取会话对象:
from sqlalchemy.orm import sessionmaker

engine = create_engine(DB_URI)
session = sessionmaker(engine)()
2. 添加对象:
* 创建对象,添加一条或者多条
class Person(Base):
    __tablename__ = 'person'
    id = Column(Integer,primary_key=True,autoincrement=True)
    name = Column(String(50))
    age = Column(Integer)
    country = Column(String(50))

    def __str__(self):
        return "<Person(name:%s,age:%s,country:%s)>" % (self.name,self.age,self.country)

# session:会话

# 增

p1 = Person(name='wqbin',age=24,country='china')
p2 = Person(name='wang',age=25,country='china')
p3 = Person(name='wangpi',age=26,country='china')
session.add(p1)
session.add_all([p2,p2])
session.commit()
3. 查找对象:
# 查找某个模型对应的那个表中所有的数据:
all_person = session.query(Person).all()
# 使用filter_by来做条件查询
all_person = session.query(Person).filter_by(name='wqbin').all()
# 使用filter来做条件查询
all_person = session.query(Person).filter(Person.name=='wqbin').all()
# 使用get方法查找数据,get方法是根据id来查找的,只会返回一条数据或者None
person = session.query(Person).get(primary_key)
# 使用first方法获取结果集中的第一条数据
person = session.query(Person).first()
4. 修改对象
首先从数据库中查找对象,然后将这条数据修改为你想要的数据,最后做commit操作就可以修改数据了。
person = session.query(Person).first()
person.name = 'wqbin123'
session.commit()
5. 删除对象
将需要删除的数据从数据库中查找出来,然后使用`session.delete`方法将这条数据从session中删除,最后做commit操作就可以了。
person = session.query(Person).first()
session.delete(person)
session.commit()
sqlalchemy常用数据类型:
- Integer:整形=INIT=INTEGER
- Float:浮点类型占据32位。
- Double:双精度浮点类型,映射到数据库中是double类型,占据64位。
- Boolean:传递True/False进去
- decimal:定点类型,为解决浮点型丢失数据精度
- enum:枚举类型
- Date:传递 datetime.date()进去
- DateTime:传递datetime.datetime()进去
- Time:传递Datetime.time()进去
- String:字符类型,使用时需要指定长度,区别于Text类型
- Text:文本类型
- LONGTEXT:长文本类型


from sqlalchemy import create_engine,Column,Integer,Float,Boolean,DECIMAL,Enum,Date,DateTime,Time,String,Text
from sqlalchemy.dialects.mysql import LONGTEXT
from sqlalchemy.ext.declarative import declarative_base
from sqlalchemy.orm import sessionmaker
# 在Python3中才有这个enum模块,在python2中没有
import enum

HOSTNAME = '127.0.0.1'
PORT = '3306'
DATABASE = 'flask'
USERNAME = 'root'
PASSWORD = 'root'

# dialect+driver://username:password@host:port/database
DB_URI = "mysql+pymysql://{username}:{password}@{host}:{port}/{db}?charset=utf8mb4".format(username=USERNAME,password=PASSWORD,host=HOSTNAME,port=PORT,db=DATABASE)

engine = create_engine(DB_URI)

Base = declarative_base(engine)

session = sessionmaker(engine)()

class TagEnum(enum.Enum):
    python = "python"
    flask = "flask"
    django = "django"

class Article(Base):
    __tablename__ = 'article'
    id = Column(Integer,primary_key=True,autoincrement=True)
    price1= Column(Float)
    is_delete = Column(Boolean)
    price2 = Column(DECIMAL(10,4))
    # 100000.0001
    tag = Column(Enum(TagEnum))
    create_time1 = Column(Date)
    create_time2 = Column(DateTime)
    create_time3 = Column(Time)
    title = Column(String(50))
    content1 = Column(Text)
    content2 = Column(LONGTEXT)

# alembic
# flask-migrate
Base.metadata.drop_all()
Base.metadata.create_all()

from datetime import date
from datetime import datetime
from datetime import time

article = Article(price1=100000.99999,price2=100000.99999,
                  create_time1=date.today(),create_time2=datetime.now(),create_time3=time())

session.add(article)
session.commit()
mysql> use flask;
Database changed
mysql> show tables ;
+-----------------+
| Tables_in_flask |
+-----------------+
| article         |
+-----------------+
row in set (0.00 sec)

mysql> show create table article;
+---------+---------------------------------------------+
| Table   | Create Table                                |
+---------+---------------------------------------------+
| article | CREATE TABLE `article` (
            `id` int(11) NOT NULL AUTO_INCREMENT,
            `price1` float DEFAULT NULL,
            `is_delete` tinyint(1) DEFAULT NULL,
            `price2` decimal(10,4) DEFAULT NULL,
            `tag` enum('python','flask','django') DEFAULT NULL,
       `tag2` enum('1','2','3') DEFAULT NULL,
            `create_time1` date DEFAULT NULL,
            `create_time2` datetime DEFAULT NULL,
            `create_time3` time DEFAULT NULL,
            `title` varchar(50) DEFAULT NULL,
            `content1` text,
            `content2` longtext,
            PRIMARY KEY (`id`)
          ) ENGINE=InnoDB AUTO_INCREMENT=2 DEFAULT CHARSET=utf8
+---------+---------------------------------------------+
row in set (0.00 sec)
mysql> select * from article;
+----+--------+-----------+-------------+------+------+--------------+---------------------+--------------+-------+----------+----------+
| id | price1 | is_delete | price2      | tag  | tag2 | create_time1 | create_time2        | create_time3 | title | content1 | content2 |
+----+--------+-----------+-------------+------+------+--------------+---------------------+--------------+-------+----------+----------+
|  1 | 100001 |      NULL | 100001.0000 | NULL | NULL | 2019-11-24   | 2019-11-24 22:16:18 | 00:00:00     | NULL  | NULL     | NULL     |
+----+--------+-----------+-------------+------+------+--------------+---------------------+--------------+-------+----------+----------+
1 row in set (0.00 sec)
Note:
Date:存储时间,只能存储年月日。映射到数据库中是date类型。在Python代码中,可以使用`datetime.date`来指定。示例代码如下:
class Article(Base):
__tablename__ = 'article'
id = Column(Integer,primary_key=True,autoincrement=True)
create_time = Column(Date)

article = Article(create_time=date(2017,10,10))
DateTime:存储时间,可以存储年月日时分秒毫秒等。映射到数据库中也是datetime类型。在Python代码中,可以使用`datetime.datetime`来指定。示例代码如下:
class Article(Base):
__tablename__ = 'article'
id = Column(Integer,primary_key=True,autoincrement=True)
create_time = Column(DateTime)

article = Article(create_time=datetime(2011,11,11,11,11,11))
Time:存储时间,可以存储时分秒。映射到数据库中也是time类型。在Python代码中,可以使用`datetime.time`来至此那个。示例代码如下:
class Article(Base):
__tablename__ = 'article'
id = Column(Integer,primary_key=True,autoincrement=True)
create_time = Column(Time)

article = Article(create_time=time(hour=11,minute=11,second=11))
Text:存储长字符串。一般可以存储60000多个字符。如果超出了这个范围,可以使用LONGTEXT类型。映射到数据库中就是text类型。
LONGTEXT:长文本类型,映射到数据库中是longtext类型。
Column常用参数:
- default:认值
- nullable:是否可空
- primary_key:是否为主键
- unique:是否唯一
- autoincrement:是否自动增长
- name:该属性在数据库中的字段映射
1. primary_key:设置某个字段为主键。
2. autoincrement:设置这个字段为自动增长的。
3. default:设置某个字段的默认值。在发表时间这些字段上面经常用。
4. nullable:指定某个字段是否为空。默认值是True,就是可以为空。
5. unique:指定某个字段的值是否唯一。默认是False。
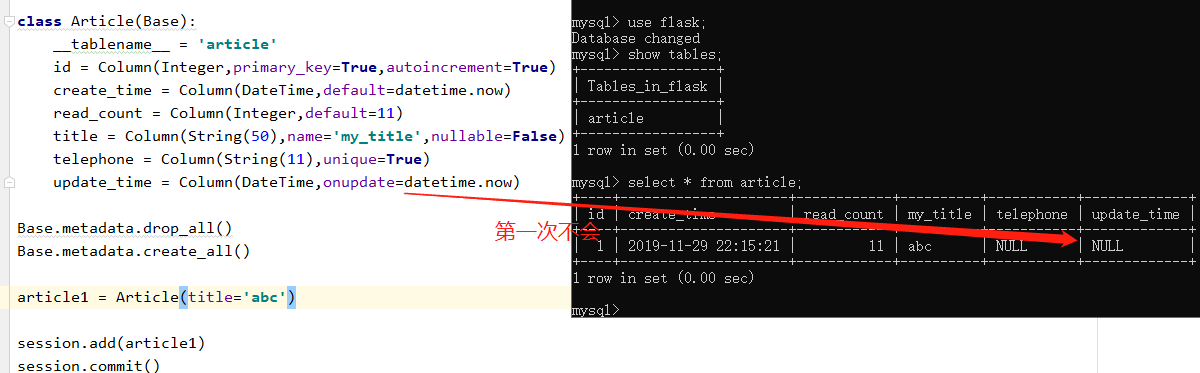
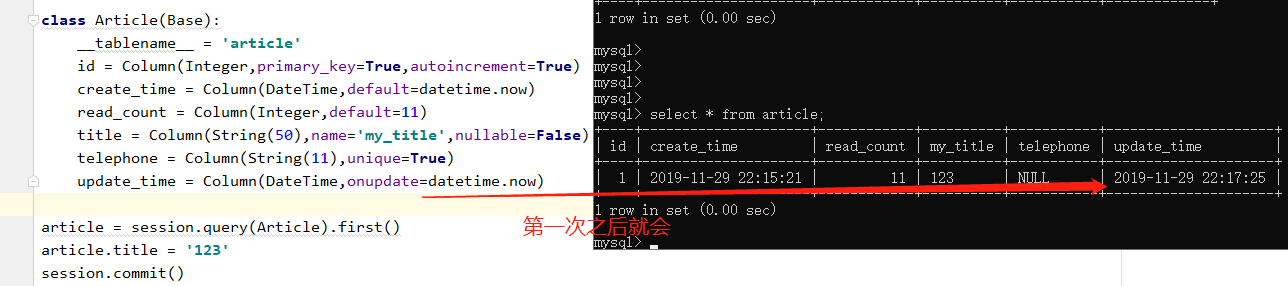
6. onupdate:在数据更新的时候会调用这个参数指定的值或者函数。但是在第一次插入这条数据的时候,不会用onupdate的值,而会使用default的值。常用的就是`update_time`(每次更新数据的时候都要更新的值)。
7. name:指定ORM模型中某个属性映射到表中的字段名。如果不指定,那么会使用这个类的属性名来作为字段名。如果指定了,就会使用name的值作为参数。这个参数也可以当作位置参数,在第1个参数来指定。
# 在Python3中才有这个enum模块,在python2中没有
from datetime import datetime

from sqlalchemy import create_engine, Column, Integer, DateTime, String
from sqlalchemy.ext.declarative import declarative_base
from sqlalchemy.orm import sessionmaker

HOSTNAME = '127.0.0.1'
PORT = '3306'
DATABASE = 'flask'
USERNAME = 'root'
PASSWORD = 'root'

# dialect+driver://username:password@host:port/database
DB_URI = "mysql+pymysql://{username}:{password}@{host}:{port}/{db}?charset=utf8mb4".format(username=USERNAME,password=PASSWORD,host=HOSTNAME,port=PORT,db=DATABASE)

engine = create_engine(DB_URI)

Base = declarative_base(engine)

session = sessionmaker(engine)()

class Article(Base):
    __tablename__ = 'article'
    id = Column(Integer,primary_key=True,autoincrement=True)
    create_time = Column(DateTime,default=datetime.now)
    read_count = Column(Integer,default=11)
    title = Column(String(50),name='my_title',nullable=False)
    telephone = Column(String(11),unique=True)
    update_time = Column(DateTime,onupdate=datetime.now)


Base.metadata.drop_all()
Base.metadata.create_all()

article1 = Article(title='abc')

session.add(article1)
session.commit()

article = session.query(Article).first()
article.title = '123'
session.commit()
 name参数也可以当作位置参数,需放在第1个位置,位置传参。
 title = Column(String(50),name='my_title',nullable=False)
 title2=Column("title_2",String(20),nullable=True)
query可用参数:
- 模型对象。指定查找这个模型中所有的对象。
- 模型中的属性。可以指定只查找某个模型的其中几个属性。
- 聚合函数。
* func.count:统计行的数量。
* func.avg:求平均值。
* func.max:求最大值。
* func.min:求最小值。
* func.sum:求和。
`func`上,其实没有任何聚合函数。实际上调用的是mysql的函数。只要mysql中有的聚合函数,都可以通过func调用。
# 模型对象
articles = session.query(Article).all()
print(articles)
结果:要看是否重写__repr__方法,默认是对象空间名
# 模型中的属性
articles = session.query(Article.title,Article.price).all()
print(articles)
结果:[('title0', 96.0), ('title1', 94.0), ('title2', 58.0), ('title3', 73.0), ('title4', 78.0), ('title5', 51.0)]
# 聚合函数
result = session.query(func.count(Article.id)).first()
print(result)
result = session.query(func.avg(Article.price)).first()
print(result)
result = session.query(func.max(Article.price)).first()
print(result)
result = session.query(func.min(Article.price)).first()
print(result)
result = session.query(func.sum(Article.price)).first()
print(result)
print(func.sum(Article.price))
结果:
(6,)
(70.0,)
(88.0,)
(51.0,)
(420.0,)
sum(article.price)
filter过滤条件:
过滤是数据提取的一个很重要的功能,以下对一些常用的过滤条件进行解释,并且这些过滤条件都是只能通过filter方法实现的:
1. equals:
article = session.query(Article).filter(Article.title == "title0").first()
print(article)
2. not equals:
query.filter(User.name != 'ed')
3. like:
query.filter(User.name.like('%ed%'))
3. in:
query.filter(User.name.in_(['ed','wendy','jack']))
# 同时,in也可以作用于一个Query
query.filter(User.name.in_(session.query(User.name).filter(User.name.like('%ed%'))))
4. not in:
query.filter(~User.name.in_(['ed','wendy','jack']))
5. is null:
query.filter(User.name==None)
# 或者是
query.filter(User.name.is_(None))
6. is not null:
query.filter(User.name != None)
# 或者是
query.filter(User.name.isnot(None))
7. and:
from sqlalchemy import and_
query.filter(and_(User.name=='ed',User.fullname=='Ed Jones'))
# 或者是传递多个参数
query.filter(User.name=='ed',User.fullname=='Ed Jones')
# 或者是通过多次filter操作
query.filter(User.name=='ed').filter(User.fullname=='Ed Jones')
8. or:
from sqlalchemy import or_
query.filter(or_(User.name=='ed',User.name=='wendy'))
外键与ForeignKey:
alter table 表名 add constraint 外键约束名 foreign key(列名) references 引用外键表(列名)
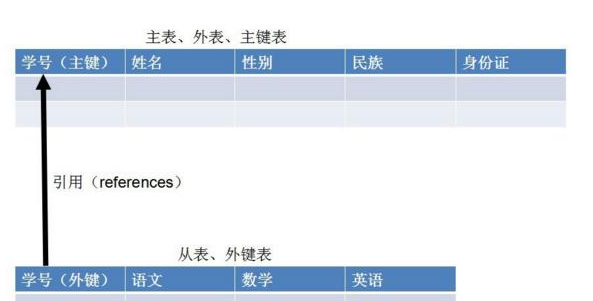
- 以公共字段作主键的表为主键表(父表,主表)
- 以公共字段作外键的表为主键表(子表,从表)
Mysql 下,外键设置:
on delete 规则:
1、CASCADE:级联
(1)所谓的级联删除,就是删除主键表的同时,外键表同时删除。
(2)假如学籍表中的某个学号被删除了,那么在学生课程表中要想查询这个被删除的学号所对应的学籍信息就会报错,因为已经不存在这个学号了,所以,删除学籍表(主键表)时必须删除其他与之关联的表,这里就说明了外键的作用,保持数据的一致性、完整性。当然反过来讲,你删除学生课程表中的记录,并不影响学籍表中的数据,你查询学号对应的学生性别年龄也能正确查询。所以删除外键表中的数据并不影响主键表。
2、NO ACTION(非活动,默认)、RESTRICT:约束/限制
当取值为No Action或者Restrict时,则当在主键表中删除对应记录时,首先检查该记录是否有对应外键,如果有则不允许删除。(即外键表约束主键表)
3、SET NULL
当取值为Set Null时,则当在主键表中删除对应记录时,首先检查该记录是否有对应外键,如果有则设置子表中该外键值为null(,一样是外键表约束主键表,不过这就要求该外键允许取null)。
NO ACTION和RESTRICT的区别:只有在及个别的情况下会导致区别,前者是在其他约束的动作之后执行,后者具有最高的优先权执行。
ORM下外键规则是一样:
在从表中增加一个字段,指定这个字段外键的是哪个表的哪个字段就可以了。从表中外键的字段,必须和父表的主键字段类型保持一致。
class User(Base):
    __tablename__ = 'user'
    id = Column(Integer,primary_key=True,autoincrement=True)
    username = Column(String(50),nullable=False)
    def __repr__(self):
        return "<User(username:%s)>" % self.username

class Article(Base):
    __tablename__ = 'article'
    id = Column(Integer,primary_key=True,autoincrement=True)
    title = Column(String(50),nullable=False)
    content = Column(Text,nullable=False)
    uid = Column(Integer,ForeignKey("user.id",onedelete='set null'))
ondelete规则:
- RESTRICT:父表数据被删除,会阻止删除。默认就是这一项。
- NO ACTION:在MySQL中,同RESTRICT。
- CASCADE:级联删除。
- SET NULL:父表数据被删除,子表数据会设置为NULL。
ondelete: Optional string.
   1.If set, emit ON DELETE <value> when issuing DDL for this constraint.
   2.Typical values include CASCADE,DELETE and RESTRICT.
ORM关系与relationship:
mysql级别的外键,还不够ORM,必须拿到一个表的外键,然后通过这个外键再去另外一张表中查找,这样太麻烦。
SQLAlchemy提供了一个`relationship`,这个类可以定义属性,以后在访问相关联的表的时候就直接可以通过属性访问的方式就可以访问得到了。示例代码:
# 父表 / 从表
# user/article

class User(Base):
    __tablename__ = 'user'
    id = Column(Integer,primary_key=True,autoincrement=True)
    username = Column(String(50),nullable=False)
    paper=relationship("Article")
    def __repr__(self):
        return "<User(username:%s)>" % self.username

class Article(Base):
    __tablename__ = 'article'
    aid = Column(Integer,primary_key=True,autoincrement=True)
    title = Column(String(50),nullable=False)
    content = Column(Text,nullable=False)
    uid = Column(Integer,ForeignKey("user.id"))

    author = relationship("User",uselist=False)

    def __repr__(self):
        return "<Article(title:%s,content:%s)>" % (self.title,self.content)

Base.metadata.drop_all()
Base.metadata.create_all()

user = User(username='wqbin')
article = Article(title='abc',content='123',uid=1)
session.add(user)
session.add(article)
session.commit()

artis = session.query(Article).first()
print(artis.author.username)
users = session.query(User).first()
print(users.paper[0].aid)
用法:backref="xxx"
paper=relationship("Article")
author = relationship("User",uselist=False)
=====>上面个可以变成下面一句。
【在class Article中】
author = relationship("User",backref="paper",uselist=False)
一对一关系
我们先介绍一个类<class 'sqlalchemy.orm.collections.InstrumentedList'>
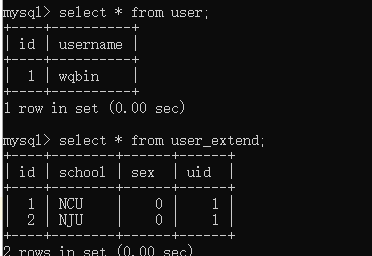
class User(Base):
    __tablename__ = 'user'
    id = Column(Integer,primary_key=True,autoincrement=True)
    username = Column(String(50),nullable=False)

    extend = relationship("UserExtend")

    def __repr__(self):
        return "<User(username:%s)>" % self.username

class UserExtend(Base):
    __tablename__ = 'user_extend'
    id = Column(Integer, primary_key=True, autoincrement=True)
    school = Column(String(50))
    sex = Column(Integer,default=0)

    uid = Column(Integer,ForeignKey("user.id"))
    user = relationship("User",uselist=False)
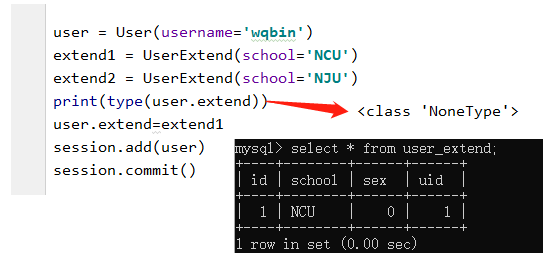
Base.metadata.drop_all()
Base.metadata.create_all()

user = User(username='wqbin')
extend1 = UserExtend(school='NCU')
print(type(user.extend))

在sqlalchemy中,如果想要将两个模型映射成一对一的关系,那么应该在父模型中,指定引用的时候,要传递一个`uselist=False`这个参数进去。
就是告诉父模型,以后引用这个从模型的时候,不再是一个列表了,而是一个对象了。
因为【extend = relationship("UserExtend")】没有加上uselist=False条件,所以可能存在一对多的关系。返回的就是一个列表【InstrumentedList】当数据进行添加时候
user.extend.append(extend1)
user.extend.append(extend2)
session.add(user)
session.commit()
一对一的关系
在每个关系中添加参数:uselist=False
在class User(Base)中
extend = relationship("UserExtend",uselist=False)
在class UserExtend(Base)中
user = relationship("User",uselist=False)
其实我们也发现的如果是【InstrumentedList】就不是一一的关系,当是【Nonetype】的时候就是一一的关系:
backref=backref("xxxx",uselist=False)
除去
extend = relationship("UserExtend",uselist=False)
user = relationship("User",uselist=False)
变成一句话就可以实现一一关系:
user = relationship("User",backref=backref("extend",uselist=False))

多对多的关系
- 先把两个需要做多对多的模型定义出来
- 使用Table定义一个中间表,中间表一般就是包含两个模型的外键字段就可以了,并且让他们两个来作为一个“复合主键”。
- 在两个需要做多对多的模型中随便选择一个模型,定义一个relationship属性,来绑定三者之间的关系,在使用relationship的时候,需要传入一个secondary=中间表。
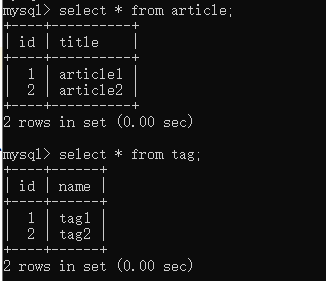
#使用Table定义中间表
article_tag = Table(
    "article_tag",
    Base.metadata,
    Column("article_id",Integer,ForeignKey("article.id"),primary_key=True),
    Column("tag_id",Integer,ForeignKey("tag.id"),primary_key=True)
)


class Article(Base):
    __tablename__ = 'article'
    id = Column(Integer,primary_key=True,autoincrement=True)
    title = Column(String(50),nullable=False)

    def __repr__(self):
        return "<Article(title:%s)>" % self.title


class Tag(Base):
    __tablename__ = 'tag'
    id = Column(Integer, primary_key=True, autoincrement=True)
    name = Column(String(50), nullable=False)

    articles = relationship("Article",backref="tags",secondary=article_tag)

    def __repr__(self):
        return "<Tag(name:%s)>" % self.name
Base.metadata.drop_all()
Base.metadata.create_all()

article1 = Article(title="article1")
article2 = Article(title="article2")

tag1 = Tag(name='tag1')
tag2 = Tag(name='tag2')

article1.tags.append(tag1)
article1.tags.append(tag2)

article2.tags.append(tag1)
article2.tags.append(tag2)

session.add(article1)
session.add(article2)

session.commit()
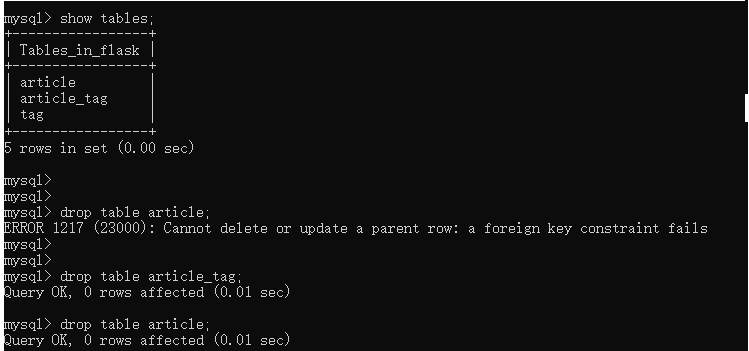
关于从表外键删除踩坑:
class User(Base):
    __tablename__ = 'user'
    id = Column(Integer,primary_key=True,autoincrement=True)
    username = Column(String(50),nullable=False)

class Article(Base):
    __tablename__ = 'article'
    id = Column(Integer, primary_key=True, autoincrement=True)
    title = Column(String(50),nullable=False)
    uid = Column(Integer,ForeignKey("user.id"))

    author = relationship("User",backref='articles')
造案例数据
Base.metadata.drop_all()
Base.metadata.create_all()

user = User(username='wqbin')
article = Article(title='how to learn python')
article.author = user
session.add(article)
session.commit()

理论上主表user表有外键约束不可删除,但是依旧可以删除。
user = session.query(User).first()
session.delete(user)
session.commit()
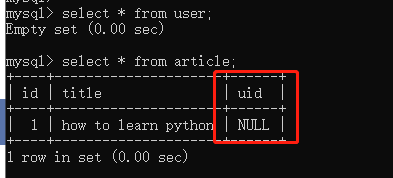
方案就是在把从表的外键设为不为空
class Article(Base):
    __tablename__ = 'article'
    id = Column(Integer, primary_key=True, autoincrement=True)
    title = Column(String(50),nullable=False)
    uid = Column(Integer,ForeignKey("user.id"),nullable=False)

ORM层面的CASCADE
如果将数据库的外键设置为RESTRICT,那么在ORM层面,删除了父表中的数据,那么从表中的外键数据将会置为NULL。如果不想要这种情况发生,那么应该将这个值的nullable=False。
在SQLAlchemy,只要将一个数据添加到session中,和他相关联的数据都可以一起存入到数据库中了。
这些是怎么设置的呢?其实是通过relationship的时候,有一个关键字参数cascad可以设置这些属性:
1.save-update:默认选项。在添加一条数据的时候,会把其他和他相关联的数据都添加到数据库中。这种行为就是save-update属性影响的。
2.delete:表示当删除某一个模型中的数据的时候,是否也删掉使用relationship和他关联的数据。
3.delete-orphan:表示当对一个ORM对象解除了父表中的关联对象的时候,自己便会被删除掉。当然如果父表中的数据被删除,自己也会被删除。
这个选项只能用在一对多上,不能用在多对多以及多对一上。并且还需要在子模型中的relationship中,增加一个sing1e_parent=True的参数。
4.merge:默认选项。当在使用session.merge,合并一个对象的时候,会将使用了relationship相关联的对象也进行merge操
5.expunge:移除操作的时候,会将相关联的对象也进行移除。这个操作只是从session中移除,并不会真正的从数据库中删除。
6.all:是对save-update,merge,refresh-expire,expunge,delete 几种的缩写。
排序
1. order_by:可以指定根据这个表中的某个字段进行排序,如果在前面加了一个-,代表的是降序排序。
2. 在模型定义的时候指定默认排序:有些时候,不想每次在查询的时候都指定排序的方式,可以在定义模型的时候就指定排序的方式。有以下两种方式:
* relationship的order_by参数:在指定relationship的时候,传递order_by参数来指定排序的字段。
* 在模型定义中,添加以下代码:
__mapper_args__ = {
         "order_by": title
       }
即可让文章使用标题来进行排序。
3. 正序排序与倒序排序:默认是使用正序排序。如果需要使用倒序排序,那么可以使用这个字段的`desc()`方法,或者是在排序的时候使用这个字段的字符串名字,然后在前面加一个负号。
# 正序排序
# 倒序排序
articles1 = session.query(Article).order_by("create_time").all()
articles2 = session.query(Article).order_by("-create_time").all()
articles3 = session.query(Article).order_by(Article.create_time.asc()).all()
articles4 = session.query(Article).order_by(Article.create_time.desc()).all()
在类中定义__mapper_args__属性
class Article(Base):
    __tablename__ = 'article'
    id = Column(Integer, primary_key=True, autoincrement=True)
    title = Column(String(50), nullable=False)
    create_time = Column(DateTime,nullable=False,default=datetime.now)
    uid = Column(Integer,ForeignKey("user.id"))

    author = relationship("User",backref=backref("articles"))

    __mapper_args__ = {
        "order_by": create_time.desc()
    }
    def __repr__(self):
        return "<Article(title:%s,create_time:%s)>" % (self.title,self.create_time)
结果如下:

backref=backref("articles",order_by=create_time.asc())
class Article(Base):
    __tablename__ = 'article'
    id = Column(Integer, primary_key=True, autoincrement=True)
    title = Column(String(50), nullable=False)
    create_time = Column(DateTime,nullable=False,default=datetime.now)
    uid = Column(Integer,ForeignKey("user.id"))

    author = relationship("User",backref=backref("articles",order_by=create_time.asc()))

    def __repr__(self):
        return "<Article(title:%s,create_time:%s)>" % (self.title,self.create_time)

limit、offset和切片操作:
1. limit:可以限制每次查询的时候只查询几条数据
2. offset:可以限制查找数据的时候过滤掉前面多少条
3. 切片:可以对Query对象使用切片操作。可以使用`slice(start,stop)`或者`[start:stop]`的方式来进行切片操作
寻找后10篇文章:
articles1 = session.query(Article).order_by(Article.id.desc())[0:10]
articles2 = session.query(Article).order_by(Article.id.desc()).offset(10).limit(10).all()
print(articles1)
print(articles2)

懒加载
在一对多,或者多对多的时候,如果想要获取多的这一部分的数据的时候,往往能通过一个属性就可以全部获取了。
比如有一个作者,想要或者这个作者的所有文章,那么可以通过user.articles就可以获取所有的。但有时候我们不想获取所有的数据,比如只想获取这个作者今天发表的文章,那么我们可以给relationship传递一个lazy='dynamic',
以后通过user.articles获取到的就不是一个列表,而是一个AppenderQuery对象了。这样就可以对这个对象再进行一层过滤和排序等操作。
通过`lazy='dynamic'`,获取出来的多的那一部分的数据,就是一个`AppenderQuery`对象了。
这种对象既可以添加新数据,也可以跟`Query`一样,可以再进行一层过滤。
总而言之一句话:如果你在获取数据的时候,想要对多的那一边的数据再进行一层过滤,那么这时候就可以考虑使用`lazy='dynamic'`。
lazy参数选项:
1. `select`:这个是默认选项。还是拿`user.articles`的例子来讲。如果你没有访问`user.articles`这个属性,那么sqlalchemy就不会从数据库中查找文章。
一旦访问了这个属性,那么sqlalchemy就会立马从数据库中查找所有的文章,并把查找出来的数据组装成一个列表返回。这也是懒加载。
2. `dynamic`:就是在访问`user.articles`的时候返回回来的不是一个列表,而是`AppenderQuery`对象。
user = User(username='wqbin')
for x in range(100):
    article = Article(title="title %s" % x)
    article.author = user
    session.add(article)
session.commit()
user = session.query(User).first()
深入研究query:
user = session.query(User)
user


Query.first()
    def first(self):
        """Return the first result of this ``Query`` or
        None if the result doesn't contain any row.

        first() applies a limit of one within the generated SQL, so that
        only one primary entity row is generated on the server side
        (note this may consist of multiple result rows if join-loaded
        collections are present).

        Calling :meth:`.Query.first` results in an execution of the underlying query.

        if self._statement is not None:
            ret = list(self)[0:1]
        else:
            ret = list(self[0:1])
        if len(ret) > 0:
            return ret[0]
        else:
            return None
artcles = session.query(User).first().articles.all()

可能是因为这句:this may consist of multiple result rows if join-loaded collections are present。
懒加载
class Article(Base):
    __tablename__ = 'article'
    id = Column(Integer, primary_key=True, autoincrement=True)
    title = Column(String(50), nullable=False)
    create_time = Column(DateTime,nullable=False,default=datetime.now)
    uid = Column(Integer,ForeignKey("user.id"))

    author = relationship("User",backref=backref("articles",lazy="dynamic"))

    def __repr__(self):
        return "<Article(title: %s)>" % self.title

过滤:
print(user.articles.filter(Article.id > 50).all())

高级查询
group_by:
根据某个字段进行分组。比如想要根据性别进行分组,来统计每个分组分别有多少人,那么可以使用以下代码来完成:
session.query(User.gender,func.count(User.id)).group_by(User.gender).all()
having:
having是对查找结果进一步过滤。比如只想要看未成年人的数量,那么可以首先对年龄进行分组统计人数,然后再对分组进行having过滤。示例代码如下:
result = session.query(User.age,func.count(User.id)).group_by(User.age).having(User.age >= 18).all()
join:
1. join分为left join(左外连接)和right join(右外连接)以及内连接(等值连接)。
2. 在sqlalchemy中,使用join来完成内连接。如果不写join的条件,默认将使用外键来作为条件连接。
3. query查找出的值取决于query方法中传了什么参数。比如现在要实现一个功能,要查找所有用户,按照发表文章的数量来进行排序。
result = session.query(User,func.count(Article.id)).join(Article).group_by(User.id).order_by(func.count(Article.id).desc()).all()`
subquery:
子查询可以让多个查询变成一个查询,只要查找一次数据库,性能相对来讲更加高效一点。不用写多个sql语句就可以实现一些复杂的查询。
那么在sqlalchemy中,要实现一个子查询,应该使用以下几个步骤:
- 将子查询按照传统的方式写好查询代码,然后在`query`对象后面执行`subquery`方法,将这个查询变成一个子查询。
- 在子查询中,将以后需要用到的字段通过`label`方法,取个别名。
- 在父查询中,如果想要使用子查询的字段,那么可以通过子查询的返回值上的属性拿到。
stmt = session.query(User.city.label("city"),User.age.label("age")).filter(User.username=='wqbin').subquery()
result = session.query(User).filter(User.city==stmt.c.city,User.age==stmt.c.age).all()