hive:
基于hadoop,数据仓库软件,用作OLAP
OLAP:online analyze process 在线分析处理
OLTP:online transaction process 在线事务处理
事务:
ACID
A:atomic 原子性
C: consistent 一致性
I:isolation 隔离性
D: durability 持久性
1读未提交
脏读 //事务一写入数据,事务二进行读取,事务一进行回滚
2读已提交
不可重复读 //事务一写入数据并提交,事务二读取,事务一进行update操作,事务二读取的数据不一致
4可重复读
幻读 //在mysql中见不到
8串行化
默认事务隔离级别 => mysql 4
=> oracle 2 , oracle没有4
RDBMS:关系型数据库管理系统
范式:
第一范式:无重复的列,一列只能包含一个字段
第二范式:主键约束,一行只能被唯一标识
第三范式:非主键字段要严格依赖于主键字段
--------------------------------------------------
id info name age classroom aircondition fans chair
--------------------------------------------------
1 {tom,20,married}
--------------------------------------------------
1 {}
--------------------------------------------------
Hive数据仓库:反范式设计,允许甚至推荐冗余
安装centos版本的mysql:
===================================
1、将hive相关软件下的文件或文件夹均拷贝到/home/centos下

2、先安装centos版的mysql
1)安装mysql的仓库镜像
sudo rpm -ivh mysql-community-release-el7-5.noarch.rpm
2)安装mysql
cd mysql
sudo yum -y localinstall *
3)启动并修改配置mysql密码
centos> systemctl start mysqld
centos> systemctl enable mysqld
centos> mysql -uroot //进入mysql中
mysql> update mysql.user set password=password('root'); //设置mysql密码为root
mysql> flush privileges; //刷新权限列表
4)退出mysql并重新进入
mysql> exit
centos> mysql -uroot -proot
3、安装hive:
1)解压
tar -xzvf apache-hive-2.1.1-bin.tar.gz -C /soft/
2)符号链接
cd /soft/
ln -s apache-hive-2.1.1-bin/ hive
3)环境变量
# hive环境变量
export HIVE_HOME=/soft/hive
export PATH=$PATH:$HIVE_HOME/bin
4)生效环境变量
source /etc/profile
5)修改hive配置文件:
1.重命名所有的template文件后缀去掉
rename '.template' '' *.template
2.修改hive-env.sh文件,添加
HADOOP_HOME=/soft/hadoop
3.重命名hive-default.xml文件为hive-site.xml
mv hive-default.xml hive-site.xml
4.修改hive-site.xml //替换自己的hive-site.xml
4.5、修改hive-site.xml中的${system:user.name}和${system:java.io.tmpdir} //可选
sed -i 's@${system:user.name}@centos@g' hive-site.xml
sed -i 's@${system:java.io.tmpdir}@/home/centos/hive@g' hive-site.xml
5.拷贝mysql驱动到hive下
cp ~/mysql-connector-java-5.1.44.jar /soft/hive/lib/
6.在mysql中创建数据库hive
create database hive;
7.初始化元数据库
schematool -initSchema -dbType mysql
4、体验hive
输入 hive 进入命令行
==========================================================hive使用==============================================================
启动hive的顺序
1、启动zk
2、启动hadoop(hdfs+MR)
3、启动hive
hive数据类型:
int
string
bigint
array => ['jenny','marry'] //array<String>
colmun, fruit
struct => {1, 'apple'} //事先定义好字段名称 struct<column int, fruit string>
int: string
map => {1:'apple'} //事先定义好k-v类型 map<int,string>
unoin => {'tom':['jenny','marry']} //联合类型,此例子是map和array的嵌套
hive建表指定分隔符:
==========================================================================
create table users2 (id int, name string, age int) row format delimited fields terminated by ' ';
row format delimited+
分隔符类型:
fields terminated by ' ' //字段分隔符
collection items terminated by ',' //array类型成员分隔符
map keys terminated by ':'
lines terminated by '
' //行分隔符,必须放在最后
hive插入数据不是使用insert,而是load:
=======================================================================
批量插入数据
1、先定义好表结构
create table employee(name string, work_place array<string>, sex_age struct<sex:string, age:int> , score map<string, int>, depart_title map<string, string>) row format delimited fields terminated by '|' collection items terminated by ',' map keys terminated by ':' lines terminated by '
' stored as textfile;
2、准备数据。数据格式要和表结构对应 employee.txt
Michael|Montreal,Toronto|Male,30|DB:80|Product:Developer
Will|Montreal|Male,35|Perl:85|Product:Lead,Test:Lead
Shelley|New York|Female,27|Python:80|Test:Lead,COE:Architect
Lucy|Vancouver|Female,57|Sales:89,HR:94|Sales:Lead
3、空表中使用load命令加载数据
load data local inpath '/home/centos/employee.txt' into table employee;
4、取出所有的成员
select name ,work_place[0] from employee; array获取
select name ,sex_age.sex from employee; 结构体获取
select name, score['python'] from employee; map成员获取
插入复杂类型数据insert
===============================
1.设置显示表头
set hive.cli.print.header=true; //设置显示表头,临时修改,想要永久修改需要修改配置文件
2.插入复杂类型使用转储:insert xxx select xxx
3.通过select语句构造某类型
select array('tom','tomas','tomson') ; //通过select语句构造出array类型
insert into employee(name,work_place) select 'tom', array('beijing','shanghai','guangzhou') ;
select map('bigdata',100); //通过select语句构造出map类型
insert into employee(name,score) select 'tomas', map('bigdata',100);
select struct('male',10);
select named_struct('sex','male','age',10); //通过select语句构造出struct类型
insert into employee(name,sex_age) select 'tomson',named_struct('sex','male','age',10);
load命令详解:
=================================
1、load本地数据
load data local inpath '/home/centos/employee.txt' into table employee; //相当于上传或者复制,源文件不变
2、load hdfs数据
load data inpath '/duowan_user.txt' into table duowan; //相当于移动
3、load本地数据 + 覆盖原始数据
load data local inpath '/home/centos/employee.txt' overwrite into table employee;
4、load hdfs数据 + 覆盖原始数据
load data inpath '/duowan_user.txt' overwrite into table duowan;
duowan数据处理:
====================================
//创建表
create table duowan(id int, name string, pass string, mail string, nickname string) row format delimited fields terminated by ' ' lines terminated by '
' stored as textfile;
//加载数据
load data inpath '/duowan_user.txt' into table duowan;
//开始执行
select pass , count(*) as count from duowan group by pass order by count desc limit 10;
//设置reduce个数
set mapreduce.job.reduces=2;
hiveserver2
//hive的jdbc接口,用户可以连接此端口来连接hive服务器
=======================================
hive jdbc //端口10000
web页面 //10002
通过jdbc连接hiveserver2
org.apache.hive.jdbc.HiveDriver //jdbc驱动类
问题:java.lang.RuntimeException: org.apache.hadoop.ipc.RemoteException:User: centos is not allowed to impersonate anonymous
解决:hive.server2.enable.doAs=false //hive-site.xml配置文件禁用连接验证
//不再使用hive直接使用hiveserver2//再在s201新界面输入 beeline -u jdbc:hive2://localhost:10000
如何使用新hive端口在ide上
1、启动hiveserver2 服务端
hiveserver2
2、编程
//查询数据使用ide
 1 public static void main(String[] args) throws Exception {
 2 Class.forName("org.apache.hive.jdbc.HiveDriver");
 3 String url = "jdbc:hive2://192.168.23.101:10000/big12";
 4 Connection conn = DriverManager.getConnection(url);
 5 Statement st = conn.createStatement();
 6 ResultSet rs = st.executeQuery("select * from duowan limit 20");
 7 while(rs.next()){
 8 int id = rs.getInt(1);
 9 String name = rs.getString(2);
10 String pass = rs.getString(3);
11 String mail = rs.getString(4);
12 String nickname = rs.getString(5);
13 System.out.println(id + "/" + name + "/" + pass + "/" + mail + "/" + nickname);
14 }
15 rs.close();
16 st.close();
17 conn.close();
18 }
19
20 //插入数据
21 @Test
22 public void testInsert() throws Exception{
23 Class.forName("org.apache.hive.jdbc.HiveDriver");
24 String url = "jdbc:hive2://192.168.23.101:10000/big12";
25 Connection conn = DriverManager.getConnection(url);
26 Statement st = conn.createStatement();
27 boolean b = st.execute("insert into users values(2,'tomas',30)");
28 if(b){
29 System.out.println("ok");
30 }
31 }
3、使用新一代客户端beeline连接hiveserer2
beeline -u jdbc:hive2://localhost:10000
4.问题解决:
问题:host 192.168.23.1 is not allowed to connect to mysql server
解决:在mysql中输入
grant all privileges on *.* to 'root'@'192.168.23.1' identified by 'root';
flush privileges;
使用beeline进行操作:
====================================
1、join
1)customer
create table customers(id int, name string, age int) row format delimited fields terminated by ' ';
2)orders
create table orders(oid int, oname string, oprice float, uid int) row format delimited fields terminated by ' ';
3)创建并加载数据
load data local inpath '' into table xxx;
4)使用join:
//内连接
select a.id, a.name, b.oname, b.oprice from customers a inner join orders b on a.id=b.uid;
//左外连接
select a.id, a.name, b.oname, b.oprice from customers a left outer join orders b on a.id=b.uid;
//右外连接
select a.id, a.name, b.oname, b.oprice from customers a right outer join orders b on a.id=b.uid;
//全外连接
select a.id, a.name, b.oname, b.oprice from customers a full outer join orders b on a.id=b.uid;
2、wordcount
1)array => collection items terminated by ' ' => explode()
explode => array
1.创建表wc
create table wc(line array<string>) row format delimited collection items terminated by ' ';
2.加载数据
load xxx
3.编写sql语句
select word, count(*) as count from (select explode(line) word from wc ) a group by word order by count desc;
2)line string => split()
split => select split('hello world', ' ') => ["hello","world"]
1.创建表wc2
create table wc2(line string) row format delimited;
2.加载数据
load xxx
3.编写sql语句
select word , count(*) as count from (select explode(split(line,' ')) as word from wc2) a group by word order by count desc;
3、最高气温统计
substr(line,16,4) => 1901
substr(line,88,5) => +0010
cast(temp as int);
1)创建temp表
create table temp(line string) ;
2)加载temp数据到表中
load data xxx
3)select year, max(temp) from (select substr(line,16,4) as year, cast(substr(line,88,5) as int) as temp from temp) a where temp != 9999 group by year;
本地模式:
================================================================
让hive自动使用hadoop的本地模式运行作业,提升处理性能
set hive.exec.mode.local.auto=true;
hive:
!sh ls -l /home/centos => 在hive命令行执行shell语句
dfs -ls / ;
alter 修改
================================================================
alter table wc rename to wc3; //修改表名
alter table user_par add partition(province='beijing',city='beijing');//添加分区
alter table customers drop column wife; //删除列,不能用!!!!!
alter table customers replace columns(wife1 string, wife2 string, wife3 string); //替换所有列
alter table customers change column id no string; //将id列改名为no,类型为string
hive分区:
=========================================
partition,是一个字段,是文件夹
前提:在hive进行where子句查询的时候,会将条件语句和全表进行比对,搜索出所需的数据,性能极差:避免全表扫描
0:建立user_par
create table user_par(id int, name string, age int) partitioned by(province string, city string)row format delimited fields terminated by ' ';
1.1、添加分区
alter table user_par add partition(province='beijing',city='beijing');
1.2、将数据加载到指定分区(分区可以不存在)
load data local inpath '/home/centos/customers.txt' into table user_par partition (province='shanxi',city='taiyuan');
1.3、将表清空
truncate table user_par;
or
1.1、插入数据动态指定分区
//设置动态分区非严格模式,无需指定静态分区
set hive.exec.dynamic.partition.mode=nonstrict;
insert into user_par partition(province,city) select * from user_nopar;
2、建立user_nopar
create table user_nopar(id int, name string, age int, province string, city string) row format delimited fields terminated by ' ';
SQL => struct query language
HQL => hive query language 类sql,和sql语句差别不大
no sql => not only sql 不仅仅是sql,和sql语句差距较大
HQL语句和MR执行过程的对应
select
==============================================join=====partition=====bucket==========================================================================
join:
========================================================================
select a.id, a.name, b.orderno, b.oprice from customers a inner join orders b on a.id=b.cid;
a inner join b //返回行数 a ∩ b
a left [outer] join b //返回行数 a
a right [outer] join b //返回行数 b
a full [outer] join b //返回行数 a+b - (a ∩ b)
a cross join b //返回行数 a * b
特殊join:
====================================================================================
1.map join
小表+大表 => 将小表加入到分布式缓存,通过迭代大表所有数据进行处理
在老版的hive中(0.7)之前,所有的join操作都是在reduce端执行的(reduce 端join)
想要进行map端join,需要进行以下操作
SET hive.auto.convert.join=true;
声明暗示 a join b , a小表,b大表
/*+ mapjoin(小表) */
SELECT /*+ MAPJOIN(a) */ a.id, a.name, b.orderno, b.oprice from customers a inner join orders b on a.id=b.cid;
在新版hive中,如果想要进行map端join
jdbc:hive2://> SET hive.auto.convert.join=true; //设置自动转换成map端join
jdbc:hive2://> SET hive.mapjoin.smalltable.filesize=600000000; //设置map端join中小表的最大值
2.common join
即reduce端join
1)、声明暗示,指定大表
/*+ STREAMTABLE(大表) */
2)、将大表放在右侧
测试:customers和orders
//不写任何暗示,观察是map端join还是reduce join
SELECT a.no, a.name, b.oname, b.oprice from customers a inner join orders b on a.no=b.uid;
//写暗示,观察效果
SELECT /*+ MAPJOIN(a) */ a.no, a.name, b.oname, b.oprice from customers a inner join orders b on a.no=b.uid;
//将自动转换map join 设置成false
SET hive.auto.convert.join=false;
//写reduce端join的暗示,观察结果
SELECT /*+ STREAMTABLE(a) */ a.no, a.name, b.oname, b.oprice from customers a inner join orders b on a.no=b.uid;
partition:
===============================================================================
文件夹形式存在,为了避免查询时的全表扫描
0.1 create table user(id int, name string, age int);
0.2 create table user2(id int, name string, age int) partitioned by (province string, city string);
1、手动创建分区
alter table user add partition(province='beijing',city='beijing');
2、load数据到分区
load data local inpath '' into table user partition(province='beijing',city='beijing');
3、插入数据动态创建分区
//设置动态分区非严格模式
set hive.exec.dynamic.partition.mode=nonstrict
insert into user2 partition(province, city) select * from user;
注意:在动态插入分区字段时注意,字段顺序必须要和分区顺序保持一致,和字段名称无关
4、删除分区数据
alter table user_par2 drop partition(province='chengdu');
5、insert数据到分区表
insert into user_par2 partition(province='USA', city='NewYork') select 10,'jerry',30;
6、查看指定表的分区列表:
show partitions user_par2;
7、如何创建分区
1)以日期或时间进行分区 比如year, month, and day
2)以位置进行分区 比如Use country, territory, state, and city
3)以业务逻辑进行分区
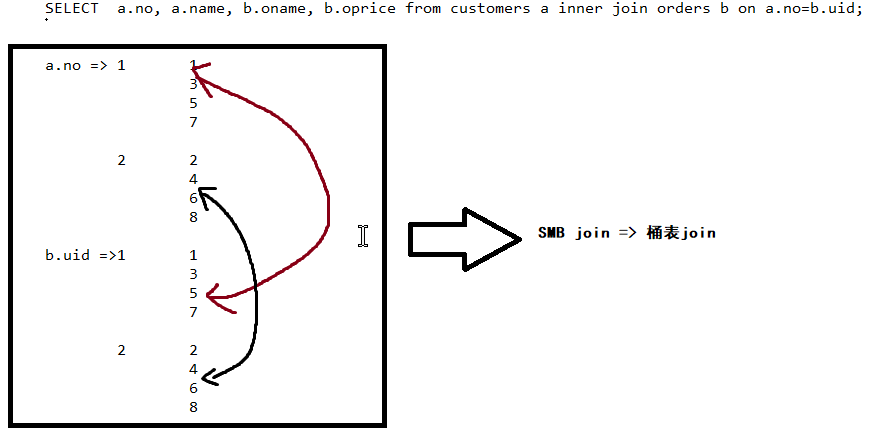
bucket:桶表
==================================================================
新型数据结构,以‘’文件段‘’的形式在分区表内部按照指定字段进行分隔---把分区表继续分成更小的文件 根据hashcode随机分配
重要特性:优化join的速度,避免全区扫描
//创建分区分桶表 分区在前分桶在后
create table user_bucket(id int, name string, age int) CLUSTERED BY (id) INTO 2 BUCKETS row format delimited fields terminated by ' ';
//在桶表中转储数据
insert into user_bucket select id, name , age from user_par2;
//查看hdfs中桶表的数据结构-------分区下又分成更小的文件
//将桶表和分区表一同使用建立新表user_new, 分区在前
create table user_new(id int, name string, age int) partitioned by (province string, city string) CLUSTERED BY (id) INTO 2 BUCKETS row format delimited fields terminated by ' ';
//查看hdfs中桶表的数据结构-------探讨
step0:create table user_new(id int, name string, age int) partitioned by (province string, city string) CLUSTERED BY (id) INTO 2 BUCKETS row format delimited fields terminated by ' ';
step1:load data local inpath '/home/centos/customers.txt' into table user_new partition(province='beijing',city='beijing');
step2:...查看hdfs...发现在(province='beijing',city='beijing')partition文件夹下只有一个文件。。。并没有自动分桶
结论:load并不会修改表中的数据结构,在桶表中的体现,就是没有将数据进行分段
//insert 数据
insert into user_new partition(province='USA', city='NewYork') select 10,'jerry',30;
//如何指定分桶字段
通过join字段进行桶字段的确定,在以下场景中分桶字段a => no , b => uid
内部表&外部表
=======================================================
内部表:
删除表 => 删除元数据,删除真实数据
MANAGED_TABLE 也叫托管表
默认表类型
外部表:
删除表 => 只删除元数据,不删除真实数据
场景:为了防止drop或者truncate表的时候数据丢失的问题
external table
create external table user_external as select * from user_par;
drop table user_externa;
打开hdfs。。发现数据文件还在
ctas:
=====================================================================
create table user_par2 like user_par; //创建user_par2,与user_par表结构一致,但是没有数据
create table user_par3 as select * from user_par; //创建user_par2,与user_par完全一致,包括数据
//但是分区会被变为字段
查看函数的扩展信息:
=====================================================================
desc function extended xxxxxxx;
eg:desc function extended format_number;
时间函数:
=====================================================================
select current_database() //当前数据库。。。。无语
select current_date() //当前日期
select current_timestamp() //当前时间戳,精确到毫秒
select date_format( current_timestamp(), 'yyyy-MM-dd HH:mm:ss'); //将时间格式化
select unix_timestamp(current_date()) //将日期转换成时间戳,精确到秒
select from_unixtime(153361440000, 'yyyy-MM-dd'); //将时间戳转化成日期
select datediff('2018-03-01','2018-02-01'); //计算两个指定日期相差多少天
字符串函数
=====================================================================
select split('hello world',' '); => array()
select substr('hello world', 7); => world
select substr('hello world', 7,12); => world
select trim(' world'); => 去掉前后的空格
format_number()
//select format_number(1234.345,2); => 1,234.35
//select format_number(1234.345,'000000.00'); => 001234.35
//select format_number(1234.345,'########.##'); => 1234.35
select concat('hello', ' world'); //拼串操作,返回 hello world
select length('helloworld') //10
条件语句
=====================================================================
select if( age > 10 ,'old', 'young') from user_par; //相当于三元运算符。
//第一个表达式成立返回第二个表达式
//第一个不成立返回第三个表达式
select case when age<20 then 'young' when age<40 then 'middle' else 'old' end from user_par;
//小于20,返回young
//小于40,返回middle
select case age when 20 then '20岁' when 40 then '40岁' else '其他岁' end from user_par;
排序:
order by //全排序
sort by //部分排序
distribute by //相当于hash分区,但是没有排序
cluster by //sort by + distribute by
=============================================================================================
//建表--- user_order 无分区
create table user_order(id int, name string, age int, province string, city string) row format delimited fields terminated by ' ';
//设置reduce个数
set mapreduce.job.reduces=2;
order by
全排序 //强制一个reduce,在真实使用中,需要加limit限制。
truncate table user_order;
insert into user_order select * from user_par order by id;
最后输出文件个数为2 =reduce
sort by
部分排序 //在每个reduce中分别排序
truncate table user_order;
set mapreduce.job.reduces=2;
insert into user_order select * from user_par sort by id;
最后输出文件个数为2 =reduce
distribute by
hash分区 // 根据id hash分区 输出文件不排序
truncate table user_order;
set mapreduce.job.reduces=2;
insert into user_order select * from user_par distribute by id;
最后输出文件个数为1 =强制reduce数
cluster by = distribute by + sort by
truncate table user_order;
set mapreduce.job.reduces=2;
insert into user_order select * from user_par cluster by id;
最后输出文件个数为2 =reduce
Hive的存储格式
================================================================
行级存储
textfile:
sequencefile :二进制的k-v对
hive-site.xml默认: SET hive.exec.compress.output=true;
SET io.seqfile.compression.type=BLOCK;
列级存储
rcfile
先将数据进行横切(4M),成为行组,行组内又纵向切割分为多个字段
orc
比rc文件更大的块(256M),优化磁盘的线性读取,通过指定的编码器确定数据类型并优化压缩
还存储了基本统计数据,比如min,max,sum,count。。。
parquet
适用范围更广(在hadoop生态系统中)
适用于嵌套文件格式
大小
create table user_seq(id int, name string, pass string, email string, nickname string) stored as SEQUENCEFILE; x
create table user_rc(id int, name string, pass string, email string, nickname string) stored as rcfile;
create table user_orc2(id int, name string, pass string, email string, nickname string) stored as orc tblproperties("orc.compress"="ZLIB");
create table user_parquet2(id int, name string, pass string, email string, nickname string) stored as parquet tblproperties("parquet.compression"="GZIP"); //NOCOMPRESS、SNAPPY、GZIP
insert into user_seq select * from user_nopar;
insert into user_rc select * from user_nopar;
insert into user_orc2 select * from user_nopar;
insert into user_parquet2 select * from user_nopar;
1、比较生成文件大小
text:136.8 MB
seq:222.41 MB 性能差
rc:353.52 KB
orc:97.4 KB //默认有压缩:ZLIB
parquet:9.26 MB //默认无压缩:NO ===GZIP==> 62.5 KB
性能
select count(*) from user_nopar; //3.649
select count(*) from user_seq; //25.368 性能差
select count(*) from user_rc; //2.391
select count(*) from user_orc2; //2.334
select count(*) from user_parquet2; //3.339 √
本地模式
==============================================================================
//设置hive自动使用本地模式
SET hive.exec.mode.local.auto=true;
//输入文件大小低于此值会进入本地模式
SET hive.exec.mode.local.auto.inputbytes.max=500000000;
//输入文件个数低于此值会进入本地模式
SET hive.exec.mode.local.auto.input.files.max=5;