鸣谢:http://www.shuyangyang.com.cn/jishuliangongfang/qianduanjishu/2014-02-18/196.html
-------------------------------------------------------------------------------------------
说明:本节采用技术:SpringMVC+ExtJs4.2+Maven+MySQL5.1以上+SLF4J(前几节学习的大家不知道记住了没,现在来总结复习下,顺便加点新技术)
学习本节前的准备:Eclipse高版本,Maven插件,JDK1.7
项目:shuyangyang
一、准备工作,创建MySQL数据库shuyangyang
/*
Navicat MySQL Data Transfer

Source Server         : localhost
Source Server Version : 50133
Source Host           : localhost:3306
Source Database       : shuyangyang

Target Server Type    : MYSQL
Target Server Version : 50133
File Encoding         : 65001

Date: 2014-02-18 23:04:49
*/

SET FOREIGN_KEY_CHECKS=0;
-- ----------------------------
-- Table structure for `t_users`
-- ----------------------------
DROP TABLE IF EXISTS `t_users`;
CREATE TABLE `t_users` (
  `ID` int(255) NOT NULL AUTO_INCREMENT,
  `Name` varchar(255) DEFAULT NULL,
  `age` smallint(6) DEFAULT NULL,
  `Address` varchar(255) DEFAULT NULL,
  `CardID` varchar(255) DEFAULT NULL,
  `Role` varchar(255) DEFAULT NULL,
  `DepartMent` varchar(255) DEFAULT NULL,
  `Sex` varchar(255) DEFAULT NULL,
  PRIMARY KEY (`ID`)
) ENGINE=MyISAM AUTO_INCREMENT=19 DEFAULT CHARSET=utf8;

-- ----------------------------
-- Records of t_users
-- ----------------------------
INSERT INTO t_users VALUES ('1', '张三', '20', '北京市海淀区', '342425199002131239', '普通用户', '用户组', '男');
INSERT INTO t_users VALUES ('2', '李四', '22', '上海市长宁区', '342425199107203116', '管理员', '管理组', '女');
INSERT INTO t_users VALUES ('3', '王五', '24', '南京市', '3426198920314669', '客服人员', '客服组', '女');
INSERT INTO t_users VALUES ('4', '赵大头', '23', '南通市', '3424198805134567', '普通用户', '用户组', '男');
INSERT INTO t_users VALUES ('5', '孙国', '21', '山东省', '3526199001234569', '普通用户', '用户组', '男');
INSERT INTO t_users VALUES ('6', '测试', '26', 'test', '456489731312123', 'test', 'test', '男');
INSERT INTO t_users VALUES ('7', '张三1', '20', '北京市海淀区', '342425199002131239', '普通用户', '用户组', '男');
INSERT INTO t_users VALUES ('8', '李四1', '22', '上海市长宁区', '342425199107203116', '管理员', '管理组', '女');
INSERT INTO t_users VALUES ('9', '王五1', '24', '南京市', '3426198920314669', '客服人员', '客服组', '女');
INSERT INTO t_users VALUES ('10', '赵大头1', '23', '南通市', '3424198805134567', '普通用户', '用户组', '男');
INSERT INTO t_users VALUES ('11', '孙国1', '21', '山东省', '3526199001234569', '普通用户', '用户组', '男');
INSERT INTO t_users VALUES ('12', '测试1', '26', 'test', '456489731312123', 'test', 'test', '男');
INSERT INTO t_users VALUES ('13', '张三2', '20', '北京市海淀区', '342425199002131239', '普通用户', '用户组', '男');
INSERT INTO t_users VALUES ('14', '李四2', '22', '上海市长宁区', '342425199107203116', '管理员', '管理组', '女');
INSERT INTO t_users VALUES ('15', '王五2', '24', '南京市', '3426198920314669', '客服人员', '客服组', '女');
INSERT INTO t_users VALUES ('16', '赵大头2', '23', '南通市', '3424198805134567', '普通用户', '用户组', '男');
INSERT INTO t_users VALUES ('17', '孙国2', '21', '山东省', '3526199001234569', '普通用户', '用户组', '男');
INSERT INTO t_users VALUES ('18', '测试2', '26', 'test', '456489731312123', 'test', 'test', '男');
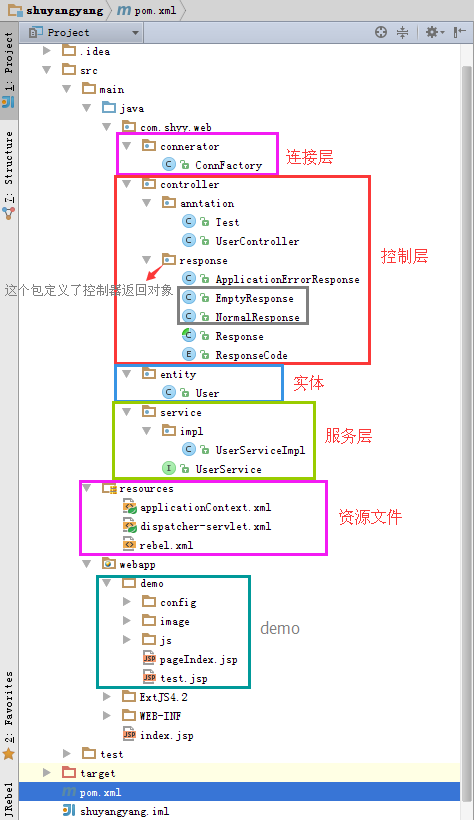
二、搭好框架
三、最终效果,主要是框架中间的数据展示

前台界面代码(这里给出的是数据展示层代码):
<%@ page language="java" contentType="text/html; charset=UTF-8" pageEncoding="UTF-8"%> <%@ page isELIgnored="false" %> <!DOCTYPE html PUBLIC "-//W3C//DTD HTML 4.01 Transitional//EN" "http://www.w3.org/TR/html4/loose.dtd"> <html> <head> <meta http-equiv="Content-Type" content="text/html; charset=UTF-8"> <title>首页</title> <link href="../ExtJS4.2/resources/css/ext-all-neptune-rtl.css" rel="stylesheet"> <script src="../ExtJS4.2/ext-all.js"></script> <script src="../ExtJS4.2/locale/ext-lang-zh_CN.js"></script> <script type="text/javascript" src="/demo/js/localXHR.js"></script> <script type="text/javascript"> Ext.onReady(function(){ //表格配置开始 // 定义列。包括定义表头、列索引、列渲染器 var columns = [ {header:'编号',dataIndex:'id'}, {header:'名称',dataIndex:'name'}, {header:'年龄',dataIndex:'age'}, {header:'性别',dataIndex:'sex',renderer:function(value){ if(value=='男'){ return "<span style='color:green;font-weight:bold';>男</span>"; } else { return "<span style='color:red;font-weight:bold';>女</span>"; } }}, {header:'地址',dataIndex:'address'}, {header:'身份证号码',dataIndex:'cardId',150}, {header:'角色',dataIndex:'role'}, {header:'部门',dataIndex:'departMent'} ]; //定义数据。(从客户端获取数据并渲染为json格式) var store = new Ext.data.Store({ pageSize:6, //每页显示几条数据 proxy:{ type:'ajax', url:'/user/showUser', reader:{ //用来对服务器端响应数据进行解码,或从客户端读取数据.Readers通常用于翻译数据,使其被加载为 Model 实例或Store. type:'json', totalProperty:'total', //检索数据集中记录总数. 只有在所有的数据集没有一次得到,而是由服务端分页得到时,该属性才需要用。(Defaults to: "total") root:'data', //包含的数据项与Reader配置的Model(s)中的相符合的属性名称。 idProperty:'id' //主键。默认为model的id. 若有特别指定一个idProperty,该值将覆盖model中定义的idProperty. } }, fields:[ {name:'id'}, //mapping:0 这样的可以指定列显示的位置,0代表第1列,可以随意设置列显示的位置 {name:'name'}, {name:'age'}, {name:'sex'}, {name:'address'}, {name:'cardId'}, {name:'role'}, {name:'departMent'} ] }); //定义表格 var grid = new Ext.grid.GridPanel({ store: store,//数据 columns: columns,//列 title: '数据',//标题 region: 'center', //框架中显示位置,单独运行可去掉此段 loadMask:true, //显示遮罩和提示功能,即加载Loading…… //forceFit:true //自动填满表格 bbar:new Ext.PagingToolbar({ //bbar:便利的配置。''Bottom Bar'的缩略形式。Ext.PagingToolbar:分页工具栏.此组件的loads块数据存入store,通过传递参数用于分页的标准。 store:store, displayInfo:true, //是否显示数据信息 displayMsg:'显示第 {0} 条到 {1} 条记录,一共 {2} 条', //只要当displayInfo为true时才有效,用来显示有数据时的提示信息,{0},{1},{2}会自动被替换成对应的数据 emptyMsg: "没有记录" //没有数据时显示信息 }) }); //加载数据。通过配置的 proxy 加载数据到Store 中. store.load({params:{start:0,limit:6}}); // 表格配置结束 // 树形配置开始 var tree = new Ext.tree.TreePanel({ store: new Ext.data.TreeStore({ proxy: { type: 'ajax', url: '/demo/config/tree.txt'// 'demo/config/tree.txt'也可以。与resource中的dispatcher-servlet.xml静态资源映射地址一致。 }, root: {//当前store的根节点。 expand: true,//展开本节点 text: '我是根sssss' } }), title: '菜单', region: 'north',//Defines the region inside border layout.(来自Ext.Component-cfg-region,4.2版本) split: true,//所有含split:true属性的区域都将得到 一个Splitter并允许手动调整大小.(它是Ext.layout.container.Border中的配置,不明白为何在此能调用此配置?) border: true,//指定该组件的边框. collapsible: true,//拥有折叠功能 120, height:'80%', minSize: 80,//未找到该配置 maxSize: 200//-- }); // 树形配置结束 //左边下部Panel。 var detailsPanel = { id: 'details-panel', title: '信息', region: 'center', bodyStyle: 'padding-bottom:15px;background:#eee;',//用户自定义CSS样式被应用到panel的body元素上 (来自Ext.panel.AbstractPanel中的配置) autoScroll: true,//在panel内容溢出时自动显示滚动条(来自Ext.Component中的配置) html: '<p class="details-info">信息显示神马的</p>'//一个 HTML 片段, 或者一个 DomHelper 描述, 用作 layout 元素的内容. (来自Ext.AbstractComponent中的配置) }; // 左边下部Panel结束 // 表单配置开始 var form = new Ext.form.FormPanel({ defaultType: 'textfield', labelAlign: 'right', title: 'form', labelWidth: 50, frame:true, 220, title: '图形表格', region: 'north', items: [{ fieldLabel: '文本框', anchor: '90%' }], buttons: [{ text: '按钮' }] }); // 表单配置结束 // 布局开始 var viewport = new Ext.Viewport({//Viewport渲染自身到网页的documet body区域, 并自动将自己调整到适合浏览器窗口的大小,在窗口大小发生改变时自动适应大小。 layout:'border', /** * items:单个组件,或者是以数组形式定义的子组件集合 将会自动添加到容器中去. * 如果子组件是指定的,它的实际组件的类型将根据xtype选项进行实例化. 每个组件都有各自的xtype. * 如果没有指定 xtype, 那么将会使用 defaultType,默认是panel. * 以下items全部采用defaultType(panel) */ items:[{ region: 'north', contentEl: 'north-div',//指定一个已存在的HTML元素, 或者一个已存在HTML元素的 id , 它们将被用作当前组件的内容. height: 73, bodyStyle: 'background-color:#BBCCEE;' },{ region: 'south', contentEl: 'south-div', height: 20, bodyStyle: 'background-color:#BBCCEE;' },{ layout: 'border', id: 'layout-browser', region:'west', border: false, split:true, margins: '2 0 5 5',//上 右 下 左 (未找到此属性的明确来源) 275, minSize: 100, maxSize: 500, items: [tree, detailsPanel] },{ region: 'center', split: true, border: true, layout: 'border', items: [grid,form] }] }); // 布局结束 }); </script> </head> <body> <div id="north-div" style="height: 73px; background-color: #101010;"><img alt="思考者日记网|束洋洋个人博客" src="/demo/image/shuyangyang_01.jpg"></div> <div id="south-div" align="center">Copyright by 束洋洋© www.shuyangyang.com.cn <a href="${pageContext.request.contextPath}/index.jsp">返回主页</a> </div> <div id="div2" ><input id="inputTest" value="name">input</div> </body> </html>
解析:
GridPanel如何获取服务端的数据?
看一下这里的代码:
//定义数据。(从客户端获取数据并渲染为json格式)
    var store = new Ext.data.Store({
        pageSize:6, //每页显示几条数据
        proxy:{
            type:'ajax',
            url:'/user/showUser',
            reader:{  //用来对服务器端响应数据进行解码,或从客户端读取数据.Readers通常用于翻译数据,使其被加载为 Model 实例或Store.
                type:'json',
                totalProperty:'total', //检索数据集中记录总数. 只有在所有的数据集没有一次得到,而是由服务端分页得到时,该属性才需要用。(Defaults to: "total")
                root:'data',  //包含的数据项与Reader配置的Model(s)中的相符合的属性名称。
                idProperty:'id'  //主键。默认为model的id. 若有特别指定一个idProperty,该值将覆盖model中定义的idProperty.
            }
        },
        fields:[
           {name:'id'}, //mapping:0 这样的可以指定列显示的位置,0代表第1列,可以随意设置列显示的位置
           {name:'name'},
           {name:'age'},
           {name:'sex'},
           {name:'address'},
           {name:'cardId'},
           {name:'role'},
           {name:'departMent'}
        ]
    });
Extjs是采用代理的方式,以ajax的提交方式从服务端获取数据的,并将它渲染为Extjs支持的json格式。
先看一下服务端返回的数据格式:
打印的数据如下:(为了方便看清,下面的数据只保留了2个User)
Response{success=true, code=OK, message='',
data=[User{id=11, name='孙国1', age=21, sex='男', address='山东省', cardId='3526199001234569', role='普通用户', departMent='用户组'},
User{id=18, name='测试2', age=26, sex='男', address='test', cardId='456489731312123', role='test', departMent='test'}],
total=18}
由此可以看出,store定义的fields的name的属性值与以上数据的data中的字段名是对应的,由此来解析数据;而reader中的totalProperty的属性值对应以上数据的total——来获取总记录数,root的属性值对应以上数据的data——来获取数据,idProperty定义的是每一行记录的主键,对应以上数据的id字段。
这里的url请求地址是/user/showUser,这里请求的是SpringMVC的地址,看下面的Controller代码:
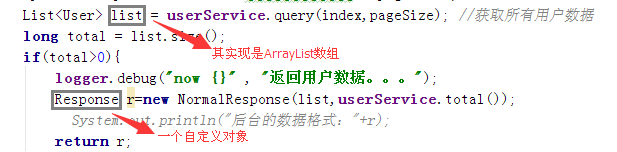
package com.shyy.web.controller.anntation;

import java.util.List;
import java.util.Map;

import javax.servlet.http.HttpServletRequest;
import javax.servlet.http.HttpServletResponse;

import org.slf4j.Logger;
import org.slf4j.LoggerFactory;
import org.springframework.stereotype.Controller;
import org.springframework.ui.Model;
import org.springframework.ui.ModelMap;
import org.springframework.web.bind.annotation.RequestMapping;
import org.springframework.web.bind.annotation.ResponseBody;

import com.shyy.web.controller.response.EmptyResponse;
import com.shyy.web.controller.response.NormalResponse;
import com.shyy.web.controller.response.Response;
import com.shyy.web.entity.User;
import com.shyy.web.service.UserService;
import com.shyy.web.service.impl.UserServiceImpl;

@Controller
@RequestMapping("/user/")
public class UserController {

    Logger logger = LoggerFactory.getLogger(UserController.class);

    UserService userService = new UserServiceImpl();

    /**
     * SpringMVC返回json数据
     * @return
     */
    @RequestMapping("showUser")
    @ResponseBody
    public Response resp(HttpServletRequest req, HttpServletResponse resp){
        String start = req.getParameter("start");//起始页
        String limit = req.getParameter("limit");//每页数量
        int index = Integer.parseInt(start);
        int pageSize = Integer.parseInt(limit);
        System.out.println(index+"-qqqqqqqqqqqq-"+pageSize);
        List<User> list = userService.query(index,pageSize); //获取所有用户数据
        long total = list.size();
        if(total>0){
            logger.debug("now {}" , "返回用户数据。。。");
            Response r=new NormalResponse(list,userService.total());
//            System.out.println("后台的数据格式:"+r);
            return r;
        }else{
            logger.debug("now {}" , "用户数据为空!");
            return new EmptyResponse();
        }

    }

    @RequestMapping("mytest")
    public String test(){
        return "wang";
    }

}
最后的NormalResponse返回的是我封装的一个返回对象,如下代码所示:
package com.shyy.web.controller.response;


public class NormalResponse extends Response {

    public NormalResponse(Object data) {
        this.setCode(ResponseCode.OK);
        this.setMessage("");
        this.setData(data);
        this.setSuccess(true);
    }

    public NormalResponse(Object data, Long total) {
        this.setCode(ResponseCode.OK);
        this.setMessage("");
        this.setData(data);
        this.setSuccess(true);
        this.setTotal(total);
    }

    public NormalResponse() {
        this.setCode(ResponseCode.OK);
        this.setMessage("");
        this.setData(null);
        this.setSuccess(true);
    }
}
附:1.此项目的pom.xml
<project xmlns="http://maven.apache.org/POM/4.0.0" xmlns:xsi="http://www.w3.org/2001/XMLSchema-instance"
  xsi:schemaLocation="http://maven.apache.org/POM/4.0.0 http://maven.apache.org/maven-v4_0_0.xsd">
  <modelVersion>4.0.0</modelVersion>
  <groupId>com.wql</groupId>
  <artifactId>shuyangyang</artifactId>
  <packaging>war</packaging>
  <version>1.0-SNAPSHOT</version>
  <name>shuyangyang Maven Webapp</name>
  <url>http://maven.apache.org</url>

  <properties>
      <spring.version>4.1.1.RELEASE</spring.version>
  </properties>

  <dependencies>

      <!-- spring-core -->
      <dependency>
          <groupId>org.springframework</groupId>
          <artifactId>spring-core</artifactId>
          <version>${spring.version}</version>
      </dependency>

      <!-- spring-web -->
      <dependency>
          <groupId>org.springframework</groupId>
          <artifactId>spring-web</artifactId>
          <version>${spring.version}</version>
      </dependency>

      <!-- spring-webmvc -->
      <dependency>
          <groupId>org.springframework</groupId>
          <artifactId>spring-webmvc</artifactId>
          <version>${spring.version}</version>
      </dependency>

      <!-- spring-test -->
      <dependency>
          <groupId>org.springframework</groupId>
          <artifactId>spring-test</artifactId>
          <version>${spring.version}</version>
          <scope>test</scope>
      </dependency>

      <!-- servlet-api -->
      <dependency>
          <groupId>javax.servlet</groupId>
          <artifactId>servlet-api</artifactId>
          <version>2.5</version>
      </dependency>

      <!-- Jsp Support -->
      <dependency>
          <groupId>javax.servlet.jsp</groupId>
          <artifactId>jsp-api</artifactId>
          <version>2.1</version>
          <scope>provided</scope>
      </dependency>

      <!-- MySQL -->
      <dependency>
          <groupId>mysql</groupId>
          <artifactId>mysql-connector-java</artifactId>
          <version>5.1.26</version>
      </dependency>

      <!--jackson -->
      <dependency>
          <groupId>com.fasterxml.jackson.core</groupId>
          <artifactId>jackson-databind</artifactId>
          <version>2.2.3</version>
      </dependency>

      <!-- SLF4J -->
      <dependency>
          <groupId>org.slf4j</groupId>
          <artifactId>slf4j-log4j12</artifactId>
          <version>1.7.2</version>
      </dependency>

  </dependencies>
  <build>
      <finalName>shuyangyang</finalName>
  </build>
</project>
说明:
1.其中的依赖spring-core与spring-web可用一个依赖——spring context代替:
<!--spring context -->
    <dependency>
        <groupId>org.springframework</groupId>
        <artifactId>spring-context</artifactId>
        <version>4.0.0.RELEASE</version>
    </dependency>
2.其中的jackson是解析json格式数据的。如果漏掉会报406错误:Failed to load resource: the server responded with a status of 406 (Not Acceptable)
3.spring-test是springMVC的测试依赖。
4.SLF4J是日志依赖,它用于在项目中记载日志。
2.此项目的资源文件:
applicationContext.xml
<?xml version="1.0" encoding="UTF-8"?>
<beans xmlns="http://www.springframework.org/schema/beans"
       xmlns:xsi="http://www.w3.org/2001/XMLSchema-instance"
       xmlns:context="http://www.springframework.org/schema/context"
       xmlns:mvc="http://www.springframework.org/schema/mvc"
       xsi:schemaLocation="http://www.springframework.org/schema/beans http://www.springframework.org/schema/beans/spring-beans.xsd http://www.springframework.org/schema/context http://www.springframework.org/schema/context/spring-context.xsd http://www.springframework.org/schema/mvc http://www.springframework.org/schema/mvc/spring-mvc.xsd">

    <context:component-scan base-package="com.shyy.web"/>

</beans>
dispatcher-servlet.xml
<?xml version="1.0" encoding="UTF-8"?>
<beans xmlns="http://www.springframework.org/schema/beans"
       xmlns:xsi="http://www.w3.org/2001/XMLSchema-instance"
       xmlns:mvc="http://www.springframework.org/schema/mvc"
       xmlns:context="http://www.springframework.org/schema/context"
       xsi:schemaLocation="http://www.springframework.org/schema/beans
       http://www.springframework.org/schema/beans/spring-beans.xsd
       http://www.springframework.org/schema/mvc
       http://www.springframework.org/schema/mvc/spring-mvc.xsd
       http://www.springframework.org/schema/context
       http://www.springframework.org/schema/context/spring-context.xsd">

    <context:component-scan base-package="com.shyy.web.controller.anntation"/>

    <mvc:annotation-driven/>

    <!-- 静态文件的访问 -->
    <mvc:resources location="/ExtJS4.2/" mapping="/ExtJS4.2/**"/>
    <mvc:resources location="/demo/image/" mapping="/demo/image/**"/>
    <mvc:resources location="/demo/js/" mapping="/demo/js/**"/>
    <mvc:resources location="/demo/config/" mapping="/demo/config/**"/>

    <!-- 视图解析器 -->
    <bean id="viewResolver" class="org.springframework.web.servlet.view.InternalResourceViewResolver">
        <!-- 视图前缀 -->
        <property name="prefix" value="/"></property>
        <!-- 视图后缀 -->
        <property name="suffix" value=".jsp"></property>
    </bean>


</beans>
3.此项目的web.xml
<?xml version="1.0" encoding="UTF-8"?>

<web-app xmlns:xsi="http://www.w3.org/2001/XMLSchema-instance"
         xmlns="http://java.sun.com/xml/ns/javaee"
         xsi:schemaLocation="http://java.sun.com/xml/ns/javaee http://java.sun.com/xml/ns/javaee/web-app_2_5.xsd"
         id="WebApp_ID" version="2.5">
  <display-name>Archetype Created Web Application</display-name>
    <welcome-file-list>
        <welcome-file>index.jsp</welcome-file>
    </welcome-file-list>
    <context-param>
        <param-name>contextConfigLocation</param-name>
        <param-value>classpath:applicationContext.xml</param-value>
    </context-param>
    <listener>
        <listener-class>org.springframework.web.context.ContextLoaderListener</listener-class>
    </listener>
    <servlet>
        <servlet-name>dispatcher</servlet-name>
        <servlet-class>org.springframework.web.servlet.DispatcherServlet</servlet-class>
        <init-param>
            <param-name>contextConfigLocation</param-name>
            <param-value>classpath:dispatcher-servlet.xml</param-value>
        </init-param>
        <load-on-startup>1</load-on-startup>
    </servlet>
    <servlet-mapping>
        <servlet-name>dispatcher</servlet-name>
        <url-pattern>/</url-pattern>
    </servlet-mapping>
    <filter>
        <filter-name>changMethod</filter-name>
        <filter-class>org.springframework.web.filter.HiddenHttpMethodFilter</filter-class>
    </filter>
    <filter-mapping>
        <filter-name>changMethod</filter-name>
        <url-pattern>/*</url-pattern>
    </filter-mapping>

</web-app>
后记:1.原作者博文中提到的Jetty尚且不知有何用途;2.Extjs像java那样存在继承特性,因此有些像本博文的js代码中涉及到的未发现有继承关系的却可以调用其属性不太明白;其次本博客用的是Extjs4.2版本,但本博文的js代码中涉及到的一些属性却未能在官方API中找到。3.前面提到的Extjs的分页问题在此博客已解决。4.此博客中涉及的项目对原博文中分享的项目作了简化和整理,如需要联系我:18681199407,qq:472543236.