一,volume
Ⅰ、emptyDir(pod消失就消失)
简介:emptyDir Volume是在Pod分配到node时创建的,从他的名称就能看得出来,它的出事内容为空,并且无需指定宿主机上对应的目录文件,
因为这是kubernetes自动分配的一个目录,当Pod从node上移除时,emptyDir中的数据也会被永久删除emptyDir的用途有:
例子1:单独在一台容器挂载目录
apiVersion: v1
kind: Pod
metadata:
  name: pod-demo
spec:
  containers:
  - name: myapp
    image: ikubernetes/myapp:v1
    volumeMounts:
    - name: cache-volume
      mountPath: /cache     //容器内部挂载目录
  volumes:
   - name: cache-volume
     emptyDir: {}  #volume类型,默认不限制使用空间

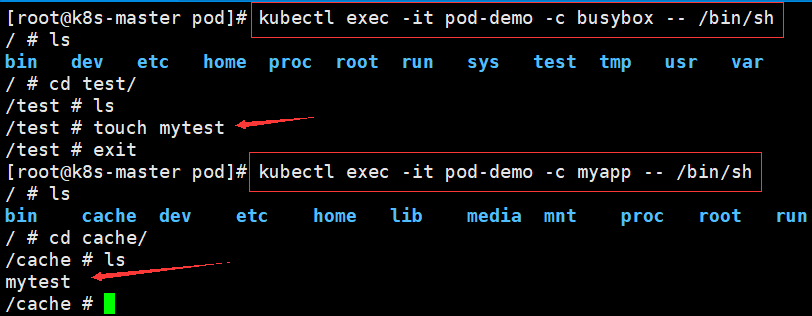
例子2、同一个pod下挂载两个目录实现文件共享
apiVersion: v1
kind: Pod
metadata:
  name: pod-demo
spec:
  containers:
   - name: myapp
     image: ikubernetes/myapp:v1
     volumeMounts:
       - name: cache-volume
         mountPath: /cache  //挂载目录
   - name: busybox
     image: busybox:latest
     imagePullPolicy: IfNotPresent
     command: ["/bin/sh","-c","sleep 6000s"]
     volumeMounts:
       - name: cache-volume
         mountPath: /test     //挂载目录
  volumes:
    - name: cache-volume
      emptyDir: {}
Ⅱ、hostPath(节点级存储,生命周期和node相同)
简介:允许挂载 Node 上的文件系统到 Pod 里面去。 如果 Pod 需要使用 Node 上的文件, 可以使用 hostPath
1、创建pod
apiVersion: v1
kind: Pod
metadata:
  name: test-pd
  namespace: wuchang
spec:
  containers:
  - image: ikubernetes/myapp:v1
    name: test-container
    volumeMounts:
    - mountPath: /test-pd
      name: test-volume
  volumes:
  - name: test-volume
    hostPath:
      path: /data
2、在cache目录下创建两个文件
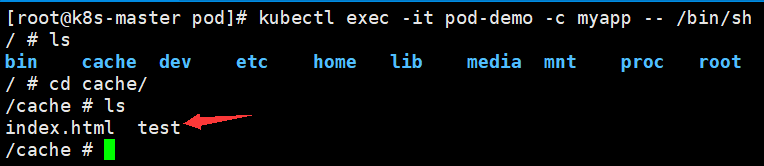
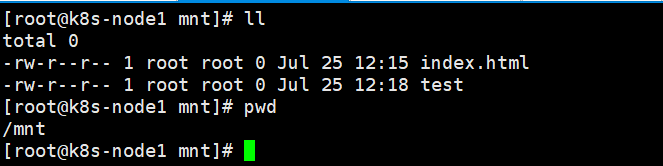
3、查看mnt目录下,
二、StorageClass
简介:在一个大规模的Kubernetes集群里,可能有成千上万个PVC,这就意味着运维人员必须实现创建出这个多个PV,此外,随着项目的需要,会有新的PVC不断被提交,那么运维人员就
需要不断的添加新的,满足要求的PV,否则新的Pod就会因为PVC绑定不到PV而导致创建失败.而且通过 PVC 请求到一定的存储空间也很有可能不足以满足应用对于存储设备的各种需求
而且不同的应用程序对于存储性能的要求可能也不尽相同,比如读写速度、并发性能等,为了解决这一问题,Kubernetes 又为我们引入了一个新的资源对象:StorageClass,通过
StorageClass 的定义,管理员可以将存储资源定义为某种类型的资源,比如快速存储、慢速存储等,用户根据 StorageClass 的描述就可以非常直观的知道各种存储资源的具体特性了,
这样就可以根据应用的特性去申请合适的存储资源了。
本案例基于StorageClass+NFS进行演示
1、创建rbac授权
[root@k8s-master storageClass]# cat rbac.yaml
apiVersion: v1
kind: ServiceAccount
metadata:
  name: nfs-client-provisioner

---
apiVersion: rbac.authorization.k8s.io/v1
kind: ClusterRole
metadata:
  name: nfs-client-provisioner-clusterrole
rules:
  - apiGroups: [""]
    resources: ["persistentvolumes"]
    verbs: ["get", "list", "watch", "create", "delete"]
  - apiGroups: [""]
    resources: ["persistentvolumeclaims"]
    verbs: ["get", "list", "watch", "update"]
  - apiGroups: ["storage.k8s.io"]
    resources: ["storageclasses"]
    verbs: ["get", "list", "watch"]
  - apiGroups: [""]
    resources: ["events"]
    verbs: ["list", "watch", "create", "update", "patch"]
  - apiGroups: [""]
    resources: ["endpoints"]
    verbs: ["create", "delete", "get", "list", "watch", "patch", "update"]

---
apiVersion: rbac.authorization.k8s.io/v1
kind: ClusterRoleBinding
metadata:
  name: nfs-client-provisioner-clusterrolebinding
subjects:
- kind: ServiceAccount
  name: nfs-client-provisioner
  namespace: default
roleRef:
  kind: ClusterRole
  name: nfs-client-provisioner-clusterrole
  apiGroup: rbac.authorization.k8s.io
2、创建provinsor.yaml
[root@k8s-master storageClass]# cat provisioner.yaml
apiVersion: apps/v1
kind: Deployment
metadata:
  name: nfs-client-prosioner
spec:
  replicas: 1
  selector:
    matchLabels:
      app: nfs-client-prosioner
  strategy:
    type: Recreate
  template:
    metadata:
      labels:
        app: nfs-client-prosioner
    spec:
      serviceAccountName: nfs-client-provisioner
      containers:
      - name: nfs-client-prosioner
        image: registry.cn-hangzhou.aliyuncs.com/rookieops/nfs-client-provisioner:v0.1
        imagePullPolicy: IfNotPresent
        volumeMounts:
        - name: nfs-client-root
          mountPath: /data/pv
        env:
        - name: PROVISIONER_NAME
          value: rookieops/nfs
        - name: NFS_SERVER
          value: 192.168.48.210
        - name: NFS_PATH
          value: /nfsdata/v120
      volumes:
      - name: nfs-client-root
        nfs:
          server: 192.168.48.210
          path: /nfsdata/v120
3、创建stroageclass.yaml
[root@k8s-master storageClass]# cat storageclass.yaml
apiVersion: storage.k8s.io/v1
kind: StorageClass
metadata:
  name: nfs-client-storageclass
provisioner: rookieops/nfs
4、查看pod情况
[root@k8s-master storageClass]# kubectl get pods
NAME                                      READY   STATUS    RESTARTS   AGE
nfs-client-provisioner-66d6f8d7b6-sm9m9   1/1     Running   0          117m
pod-demo                                  1/1     Running   0          171m
4、创建测试pod,检查是否创建成功
三、PV,以NFS为例(永久存储,生命周期与NFS server相同)
Ⅰ、在非K8S机器安装nfs服务器
[root@localhost etc]# yum -y install nfs*
[root@localhost etc]# mkdir /nfsdata
[root@localhost etc]# chmod 666 /nfsdata/
[root@localhost etc]# cat /etc/exports
/nfsdata *(rw,no_root_squash,no_all_squash,sync)  //任意客户端可连接
/home/xubu/share/   192.168.1.1(rw,sync,no_root_squash,no_subtree_check) //指定的
[root@localhost etc]# systemctl start nfs
[root@localhost etc]# systemctl start rpcbind
Ⅱ、在所有K8S节点安装nfs客户端
[root@k8s-master pod]# yum -y install nfs-utils rpcbind
[root@k8s-node1 mnt]# showmount -e 192.168.254.120
报错:clnt_create: RPC: Port mapper failure - Unable to receive: errno 113 (No route to host)
解决:该问题为nfs服务器未关闭防火墙,将防火墙关闭即可
Ⅲ、测试新建目录是否能正常挂载
[root@k8s-master pod]# mkdir /test
[root@k8s-master pod]# mount -t nfs 192.168.254.120:/nfsdata /test/
Ⅳ、创建pv
apiVersion: v1
kind: PersistentVolume
metadata:
  name: pv-nfs
spec:
  capacity:
   storage: 1Gi
  accessModes:
   - ReadWriteOnce
  persistentVolumeReclaimPolicy: Retain
  storageClassName: nfs
  nfs:
    path: /nfsdata
    server: 192.168.254.120
① capacity 指定 PV 的容量为 1G。
② accessModes 指定访问模式为 ReadWriteOnce,支持的访问模式有:
ReadWriteOnce – PV 能以 read-write 模式 mount 到单个节点。
ReadOnlyMany – PV 能以 read-only 模式 mount 到多个节点。
ReadWriteMany – PV 能以 read-write 模式 mount 到多个节点。
③ persistentVolumeReclaimPolicy 指定当 PV 的回收策略为 Recycle,支持的策略有:
Retain – 需要管理员手工回收。
Recycle – 如果pvc删除了,创建的文件也会删除。
Delete – 删除 Storage Provider 上的对应存储资源,例如 AWS EBS、GCE PD、Azure Disk、OpenStack Cinder Volume 等。
④ storageClassName 指定 PV 的 class 为 nfs。相当于为 PV 设置了一个分类,PVC 可以指定 class 申请相应 class 的 PV。
⑤ 指定 PV 在 NFS 服务器上对应的目录
Ⅴ、创建PVC
apiVersion: v1
kind: PersistentVolumeClaim
metadata:
  name: mypvc2
spec:
  accessModes:
   - ReadWriteOnce    //根据这个方式来选择绑定的PV
  resources:
    requests:
      storage: 1Gi
  storageClassName: nfs
Ⅵ、创建pod
[root@k8s-master pod]# cat volume-nfs.yaml
apiVersion: v1
kind: Pod
metadata:
  name: pod-demo
spec:
  containers:
   - name: myapp
     image: ikubernetes/myapp:v1
     volumeMounts:
       - name: cache-volume
         mountPath: /cache
   - name: busybox
     image: busybox:latest
     imagePullPolicy: IfNotPresent
     command: ["/bin/sh","-c","sleep 6000s"]
     volumeMounts:
       - name: cache-volume
         mountPath: /test
  volumes:
    - name: cache-volume    //名称和volumemounts的名称一致
      persistentVolumeClaim:
        claimName: mypvc2    //名称为pvc的名称
执行创建pod命令
[root@k8s-master pod]# kubectl apply -f volume-nfs.yaml
Ⅶ、验证pod里的两个容器创建文件是否会同步
1、在pod里面创建文件
[root@k8s-master pod]# kubectl exec -it pod-demo -c busybox -- /bin/sh   //进入容器
/ # ls
bin   dev   etc   home  proc  root  run   sys   test  tmp   usr   var
/ # cd test/  进入共享目录
/test # ls
/test # touch hello   //创建文件hello
/test # echo "1.html">1.html  //创建文件1.html
/test # ls
1.html  hello
2、查看nfs服务器上的目录,成功
[root@localhost nfs1]# ll
total 4
-rw-r--r--. 1 root root 7 Jul 27 04:02 1.html
-rw-r--r--. 1 root root 0 Jul 27 04:01 hello
[root@localhost nfs1]# pwd
/nfs1
[root@localhost nfs1]#
Ⅷ、PVC 的回收
当不在需要使用pvc的时候可以进行相应的删除操作,
1、删除之前的状态为bound

2、执行删除的操作
[root@k8s-master pod]# kubectl delete pvc mypvc2
persistentvolumeclaim "mypvc2" deleted
3、查看文件还是存在
[root@localhost nfs1]# ll
total 4
-rw-r--r--. 1 root root 7 Jul 27 04:02 1.html
-rw-r--r--. 1 root root 0 Jul 27 04:01 hello