在我们的很多框架或者项目应用中,缓存在一定程度上可以提高程序的响应速度,以及减轻服务器的承载压力,因此在一些地方我们都考虑引入缓存模块,这篇随笔介绍使用开源缓存框架CacheManager来实现数据的缓存,在微信开发框架中,我们有一些常用的处理也需要应用到缓存,因此本随笔以微信框架为例介绍缓存的实际使用,实际上,在我们很多框架中,如混合式开发框架、Web开发框架、Bootstrap开发框架中,这个模块都是通用的。
1、框架的缓存设计
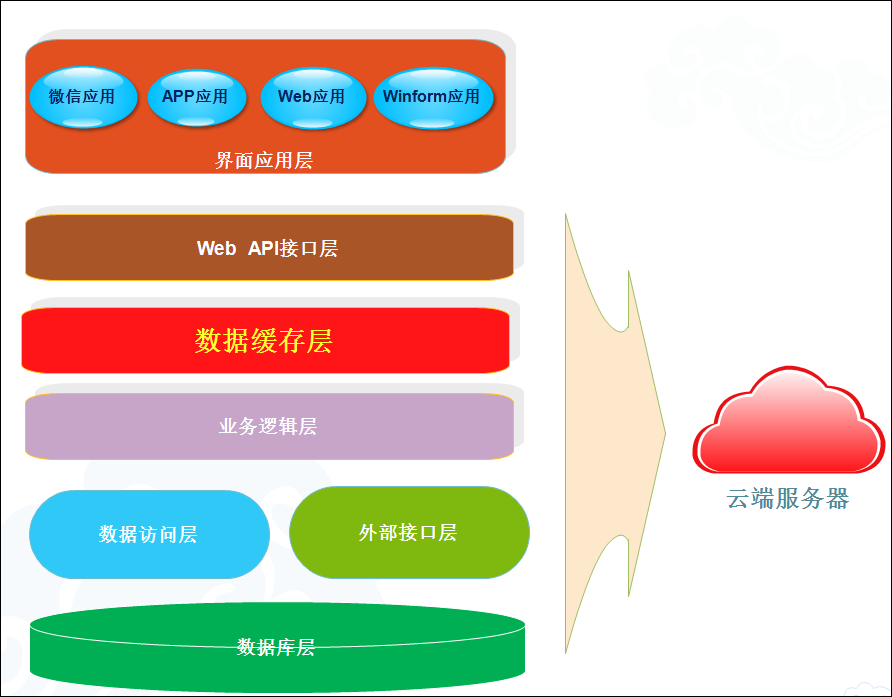
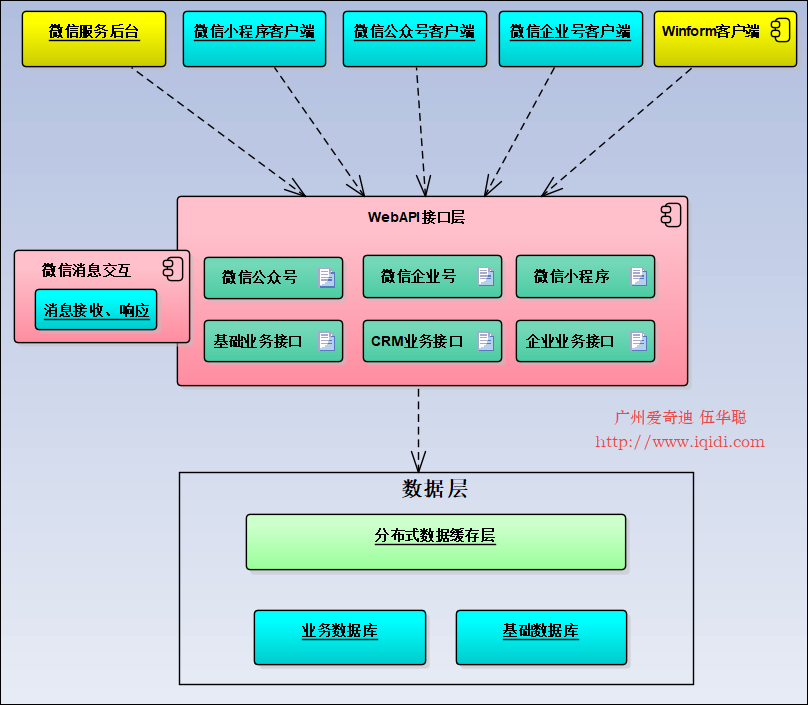
在我们的微信开发框架中,缓存作为数据库和对外接口之间的一个分层,提供数据的缓存响应处理,如下结构所示是Web API层对缓存的架构设计。


在缓存的处理中,我侧重于使用CacheManager,这个缓存框架是一个集大成者,关于CacheManager 的介绍,我们可以回顾下我之前的随笔《.NET缓存框架CacheManager在混合式开发框架中的应用(1)-CacheManager的介绍和使用》。
CacheManager是一个以C#语言开发的开源.Net缓存框架抽象层。它不是具体的缓存实现,但它支持多种缓存提供者(如Redis、Memcached等)并提供很多高级特性。
CacheManager 主要的目的使开发者更容易处理各种复杂的缓存场景,使用CacheManager可以实现多层的缓存,让进程内缓存在分布式缓存之前,且仅需几行代码来处理。
CacheManager 不仅仅是一个接口去统一不同缓存提供者的编程模型,它使我们在一个项目里面改变缓存策略变得非常容易,同时也提供更多的特性:如缓存同步、并发更新、序列号、事件处理、性能计算等等,开发人员可以在需要的时候选择这些特性。
CacheManager的GitHub源码地址为:https://github.com/MichaCo/CacheManager,如果需要具体的Demo及说明,可以访问其官网:http://cachemanager.michaco.net
2、在微信框架中整合CacheManager 缓存框架
在使用CacheManager 缓存的时候,我们可以直接使用相关对象进行处理,首先需要定义一个类来进行初始化缓存的设置,然后进行调用,调用的时候可以使用IOC的方式构建对象,如下代码所示创建一个自定义的缓存管理类
    /// <summary>
    /// 基于CacheManager的接口处理
    /// </summary>
    public class CacheManager : ICacheManager
    {
        /// <summary>
        /// ICacheManager对象
        /// </summary>
        public ICacheManager<object> Manager { get; set; }

        /// <summary>
        /// 默认构造函数
        /// </summary>
        public CacheManager()
        {
            // 初始化缓存管理器
            Manager = CacheFactory.Build("getStartedCache", settings =>
            {
                settings
                .WithSystemRuntimeCacheHandle("handleName")
                .And
                .WithRedisConfiguration("redis", config =>
                {
                    config.WithAllowAdmin()
                        .WithDatabase(0)
                        .WithEndpoint("localhost", 6379);
                })
                .WithMaxRetries(100)
                .WithRetryTimeout(50)
                .WithRedisBackplane("redis")
                .WithRedisCacheHandle("redis", true)
                ;
            });
        }
    }
}
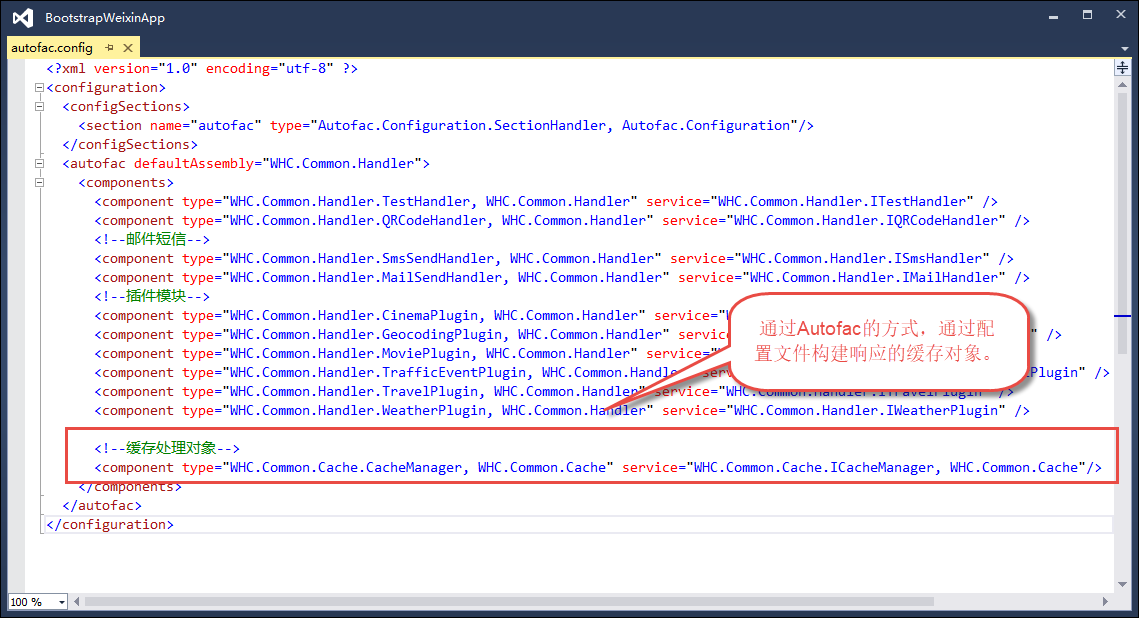
然后在Autofac的配置文件中配置缓存的相关信息,如下文件所示。

如果直接使用Autofac的构造类来处理,那么调用缓存处理的代码如下所示。
            //通过AutoFac工厂获取对应的接口实现
            var cache = AutoFactory.Instatnce.Container.Resolve<ICacheManager>();
            if (cache != null)
            {
                accountInfo = cache.Manager.Get(key) as AccountInfo;
                if (accountInfo == null)
                {
                    var value = BLLFactory<Account>.Instance.FindByID(accountId);
                    var item = new CacheItem<object>(key, value, ExpirationMode.Absolute, TimeSpan.FromMinutes(TimeOut_Minutes));
                    cache.Manager.Put(item);

                    accountInfo = cache.Manager.Get(key) as AccountInfo;
                }
            }
如果为了使用方便,我们还可以对这个辅助类进行进一步的封装,以便对它进行统一的调用处理即可。
    /// <summary>
    /// 基于.NET CacheManager的缓存管理,文档参考:http://cachemanager.michaco.net/documentation
    /// </summary>
    public class CacheManagerHelper
    {
        /// <summary>
        /// 锁定处理变量
        /// </summary>
        private static readonly object locker = new object();

        /// <summary>
        /// 创建一个缓存的键值,并指定响应的时间范围,如果失效,则自动获取对应的值
        /// </summary>
        /// <typeparam name="T">对象类型</typeparam>
        /// <param name="key">对象的键</param>
        /// <param name="cachePopulate">获取缓存值的操作</param>
        /// <param name="expiration">失效的时间范围</param>
        /// <param name="mode">失效类型</param>
        /// <returns></returns>
        public static T GetCacheItem<T>(string key, Func<T> cachePopulate, TimeSpan expiration,
            string region = "_", ExpirationMode mode = ExpirationMode.Sliding) where T :class
        {
            CacheItem<object> outItem = null;
            //通过AutoFac工厂获取对应的接口实现
            var cache = AutoFactory.Instatnce.Container.Resolve<ICacheManager>();
            if (cache != null)
            {
                if (cache.Manager.Get(key, region) == null)
                {
                    lock (locker)
                    {
                        if (cache.Manager.Get(key, region) == null)
                        {
                            //Add、Put差异,Add只有在空值的情况下执行加入并返回true,Put总会替换并返回True
                            //如果按下面的方式加入,那么会留下历史丢弃的键值: cache.Manager.Put(key, value);

                            var value = cachePopulate();
                            var item = new CacheItem<object>(key, region, value, mode, expiration);
                            cache.Manager.Put(item);
                        }
                    }
                }

                return cache.Manager.Get(key, region) as T;
            }
            else
            {
                throw new ArgumentNullException("AutoFac配置参数错误,请检查autofac.config是否存在ICacheManager的定义");
            }
        }
    }
不过由于官方已经提供了一个类似上面的代码逻辑的TryGetOrAdd方法,这个方法的定义如下所示。
TryGetOrAdd(String, String, Func<String, String, TCacheValue>, out TCacheValue)
Tries to either retrieve an existing item or add the item to the cache if it does not exist. The valueFactory will be evaluated only if the item does not exist.
Declaration
bool TryGetOrAdd(string key, string region, Func<string, string, TCacheValue> valueFactory, out TCacheValue value)Parameters
| Type | Name | Description |
|---|---|---|
| String | key |
The cache key. |
| String | region |
The cache region. |
| Func<String, String, TCacheValue> | valueFactory |
The method which creates the value which should be added. |
| TCacheValue | value |
The cache value. |
Returns
| Type | Description |
|---|---|
| Boolean |
|
我们根据这个参数的定义,可以进一步简化上面的辅助类代码。
                cache.Manager.TryGetOrAdd(key, region, (_key, _region) =>{
                    var value = cachePopulate();
                    var item = new CacheItem<object>(key, region, value, mode, expiration);
                    return item;
                }, out outItem);
                return outItem as T;
整个类的代码如下所示
    /// <summary>
    /// 基于.NET CacheManager的缓存管理,文档参考:http://cachemanager.michaco.net/documentation
    /// </summary>
    public class CacheManagerHelper
    {
        /// <summary>
        /// 创建一个缓存的键值,并指定响应的时间范围,如果失效,则自动获取对应的值
        /// </summary>
        /// <typeparam name="T">对象类型</typeparam>
        /// <param name="key">对象的键</param>
        /// <param name="cachePopulate">获取缓存值的操作</param>
        /// <param name="expiration">失效的时间范围</param>
        /// <param name="mode">失效类型</param>
        /// <returns></returns>
        public static T GetCacheItem<T>(string key, Func<T> cachePopulate, TimeSpan expiration,
            string region = "_", ExpirationMode mode = ExpirationMode.Sliding) where T :class
        {
            CacheItem<object> outItem = null;
            //通过AutoFac工厂获取对应的接口实现
            var cache = AutoFactory.Instatnce.Container.Resolve<ICacheManager>();
            if (cache != null)
            {
                cache.Manager.TryGetOrAdd(key, region, (_key, _region) =>{
                    var value = cachePopulate();
                    var item = new CacheItem<object>(key, region, value, mode, expiration);
                    return item;
                }, out outItem);
                return outItem as T;
            }
            else
            {
                throw new ArgumentNullException("AutoFac配置参数错误,请检查autofac.config是否存在ICacheManager的定义");
            }
        }
    }
这样代码就简化了不少,而且不用自己控制读取的线程锁了,下面代码是使用辅助类实现缓存的添加及获取处理。
        /// <summary>
        /// 为避免频繁的对数据库检索,提高获取账号信息的速度
        /// 我们把账号信息根据ID缓存起来,方便快速使用,提高效率。
        /// </summary>
        public static AccountInfo GetAccountByID(string accountId)
        {
            AccountInfo accountInfo = null;

            #region 使用.NET CacheManager缓存
            //正常情况下access_token有效期为7200秒,这里使用缓存设置短于这个时间即可
            var key = "GetAccountByID_" + accountId;
            accountInfo = CacheManagerHelper.GetCacheItem<AccountInfo>(key, () =>
            {
                return BLLFactory<Account>.Instance.FindByID(accountId);
            }, TimeSpan.FromMinutes(TimeOut_Minutes));

            return accountInfo;
        }
通过这样的辅助类封装,我们可以在需要缓存的函数里面,统一使用辅助类对数据进行缓存或者读取缓存的操作。
我们也可以直接使用Autofac构建的缓存管理进行操作,如在小程序里面,我们对用户敏感数据的解密处理函数,如下所示。
        /// <summary>
        /// 根据微信小程序平台提供的解密算法解密数据
        /// </summary>
        [HttpGet]
        public SmallAppUserInfo Decrypt(string encryptedData, string iv, string thirdkey)
        {
            SmallAppUserInfo userInfo = null;

            //通过AutoFac工厂获取对应的接口实现
            var cache = AutoFactory.Instatnce.Container.Resolve<ICacheManager>();
            if (cache != null)
            {
                //从缓存里面,获取对应的SessionKey
                var sessionkey = cache.Manager.Get(thirdkey);
                if (sessionkey != null)
                {
                    //对用户身份加密数据进行解析,获取包含openid等属性的完整对象
                    IBasicApi api = new BasicApi();
                    userInfo = api.Decrypt(encryptedData, iv, sessionkey.ToString());
                }
            }
            return userInfo;
        }