0. 前言
前面介绍的都是一些标准的第三方中间件,基本都是有现成的Dockerfile或者Image,不需要我过多的关心,这一篇要介绍一些自己构建的Docker Image了。刚开始学,Dockerfile写得比较挫,请见谅哈!!!
1. 构建Nginx-RTMP镜像
由于基于Nginx的RTMP插件的镜像,好像没有找到。同时为了以后可以自己自定义功能,因此需要自己构建镜像。关于Nginx构建,可以参考官方的文档https://github.com/nginxinc/docker-nginx/ 关于RTMP插件的编译,可以参考我之前的博客 https://www.cnblogs.com/wunaozai/p/9427730.html
我看Nginx官方标准的Dockerfile写得很复杂,现在还不懂得一些命令有什么用,我按照自己的理解,写了一份Dockerfile
 1 FROM alpine:latest
 2 RUN apk add --no-cache --virtual .build-deps
 3     gcc
 4     libc-dev
 5     make
 6     openssl-dev
 7     pcre-dev
 8     curl
 9
10 RUN wget https://nginx.org/download/nginx-1.14.1.tar.gz &&
11     tar -zxvf nginx-1.14.1.tar.gz &&
12     wget https://github.com/arut/nginx-rtmp-module/archive/v1.2.1.tar.gz &&
13     mv v1.2.1.tar.gz nginx-rtmp-module.tar.gz &&
14     tar -zxvf nginx-rtmp-module.tar.gz
15
16 WORKDIR /nginx-1.14.1
17
18 RUN ./configure --prefix=/opt --with-stream --add-module=../nginx-rtmp-module-1.2.1 &&
19     make -j$(getconf _NPROCESSORS_ONLN) &&
20     make install
21
22 WORKDIR /
23
24 RUN strip /opt/sbin/nginx &&
25     rm -rf /nginx-*
26
27 EXPOSE 80 1935
28
29 COPY nginx.conf /opt/conf/nginx.conf
30 COPY env.sh /
31
32 RUN chmod +x env.sh
33
34 ENTRYPOINT ["/env.sh"]
这里简单说一下,第一步安装必要的依赖,然后下载nginx源码及nginx-rtmp-module源码,第三步,编译,最后删除临时安装包。完成。
最主要功能的实现,是在nginx.conf和env.sh 这两个文件。先看nginx.conf配置文件
 1 worker_processes  1;
 2
 3 daemon off;
 4
 5 events {
 6     worker_connections  1024;
 7 }
 8
 9 http {
10     include       mime.types;
11     default_type  application/octet-stream;
12     access_log  /opt/logs/access.log;
13     sendfile        on;
14     keepalive_timeout  65;
15
16     server {
17         listen       80;
18         server_name  localhost;
19
20         location / {
21             root   /opt/html;
22             index  index.html index.htm;
23         }
24
25         error_page   500 502 503 504  /50x.html;
26         location = /50x.html {
27             root   html;
28         }
29     }
30 }
31
32 rtmp {
33     server {
34         listen 1935;
35         access_log /opt/logs/rtmp_access.log;
36         application rtmp{
37             live on;
38             notify_method get;
39             on_play http://127.0.0.1/on_play;
40             on_publish http://127.0.0.1/on_publish;
41             on_update http://127.0.0.1/on_update;
42             notify_update_timeout 120s;
43         }
44     }
45 }
这一份配置应该也不难理解,我之前的博客已经讲解到了。开启RTMP默认端口1935,对RTMP的推流端和拉流端进行验证,验证逻辑在on_play/on_publish/on_update 这几个URL里面。具体的逻辑,就可以通过HTTP服务器实现,默认是不验证的。
另外一份配置是env.sh 目前还不清楚Docker配置环境变量有什么好的方法,我用的比较笨的方法。
 1 #!/bin/sh
 2
 3 echo "ok" > /opt/html/healthcheck
 4 echo "ok" > /opt/html/on_play
 5 echo "ok" > /opt/html/on_publish
 6 echo "ok" > /opt/html/on_update
 7
 8 if [ 0"$NGINX_RTMP_URL_PLAY" = "0" ]; then
 9     echo "on_play"
10 else
11     sed -i "s#127.0.0.1/on_play#$NGINX_RTMP_URL_PLAY#g" /opt/conf/nginx.conf
12 fi
13 if [ 0"$NGINX_RTMP_URL_PUBLISH" = "0" ]; then
14     echo "on_publish"
15 else
16     sed -i "s#127.0.0.1/on_publish#$NGINX_RTMP_URL_PUBLISH#g" /opt/conf/nginx.conf
17 fi
18 if [ 0"$NGINX_RTMP_URL_UPDATE" = "0" ]; then
19     echo "on_update"
20 else
21     sed -i "s#127.0.0.1/on_update#$NGINX_RTMP_URL_UPDATE#g" /opt/conf/nginx.conf
22 fi
23
24 /opt/sbin/nginx
哈哈!就是通过环境变量来改变nginx.conf 配置,相比于官方的通过templates模版方式确实LOW很多啊。
1 version: '3'
2 services:
3     demo:
4         image: nginx-rtmp
5         ports:
6             - 1935:1935
构建、运行
1 docker build -t nginx-rtmp .
2 docker-compose up -d
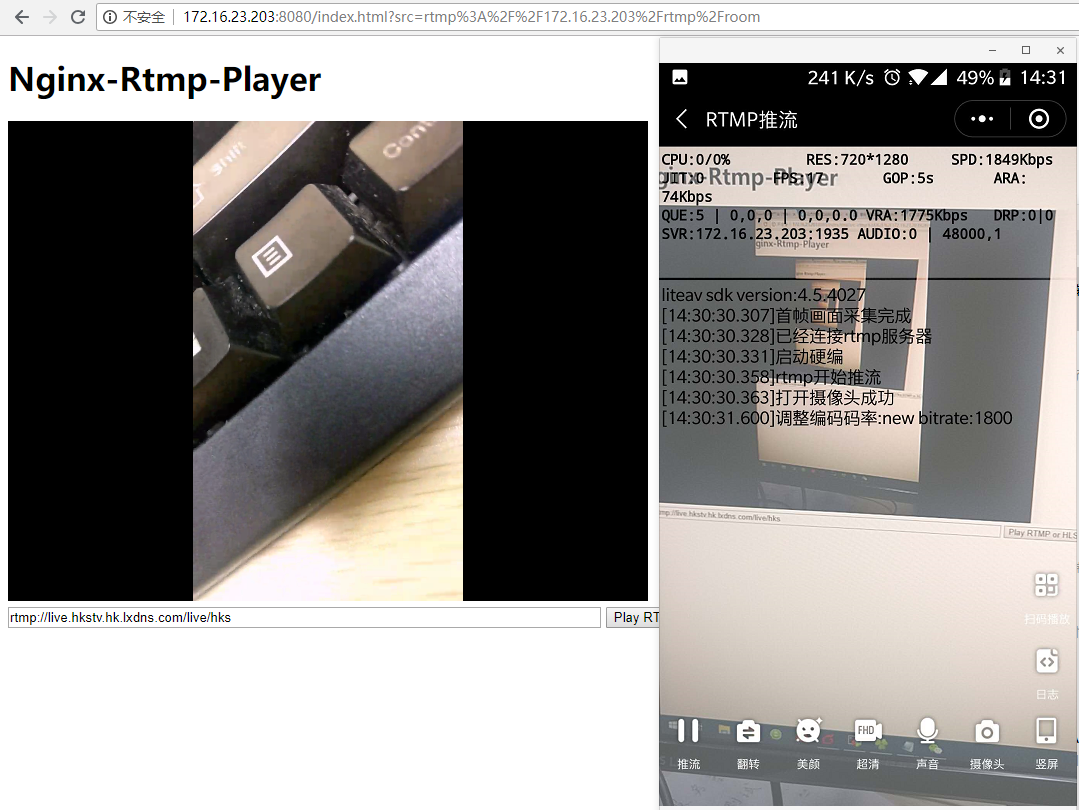
启动后,可以进行推流和拉流了,测试工具,推流可以使用微信小程序里的 腾讯视频云 进行推流。拉流可以用下面构建的RTMP-Player工具进行拉流。
2. 构建RTMP-Player镜像
这里我使用 GrindPlayer 工具,使用的是Flash。我打包成已经镜像,并上传至阿里云,有需要的可以通过链接进行pull下载,需要GrindPlayer工具源码的博文最后也给出下载地址,播放器Flash的在github.com上也有介绍。
Dockerfile
1 FROM nginx:1.14-alpine
2 COPY GrindPlayer /usr/share/nginx/html
3 EXPOSE 80
4 STOPSIGNAL SIGTERM
5 CMD ["nginx", "-g", "daemon off;"]
构建、上传阿里云Docker仓库
1 docker build -t rtmp-player .
2 docker tag rtmp-player:latest registry.cn-shenzhen.aliyuncs.com/wunaozai/rtmp-player:0.0.1
3 docker push registry.cn-shenzhen.aliyuncs.com/wunaozai/rtmp-player:0.0.1
3. 实际演示
利用docker-compose启动
 1 version: '3'
 2 services:
 3     nginx-rtmp:
 4         image: registry.cn-shenzhen.aliyuncs.com/wunaozai/nginx-rtmp
 5         ports:
 6             - 1935:1935
 7         environment:
 8             - NGINX_RTMP_URL_PLAY=127.0.0.1:80/on_play
 9             - NGINX_RTMP_URL_PUBLISH=127.0.0.1:80/on_publish
10             - NGINX_RTMP_URL_UPDATE=127.0.0.1:80/on_update
11
12     rtmp-player:
13         image: registry.cn-shenzhen.aliyuncs.com/wunaozai/rtmp-player
14         ports:
15             - 8080:80
启动后,我利用微信小程序RTMP推流,然后用这个RTMP-Player拉流,可以正常使用。完美!
4. 多说两句
这种视频类的应用,主要还是带宽问题。阿里云带宽收费又比较贵,哎~~。这个不说了。上面利用nginx-rtmp就架起了一个简单的基于HTTP认证的RTMP流媒体服务器。如果有多台电脑,就在多台电脑上,部署该nginx-rtmp应用,然后配置环境变量NGINX_RTMP_URL_*,这里的URL地址指向统一认证地址即可。假设客户端A,登录获取RTMP授权,得到rtmp://127.0.0.1/rtmp/room?token=123播放地址,然后在服务器L上进行推流,通过MQTT推送给客户端B,客户端B利用该URL地址进行拉流。如果需要多个客户端拉流,只需通过MQTT推送给多个客户端即可。
附件下载:
https://files.cnblogs.com/files/wunaozai/GrindPlayer.zip
参考资料:
https://github.com/nginxinc/docker-nginx/
https://www.cnblogs.com/wunaozai/p/9427730.html