Spring+SpringMVC
MVC呢,现在似乎越来越流行使用SpringMVC框架,我自己用的感觉,是非常好,确实很舒服,配置一开始是麻烦了一点点,但是后续的开发真的是很清爽!
SpringMVC配置文件
目录:resource/config/spring,文件名:spring-mvc.xml

 1 <?xml version="1.0" encoding="UTF-8"?>
 2 <beans xmlns="http://www.springframework.org/schema/beans"
 3        xmlns:xsi="http://www.w3.org/2001/XMLSchema-instance"
 4        xmlns:context="http://www.springframework.org/schema/context"
 5        xmlns:mvc="http://www.springframework.org/schema/mvc"
 6        xsi:schemaLocation="http://www.springframework.org/schema/beans http://www.springframework.org/schema/beans/spring-beans.xsd http://www.springframework.org/schema/context http://www.springframework.org/schema/context/spring-context.xsd http://www.springframework.org/schema/mvc http://www.springframework.org/schema/mvc/spring-mvc.xsd">
 7
 8     <!--自动扫描控制器-->
 9     <context:component-scan base-package="com.magic.rent.controller"/>
10     <!--视图渲染-->
11     <bean id="internalResourceViewResolver" class="org.springframework.web.servlet.view.InternalResourceViewResolver">
12         <property name="prefix" value="/WEB-INF/views/"/>
13         <property name="suffix" value=".jsp"/>
14     </bean>
15     <!--控制器映射器和控制器适配器-->
16     <mvc:annotation-driven/>
17 </beans>
Spring配置文件
目录:resource/config/spring,文件名:applicationContext-service.xml
额,这个应该属于Spring的配置文件,噗,之前忘了,就在这里一起补了吧。这个内容暂时比较少,就是Servicec层,以后如果还有什么内容,可以继续往这里填,比如加入什么工具或框架之类的。
<?xml version="1.0" encoding="UTF-8"?>
<beans xmlns="http://www.springframework.org/schema/beans"
       xmlns:xsi="http://www.w3.org/2001/XMLSchema-instance"
       xmlns:context="http://www.springframework.org/schema/context"
       xsi:schemaLocation="http://www.springframework.org/schema/beans
    http://www.springframework.org/schema/beans/spring-beans.xsd
    http://www.springframework.org/schema/context
    http://www.springframework.org/schema/context/spring-context.xsd">

    <!--扫描service-->
    <context:component-scan base-package="com.magic.rent.service"/>
    <!--注册统一异常控制-->
    <bean id="exception" class="com.magic.rent.exception.exhandler.CustomExceptionHandler"/>
</beans>
目录:resource/config/spring,文件名:applicationContext-transaction.xml
这个主要是用于事务。其中用到了AOP的配置,其他AOP配置可以参照这样的格式,但是AOP配置是有一点麻烦的,还是需要好好去看看Spring的文档再配置比较好的。
<?xml version="1.0" encoding="UTF-8"?>
<beans xmlns="http://www.springframework.org/schema/beans"
       xmlns:xsi="http://www.w3.org/2001/XMLSchema-instance" xmlns:tx="http://www.springframework.org/schema/tx"
       xmlns:aop="http://www.springframework.org/schema/aop"
       xsi:schemaLocation="http://www.springframework.org/schema/beans
       http://www.springframework.org/schema/beans/spring-beans.xsd
       http://www.springframework.org/schema/tx
       http://www.springframework.org/schema/tx/spring-tx.xsd
       http://www.springframework.org/schema/aop
       http://www.springframework.org/schema/aop/spring-aop.xsd">

    <bean id="dataSourceTransactionManager" class="org.springframework.jdbc.datasource.DataSourceTransactionManager">
        <property name="dataSource" ref="dataSource"/>
    </bean>

    <tx:advice id="txAdvice" transaction-manager="dataSourceTransactionManager">
        <tx:attributes>
      <--这部分,主要是根据方法名称来进行匹配限定,但是我们是用MyBatis自动生成的Mapper接口,所以在这边大家要按照MyBatis的命名规范来设置name的值。
            <tx:method name="select*" propagation="REQUIRED"/>
            <tx:method name="update*" propagation="REQUIRED"/>
            <tx:method name="delete*" propagation="REQUIRED"/>
            <tx:method name="insert*" propagation="REQUIRED"/>
        </tx:attributes>
    </tx:advice>
    <aop:config>
        <aop:advisor advice-ref="txAdvice" pointcut="execution(* com.magic.rent.service.*.*(..))"/>
    </aop:config>
</beans>
讲到这里,做一个小总结,其实到此为止,就是一个Spring+SpringMVC+MyBatis的整合,这个网上有很多这种类似的例子,这个也不会多难,到此为止,基本上也是简单的配置,配置文件其实没有多少复杂。
Spring统一异常处理
Spring框架自带了统一异常处理的功能,方法有三个,但是我只介绍一个,因为只有这个,才是生产上大多数的用法。
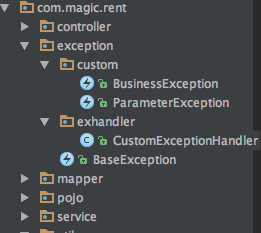
创建目录
━java
┗exception(这个类呢,是跟service、controller这些同级的,因为这个类中的Custom可以定义出非常详细的异常情况。)
┣custom(存放自定义的异常,用于实际业务层进行抛出)
┗exhandler(存放异常处理的控制器)
━webapp
┣WEB-INF
┣admin(管理页面)
┣error(存放错误页面)
┗views(存放普通页面)
如图:

创建异常类控制类
目录:com.magic.rent.exception.exhandler,文件名:CustomExceptionHandler.java
package com.magic.rent.exception.exhandler;

import com.magic.rent.exception.custom.BusinessException;
import com.magic.rent.exception.custom.ParameterException;
import org.springframework.stereotype.Service;
import org.springframework.web.servlet.HandlerExceptionResolver;
import org.springframework.web.servlet.ModelAndView;

import javax.servlet.http.HttpServletRequest;
import javax.servlet.http.HttpServletResponse;
import java.util.HashMap;
import java.util.Map;

public class CustomExceptionHandler implements HandlerExceptionResolver {

    public ModelAndView resolveException(HttpServletRequest httpServletRequest, HttpServletResponse httpServletResponse, Object o, Exception ex) {
        Map<String, Object> model = new HashMap<String, Object>();
        model.put("ex", ex);
        // 根据不同错误转向不同页面
        if (ex instanceof BusinessException) {
            return new ModelAndView("../error/business_error", model);
        } else if (ex instanceof ParameterException) {
            return new ModelAndView("../error/parameter_error", model);
        } else {
            return new ModelAndView("../error/404", model);
        }
    }
}
类中ModelAndView的地址,是“../error/xxx”,这么写是因为我们在SpringMVC配置“spring-mvc.xml”中的internalResourceViewResolver标签设置了前缀和后缀,默认前缀是从views文件夹开始访问页面,要改成error文件夹,就得写成这样子,当然这个类可以统一的再优化一下,比如把“../error/”抽出来统一设置。当然这边也可以改用Json的方式返回,而不是一定要跳转界面,改成Json或许更符合需求,毕竟现在多是用Ajax做交互。以后如果有改,我再贴代码上来。
写一个自定义异常范例
目录:com.magic.rent.exception.custom,文件名:BusinessException.java
 1 package com.magic.rent.exception.custom;
 2
 3 public class BusinessException extends RuntimeException {
 4     public BusinessException(String message) {
 5         super(message);
 6     }
 7
 8     public BusinessException(String message, Throwable cause) {
 9         super(message, cause);
10     }
11 }
其实也没什么内容,就继承一下,然后复写一下方法就好了。当然,根据自己的需求,可以自己增加内容。使用的是,也是非常容易,比如下面这个代码片段。不符合条件,就抛出异常,然后不断地通过方法向上抛不要try-Catch,最后就会被这个异常控制器捕捉。
 //如果查找不到用户信息,则抛出异常
        if (sysUsers == null) {
            throw new UsernameNotFoundException(
                    "UserDetailsService.userNotFount");
        }
