在前面的文章中,已经实现了“设置中心”第一栏的功能以及布局

本文地址:http://www.cnblogs.com/wuyudong/p/5936016.html,转载请注明出处。
自定义属性声明
接下来实现其他栏的布局和功能,由于它们之间的功能和布局类似,只是属性名称不同。所以本文在自定义控件的基础上实现自定义属性
首先参考标准控件的源码,这里选择TextView
源码路径为:D:adt-bundle-windows-x86_64_20140101sdkplatformsandroid-18data esvalues
打开本文件夹下的attrs.xml文件,找到下面的代码:
    <declare-styleable name="TextView">
        <!-- Determines the minimum type that getText() will return.
             The default is "normal".
             Note that EditText and LogTextBox always return Editable,
             even if you specify something less powerful here. -->
        <attr name="bufferType">
            <!-- Can return any CharSequence, possibly a
             Spanned one if the source text was Spanned. -->
            <enum name="normal" value="0" />
            <!-- Can only return Spannable. -->
            <enum name="spannable" value="1" />
            <!-- Can only return Spannable and Editable. -->
            <enum name="editable" value="2" />
        </attr>
        <!-- Text to display. -->
        <attr name="text" format="string" localization="suggested" />
        <!-- Hint text to display when the text is empty. -->
        <attr name="hint" format="string" />
于是我们也可以模仿关键节点,写出自定义属性,工程resvalues文件夹下新建attrs.xml文件,添加代码如下:
<?xml version="1.0" encoding="utf-8"?>
<resources>
    <declare-styleable name="com.wuyudong.mobilesafe.view.SettingItemView">
        <attr name="destitle" format="string"/>
        <attr name="desoff" format="string"/>
        <attr name="deson" format="string"/>
    </declare-styleable>
</resources>
构造方法中获取自定义属性值
接下来定义命名空间,也是参考android标准来写
<?xml version="1.0" encoding="utf-8"?>
<LinearLayout xmlns:android="http://schemas.android.com/apk/res/android"
……
mobilesafe替换掉原有android
com.wuyudong.mobilesafe必须这样编写,替换掉了android,代表当前应用自定义属性
xmlns:mobilesafe="http://schemas.android.com/apk/res/com.wuyudong.mobilesafe"
修改后的代码如下:
    <com.wuyudong.mobilesafe.view.SettingItemView
        xmlns:mobilesafe="http://schemas.android.com/apk/res/com.wuyudong.mobilesafe"
        android:id="@+id/siv_update"
        android:layout_width="match_parent"
        android:layout_height="wrap_content"
        mobilesafe:destitle="自动更新设置"
        mobilesafe:desoff="自动更新已关闭"
        mobilesafe:deson="自动更新已开启" >
    </com.wuyudong.mobilesafe.view.SettingItemView>
自定义属性值已经搞定,现在是SettingItemView类如何获取这些值?
在SettingItemView类的构造函数中调用initAttrs函数,然后通过initAttrs函数实现属性的返回。先通过一些小的实践来熟悉相关的API
   /**
     * 返回属性集合中自定义属性的属性值
     * @param attrs  构造方法中维护好的属性集合
     */
    private void initAttrs(AttributeSet attrs) {
        //获取属性的总个数
        Log.i(tag,"attrs.getAttributeCount(): " + attrs.getAttributeCount());
        //获取属性名称以及属性值
        for (int i = 0; i < attrs.getAttributeCount(); i++) {
            Log.i(tag, "name = " + attrs.getAttributeName(i));
            Log.i(tag, "value = " + attrs.getAttributeValue(i));
            Log.i(tag, "==================分割线======================");
        }
    }
运行项目后在Logcat中打印下面的日志信息:
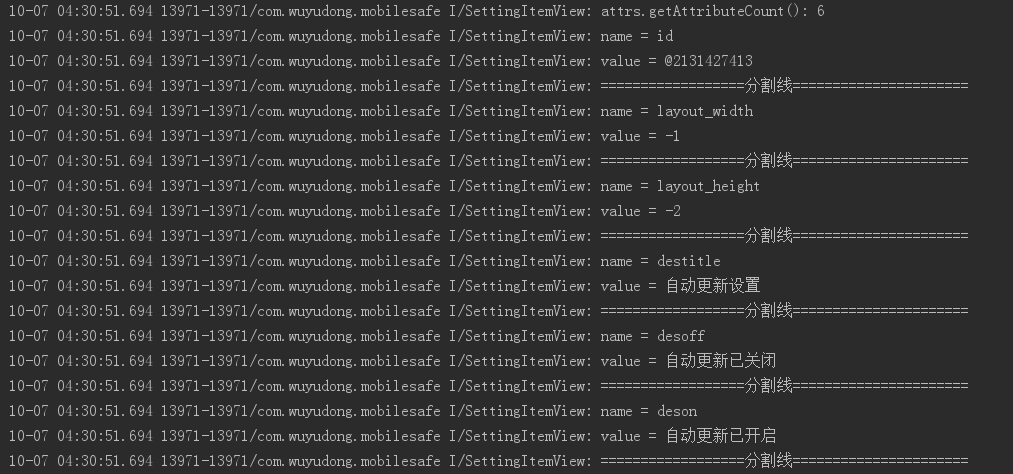
解释一下上面的部分代码:
value = @2131427413对应的十六进制值为:7F0B0055,其实就是对应的R文件中
public static final int siv_update=0x7f0b0055;
其他的都很简单
接着我们使用其他的API来进行获取属性的值
private static final String NAMESPACE = "http://schemas.android.com/apk/res/com.wuyudong.mobilesafe";
...........

 /**
     * 返回属性集合中自定义属性的属性值
     * @param attrs  构造方法中维护好的属性集合
     */
    private void initAttrs(AttributeSet attrs) {
     /*   //获取属性的总个数
        Log.i(tag,"attrs.getAttributeCount(): "+attrs.getAttributeCount());
        //获取属性名称以及属性值
        for (int i = 0; i < attrs.getAttributeCount(); i++) {
            Log.i(tag, "name = " + attrs.getAttributeName(i));
            Log.i(tag, "value = " + attrs.getAttributeValue(i));
            Log.i(tag, "==================分割线======================");
        }*/
        String destitle = attrs.getAttributeValue(NAMESPACE, "destitle");
        String desoff = attrs.getAttributeValue(NAMESPACE, "desoff");
        String deson = attrs.getAttributeValue(NAMESPACE, "deson");
        Log.i(tag, destitle);
        Log.i(tag, desoff);
        Log.i(tag, deson);
    }
运行项目后在Logcat中打印下面的日志信息:

说明已经成功获取所设置的属性值
这样就可以复用代码实现第二栏的电话归属地的布局
    <com.wuyudong.mobilesafe.view.SettingItemView
        xmlns:mobilesafe="http://schemas.android.com/apk/res/com.wuyudong.mobilesafe"
        android:id="@+id/siv_update"
        android:layout_width="match_parent"
        android:layout_height="wrap_content"
        mobilesafe:destitle="自动更新设置"
        mobilesafe:desoff="自动更新已关闭"
        mobilesafe:deson="自动更新已开启" >
    </com.wuyudong.mobilesafe.view.SettingItemView>

    <com.wuyudong.mobilesafe.view.SettingItemView
        xmlns:mobilesafe="http://schemas.android.com/apk/res/com.wuyudong.mobilesafe"
        android:layout_width="match_parent"
        android:layout_height="wrap_content"
        mobilesafe:destitle="电话归属地的显示设置"
        mobilesafe:desoff="归属地的显示已关闭"
        mobilesafe:deson="归属地的显示已开启" >
    </com.wuyudong.mobilesafe.view.SettingItemView>