最近在读陶辉的《深入理解Nginx:模块开发与架构解析》,一是想跟着大牛练练阅读和编写开源代码的能力,二是想学学Nginx优秀的架构设计,三是想找一个点深入下Linux下网络编程的细节。侯捷在他的《STL源码剖析》的自序里说过,“追踪一流作品并于其中吸取养分,远比自己关起门来写个三流作品,价值高得多”。我个人比较喜欢《深入理解Nginx》这本书,它讲解的很全面,相关的知识都会有所介绍,整体的脉络比较明晰。只是涉及东西比较多,有时真希望纸质文档也能像在线lxr那样给结构体和函数的使用处和定义做一个超链接,这样来回跳转查阅不会太麻烦。纸上得来终觉浅,绝知此事要躬行,读书的时候自然少不了实际地动手。这个系列的博文便是对学习过程的梳理和动手过程的记录。不过虽希望成“系列”,限于时间和精力,以及对nginx刚刚上手,我很难保证下一篇什么时候能写好,还请谅解。
另外,原书对实际动手时遇到的一些细节问题已有提及,我便不再赘述。如无特殊提示和说明,代码均为原书上的代码。
一、安装与配置
首先需要安装Nginx要用到或者可能用到的软件:GCC、pcre、zlib、OpenSSL。由于原书使用yum直接安装,我又懒得在旧版(10.04)的Ubuntu下折腾安装包,因此直接搞了个Fedora19虚拟机也就能直接用yum了。虽然看上去也挺麻烦,其实也不过是下下ISO镜像、配配vim、搞个文件共享而已,轻车熟路。另外要注意的是:
我的Fedora19不带fastest-mirror,最好先装下这个yum的插件,不然后面的下载可能会慢死人不偿命;
如果系统不带C库手册,为了便于编码时查阅C库函数,请yum install man-pages。
配置过程包括Linux内核参数优化(/etc/sysctl.conf)、Nginx源码配置(可以直接下载、解压、configure、make、make install)、nginx.conf的配置,照着原书上的来就是,nginx.conf的具体实践留给下文。不过你可以借机照着原书学学configure文件的写法,这可是Linux下的一项通用技能。
另外为了方便使用,我建立了个软链接:先删除/usr/bin/nginx,然后ln -s /usr/local/nginx/sbin/nginx /usr/bin/nginx。
二、HelloWorld的实现
Nginx封装了一些数据结构,了解下即可,马上就要用到。跟随第三章的思路,要知道如何将自己写的模块编译进Nginx:最简单且不易出错的方法是编写config文件,其中包括模块名称、所有的模块名称(使用递归赋值)、模块源代码路径,原书的例子:


ngx_addon_name=ngx_http_mytest_module
HTTP_MODULES="$HTTP_MODULES ngx_http_mytest_module"
NGX_ADDON_SRCS="$NGX_ADDON_SRCS $ngx_addon_dir/ngx_http_mytest_module.c"
然后用C语言编写模块源码。书中介绍了几个数据结构和函数,经过梳理,它们的关系是这样的:
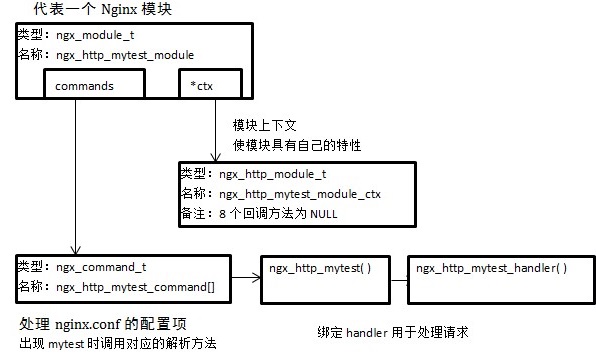
它们完成任务的具体过程和编码实现原书上都有(一些数据传递如HTTP请求的解析、数据传递是由Nginx的HTTP框架完成的,在模块代码中并未体现),整合到源码的对应目录下(和config一致,这里是nginx-1.4.2/my_module/helloword/)的ngx_http_mytest_module.c文件中即可。记得添加头文件ngx_config.h、ngx_core.h和ngx_http.h:
#include <ngx_config.h>
#include <ngx_core.h>
#include <ngx_http.h>

static char* ngx_http_mytest(ngx_conf_t *cf,ngx_command_t *cmd, void *conf);
static ngx_int_t ngx_http_mytest_handler(ngx_http_request_t *r);

static char* ngx_http_mytest(ngx_conf_t *cf,ngx_command_t *cmd, void *conf)
{
    ngx_http_core_loc_conf_t *clcf;
    clcf = ngx_http_conf_get_module_loc_conf(cf,ngx_http_core_module);
    clcf->handler = ngx_http_mytest_handler;
    return NGX_CONF_OK;
}

static ngx_command_t ngx_http_mytest_commands[] = {
    {
        ngx_string("mytest"),
        NGX_HTTP_MAIN_CONF|NGX_HTTP_SRV_CONF|NGX_HTTP_LOC_CONF|NGX_HTTP_LMT_CONF|NGX_CONF_NOARGS,
        ngx_http_mytest,
        NGX_HTTP_LOC_CONF_OFFSET,
        0,
        NULL },
    ngx_null_command
};

static ngx_http_module_t ngx_http_mytest_module_ctx = {
    NULL,
    NULL,
    NULL,
    NULL,

    NULL,
    NULL,
    NULL,
    NULL
};

ngx_module_t ngx_http_mytest_module = {
    NGX_MODULE_V1,
    &ngx_http_mytest_module_ctx,
    ngx_http_mytest_commands,
    NGX_HTTP_MODULE,
    NULL,
    NULL,
    NULL,
    NULL,
    NULL,
    NULL,
    NULL,
    NGX_MODULE_V1_PADDING
};

static ngx_int_t ngx_http_mytest_handler(ngx_http_request_t *r)
{
    if(!(r->method & (NGX_HTTP_GET|NGX_HTTP_HEAD))) {
        return NGX_HTTP_NOT_ALLOWED;
    }

    ngx_int_t rc = ngx_http_discard_request_body(r);
    if(rc!=NGX_OK) {
        return rc;
    }

    ngx_str_t type = ngx_string("text/plain");
    ngx_str_t response = ngx_string("Hello World!");
    r->headers_out.status = NGX_HTTP_OK;
    r->headers_out.content_length_n = response.len;
    r->headers_out.content_type = type;

    rc = ngx_http_send_header(r);
    if(rc == NGX_ERROR || rc> NGX_OK || r->header_only) {
        return rc;
    }

    ngx_buf_t *b;
    b = ngx_create_temp_buf(r->pool,response.len);
    if(b==NULL) {
        return NGX_HTTP_INTERNAL_SERVER_ERROR;
    }
    ngx_memcpy(b->pos,response.data,response.len);
    b->last = b->pos + response.len;
    b->last_buf = 1;

    ngx_chain_t out;
    out.buf = b;
    out.next = NULL;
    return ngx_http_output_filter(r,&out);
}
最后一步是修改nginx.conf配置,为http块中增加一个对应于mytest模块的location块:
location /test {
        mytest;
}
这里有几点需要注意的,我在这里折腾了不少时间:
1.原书中写的是Location,其实应该是location;
2.如果之前make install过,此时修改源码的nginx.conf,那么只能复制到/usr/local/nginx/conf/nginx.conf.default,而不是nginx.conf,这时启动nginx是不能生效的。这一点可以从Makefile文件中推断出来,解决办法是make install后将nginx.conf.default覆盖nginx.conf,或者直接修改/usr/local/nginx/conf/nginx.conf。
此时启动nginx,在终端输入
curl http://localhost/test
就可以看到Hello World!了。
其实你会发现,对于http://localhost/test/*,*表示任意字符串,都能获得Hello World!的结果。