1.首先使用vue create my_project 构建一个自己的Vue项目
2.vue.config.js和package.json配置如下,做了些修改
const path = require('path')
module.exports = {
publicPath: '/',
outputDir: 'dist',
devServer: {
port: 9981,
open: true,
overlay: {
warnings: false,
errors: true
},
// lintOnSave: false
},
productionSourceMap: false,
configureWebpack: {
performance: {
hints: false
}
},
// 修改 pages 入口
pages: {
index: {
entry: 'examples/main.js', // 入口
template: 'public/index.html', // 模板
filename: 'index.html' // 输出文件
}
},
// 扩展 webpack 配置
chainWebpack: config => {
// @ 默认指向 src 目录,这里要改成 examples
// 另外也可以新增一个 ~ 指向 packages
config.resolve.alias
.set('@', path.resolve('examples'))
.set('~', path.resolve('packages'))
// 把 packages 和 examples 加入编译,因为新增的文件默认是不被 webpack 处理的
config.module
.rule('js')
.include.add(/packages/).end()
.include.add(/examples/).end()
.use('babel')
.loader('babel-loader')
.tap(options => {
// 修改它的选项...
return options
})
}
}
2.package.json:
{
"name": "shr-ui",
"version": "0.1.2",
"private": false,
"main": "lib/shr-ui.umd.js",
"style": "lib/shr-ui.css",
"files": [
"packages",
"lib",
"src"
],
"scripts": {
"dev": "vue-cli-service serve",
"build": "vue-cli-service build",
"lint": "vue-cli-service lint",
"docs:dev": "vuepress dev docs",
"docs:build": "vuepress build docs",
"lib": "vue-cli-service build --target lib --name shr-ui --dest lib packages/index.js"
},
"dependencies": {
"core-js": "^2.6.5",
"vue": "^2.6.10"
},
"devDependencies": {
"@vue/cli-plugin-babel": "^3.7.0",
"@vue/cli-plugin-eslint": "^3.7.0",
"@vue/cli-service": "^3.7.0",
"babel-eslint": "^10.0.1",
"babel-plugin-component": "^1.1.1",
"eslint": "^5.16.0",
"eslint-plugin-vue": "^5.0.0",
"less": "^3.9.0",
"less-loader": "^5.0.0",
"node-sass": "^5.0.0",
"sass-loader": "^10.1.0",
"vue-template-compiler": "^2.5.21",
"vuepress": "^0.14.11"
},
"eslintConfig": {
"root": true,
"env": {
"node": true
},
"extends": [
"plugin:vue/essential",
"eslint:recommended"
],
"rules": {},
"parserOptions": {
"parser": "babel-eslint"
}
},
"postcss": {
"plugins": {
"autoprefixer": {}
}
},
"browserslist": [
"> 1%",
"last 2 versions"
]
}
3.新建两个文件夹,一个叫packages和src文件,用于后期存储组件和公用方法
4.packages下这样写:index.js==>>
import ShrButton from "./button";
import { resolvingDate } from "../src/utils"
// 所有组件列表
const components = [ShrButton];
// 定义 install 方法,接收 Vue 作为参数
const install = function (Vue) {
// 判断是否安装,安装过就不继续往下执行
if (install.installed) return;
install.installed = true;
// 遍历注册所有组件
components.map(component => Vue.component(component.name, component));
// 下面这个写法也可以
// components.map(component => Vue.use(component))
Vue.prototype.$resolvingDate = resolvingDate;
};
// 检测到 Vue 才执行,毕竟我们是基于 Vue 的
if (typeof window !== "undefined" && window.Vue) {
install(window.Vue);
}
export {
install,
ShrButton,
// function
resolvingDate
}
export default {
install,
ShrButton,
};
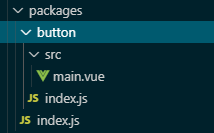
结构如图:
5.button/index.js==>
// 为组件提供 install 方法,供组件对外按需引入
import ShrButton from "./src/main";
ShrButton.install = Vue => {
Vue.component(ShrButton.name, ShrButton);
};
export default ShrButton;
6.src/main.vue == >
<template>
<div class="button_div">
<el-button type="primary" :loading="loadingbutton" @click="handleClick"
><slot></slot
></el-button>
</div>
</template>
<script>
export default {
name: "ShrButton",
props: {
time: {
type: Number,
default: 2000,
},
},
data() {
return {
loadingbutton: false,
};
},
methods: {
handleClick() {
if (this.loadingbutton) return;
this.loadingbutton = true;
setTimeout(() => {
this.loadingbutton = false;
}, this.time);
this.$emit("click");
},
},
};
</script>
<style lang="scss" scoped>
.button_div {
display: inline;
}
</style>
优点:这样就分装好了一个延时按钮,每次点击都会有一个防抖事件,达到不会连续点击连续出发后台接口等
分装好久执行 npm run lib命令就会自动打包好lib文件,最后要发到npm的。
打包好之后再执行,npm login ,然后再执行npm publish。就成功上传到了npm上啦。我们再看看在项目中怎么使用吧。
首先npm install shr-ui就可以下载我们的组件,然后引入

这是通过Vue.use全局注册的方法,也可以和element-ui一样的按需引入的方法

好了,分装组件并上传到npm上,并下载应用到项目,就此结束。欢迎有问题的小伙伴提出提问!