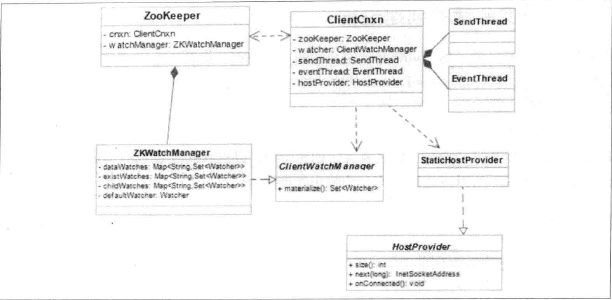
客户端是开发人员使用Zookeeper的主要的途径,以下内容将对Zookeeper的内部原理进行详细的学习和讲解。ZooKeeper的客户端主要有一下几个核心组件组成:
- Zookeeper:提供客户端访问ZooKeeper服务器的API.
- ClientWatchManager:负责管理客户端注册的Watcher.
- HostProvider:客户端地址列表管理器。
- ClientCnxn:客户端核心线程,其内部包含连个线程及SendThread和EvnentThread。SendThread是一个IO线程主要负责客户端和服务端之间的网络通信;后者是一个事件处理线程,主要负责对服务端时间进行处理。
客户端的整体架构如下:
实例
下面使用具体的实例结合源码来分析Zookeeper源码创建的过程:如下代码是一个单例的ZooKeeperSupport可以用来回去Zookeeper客户端对象:


 1 public class ZookeeperSupport {
 2     private static volatile ZooKeeper zooKeeper = null; // zookeeper连接,在初始化zk配置时设置
 3     public static final Integer zooKeeperLock = new Integer(1);
 4     public static boolean isUseZk = true; // 是否使用zk,默认使用,当zk连接发生异常时不再使用
 5     public static final long ZK_CONNECT_TIMEOUT = 1L; //zk连接的超时时间设置,单位为秒
 6
 7     public static ZooKeeper getZooKeeper() {
 8         // 如果zookeeper为null 或者连接不可用,则重新获取连接,一般情况下,不会触发
 9         if (zooKeeper == null || !zooKeeper.getState().isAlive()) {
10             synchronized (zooKeeperLock) {
11                 // 如果发现zk不再使用,则不再创建新的zk,直接返回
12                 if (isUseZk) {
13                     if (zooKeeper == null || !zooKeeper.getState().isAlive()) {
14                         try {
15                             zooKeeper = createNewZookeper();
16                         } catch (Exception e) {
17                             Constant.log_cron.error("[initZkConfig] error happen where new zookeeper", e);
18                         }
19                     }
20                 }
21             }
22         }
23         return zooKeeper;
24     }
25
26     public static void setZooKeeper(ZooKeeper zooKeeper) {
27         ZookeeperSupport.zooKeeper = zooKeeper;
28     }
29
30     /**
31      * zookeeper启动时,异步启动两个线程,所以new之后并不代表连接已经建立,此时如果调用zk的一些方法会抛ConnectionLoss的异常
32      * 为了避免这种情况,封装new方法,每次new的时候去等待连接已经建立才做后面的步骤
33      *
34      * @return
35      * @throws Exception
36      */
37     public static ZooKeeper createNewZookeper() throws Exception {
38         CountDownLatch connectedLatch = new CountDownLatch(1);
39         ZooKeeper zooKeeper = new ZooKeeper(ZKConfig.getInstance().getConnectUrl(), ZKConfig.getInstance().getTimeout(), new DefaultWatcher(connectedLatch));
40         if (States.CONNECTING == zooKeeper.getState()) {
41             boolean ret = connectedLatch.await(ZK_CONNECT_TIMEOUT, TimeUnit.SECONDS);
42             // 如果等待超时了,还没有收到连接成功的通知,则说明zk不可用,直接不用zk,并报警
43             if(!ret){
44                 isUseZk = false;
45             }
46         }
47         return zooKeeper;
48     }
49 }
为了使用Zookeeper服务,必需创建一个Zookeeper类的对象。在创建Zookeeper类的对象时客户端Session的建立是一个异步的过程,构造方法可能会在回话完成建立完成前立即返回,构造方法中的Watcher就是处理连接状态通知的接口。下面给出了DefaultWatcher实现:
 1 public class DefaultWatcher implements Watcher {
 2     private CountDownLatch connectedLatch;
 3     public DefaultWatcher(CountDownLatch connectedLatch) {
 4         this.connectedLatch = connectedLatch;
 5     }
 6     // 监控所有被触发的事件
 7     @Override
 8     public void process(WatchedEvent event) {
 9         if (connectedLatch != null && event.getState() == KeeperState.SyncConnected) {
10             connectedLatch.countDown();
11         }
12     }
13 }
源码分析
Zookeeper类一共有9个构造函数,具体参数的意义如下:
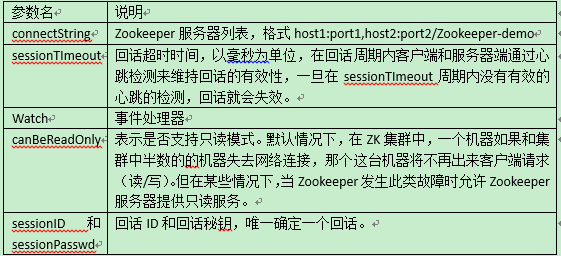
由上面的实例可知,在创建Zookeeper对象时最终调用了如下的构造函数:
 1 可以看到上面的实例中最终调用了这个构造方法:
 2 public ZooKeeper(String connectString, int sessionTimeout, Watcher watcher,
 3             boolean canBeReadOnly, HostProvider aHostProvider,
 4             ZKClientConfig clientConfig) throws IOException {
 5         if (clientConfig == null) {
 6             clientConfig = new ZKClientConfig();
 7         }
 8         this.clientConfig = clientConfig;
 9         //1.初始化watcherManger
10         watchManager = defaultWatchManager();
11         //2.为watchManager设置设置默认的Watcher
12         watchManager.defaultWatcher = watcher;
13         //3.解析服务器串
14         ConnectStringParser connectStringParser = new ConnectStringParser(
15                 connectString);
16         hostProvider = aHostProvider;
17         //4.创建ClientCnxn对象,并启动
18         cnxn = new ClientCnxn(connectStringParser.getChrootPath(),
19                 hostProvider, sessionTimeout, this, watchManager,
20                 getClientCnxnSocket(), canBeReadOnly);
21         cnxn.start();
22 }
根据如上源码可知在初始化Zookeeper对象时主要做了三件事情:
- 初始化ZKWatcherManager
- 解析服务器串,并初始化hostprovider
- 初始化并启动ClientCnxn
1.初始化ZKWatcherManager
下面针对上面三个步骤注意分析。WatchManager主要负责管理客户端注册的Wathcr。首先看看 defaultWatchManager()方法,
1  protected ZKWatchManager defaultWatchManager() {
2         return new ZKWatchManager(getClientConfig().getBoolean(ZKClientConfig.DISABLE_AUTO_WATCH_RESET));
3     }
该方法创建了一个ZKWatchManager对象, ZKWatchManager实现了ClientWatchManager接口,ClientWatchManager接口只有一个materialize()方法,该方法根据keeperState、eventType和path返回应该被通知的Watcher集合。其声明如下:
public interface ClientWatchManager {
    public Set<Watcher> materialize(Watcher.Event.KeeperState   state,
        Watcher.Event.EventType type, String path);
}
接下来看看ZKWatchManager的实现,在ZKWatchManager中包含了五个属性:
1 private final Map<String, Set<Watcher>> dataWatches =new HashMap<String, Set<Watcher>>();
2 private final Map<String, Set<Watcher>> existWatches =new HashMap<String, Set<Watcher>>();
3 private final Map<String, Set<Watcher>> childWatches =new HashMap<String, Set<Watcher>>();
4 private boolean disableAutoWatchReset;//用于禁止在Client重连是在服务端重建watch
5 protected volatile Watcher defaultWatcher;//默认的watcher
在ZKWatchManager中最重要的方法是materialize()方法,下面结合源码进行分析:
public Set<Watcher> materialize(Watcher.Event.KeeperState state, Watcher.Event.EventType type,String clientPath){
            //用于存储返回结果
            Set<Watcher> result = new HashSet<Watcher>();
            //根据EventType进行不同的操作
            switch (type) {
            case None:
                //将defaultWatcher返回
                result.add(defaultWatcher);
                //如果KeeperState不是SyncConnected,并且disableAutoWatchReset为true返回所有的watcher,并清空
                boolean clear = disableAutoWatchReset && state != Watcher.Event.KeeperState.SyncConnected;
                synchronized(dataWatches) {
                    for(Set<Watcher> ws: dataWatches.values()) {
                        result.addAll(ws);
                    }
                    if (clear) {
                        dataWatches.clear();
                    }
                }

                synchronized(existWatches) {
                    for(Set<Watcher> ws: existWatches.values()) {
                        result.addAll(ws);
                    }
                    if (clear) {
                        existWatches.clear();
                    }
                }

                synchronized(childWatches) {
                    for(Set<Watcher> ws: childWatches.values()) {
                        result.addAll(ws);
                    }
                    if (clear) {
                        childWatches.clear();
                    }
                }
                return result;
            //如果EventType是NodeDataChanged或者NodeCreated,将dataWatches和existWatches
            case NodeDataChanged:
            case NodeCreated:
                synchronized (dataWatches) {
                    addTo(dataWatches.remove(clientPath), result);
                }
                synchronized (existWatches) {
                    addTo(existWatches.remove(clientPath), result);
                }
                break;
            //如果EventType是NodeChildrenChanged,将childWatches返回
            case NodeChildrenChanged:
                synchronized (childWatches) {
                    addTo(childWatches.remove(clientPath), result);
                }
                break;
            //如果EventType是NodeDeleted,将dataWatches返回
            case NodeDeleted:
                synchronized (dataWatches) {
                    addTo(dataWatches.remove(clientPath), result);
                }
                synchronized (existWatches) {
                    Set<Watcher> list = existWatches.remove(clientPath);
                    if (list != null) {
                        addTo(existWatches.remove(clientPath), result);
                    }
                }
                synchronized (childWatches) {
                    addTo(childWatches.remove(clientPath), result);
                }
                break;
            default:
                throw new RuntimeException(msg);
            }
            return result;
        }
}
在看了ZKWatcherManager代码之后,那么产生一个疑问Watcher是在什么时候添加到ZKWatcherManager中的,以Zookeeper接口中的getData()为例:
public void getData(final String path, Watcher watcher,DataCallback cb, Object ctx){
     …
     //在此处创建了WatchRegistration对象
     WatchRegistration wcb = null;
     if (watcher != null) {
            wcb = new DataWatchRegistration(watcher, clientPath);
     }

        …
     //调用clientCnxn的queuePacket方法
cnxn.queuePacket(h,newReplyHeader(),request,response,cb,clientPath,serverPath, ctx, wcb);
}
从上面可以看到在getData()方法中中创建了一个DataWatchRegistration对象,接下来再分析一下DataWatchRegistration。DataWatchRegistration继承了WatchRegistration类,WatchRegistration有一个抽象方法如下:
1 abstract protected Map<String, Set<Watcher>> getWatches(int rc);
该方法从ZKWatcherManager中获取一个合适的Map。除此之外还有个register方法,真正的向ZKWatcherManager中注册Watcher,其具体代码如下:
 public void register(int rc) {
            if (shouldAddWatch(rc)) {
                Map<String, Set<Watcher>> watches = getWatches(rc);
                synchronized(watches) {
                    Set<Watcher> watchers = watches.get(clientPath);
                    if (watchers == null) {
                        watchers = new HashSet<Watcher>();
                        watches.put(clientPath, watchers);
                    }
                    watchers.add(watcher);
                }
            }
}
现在再看一下DataWatchRegistration中是如何实现getWatches(int rc)方法:
protected Map<String, Set<Watcher>> getWatches(int rc) {
            return watchManager.dataWatches;
}
在DataWatchRegistration中直接返回了watchManager.dataWatches register()方法在finishPacket会调用。
2.ClinetCnxn的创建
在Zookeeper的构造函数中,创建并启动ClientCnxn的代码如下:
cnxn = new ClientCnxn(connectStringParser.getChrootPath(),
                hostProvider, sessionTimeout, this, watchManager,
                getClientCnxnSocket(), canBeReadOnly);
cnxn.start();
在构造方法中调用的getClientCnxnSocket()方法,该方法根据系统配置创建一个ClientCnxnSocket对象,具体代码如下:
 1 private ClientCnxnSocket getClientCnxnSocket() throws IOException {
 2         String clientCnxnSocketName = getClientConfig().getProperty(
 3                 ZKClientConfig.ZOOKEEPER_CLIENT_CNXN_SOCKET);
 4         //默认使用ClientCnxnSocketNIO
 5 if (clientCnxnSocketName == null) {
 6             clientCnxnSocketName = ClientCnxnSocketNIO.class.getName();
 7         }
 8         try {
 9             //反射获取构造函数
10             Constructor<?> clientCxnConstructor = Class.forName(clientCnxnSocketName).
11 getDeclaredConstructor(ZKClientConfig.class);
12                 //创建对象
13             ClientCnxnSocket clientCxnSocket = (ClientCnxnSocket) clientCxnConstructor.
14 newInstance(getClientConfig());
15             return clientCxnSocket;
16         } catch (Exception e) {
17             IOException ioe = new IOException("Couldn't instantiate "
18                     + clientCnxnSocketName);
19             ioe.initCause(e);
20             throw ioe;
21         }
22     }
接下来看一下ClientCnxn的构造方法:
public ClientCnxn(String chrootPath, HostProvider hostProvider, int sessionTimeout, ZooKeeper zooKeeper,ClientWatchManager watcher, ClientCnxnSocket clientCnxnSocket,
      long sessionId, byte[] sessionPasswd, boolean canBeReadOnly) {
        …
        connectTimeout = sessionTimeout / hostProvider.size();
        readTimeout = sessionTimeout * 2 / 3;
        …
        //初始化sendThread和EventThread
        sendThread = new SendThread(clientCnxnSocket);
        eventThread = new EventThread();
        this.clientConfig=zooKeeper.getClientConfig();
}
关于sendThread和EventThread暂时先不分析,接下来看看ClientCnxn的start()方法,该方法主要用于启动sendThread线程和eventThread线程。
1 public void start() {
2         sendThread.start();
3         eventThread.start();
4 }
EventThread
EventThread:主要用于处理Zookeeper客户端的各种事件,需要注意的是EventThread是一个守护线程。在EventThread内部主要包含以下几个属性:
1     //保存一个待处理的时间的队列
2     final LinkedBlockingQueue<Object> waitingEvents =new LinkedBlockingQueue<Object>();
3     private volatile KeeperState sessionState = KeeperState.Disconnected;
4     private volatile boolean wasKilled = false;// 判断EventThread是否被杀掉
5     private volatile boolean isRunning = false;//判断EventThread是否还在运行
同时在EventThread内部有几个方法将不同待处理事件添加到waitingEvents,这些方法我们暂时不做分析。接下来看看EventThread的run()方法:
 1 public void run() {
 2            try {
 3               isRunning = true;
 4               while (true) {
 5                  //从任务队列中取出待处理任务
 6                  Object event = waitingEvents.take();
 7                  if (event == eventOfDeath) {
 8                     wasKilled = true;
 9                  } else {
10                     //处理事务
11                     processEvent(event);
12                  }
13                  if (wasKilled)
14                     synchronized (waitingEvents) {
15                        if (waitingEvents.isEmpty()) {
16                           isRunning = false;
17                           break;
18                        }
19                     }
20               }
21            } catch (InterruptedException e) {
22             …
23            }
24             …
25 }
processEvent()方法比较简单,就是调用相应的对象执行相应的处理。
SendThread
SendThread主要负责客户端与服务器端的IO和心跳消息。SendThread主要包含以下四个属性:
private long lastPingSentNs;//记录上一次心跳发送时间
private final ClientCnxnSocket clientCnxnSocket;//在ClientCnxn构造时传入的
private Random r = new Random(System.nanoTime());
private boolean isFirstConnect = true;
SendThread的构造方法如下:
SendThread(ClientCnxnSocket clientCnxnSocket) {
    uper(makeThreadName("-SendThread()"));
    state = States.CONNECTING;//将ClientCnxn中state由Not_connected设置为CONNECTING
    this.clientCnxnSocket = clientCnxnSocket;
    etDaemon(true);//设置为守护线程
}
接下来看看SendThread的run方法,其中这段代码比较长先进行逐一分析:
clientCnxnSocket.introduce(this, sessionId, outgoingQueue);
clientCnxnSocket.updateNow();
clientCnxnSocket.updateLastSendAndHeard();
int to;
long lastPingRwServer = Time.currentElapsedTime();
final int MAX_SEND_PING_INTERVAL = 10000; //10 seconds
接下来进入While循环,在循环的第一部分判断socket连接是否建立,如果没有建立就建立连接,改代码主要如下
if (!clientCnxnSocket.isConnected()) {
    // don't re-establish connection if we are closing
    if (closing) {
      break;
    }
    startConnect();
    lientCnxnSocket.updateLastSendAndHeard();
 }
进入startConnect继续跟踪,发现startConnect()最终调用了ClientCnxnSocketNIO的connect方法,在connect()方法内部先调用了createSock()方法创建一个Sockect对象,其具体实现如下:
SocketChannel createSock() throws IOException {
        SocketChannel sock;
        sock = SocketChannel.open();
        sock.configureBlocking(false);
        sock.socket().setSoLinger(false, -1);
        sock.socket().setTcpNoDelay(true);
        return sock;
}
接下来connect()方法继续调用registerAndConnect,该方法真正的向服务器端建立连接:
void registerAndConnect(SocketChannel sock, InetSocketAddress addr)
    throws IOException {
        sockKey = sock.register(selector, SelectionKey.OP_CONNECT);
        boolean immediateConnect = sock.connect(addr);
        if (immediateConnect) {
            sendThread.primeConnection();
        }
}
可以看到在registerAndConnect方法中又调用了SendThread的primeConnection()方法,在primeConnection()方法中主要初始化Session、Watch和权限信息,同时注册ClientCnxnSocketNIO对读时间和写时间的监听。继续回到SendThread的run()方法。接下来继续判断连接状态,如果是state.isConnected()会进行一系列的操作,其中最重要的是调用sendPing()方法和clientCnxnSocket.doTransport(to, pendingQueue, ClientCnxn.this);,再此主要分析一下doTransport()方法,
 1 void doTransport(int waitTimeOut, List<Packet> pendingQueue, ClientCnxn cnxn)
 2             throws IOException, InterruptedException {
 3         selector.select(waitTimeOut);
 4         Set<SelectionKey> selected;
 5         synchronized (this) {
 6             selected = selector.selectedKeys();
 7         }
 8         updateNow();
 9         for (SelectionKey k : selected) {
10             SocketChannel sc = ((SocketChannel) k.channel());
11             //如果是连接事件
12             if ((k.readyOps() & SelectionKey.OP_CONNECT) != 0) {
13                 if (sc.finishConnect()) {
14                     updateLastSendAndHeard();
15                     updateSocketAddresses();
16                     sendThread.primeConnection();
17                 }
18             }
19             //如果是读写事件
20              else f((k.readyOps() & (SelectionKey.OP_READ | SelectionKey.OP_WRITE)) != 0) {
21                 doIO(pendingQueue, cnxn);
22             }
23         }
24         if (sendThread.getZkState().isConnected()) {
25             if (findSendablePacket(outgoingQueue,
26                     sendThread.tunnelAuthInProgress()) != null) {
27                 enableWrite();
28             }
29         }
30         selected.clear();
31 }
可以看到最重要的方法是doIO(),在doIO()方法中主要进行读写操作.继续回到SendThread的run方法,看看run()方法在结束时做什么工作,在run()方法,跳出while循环时代码如下
synchronized (state) {
                // When it comes to this point, it guarantees that later queued
                // packet to outgoingQueue will be notified of death.
                cleanup();
            }
            //调用selector.close()
            clientCnxnSocket.close();
            if (state.isAlive()) {
                //添加Disconnected事件
                eventThread.queueEvent(new WatchedEvent(Event.EventType.None,
                        Event.KeeperState.Disconnected, null));
}
在SendThread的run()结束前很重要的一步操作是调用cleanup()方法:
 1 private void cleanup() {
 2             //关闭网络连接
 3 clientCnxnSocket.cleanup();
 4             synchronized (pendingQueue) {
 5                 //遍历pendingQueue,执行conLossPacket
 6                 for (Packet p : pendingQueue) {
 7                     conLossPacket(p);
 8                 }
 9                 //清除pendingQueue
10                 pendingQueue.clear();
11             }
12             // We can't call outgoingQueue.clear() here because
13             // between iterating and clear up there might be new
14             // packets added in queuePacket().
15             Iterator<Packet> iter = outgoingQueue.iterator();
16             while (iter.hasNext()) {
17                 Packet p = iter.next();
18                 conLossPacket(p);
19                 iter.remove();
20             }
21 }
在cleanUp方法中最主要的是循环和遍历pendingQueue和outgoingQueue,并针对两个队列中每一个Packet调用conLossPacket(p)方法,最后清空两个队列,现在具体看一看conLossPacket(p)中具体做了什么事情,在conLossPacket(p)主要调用了finishPacket(p),现在进finishPacket(p)方法进行分析:
private void finishPacket(Packet p) {
        int err = p.replyHeader.getErr();
        //watcher的注册于取消注册
        ….
        //判断是否有异步的回调,如果没有将finished设置为true,唤醒所有等待的事件
        if (p.cb == null) {
            synchronized (p) {
                p.finished = true;
                p.notifyAll();
            }
        } else {
        //有异步回调,将finished设置为true,并将packet加入到EventThread的队列
            p.finished = true;
            eventThread.queuePacket(p);
        }
}
至此真个Zookeeper连接的建立过程就完成了。