1.概述
一个运行中的Elasticsearch实例称为一个节点(node),而集群是由一个或者多个拥有相同cluster.name配置的节点组成,它们共同承担数据和负载的压力。当有节点加入集群中或者从集群中移除节点时,集群将会重新平均分布所有的数据。
如一个节点被选举成为主节点时,它将负责管理集群范围内的所有变更,例如增删索引或者节点等。而主节点并不需要涉及到文档级别的变更和搜索等操作,所以当集群只拥有一个主节点的情况下,即使流量的增加它也不会成为瓶颈。任何节点都可以成为主节点。
用户可以将请求发送到集群中的任何节点,包括主节点。每个节点都知道任意文档所处的位置,并且能够将我们的请求直接转发到存储我们所需文档的节点。无论我们将请求发送到哪个节点,它都能负责从各个包含我们所需文档的节点收集回数据,并将最终结果返回給客户端。Elasticsearch对这一切的管理都是透明的。
2. 为什么要实现Elasticsearch集群
如果是单节点集群,一旦该节点出现故障,无法做到故障转移,那么Elasticsearch就会无法访问,这对系统来说是灾难性的,而部署多节点集群,能够水平扩容,故障转移,实现高可用,解决高并发。
2.1高可用
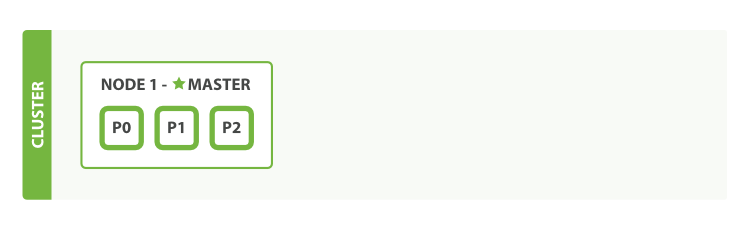
假设我们部署了三个节点集群(三个主分片P0、P1、P2,分别各对应两个副本分片R0、R1、R2):
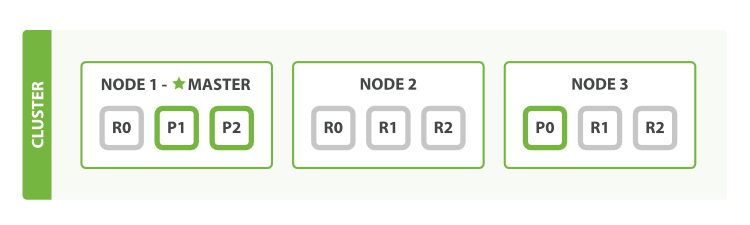
如果主节点Node1故障了,Elasticsearch内部机制会根据节点故障重新选举一个节点作为主节点,而主副分片也会重新调整: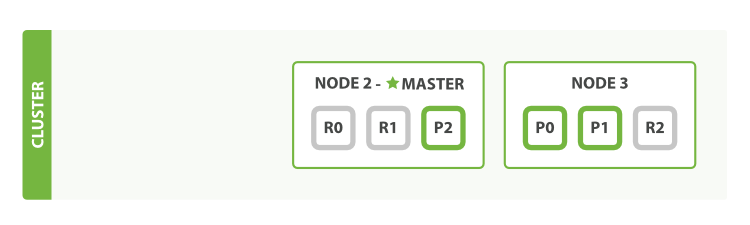
但因为副本分片是主副一比二缘故,此时集群健康状态会是yellow。但当故障节点恢复正常时候,集群健康状态会是green恢复正常。
2.2存储空间
一台服务器存储空间肯定是有限的,当数据量上来时候,这是灾难性的。如果部署多台服务器节点集群,那么就能解决存储空间的问题了。
3.集群搭建
3.1环境准备
|
System |
IP |
Node |
Leader |
|
CentOS-7 |
192.168.142.129 |
node-1 |
master |
|
192.168.142.130 |
node-2 |
replica |
分别往129、130服务器部署两个Elasticsearch节点,安装详情可以参考我第一篇文章。
3.2修改elasticsearch.yml配置
# ---------------------------------- Cluster -----------------------------------
#
# Use a descriptive name for your cluster:
#
cluster.name: my-ebs
#
# ------------------------------------ Node ------------------------------------
#
# Use a descriptive name for the node:
#
node.name: node-1
#
# Add custom attributes to the node:
#
#node.attr.rack: r1
#
# ----------------------------------- Memory -----------------------------------
#
# Lock the memory on startup:
#
bootstrap.memory_lock: true
#
# Make sure that the heap size is set to about half the memory available
# on the system and that the owner of the process is allowed to use this
# limit.
#
# Elasticsearch performs poorly when the system is swapping the memory.
#
# ---------------------------------- Network -----------------------------------
#
# By default Elasticsearch is only accessible on localhost. Set a different
# address here to expose this node on the network:
#
network.host: 192.168.142.129
#
# By default Elasticsearch listens for HTTP traffic on the first free port it
# finds starting at 9200. Set a specific HTTP port here:
#
#http.port: 9200
#
# For more information, consult the network module documentation.
#
# --------------------------------- Discovery ----------------------------------
#
# Pass an initial list of hosts to perform discovery when this node is started:
# The default list of hosts is ["127.0.0.1", "[::1]"]
#
#discovery.seed_hosts: ["host1", "host2"]
discovery.seed_hosts: ["192.168.142.129", "192.168.142.130"]
#
# Bootstrap the cluster using an initial set of master-eligible nodes:
#
cluster.initial_master_nodes: ["node-1", "node-2"]
#
# For more information, consult the discovery and cluster formation module documentation.
#
这是node-1修改后的配置,node-2配置相差不大,区别如下:
node.name: node-2
network.host: 192.168.142.130
集群节点外部访问HTTP端口默认都是9200,内部TCP连接端口默认都是9300。如果是同一个服务器不同节点,那么就要配置不同的端口号了。具体配置说明详情可以查看官网。
3.3允许Elasticsearch端口访问
输入如下命令放开防火墙对Elasticsearch端口访问限制:
firewall-cmd --zone=public --add-port=9200/tcp --permanent
firewall-cmd --zone=public --add-port=9300/tcp –permanent
重新加载防火墙:
firewall-cmd –reload
3.4启动Elasticsearch集群
如何启动Elasticsearch或者启动过程会遇到什么样问题,不懂的可以查看我第一篇文章,里面基本都有介绍,这里就不一一描述了,因为集群搭建主要是配置文件:
●node1: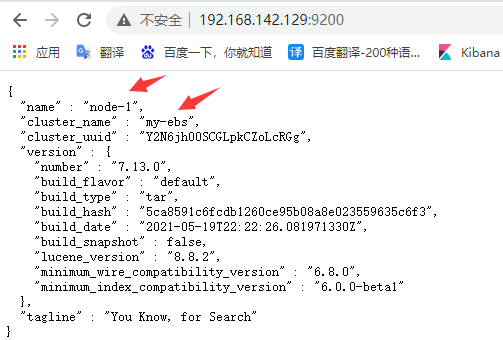
●node2: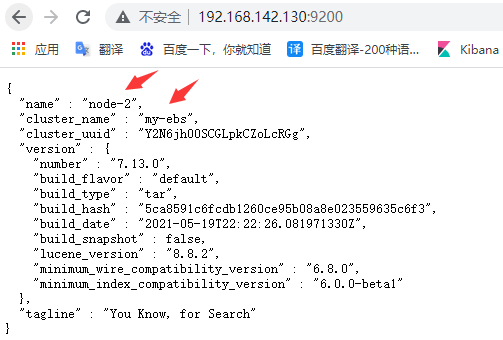
●查看集群节点状况:
http://192.168.142.129:9200/_cat/nodes?pretty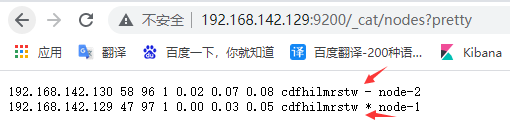
注:*符号表示主节点,-表示副节点。
●查看集群状态:
http://192.168.142.129:9200/_cluster/health
status字段指示着当前集群在总体上是否工作正常。它的三种颜色含义如下:
green:所有的主分片和副本分片都正常运行。
yellow:所有的主分片都正常运行,但不是所有的副本分片都正常运行。
red:有主分片没能正常运行。
参考文献:
Important Elasticsearch configuration
应对故障