开发环境准备:从官网下载Windows版本的STS工具,使用eclipse的需要根据eclipse版本号下载相应插件。
参考博客:纯洁的微笑,下载项目代码
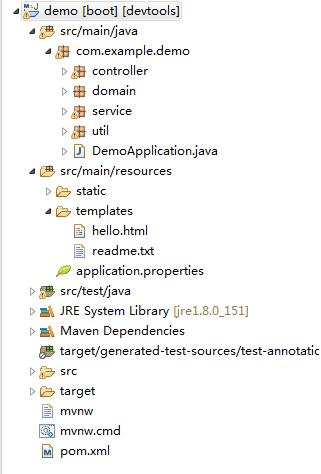
一、项目结构
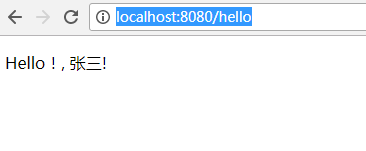
二、需求:输出hello world
controller 类:注解@Controller 配合thymeleaf 返回页面,注解@RestController 类里面的方法都以json格式输出,不再配置转json
@Controller
public class HelloWorldController {

    @RequestMapping("/hello")
    public String index(ModelMap map) {
        map.addAttribute("name", "张三");
        return "Hello";
    }
}
pom.xml: spring boot配合Thymeleaf页面输出
<?xml version="1.0" encoding="UTF-8"?>
<project xmlns="http://maven.apache.org/POM/4.0.0"
    xmlns:xsi="http://www.w3.org/2001/XMLSchema-instance"
    xsi:schemaLocation="http://maven.apache.org/POM/4.0.0 http://maven.apache.org/xsd/maven-4.0.0.xsd">
    <modelVersion>4.0.0</modelVersion>

    <groupId>com.example</groupId>
    <artifactId>demo</artifactId>
    <version>0.0.1-SNAPSHOT</version>
    <packaging>jar</packaging>

    <name>demo</name>
    <description>Demo project for Spring Boot</description>

    <parent>
        <groupId>org.springframework.boot</groupId>
        <artifactId>spring-boot-starter-parent</artifactId>
        <version>2.0.5.RELEASE</version>
        <relativePath /> <!-- lookup parent from repository -->
    </parent>

    <properties>
        <project.build.sourceEncoding>UTF-8</project.build.sourceEncoding>
        <project.reporting.outputEncoding>UTF-8</project.reporting.outputEncoding>
        <java.version>1.8</java.version>

        <mybatis-spring-boot>1.2.0</mybatis-spring-boot>
    </properties>

    <dependencies>
        <!-- 添加web支持 -->
        <dependency>
            <groupId>org.springframework.boot</groupId>
            <artifactId>spring-boot-starter-web</artifactId>
        </dependency>
        <dependency>
            <groupId>org.springframework.boot</groupId>
            <artifactId>spring-boot-starter</artifactId>
        </dependency>

        <dependency>
            <groupId>org.springframework.boot</groupId>
            <artifactId>spring-boot-starter-test</artifactId>
            <scope>test</scope>
        </dependency>

        <!-- spring data JPA -->
        <dependency>
            <groupId>org.springframework.boot</groupId>
            <artifactId>spring-boot-starter-data-jpa</artifactId>
        </dependency>

        <dependency>
            <groupId>mysql</groupId>
            <artifactId>mysql-connector-java</artifactId>
        </dependency>

        <!-- redis依赖 -->
        <dependency>
            <groupId>org.springframework.boot</groupId>
            <artifactId>spring-boot-starter-data-redis</artifactId>
        </dependency>

        <!-- Thymeleaf是一款用于渲染XML/XHTML/HTML5内容的模板引擎 -->
        <dependency>
            <groupId>org.springframework.boot</groupId>
            <artifactId>spring-boot-starter-thymeleaf</artifactId>
        </dependency>

        <!-- 热部署 -->
        <dependency>
            <groupId>org.springframework.boot</groupId>
            <artifactId>spring-boot-devtools</artifactId>
            <optional>true</optional>
        </dependency>
    </dependencies>

    <build>
        <plugins>
            <plugin>
                <groupId>org.springframework.boot</groupId>
                <artifactId>spring-boot-maven-plugin</artifactId>
                <configuration>
                    <fork>true</fork>
                </configuration>
            </plugin>
        </plugins>
    </build>


</project>
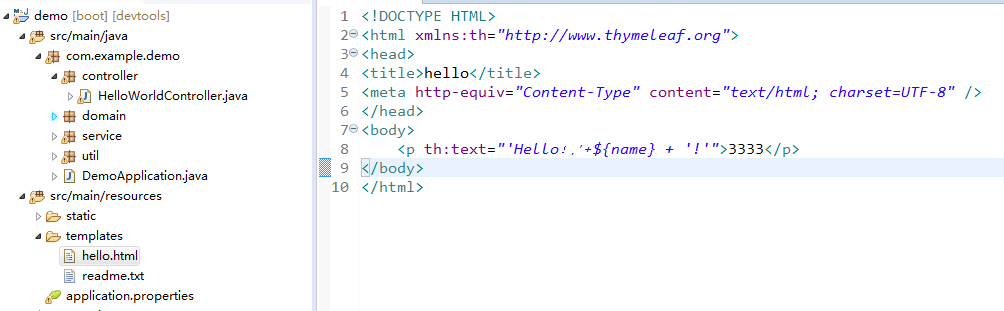
hello.html
spring boot配置文件:application.properties
# 定位模板的目录(即页面访问位置)
spring.mvc.view.prefix=classpath:/templates/
# 给返回的页面添加后缀名
spring.mvc.view.suffix=.html

#jdbc
spring.datasource.url=jdbc:mysql://localhost:3306/mysql
spring.datasource.username=root
spring.datasource.password=root
spring.datasource.driver-class-name=com.mysql.jdbc.Driver

#jpa
#spring.jpa.properties.hibernate.hbm2ddl.auto=update
spring.jpa.properties.hibernate.dialect=org.hibernate.dialect.MySQL5InnoDBDialect
spring.jpa.show-sql= true
#hibernate.hbm2ddl.auto参数的作用主要用于:自动创建|更新|验证数据库表结构
#create: 每次加载hibernate时都会删除上一次的生成的表,然后根据你的model类再重新来生成新表,哪怕两次没有任何改变也要这样执行,这就是导致数据库表数据丢失的一个重要原因。
#create-drop :每次加载hibernate时根据model类生成表,但是sessionFactory一关闭,表就自动删除。
#update:最常用的属性,第一次加载hibernate时根据model类会自动建立起表的结构(前提是先建立好数据库),以后加载hibernate时根据 model类自动更新表结构,即使表结构改变了但表中的行仍然存在不会删除以前的行。要注意的是当部署到服务器后,表结构是不会被马上建立起来的,是要等 应用第一次运行起来后才会。
#validate :每次加载hibernate时,验证创建数据库表结构,只会和数据库中的表进行比较,不会创建新表,但是会插入新值。


# REDIS (RedisProperties)
# Redis数据库索引(默认为0)
spring.redis.database=0
# Redis服务器地址
spring.redis.host=127.0.0.1
# Redis服务器连接端口
spring.redis.port=6379
# Redis服务器连接密码(默认为空)
spring.redis.password=
# 连接池最大连接数(使用负值表示没有限制)
spring.redis.pool.max-active=8
# 连接池最大阻塞等待时间(使用负值表示没有限制)
spring.redis.pool.max-wait=-1
# 连接池中的最大空闲连接
spring.redis.pool.max-idle=8
# 连接池中的最小空闲连接
spring.redis.pool.min-idle=0
# 连接超时时间(毫秒)
spring.redis.timeout=5000
启动程序:
@SpringBootApplication
public class DemoApplication {

    public static void main(String[] args) {
        SpringApplication.run(DemoApplication.class, args);
    }
}
访问:http://localhost:8080/hello