
作者:jayzou
https://segmentfault.com/a/1190000021228976
背景
项目中需要渲染一个5000+节点的树组件,但是在引入element Tree组件之后发现性能非常差,无论是滚动、展开/收起节点还是点击节点卡顿都非常明显,利用performance跑一下性能数据发现到问题所在
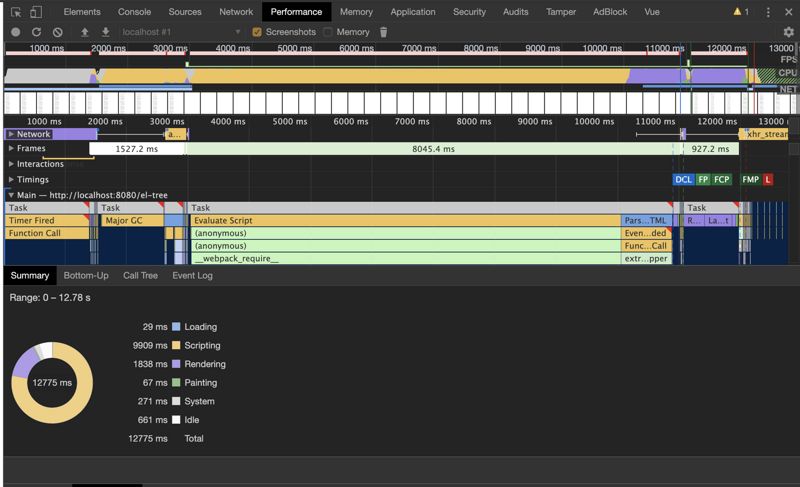
从上图可以看到,除去Idle之外,总共花费的时间为12s,其中Scripting花了10s
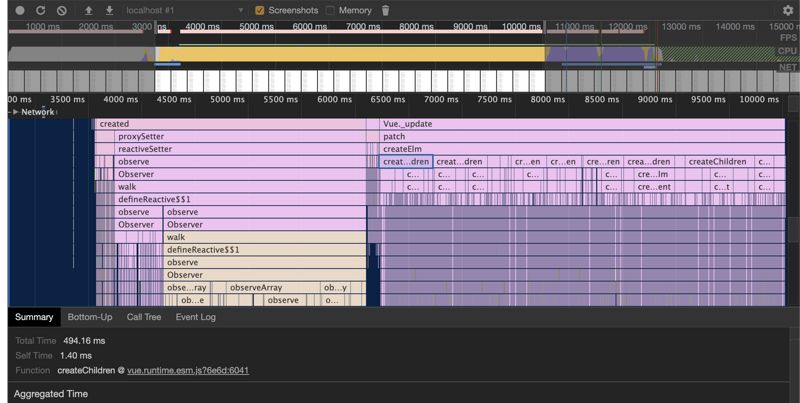
从上图可以看出,Scripting期间除了 Observe 之外,大部分时间都在调用createChildren来创建vue实例
优化思路
从上面的分析可以看出引发的性能问题都是因为渲染的节点过多导致,那么要解决这个问题就是尽量减少节点的渲染,然而在业界中与之相类似的解决方案就是虚拟列表
虚拟列表的核心概念就是 根据滚动来控制可视区域渲染的列表
这样一来,就能大幅度减少节点的渲染,提升性能
具体的步骤如下:
-
将递归结构的tree数据“拍平”,但是保留parent以及child的引用(一方面是为了方便查找子级和父级节点的引用,另一方面是为了方便计算可视区域的list数据)
-
动态计算滚动区域的高度(很多虚拟长列表的组件都是固定高度的,但是因为这里是tree,需要折叠/展开节点,所以是动态计算高度)
-
根据可见的高度以及滚动的距离渲染相应的节点
代码实现
最简代码实现
<template>
  <div class="b-tree" @scroll="handleScroll">
    <div class="b-tree__phantom" :style="{ height: contentHeight }"></div>
    <div
      class="b-tree__content"
      :style="{ transform: `translateY(${offset}px)` }"
    >
      <div
        v-for="(item, index) in visibleData"
        :key="item.id"
        class="b-tree__list-view"
        :style="{
          paddingLeft: 18 * (item.level - 1) + 'px'
        }"
      >
      <i :class="item.expand ? 'b-tree__expand' : 'b-tree__close' " v-if="item.children && item.children.length" />
        <slot :item="item" :index="index"></slot>
      </div>
    </div>
  </div>
</template>

<style>
.b-tree {
  position: relative;
  height: 500px;
  overflow-y: scroll;
}
.b-tree__phantom {
  position: absolute;
  left: 0;
  top: 0;
  right: 0;
  z-index: -1;
}
.b-tree__content {
  position: absolute;
  left: 0;
  right: 0;
  top: 0;
  min-height: 100px;
}
.b-tree__list-view{
  display: flex;
  align-items: center;
  cursor: pointer;
}
.b-tree__content__item {
  padding: 5px;
  box-sizing: border-box;

  display: flex;
  justify-content: space-between;
  position: relative;
  align-items: center;
  cursor: pointer;
}
.b-tree__content__item:hover,
.b-tree__content__item__selected {
  background-color: #d7d7d7;
}
.b-tree__content__item__icon {
  position: absolute;
  left: 0;
  color: #c0c4cc;
  z-index: 10;
}
.b-tree__close{
    display:inline-block;
    0;
    height:0;
    overflow:hidden;
    font-size:0;
  margin-right: 5px;
    border-5px;
    border-color:transparent transparent transparent #C0C4CC;
    border-style:dashed dashed dashed solid
}
.b-tree__expand{
    display:inline-block;
    0;
    height:0;
    overflow:hidden;
    font-size:0;
  margin-right: 5px;
    border-5px;
    border-color:#C0C4CC transparent transparent transparent;
    border-style:solid dashed dashed dashed
}
</style>

<script>
export default {
  name: "bigTree",
  props: {
    tree: {
      type: Array,
      required: true,
      default: []
    },
    defaultExpand: {
      type: Boolean,
      required: false,
      default: false
    },
    option: {
      // 配置对象
      type: Object,
      required: true,
      default: {}
    }
  },
  data() {
    return {
      offset: 0, // translateY偏移量
      visibleData: []
    };
  },
  computed: {
    contentHeight() {
      return (
        (this.flattenTree || []).filter(item => item.visible).length *
          this.option.itemHeight +
        "px"
      );
    },
    flattenTree() {
      const flatten = function(
        list,
        childKey = "children",
        level = 1,
        parent = null,
        defaultExpand = true
      ) {
        let arr = [];
        list.forEach(item => {
          item.level = level;
          if (item.expand === undefined) {
            item.expand = defaultExpand;
          }
          if (item.visible === undefined) {
            item.visible = true;
          }
          if (!parent.visible || !parent.expand) {
            item.visible = false;
          }
          item.parent = parent;
          arr.push(item);
          if (item[childKey]) {
            arr.push(
              ...flatten(
                item[childKey],
                childKey,
                level + 1,
                item,
                defaultExpand
              )
            );
          }
        });
        return arr;
      };
      return flatten(this.tree, "children", 1, {
        level: 0,
        visible: true,
        expand: true,
        children: this.tree
      });
    }
  },
  mounted() {
    this.updateVisibleData();
  },
  methods: {
    handleScroll(e) {
      const scrollTop = e.target.scrollTop
      this.updateVisibleData(scrollTop)
    },

    updateVisibleData(scrollTop = 0) {
      const start = Math.floor(scrollTop / this.option.itemHeight);
      const end = start + this.option.visibleCount;
      const allVisibleData = (this.flattenTree || []).filter(
        item => item.visible
      );
      this.visibleData = allVisibleData.slice(start, end);
      this.offset = start * this.option.itemHeight;
    }
  }
};
</script>
细节如下:
-
整个容器使用相对定位是为了避免在滚动中引起页面回流
-
phantom 容器为了撑开高度,让滚动条出现
-
flattenTree 为了拍平 递归结构的tree数据,同时添加level、expand、visibel属性,分别代表节点层级、是否展开、是否可视
-
contentHeight 动态计算容器的高度,隐藏(收起)节点不应该计算在总高度里面
这样一来渲染大数据的tree组件就有了基本的雏形,接下来看看节点展开/收起如何实现
节点展开收起
在flattenTree中保留了针对子级的引用,展开/收起的话,只需要对子级进行显示/隐藏即可
{
    methods: {
         //展开节点
        expand(item) {
          item.expand = true;
          this.recursionVisible(item.children, true);
        },
        //折叠节点
        collapse(item) {
          item.expand = false;
          this.recursionVisible(item.children, false);
        },
        //递归节点
        recursionVisible(children, status) {
          children.forEach(node => {
            node.visible = status;
            if (node.children) {
              this.recursionVisible(node.children, status);
            }
          })
        }
}
结论
对比下优化前和优化后的一些性能数据
element tree组件
初次渲染(全收起)

scripting: 11525ms
rendering: 2041ms
注:全展开直接卡死

scripting: 84ms
rendering: 683ms
优化后的tree组件
首次渲染(全展开)
scripting: 1671ms 对比优化前性能提升 6.8倍
rendering: 31ms 对比优化前性能提升 65倍
节点展开
scripting: 86ms 优化前性能一致
rendering: 6ms 对比优化前性能提升 113倍
big-tree组件
最终封装成 vue-big-tree 组件供调用,欢迎star~~
更多精彩敬请关注公众号

Java极客思维
微信扫一扫,关注公众号