p5.js完成星际穿越特效
欢迎关注我的博客,⬅️点他即可。
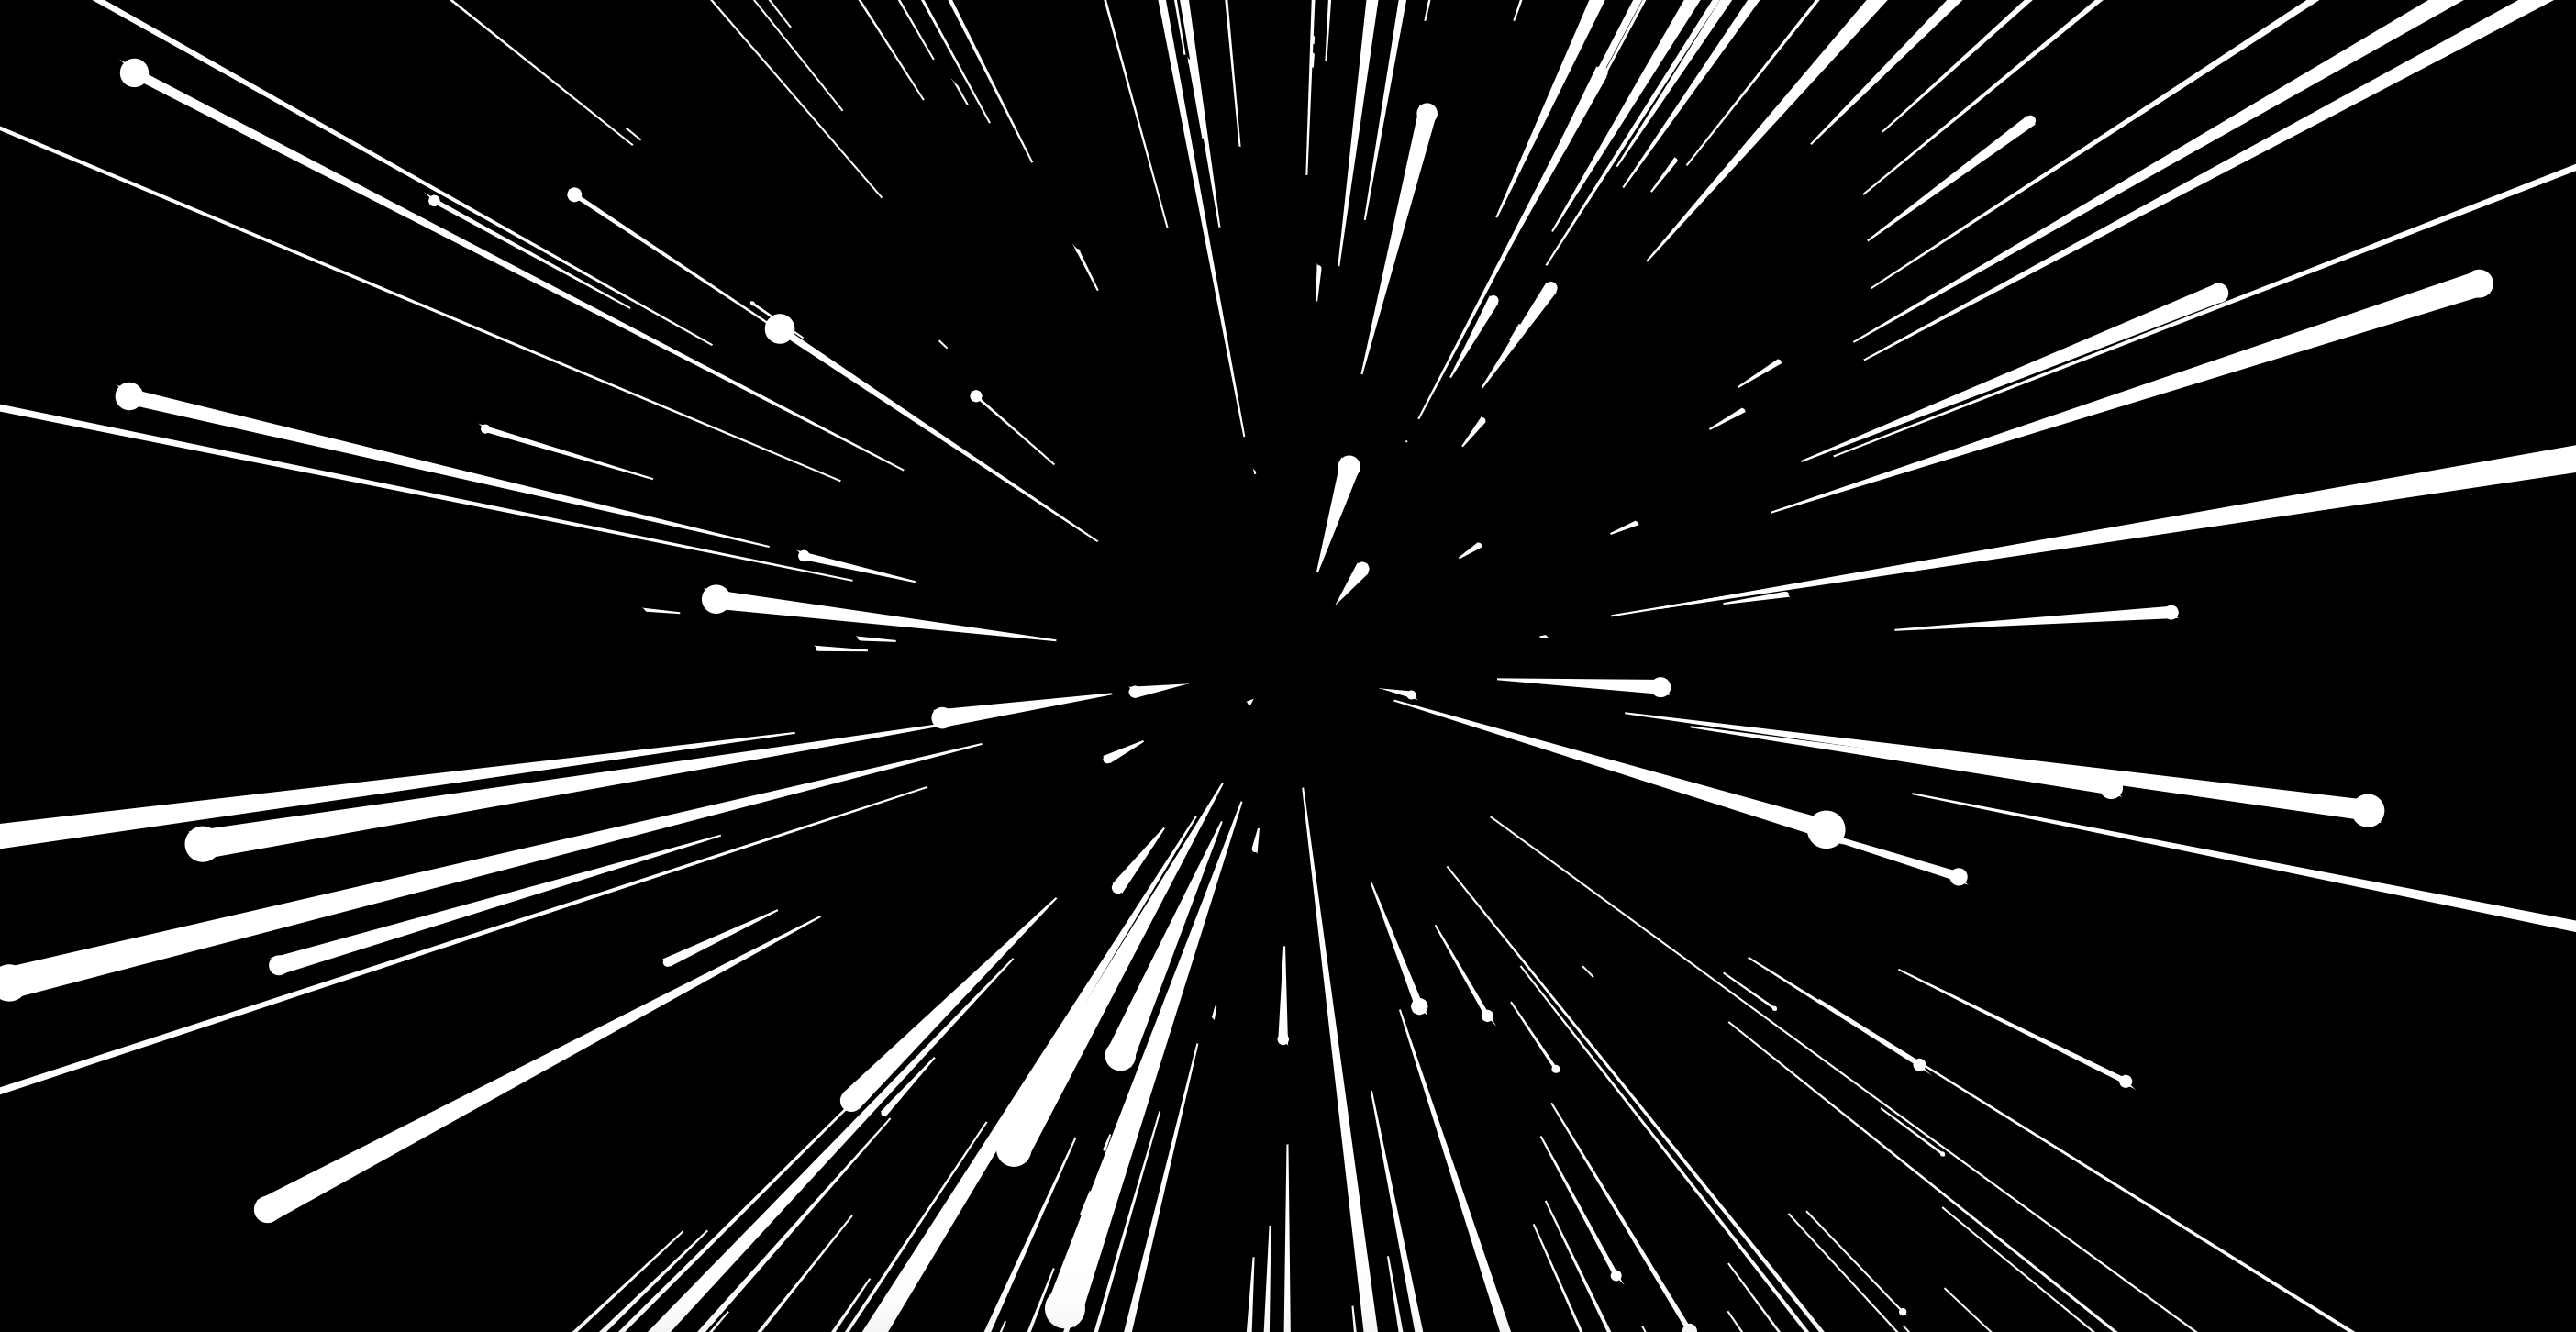
星际穿越,是模仿漫天星辰扑面而来的感觉。
最关键的在于对透视的掌握。
参考资料:The Coding Train
00 思路构想
- 星星是一个圆,会随机的出现在屏幕的任何位置;
- 星星会从远处到眼前:圆的大小来表示远近;
- 星星的运动轨迹:连接星星与中心点的射线,向外运动。
01 创建星星
我们可以使用一个 Star 类,来用它表示我们的星星。
class Star { }
星星的成员变量有哪些?星星的位置、大小和运动的速度:
class Star {
  constructor() {
    this.x = random(-width / 2, width / 2) // 随机x坐标
    this.y = random(-width / 2, width / 2) // 随机y坐标
    this.z = random(0, width) // 随机z坐标
    this.r = 25 + random(-2, 3) // 随机半径
  }

  // 在当前位置画圆
  show() {
    fill(255)
    noStroke()
    ellipse(this.x, this.y, this.r, this.r)
  }
}
这里为什么是-width/2 到 width/2 呢?
而且为什么 y 的值也要取决于 width 呢?
因为 p5 的原点是在左上角,我们的星星从原点计算起会很方便,一会儿我们会通过一条语句,将整个画面往右下挪动,使原点在画面中呈现!
y 的值之所以取决于 width,是因为电脑一般都是长方形,并且 width>height。
如果是分别根据 width 和 height 随机值,就会导致分布不均匀,变成蝴蝶型(左右两边集中,上下很稀疏)。
我们还需要什么?
因为星星会不断的移动,所以说我们需要绘制它移动的轨迹。但是首先,我们需要初始化星星:
let stars = [] // 存放星星的数组

function setup() {
	const starsNumber = 100 // 星星的个数
	for (let i = 0; i < starsNumber; i++) {
		const temp = new Star()
		stars.push(temp)
	}
}
现在我们初始化了 100 个星星,但是画布忘记绘制了。我们不妨利用 css 和 js,让用户浏览器无论是多大,我们都刚刚好全屏显示。
让我们来写一点点 CSS:
* {
	margin: 0;
	padding: 0;
}
body {
	 100vw;
	height: 100vh;
}
然后需要用到:document.body.offsetWidth获取宽度,同理,offsetHeight可以获取高度:
function setup() {
	const wid = document.body.offsetWidth
	const heig = document.body.offsetHeight
	createCanvas(wid, heig)

	// 这里放刚刚新建星星的代码
}
注意,这里不要使用width与height作为变量名。因为 p5 中,width 与 height 就代表当前画布宽高。
所以归纳一下,第一阶段,在 setup 方法和 draw 方法中,应该这么写:
let stars = []

function setup() {
	const wid = document.body.offsetWidth
	const heig = document.body.offsetHeight
	createCanvas(wid, heig)
	const starsNumber = 100
	for (let i = 0; i < starsNumber; i++) {
		const temp = new Star()
		stars.push(temp)
	}
}

function draw() {
	background('#000')
	for (let i = 0; i < stars.length; i++) {
		stars[i].show()
	}
}
这样就在屏幕上绘制出了 100 个静态的星星。
02 移动星星
移动星星,意味着改变位置,连续的改变位置就会变成移动。因为我们前面说到过,使用一个对象的方法创建的圆,再调用该对象的该方法时,便会重新创建,原来的圆就会消失。
这一步看起来很复杂,但其实非常简单。
我们在更新函数里面,只需要做两件事情:
- 减少 z,因为 z 是星星离我们的距离;
- 如果星星跑到了我们背后,他们就该重置位置在离我们最远处了。
update(speed) {
   z = z - seed;
   if(z <= 1) {
     z = width;
     x = random(0, width);
     y = random(0, height);
   }
}
这里可能有人会疑惑:为什么第一次初始化星星的时候,是random(0, width),现在让 z 的值直接等于 width 呢?
因为我们第一打开网页的时候,星星出现,这个时候星星应该是有远的有近的。
可是当我们星星飞走了,重新生成的时候,他就该从无限远处进入视野,而不是直接出现在眼前。
接下来我们不需要关心 x 和 y 的值应该怎样变化,因为可以通过某种计算,将 z 的变化,线性的表现在 x,y 上。
这里需要提到一点,我们在这里利用了透视的原理,实际上,x 与 y 的值是不会改变的,只是我们的透视视角,让他们看起来,是一条斜线。
更新完了位置,我们需要在 show 方法中,通过计算表示出新的 x、y 了。
show() {
  fill(255); // 上色
  noStroke()
  const nowX = map(this.x / this.z, -1, 1, -width / 2, width / 2)
	const nowY = map(this.y / this.z, -1, 1, -width / 2, width / 2)
  const nowR = map(this.z, 0, width, this.r, 0)
  ellipse(nowX, nowY, nowR, nowR)
}
紧接着我们只需要在主方法里,不断的循环update()和show()即可!
03 大功告成
function draw() {
  background(0);
  translate(width / 2, height / 2);
  for(int i = 0; i < stars.length; i++) {
    stars[i].update(speed);
    stars[i].show();
}
04 附录:完整代码
let stars = []

function setup() {
	const wid = document.body.offsetWidth
	const heig = document.body.offsetHeight
	createCanvas(wid, heig)
	let starsNumber = parseInt((width * height) / 6500)
	for (let i = 0; i < starsNumber; i++) {
		const temp = new Star()
		stars.push(temp)
	}
}

function draw() {
	translate(wid / 2, heig / 2)
	background('#000')
	for (let i = 0; i < stars.length; i++) {
		stars[i].update(15)
		stars[i].show()
	}
}
class Star {
	constructor() {
		this.x = random(-width / 2, width / 2)
		this.y = random(-width / 2, width / 2)
		this.z = random(0, width)

		this.r = 25 + random(-2, 3)
		this.isMiss = false
		this.sx
		this.sy
	}

	update(speed) {
		this.z -= speed
		if (this.z <= 1) {
			this.x = random(-width / 2, width / 2)
			this.y = random(-width / 2, width / 2)
			this.z = width
			this.isMiss = false
		}
	}

	show() {
		fill(255)
		noStroke()
		const nowX = map(this.x / this.z, -1, 1, -width / 2, width / 2)
		const nowY = map(this.y / this.z, -1, 1, -width / 2, width / 2)
		if (!this.isMiss) {
			this.sx = nowX
			this.sy = nowY
			this.isMiss = true
		}
		const nowR = map(this.z, 0, width, this.r, 0)
		ellipse(nowX, nowY, nowR, nowR)

		stroke(255)
		triangle(nowX + nowR / 3, nowY + nowR / 3, nowX - nowR / 3, nowY - nowR / 3, this.sx, this.sy)
	}
}
这里我加上了射线,其实非常简单,就是在星星的新位置和起始点画三角形即可。
(完)