模态框
<html>
	<head>
		<meta charset="UTF-8">
		<title>模态框</title>
		<style type="text/css">
			* {
				padding: 0;
				margin: 0;
			}

			html,
			body {
				 100%;
				height: 100%;
			}

			#bg {
				position: relative;
				top: 0;
				left: 0;
				 100%;
				height: 100%;
				background-color: rgba(0, 0, 0, .3);
			}

			#login {
				 300px;
				height: 300px;
				border-radius: 3px;
				background-color: #fff;
				line-height: 300px;
				text-align: center;
				margin: 0 auto;
				position: relative;
			}

			#close {
				position: absolute;
				right: 0;
				top: 0;
				 20px;
				height: 20px;
				background-color: red;
				line-height: 20px;
				text-align: center;
				color: green;
				cursor: pointer;
			}
		</style>
	</head>

	<body>
		<button id="btn">登录</button>
		<!-- 需求:

	打开网页时,点击登录显示一个背景图,中心 弹出一个登录框,登录框 右上角有关闭按钮 点击关闭 关闭登录框
	 -->
		<script type="text/javascript">
			function $(id) {
				return document.getElementById(id);
			}

			// 1.点击登录按钮  弹出登录框
			// 背景
			var oBg = document.createElement('div');

			// 登录框
			var oLogin = document.createElement('p');

			// 关闭按钮
			var oClose = document.createElement('span');

			oBg.id = 'bg';
			oLogin.id = 'login';
			oClose.id = 'close';

			oClose.innerText = 'X';
			oLogin.innerHTML = '登录框成功弹出';

			// 追加
			oBg.appendChild(oLogin);
			oLogin.appendChild(oClose);

			console.log($('btn'));
			$('btn').onclick = function() {

				this.parentNode.appendChild(oBg);
				this.style.display = ' none';
			}

			oClose.onclick = function() {
				oBg.parentNode.removeChild(oBg);
				$('btn').style.display = 'inline-block';

			}
		</script>
	</body>
</html>


留言板
<!DOCTYPE html>
<html>

	<head>
		<meta charset="UTF-8">
		<title>留言板</title>
		<style type="text/css">
			* {
				padding: 0;
				margin: 0;
			}

			.close {
				display: inline-block;
				 20px;
				height: 20px;
				line-height: 20px;
				text-align: center;
				cursor: pointer;
				background-color: rgba(0, 0, 0, .1);
				margin-left: 20px;
			}
		</style>
	</head>

	<body>
		<h1>简易留言板</h1>
		<div id="box">
			<!--<ul>

            </ul>-->

		</div>
		<textarea id="msg"></textarea>
		<input type="button" id="btn" value="留言" />
		<button onclick="sum()">统计</button>
	</body>
	<script type="text/javascript">
		// 0 将ul标签添加到div#box标签中
		var oUl = document.createElement('ul');
		var oBox = document.getElementById('box');
		oBox.appendChild(oUl);

		var oBtn = document.getElementById('btn');
		var oMsg = document.getElementById('msg')
		// 控制留言的总数量
		var count = 0;
		oBtn.onclick = function() {

			// 点击留言按钮事件操作
			// 1.创建li标签
			var oLi = document.createElement('li');
			//2.设置内容
			oLi.innerHTML = '留言: '+oMsg.value + "<span class='close'>X</span>"

			// 3.如果想在插入的第一个li获取的前面继续添加li标签
			//3.1获取li标签
			var olis = document.getElementsByTagName('li');
			//3.2 如果是第一次添加的li标签,则直接添加到ul的后面
			if(olis.length == 0) {
				oUl.appendChild(oLi);
				count++;

			} else {
				// 3.3 如果不是第一次添加的li标签,则插入到第一个li标签的前面
				oUl.insertBefore(oLi, olis[0]);
				count++;
			}
			// 4.添加完成之后 清空textarea的值
			oMsg.value = '';

			// 5.点击X的时候删除当前的一条数据
			//5.1先获取所有的X
			var oSpans = document.getElementsByTagName('span');

			// 5.2for循环 对所有的X添加点击事件
			for(var i = 0; i < oSpans.length; i++) {
				oSpans[i].onclick = function() {
					// 5.3 移除当前的li标签
					oUl.removeChild(this.parentNode)
					count--;
				}
			}

		}

		function sum() {
			alert('一共发布了' + count + '条留言');

		}
	</script>

</html>


模拟hover选择器
<!DOCTYPE html>
<html lang="en">
<head>
	<meta charset="UTF-8">
	<title></title>
	<style type="text/css">
		button{
			margin: 10px;
			 100px;
			height: 40px;
			cursor: pointer;
		}
		button.active{
			background-color: green;
		}

	</style>
</head>
<body>
	<button class="active">按钮1</button>
	<button>按钮2</button>
	<button>按钮3</button>
	<button>按钮4</button>
	<button>按钮5</button>
	<script type="text/javascript">

		// 需求: 鼠标悬浮 哪个button上,该button变成绿色的背景(添加类 active)

		var oBtns = document.getElementsByTagName('button');

		for(var i  = 0; i < oBtns.length; i++){
			oBtns[i].onmouseover = function(){

				// 重要:  排他思想: 先把所有按钮的className设置为空,然后把(this)当前这个按钮的className设置active
				for(var j = 0;j < oBtns.length; j++){
					oBtns[j].className = '';
				}

				this.className = 'active';
			}
		}

		for(var i = 0;i < oBtns.length; i++){
			oBtns[i].onmouseout = function(){
				this.className = '';
			}
		}


	</script>


</body>
</html>

tab栏选项卡
<!DOCTYPE html>
<html lang="en">

	<head>
		<meta charset="UTF-8">
		<title></title>
		<style type="text/css">
			* {
				padding: 0;
				margin: 0;
			}

			ul {
				list-style: none;
			}

			#tab {
				 480px;
				margin: 20px auto;
				border: 1px solid red;
			}

			ul {
				 100%;
				overflow: hidden;
			}

			#tab ul li {
				float: left;
				 160px;
				height: 60px;
				line-height: 60px;
				text-align: center;
				background-color: #ccc;
			}

			#tab ul li a {
				color: black;
				display: block;
				 100%;
				height: 100%;
				text-decoration: none;
			}

			#tab ul li.active {
				background-color: red;
			}

			#tab p {
				display: none;
				height: 200px;
				text-align: center;
				line-height: 200px;
				background-color: red;
			}

			#tab p.active {
				display: block;
			}
		</style>
	</head>

	<body>
		<div id="tab">
			<ul>
				<li class="active">
					<a href="javascript:void(0);">首页</a>
				</li>
				<li>
					<a href="javascript:void(0);">新闻</a>
				</li>
				<li>
					<a href="javascript:void(0);">图片</a>
				</li>
			</ul>
			<p class="active">首页内容</p>
			<p>新闻内容</p>
			<p>图片</p>
		</div>
		<script type="text/javascript">
			// 需求:  鼠标放在上面,li上  li本身变色(添加类) 对应下面p也显示出来(添加类)
			// 思路: 1.点亮上面的盒子   2 利用索引值来显示下面的盒子

			/*
			// 变量提升
			var a;
			console.log(a);//undefined
			a = 10;
			console.log(a);
			*/

			var tabLi = document.getElementsByTagName('li');
			var tabP = document.getElementsByTagName('p');

			for(var i = 0; i < tabLi.length; i++) {
				// 将 i保存到 li标签对象中
				tabLi[i].index = i;
				// for循环和点击事件 谁快  i 全局作用域(块级作用域)   3
				tabLi[i].onclick = function() {

					for(var j = 0; j < tabLi.length; j++) {
						tabLi[j].className = '';
						tabP[j].className = '';
					}
					this.className = 'active';
					// Cannot set property 'className' of undefined
					console.log(i);
					tabP[this.index].className = 'active';
				}
			}
		</script>
	</body>

</html>

购物车案例
<!DOCTYPE html>
<html lang="en">
<head>
    <meta charset="UTF-8">
    <title></title>
    <style type="text/css">
        *{
            padding: 0;
            margin: 0;
        }
        .box{
             500px;
            height: 400px;
            margin: 100px auto;
            background-color: rgba(255,255,255,0.4);
            position: relative;

        }
        .car{
             150px;
            height: 30px;
            background-color: #fff;
            padding-left: 30px;
            position: absolute;
            left: 130px;
            top: 3px;
            z-index: 3;
            border: 1px solid green;

        }
        .shop{
             310px;
            height: 70px;
            background-color: #fff;
            position: absolute;
            top:33px;
            left: 0;
            display: none;

        }
        div.c{

            border-bottom- 0;

        }
        div.t{
            border:  1px solid green;
        }
    </style>
</head>
<body>
    <div class="box">
        <div class="car" id="myCar">我的购物车</div>
        <div class="shop t" id="shop"></div>
    </div>
    <script type="text/javascript">
        var myCar =  document.getElementById('myCar');
        var shop  = document.getElementById('shop');
        myCar.onmouseover = function(){
            shop.style.display = 'block';
            myCar.className +=' c';
        }
        myCar.onmouseout = function(){
            shop.style.display = 'none';
            myCar.removeAttribute('class');
            myCar.className = 'car';
        }
    </script>
</body>
</html>
下拉菜单
<!DOCTYPE html>
<html>
<head>
<meta charset="UTF-8">
<title></title>
<style>
* {
margin: 0;
padding: 0;
}
#box{
margin: 50px;
200px;
border: 1px dashed #bbb;
}
#box ul{
100%;
overflow: hidden;
height: 31px;
/*overflow: hidden;
height: 31px;*/
}
#box ul.show{
height: auto;
}
#box ul li{
list-style: none;
100%;
height: 25px;
line-height: 25px;
background: #fff;
color: #000;
font-size: 12px;
font-weight: bold;
}
#box ul li.title{
cursor: pointer;
height: 30px;
background: pink;
line-height: 30px;
font-size: 14px;
color: #fff;
}
</style>
</head>
<body>
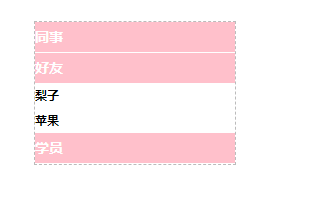
<div id="box">
<ul class="show">
<li class="title">同事</li>
<li>佳能</li>
<li>which</li>
<li>林泷</li>
<li>rose</li>
</ul>
<ul>
<li class="title">好友</li>
<li>梨子</li>
<li>苹果</li>
</ul>
<ul>
<li class="title">学员</li>
<li>长风</li>
<li>沙通</li>
<li>徐薇</li>
<li>许云朋</li>
</ul>
</div>
<script src="js/jquery-3.2.1.js"></script>
<script type="text/javascript" >
/* jquery写法
* $(function(){
var oUl= $("ul");
var length = $("ul").length;
console.log(length);
$("ul").click(function(event){
$(this).addClass("show").siblings('ul').removeClass('show');
})
});*/
var oUl = document.getElementsByTagName("ul");
var length = oUl.length;
var index = 0;
for(var i = 0 ; i < length ; i ++){
oUl[i].aa = i;
oUl[i].onclick = function () {
oUl[index].className = "";
index = this.aa;
oUl[index].className = "show";
}
}
</script>
</body>
</html>