1.进入root目录并下载elasticsearch
cd /root
wget https://download.elastic.co/elasticsearch/elasticsearch/elasticsearch-1.7.3.tar.gz
2.解压下载好的压缩包
tar -zxvf elasticsearch-1.7.3.tar.gz
3.修改目录名字为node1(这里需要安装三个节点)
mv elasticsearch-1.7.3 elasticsearch-node3
4.修改/root/elasticsearch-node3/config/elasticsearch.yml 为如下内容(注意红色部分为三个节点不一致的地方)
(下面配置未见为node3的配置)
##################### Elasticsearch Configuration Example #####################

# This file contains an overview of various configuration settings,
# targeted at operations staff. Application developers should
# consult the guide at <http://elasticsearch.org/guide>.
#
# The installation procedure is covered at
# <http://elasticsearch.org/guide/en/elasticsearch/reference/current/setup.html>.
#
# Elasticsearch comes with reasonable defaults for most settings,
# so you can try it out without bothering with configuration.
#
# Most of the time, these defaults are just fine for running a production
# cluster. If you're fine-tuning your cluster, or wondering about the
# effect of certain configuration option, please _do ask_ on the
# mailing list or IRC channel [http://elasticsearch.org/community].

# Any element in the configuration can be replaced with environment variables
# by placing them in ${...} notation. For example:
#
#node.rack: ${RACK_ENV_VAR}

# For information on supported formats and syntax for the config file, see
# <http://elasticsearch.org/guide/en/elasticsearch/reference/current/setup-configuration.html>


################################### Cluster ###################################

# Cluster name identifies your cluster for auto-discovery. If you're running
# multiple clusters on the same network, make sure you're using unique names.
#
cluster.name: elasticsearch
#集群名字, 相同集群名字的节点启动后会自动放一起


#################################### Node #####################################

# Node names are generated dynamically on startup, so you're relieved
# from configuring them manually. You can tie this node to a specific name:
#
node.name: "es-node3"
#节点名字


# Every node can be configured to allow or deny being eligible as the master,
# and to allow or deny to store the data.
#
# Allow this node to be eligible as a master node (enabled by default):
#
#node.master: true
#
# Allow this node to store data (enabled by default):
#
#node.data: true

# You can exploit these settings to design advanced cluster topologies.
#
# 1. You want this node to never become a master node, only to hold data.
#    This will be the "workhorse" of your cluster.
#
#node.master: false
#node.data: true
#
# 2. You want this node to only serve as a master: to not store any data and
#    to have free resources. This will be the "coordinator" of your cluster.
#
#node.master: true
#node.data: false
#
# 3. You want this node to be neither master nor data node, but
#    to act as a "search load balancer" (fetching data from nodes,
#    aggregating results, etc.)
#
#node.master: false
#node.data: false

# Use the Cluster Health API [http://localhost:9200/_cluster/health], the
# Node Info API [http://localhost:9200/_nodes] or GUI tools
# such as <http://www.elasticsearch.org/overview/marvel/>,
# <http://github.com/karmi/elasticsearch-paramedic>,
# <http://github.com/lukas-vlcek/bigdesk> and
# <http://mobz.github.com/elasticsearch-head> to inspect the cluster state.

# A node can have generic attributes associated with it, which can later be used
# for customized shard allocation filtering, or allocation awareness. An attribute
# is a simple key value pair, similar to node.key: value, here is an example:
#
#node.rack: rack314

# By default, multiple nodes are allowed to start from the same installation location
# to disable it, set the following:
#node.max_local_storage_nodes: 1


#################################### Index ####################################

# You can set a number of options (such as shard/replica options, mapping
# or analyzer definitions, translog settings, ...) for indices globally,
# in this file.
#
# Note, that it makes more sense to configure index settings specifically for
# a certain index, either when creating it or by using the index templates API.
#
# See <http://elasticsearch.org/guide/en/elasticsearch/reference/current/index-modules.html> and
# <http://elasticsearch.org/guide/en/elasticsearch/reference/current/indices-create-index.html>
# for more information.

# Set the number of shards (splits) of an index (5 by default):
#
#index.number_of_shards: 5

# Set the number of replicas (additional copies) of an index (1 by default):
#
#index.number_of_replicas: 1

# Note, that for development on a local machine, with small indices, it usually
# makes sense to "disable" the distributed features:
#
#index.number_of_shards: 1
#index.number_of_replicas: 0

# These settings directly affect the performance of index and search operations
# in your cluster. Assuming you have enough machines to hold shards and
# replicas, the rule of thumb is:
#
# 1. Having more *shards* enhances the _indexing_ performance and allows to
#    _distribute_ a big index across machines.
# 2. Having more *replicas* enhances the _search_ performance and improves the
#    cluster _availability_.
#
# The "number_of_shards" is a one-time setting for an index.
#
# The "number_of_replicas" can be increased or decreased anytime,
# by using the Index Update Settings API.
#
# Elasticsearch takes care about load balancing, relocating, gathering the
# results from nodes, etc. Experiment with different settings to fine-tune
# your setup.

# Use the Index Status API (<http://localhost:9200/A/_status>) to inspect
# the index status.


#################################### Paths ####################################

# Path to directory containing configuration (this file and logging.yml):
#
#path.conf: /path/to/conf

# Path to directory where to store index data allocated for this node.
#
#path.data: /path/to/data
#
# Can optionally include more than one location, causing data to be striped across
# the locations (a la RAID 0) on a file level, favouring locations with most free
# space on creation. For example:
#
#path.data: /path/to/data1,/path/to/data2

# Path to temporary files:
#
#path.work: /path/to/work

# Path to log files:
#
#path.logs: /path/to/logs

# Path to where plugins are installed:
#
#path.plugins: /path/to/plugins


#################################### Plugin ###################################

# If a plugin listed here is not installed for current node, the node will not start.
#
#plugin.mandatory: mapper-attachments,lang-groovy


################################### Memory ####################################

# Elasticsearch performs poorly when JVM starts swapping: you should ensure that
# it _never_ swaps.
#
# Set this property to true to lock the memory:
#
#bootstrap.mlockall: true

# Make sure that the ES_MIN_MEM and ES_MAX_MEM environment variables are set
# to the same value, and that the machine has enough memory to allocate
# for Elasticsearch, leaving enough memory for the operating system itself.
#
# You should also make sure that the Elasticsearch process is allowed to lock
# the memory, eg. by using `ulimit -l unlimited`.


############################## Network And HTTP ###############################

# Elasticsearch, by default, binds itself to the 0.0.0.0 address, and listens
# on port [9200-9300] for HTTP traffic and on port [9300-9400] for node-to-node
# communication. (the range means that if the port is busy, it will automatically
# try the next port).

# Set the bind address specifically (IPv4 or IPv6):
#
network.bind_host: 192.168.0.45
#绑定的ip(本机ip)


# Set the address other nodes will use to communicate with this node. If not
# set, it is automatically derived. It must point to an actual IP address.
#
network.publish_host: 192.168.0.45
#其他节点和本节点的交互ip
# Set both 'bind_host' and 'publish_host':
#
network.host: 192.168.0.45

# Set a custom port for the node to node communication (9300 by default):
#
transport.tcp.port: 9302

# Enable compression for all communication between nodes (disabled by default):
#
#transport.tcp.compress: true

# Set a custom port to listen for HTTP traffic:
#
http.port: 9202

# Set a custom allowed content length:
#
#http.max_content_length: 100mb

# Disable HTTP completely:
#
#http.enabled: false


################################### Gateway ###################################

# The gateway allows for persisting the cluster state between full cluster
# restarts. Every change to the state (such as adding an index) will be stored
# in the gateway, and when the cluster starts up for the first time,
# it will read its state from the gateway.

# There are several types of gateway implementations. For more information, see
# <http://elasticsearch.org/guide/en/elasticsearch/reference/current/modules-gateway.html>.

# The default gateway type is the "local" gateway (recommended):
#
#gateway.type: local

# Settings below control how and when to start the initial recovery process on
# a full cluster restart (to reuse as much local data as possible when using shared
# gateway).

# Allow recovery process after N nodes in a cluster are up:
#
#gateway.recover_after_nodes: 1

# Set the timeout to initiate the recovery process, once the N nodes
# from previous setting are up (accepts time value):
#
#gateway.recover_after_time: 5m

# Set how many nodes are expected in this cluster. Once these N nodes
# are up (and recover_after_nodes is met), begin recovery process immediately
# (without waiting for recover_after_time to expire):
#
#gateway.expected_nodes: 2


############################# Recovery Throttling #############################

# These settings allow to control the process of shards allocation between
# nodes during initial recovery, replica allocation, rebalancing,
# or when adding and removing nodes.

# Set the number of concurrent recoveries happening on a node:
#
# 1. During the initial recovery
#
#cluster.routing.allocation.node_initial_primaries_recoveries: 4
#
# 2. During adding/removing nodes, rebalancing, etc
#
#cluster.routing.allocation.node_concurrent_recoveries: 2

# Set to throttle throughput when recovering (eg. 100mb, by default 20mb):
#
#indices.recovery.max_bytes_per_sec: 20mb

# Set to limit the number of open concurrent streams when
# recovering a shard from a peer:
#
#indices.recovery.concurrent_streams: 5


################################## Discovery ##################################

# Discovery infrastructure ensures nodes can be found within a cluster
# and master node is elected. Multicast discovery is the default.

# Set to ensure a node sees N other master eligible nodes to be considered
# operational within the cluster. This should be set to a quorum/majority of
# the master-eligible nodes in the cluster.
#
discovery.zen.minimum_master_nodes: 2
#最小具备master资格的节点
# Set the time to wait for ping responses from other nodes when discovering.
# Set this option to a higher value on a slow or congested network
# to minimize discovery failures:
#
discovery.zen.ping.timeout: 30s
#超时时间


# For more information, see
# <http://elasticsearch.org/guide/en/elasticsearch/reference/current/modules-discovery-zen.html>

# Unicast discovery allows to explicitly control which nodes will be used
# to discover the cluster. It can be used when multicast is not present,
# or to restrict the cluster communication-wise.
#
# 1. Disable multicast discovery (enabled by default):
#
discovery.zen.ping.multicast.enabled: false
#关闭多播发现节点

#
# 2. Configure an initial list of master nodes in the cluster
#    to perform discovery when new nodes (master or data) are started:
#
discovery.zen.ping.unicast.hosts: ["192.168.0.45:9300","192.168.0.45:9301","192.168.0.45:9302"]
#集群中的其他节点信息,默认端口为9300
# EC2 discovery allows to use AWS EC2 API in order to perform discovery.
#
# You have to install the cloud-aws plugin for enabling the EC2 discovery.
#
# For more information, see
# <http://elasticsearch.org/guide/en/elasticsearch/reference/current/modules-discovery-ec2.html>
#
# See <http://elasticsearch.org/tutorials/elasticsearch-on-ec2/>
# for a step-by-step tutorial.

# GCE discovery allows to use Google Compute Engine API in order to perform discovery.
#
# You have to install the cloud-gce plugin for enabling the GCE discovery.
#
# For more information, see <https://github.com/elasticsearch/elasticsearch-cloud-gce>.

# Azure discovery allows to use Azure API in order to perform discovery.
#
# You have to install the cloud-azure plugin for enabling the Azure discovery.
#
# For more information, see <https://github.com/elasticsearch/elasticsearch-cloud-azure>.

################################## Slow Log ##################################

# Shard level query and fetch threshold logging.

#index.search.slowlog.threshold.query.warn: 10s
#index.search.slowlog.threshold.query.info: 5s
#index.search.slowlog.threshold.query.debug: 2s
#index.search.slowlog.threshold.query.trace: 500ms

#index.search.slowlog.threshold.fetch.warn: 1s
#index.search.slowlog.threshold.fetch.info: 800ms
#index.search.slowlog.threshold.fetch.debug: 500ms
#index.search.slowlog.threshold.fetch.trace: 200ms

#index.indexing.slowlog.threshold.index.warn: 10s
#index.indexing.slowlog.threshold.index.info: 5s
#index.indexing.slowlog.threshold.index.debug: 2s
#index.indexing.slowlog.threshold.index.trace: 500ms

################################## GC Logging ################################

#monitor.jvm.gc.young.warn: 1000ms
#monitor.jvm.gc.young.info: 700ms
#monitor.jvm.gc.young.debug: 400ms

#monitor.jvm.gc.old.warn: 10s
#monitor.jvm.gc.old.info: 5s
#monitor.jvm.gc.old.debug: 2s

################################## Security ################################

# Uncomment if you want to enable JSONP as a valid return transport on the
# http server. With this enabled, it may pose a security risk, so disabling
# it unless you need it is recommended (it is disabled by default).
#
#http.jsonp.enable: true
5.拷贝配置好的node3目录为node1,node2并根据步骤4修改elasticsearch.yml
cp -r elasticsearch-node3/ elasticsearch-node1
cp -r elasticsearch-node3/ elasticsearch-node2
6.修改好node1,node2的配置文件后,依次启动
/root/elasticsearch-node1/bin/elasticsearch -d -Xms512m -Xmx512m
/root/elasticsearch-node2/bin/elasticsearch -d -Xms512m -Xmx512m
/root/elasticsearch-node3/bin/elasticsearch -d -Xms512m -Xmx512m
7.检查启动状态
[root@localhost ~]# ps -ef | grep elasticsearch
root       1892      1 26 16:32 pts/0    00:00:10 /root/jdk/bin/java -Xms256m -Xmx1g -Djava.awt.headless=true -XX:+UseParNewGC -XX:+UseConcMarkSweepGC -XX:CMSInitiatingOccupancyFraction=75 -XX:+UseCMSInitiatingOccupancyOnly -XX:+HeapDumpOnOutOfMemoryError -XX:+DisableExplicitGC -Dfile.encoding=UTF-8 -Delasticsearch -Des.path.home=/root/elasticsearch-node1 -cp :/root/elasticsearch-node1/lib/elasticsearch-1.7.3.jar:/root/elasticsearch-node1/lib/*:/root/elasticsearch-node1/lib/sigar/* -Xms512m -Xmx512m org.elasticsearch.bootstrap.Elasticsearch
root       1913      1 21 16:32 pts/0    00:00:07 /root/jdk/bin/java -Xms256m -Xmx1g -Djava.awt.headless=true -XX:+UseParNewGC -XX:+UseConcMarkSweepGC -XX:CMSInitiatingOccupancyFraction=75 -XX:+UseCMSInitiatingOccupancyOnly -XX:+HeapDumpOnOutOfMemoryError -XX:+DisableExplicitGC -Dfile.encoding=UTF-8 -Delasticsearch -Des.path.home=/root/elasticsearch-node2 -cp :/root/elasticsearch-node2/lib/elasticsearch-1.7.3.jar:/root/elasticsearch-node2/lib/*:/root/elasticsearch-node2/lib/sigar/* -Xms512m -Xmx512m org.elasticsearch.bootstrap.Elasticsearch
root       1952      1 28 16:32 pts/0    00:00:07 /root/jdk/bin/java -Xms256m -Xmx1g -Djava.awt.headless=true -XX:+UseParNewGC -XX:+UseConcMarkSweepGC -XX:CMSInitiatingOccupancyFraction=75 -XX:+UseCMSInitiatingOccupancyOnly -XX:+HeapDumpOnOutOfMemoryError -XX:+DisableExplicitGC -Dfile.encoding=UTF-8 -Delasticsearch -Des.path.home=/root/elasticsearch-node3 -cp :/root/elasticsearch-node3/lib/elasticsearch-1.7.3.jar:/root/elasticsearch-node3/lib/*:/root/elasticsearch-node3/lib/sigar/* -Xms512m -Xmx512m org.elasticsearch.bootstrap.Elasticsearch
root       2007   1150  0 16:33 pts/0    00:00:00 grep --color=auto elasticsearch
[root@localhost ~]#
8.集群的停止:可以通过如下命令关闭集群所有节点
curl -XPOST http://192.168.0.45:9200/_cluster/nodes/_shutdown
9. 安装可视化插件
BigDesk Plugin : 对集群中es状态进行监控。
Elasticsearch Head Plugin: 对ES进行各种操作,如查询、删除、浏览索引等
cd /root/elasticsearch-node1/bin
./plugin -install mobz/elasticsearch-head
./plugin -install lukas-vlcek/bigdesk
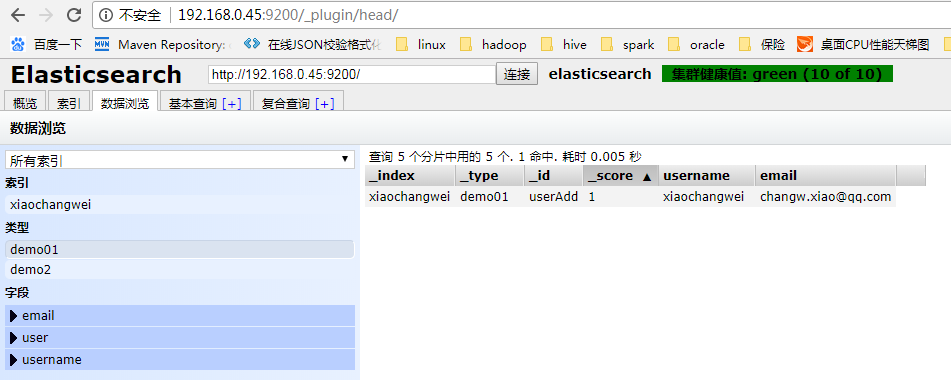
10.打开浏览器,输入地址 http://192.168.0.45:9200/_plugin/head/
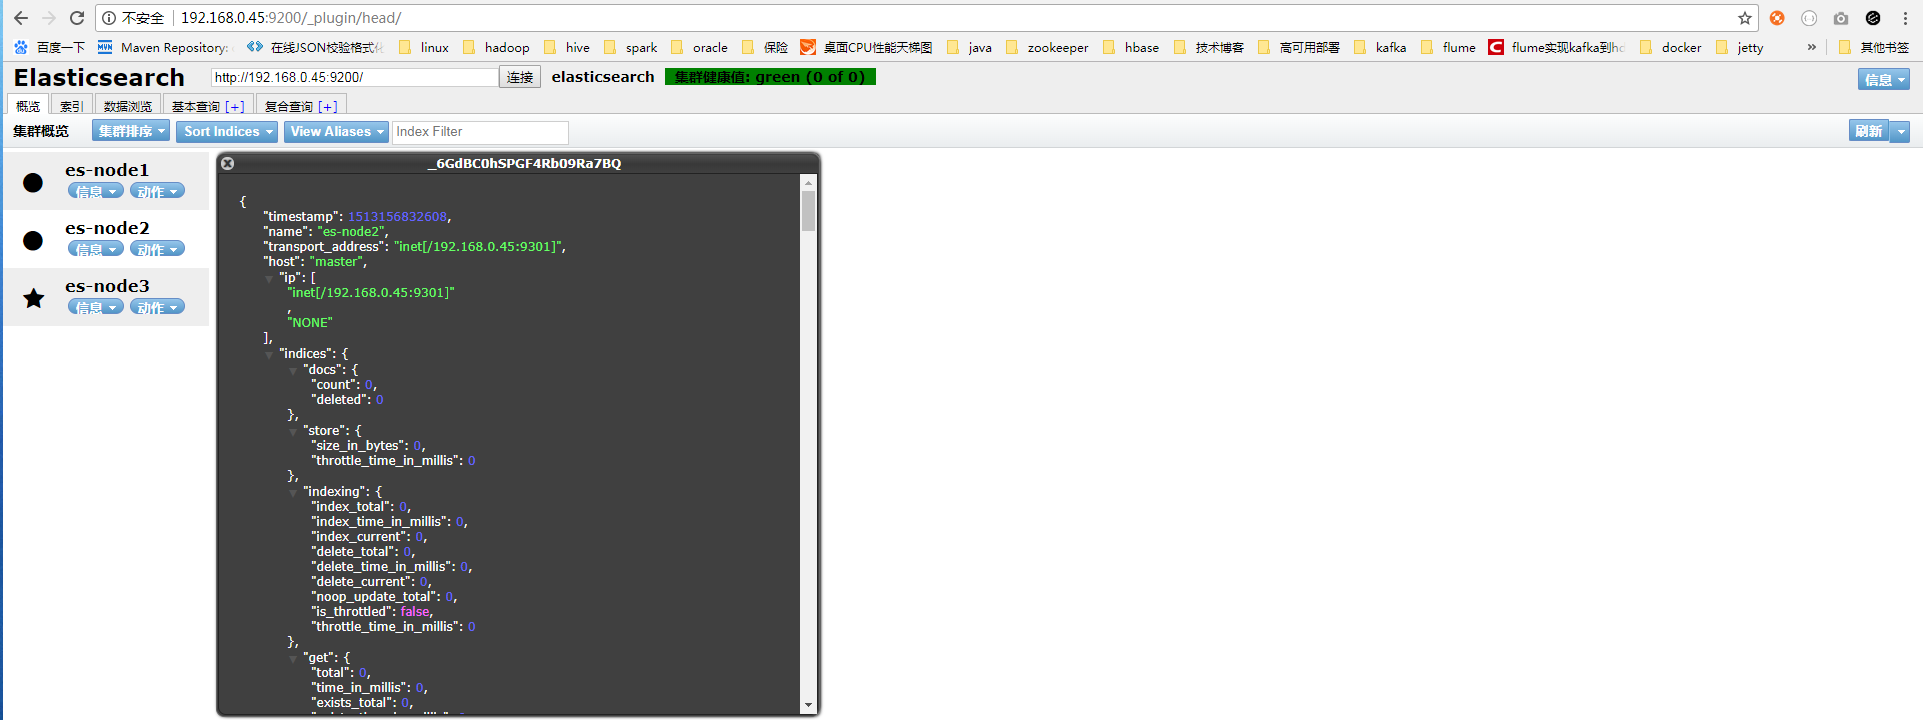
可以看见节点信息以及相关的操作
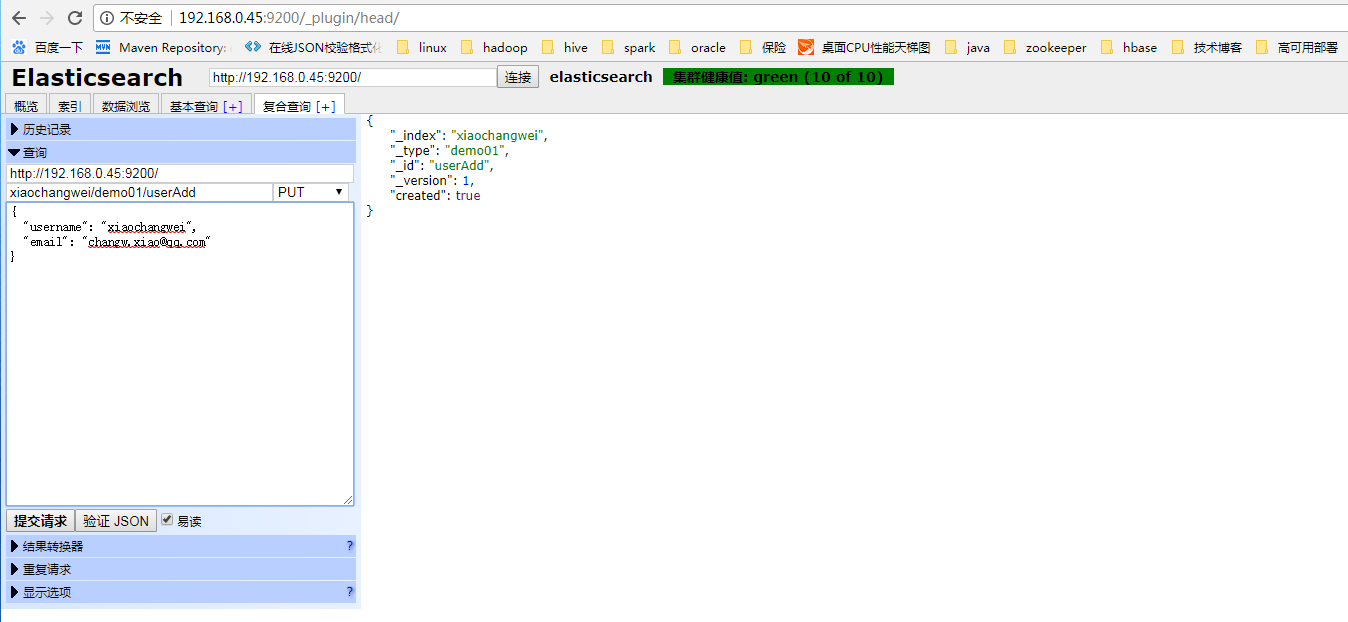
通过页面添加
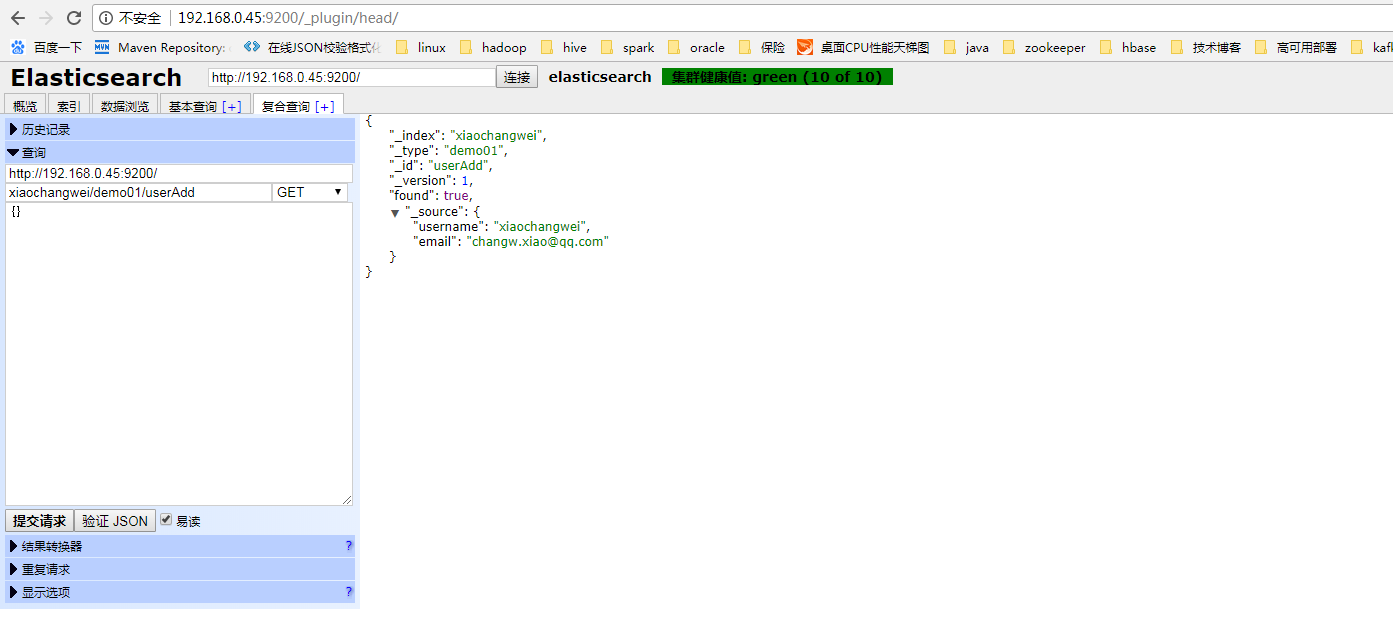
通过get方式获取
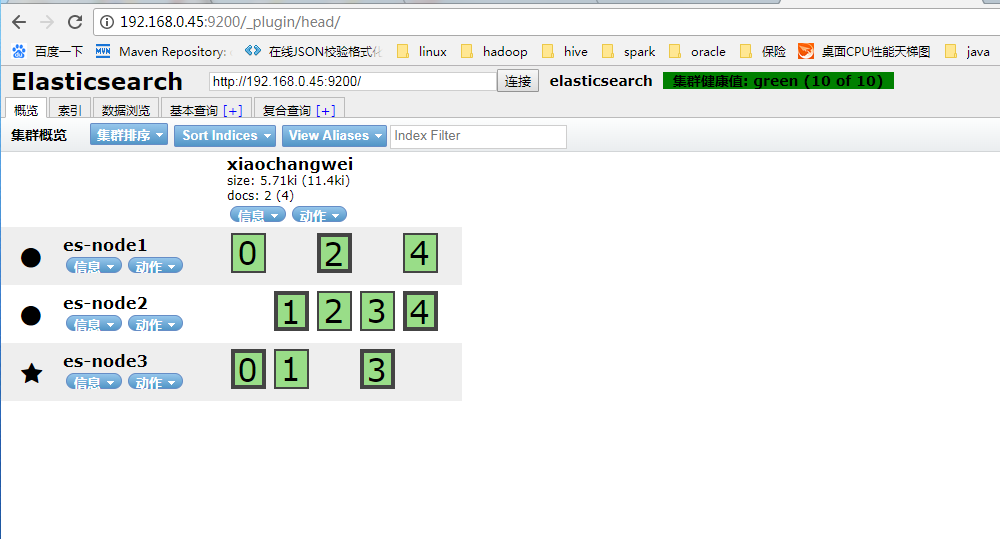
再返回首页查看
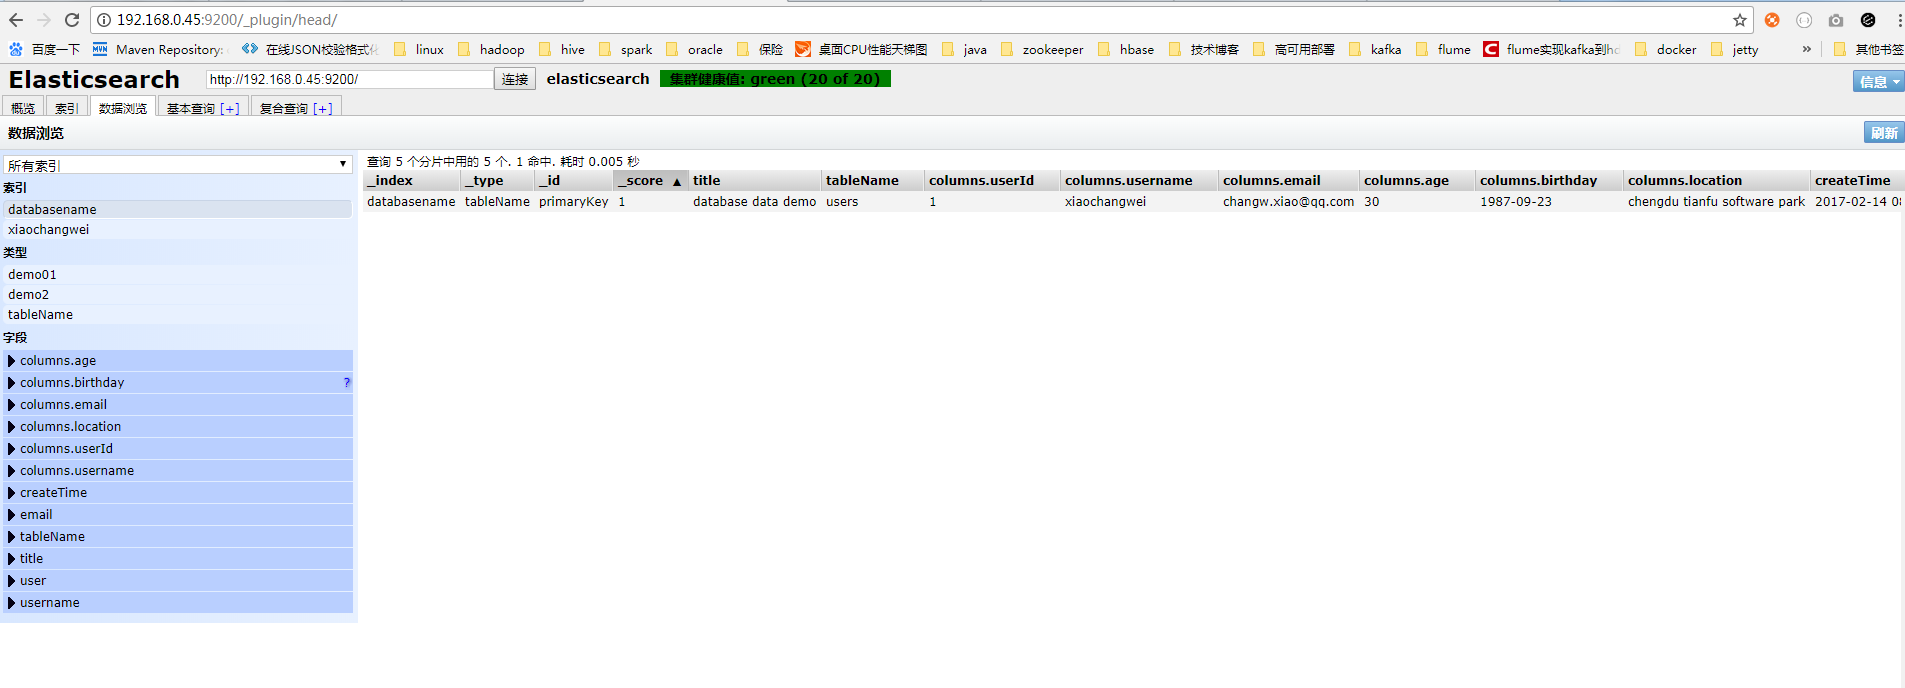
全部的数据可以通过数据浏览来看,能看到索引、类型、字段已经对应的值
另外需要补充下,通过命令put数据进去各层级分别代表什么
如通过下列命令:
http://192.168.0.45:9200/databasename/tableName/primaryKey

{
  "title": "database data demo",
  "tableName": "users",
  "columns": {
    "userId": "1",
    "username": "xiaochangwei",
    "email": "changw.xiao@qq.com",
    "age": "30",
    "birthday": "1987-09-23",
    "location": "chengdu tianfu software park"
  },
  "createTime": "2017-02-14 08:24:00"
}
url中三层可以理解为mysql中的数据库,表名,还有主键, 以后搜索的时候就按照这个顺序来搜索了,意思就是这个意思,表达不好 不好意思
再罗嗦一句, databasename必须为小写

另外,我这里加入的是复合字段,即columns里面又包含了多个字段,elasticsearch中这样用的时候特多,存储时,是按 父字段.子字段方式存的, 如:
更多命令请参考elasticsearch使用指南,或者参考 http://blog.csdn.net/tanfei113/article/details/51934037
后续会在springboot+springCloud系列学习内容中依次展示主流工具的使用
部分代码已经提交到git上了,请参考顶部地址获取,有不对的地方请指正
-------------------------------------------------------------------------
在springboot中使用elasticsearch的时候,用上述安装的1.7.3版本始终链接不上,后来发现是springboot 1.5.3.RELEASE 和1.7.3 版本不匹配 https://github.com/spring-projects/spring-data-elasticsearch/wiki/Spring-Data-Elasticsearch---Spring-Boot---version-matrix
故安装了2.3.3版本的,安装方式和上面类似,就简单的记录下了
cd /usr/src
wget https://download.elastic.co/elasticsearch/release/org/elasticsearch/distribution/zip/elasticsearch/2.3.3/elasticsearch-2.3.3.zip
unzip elasticsearch-2.3.3.zip
mv elasticsearch-2.3.3 elasticsearch-2.3.3-node1
cp -ri elasticsearch-2.3.3-node1 elasticsearch-2.3.3-node2
修改配置文件
node1的配置文件为


# ======================== Elasticsearch Configuration =========================
#
# NOTE: Elasticsearch comes with reasonable defaults for most settings.
#       Before you set out to tweak and tune the configuration, make sure you
#       understand what are you trying to accomplish and the consequences.
#
# The primary way of configuring a node is via this file. This template lists
# the most important settings you may want to configure for a production cluster.
#
# Please see the documentation for further information on configuration options:
# <http://www.elastic.co/guide/en/elasticsearch/reference/current/setup-configuration.html>
#
# ---------------------------------- Cluster -----------------------------------
#
# Use a descriptive name for your cluster:
#
cluster.name: es-cluster
#
# ------------------------------------ Node ------------------------------------
#
# Use a descriptive name for the node:
#
node.name: node-1
#
# Add custom attributes to the node:
#
# node.rack: r1
#
# ----------------------------------- Paths ------------------------------------
#
# Path to directory where to store the data (separate multiple locations by comma):
#
# path.data: /path/to/data
#
# Path to log files:
#
# path.logs: /path/to/logs
#
# ----------------------------------- Memory -----------------------------------
#
# Lock the memory on startup:
#
# bootstrap.mlockall: true
#
# Make sure that the `ES_HEAP_SIZE` environment variable is set to about half the memory
# available on the system and that the owner of the process is allowed to use this limit.
#
# Elasticsearch performs poorly when the system is swapping the memory.
#
# ---------------------------------- Network -----------------------------------
#
# Set the bind address to a specific IP (IPv4 or IPv6):
#
network.host: 192.168.0.45
#
# Set a custom port for HTTP:
#
http.port: 9200
transport.tcp.port: 9300
node.master: true
node.data: true
#
# For more information, see the documentation at:
# <http://www.elastic.co/guide/en/elasticsearch/reference/current/modules-network.html>
#
# --------------------------------- Discovery ----------------------------------
#
# Pass an initial list of hosts to perform discovery when new node is started:
# The default list of hosts is ["127.0.0.1", "[::1]"]
#
# discovery.zen.ping.unicast.hosts: ["host1", "host2"]
discovery.zen.ping.multicast.enabled: false
discovery.zen.ping.unicast.hosts: ["192.168.0.45:9300","192.168.0.45:9301"]
#
# Prevent the "split brain" by configuring the majority of nodes (total number of nodes / 2 + 1):
#
discovery.zen.minimum_master_nodes: 2
#
# For more information, see the documentation at:
# <http://www.elastic.co/guide/en/elasticsearch/reference/current/modules-discovery.html>
#
# ---------------------------------- Gateway -----------------------------------
#
# Block initial recovery after a full cluster restart until N nodes are started:
#
# gateway.recover_after_nodes: 3
#
# For more information, see the documentation at:
# <http://www.elastic.co/guide/en/elasticsearch/reference/current/modules-gateway.html>
#
# ---------------------------------- Various -----------------------------------
#
# Disable starting multiple nodes on a single system:
#
# node.max_local_storage_nodes: 1
#
# Require explicit names when deleting indices:
#
# action.destructive_requires_name: true
node2的配置文件为
# ======================== Elasticsearch Configuration =========================
#
# NOTE: Elasticsearch comes with reasonable defaults for most settings.
#       Before you set out to tweak and tune the configuration, make sure you
#       understand what are you trying to accomplish and the consequences.
#
# The primary way of configuring a node is via this file. This template lists
# the most important settings you may want to configure for a production cluster.
#
# Please see the documentation for further information on configuration options:
# <http://www.elastic.co/guide/en/elasticsearch/reference/current/setup-configuration.html>
#
# ---------------------------------- Cluster -----------------------------------
#
# Use a descriptive name for your cluster:
#
cluster.name: es-cluster
#
# ------------------------------------ Node ------------------------------------
#
# Use a descriptive name for the node:
#
node.name: node-2
#
# Add custom attributes to the node:
#
# node.rack: r1
#
# ----------------------------------- Paths ------------------------------------
#
# Path to directory where to store the data (separate multiple locations by comma):
#
# path.data: /path/to/data
#
# Path to log files:
#
# path.logs: /path/to/logs
#
# ----------------------------------- Memory -----------------------------------
#
# Lock the memory on startup:
#
# bootstrap.mlockall: true
#
# Make sure that the `ES_HEAP_SIZE` environment variable is set to about half the memory
# available on the system and that the owner of the process is allowed to use this limit.
#
# Elasticsearch performs poorly when the system is swapping the memory.
#
# ---------------------------------- Network -----------------------------------
#
# Set the bind address to a specific IP (IPv4 or IPv6):
#
network.host: 192.168.0.45
#
# Set a custom port for HTTP:
#
http.port: 9201
transport.tcp.port: 9301
node.master: true
node.data: true
#
# For more information, see the documentation at:
# <http://www.elastic.co/guide/en/elasticsearch/reference/current/modules-network.html>
#
# --------------------------------- Discovery ----------------------------------
#
# Pass an initial list of hosts to perform discovery when new node is started:
# The default list of hosts is ["127.0.0.1", "[::1]"]
#
# discovery.zen.ping.unicast.hosts: ["host1", "host2"]
discovery.zen.ping.multicast.enabled: false
discovery.zen.ping.unicast.hosts: ["192.168.0.45:9300","192.168.0.45:9301"]
#
# Prevent the "split brain" by configuring the majority of nodes (total number of nodes / 2 + 1):
#
discovery.zen.minimum_master_nodes: 2
#
# For more information, see the documentation at:
# <http://www.elastic.co/guide/en/elasticsearch/reference/current/modules-discovery.html>
#
# ---------------------------------- Gateway -----------------------------------
#
# Block initial recovery after a full cluster restart until N nodes are started:
#
# gateway.recover_after_nodes: 3
#
# For more information, see the documentation at:
# <http://www.elastic.co/guide/en/elasticsearch/reference/current/modules-gateway.html>
#
# ---------------------------------- Various -----------------------------------
#
# Disable starting multiple nodes on a single system:
#
# node.max_local_storage_nodes: 1
#
# Require explicit names when deleting indices:
#
# action.destructive_requires_name: true
不能使用root用户启动,所以必须新建用户并授权elasticsearch-2.3.3-node1 和 elasticsearch-2.3.3-node2目录的读写权限
最后启动
[dev@master logs]$ /usr/src/es-node1/bin/elasticsearch -d
[dev@master logs]$ /usr/src/es-node2/bin/elasticsearch -d
[dev@master logs]$ ps -ef | grep elastic
dev        2528      1  8 23:40 pts/3    00:00:07 /usr/src/jdk/bin/java -Xms256m -Xmx1g -Djava.awt.headless=true -XX:+UseParNewGC -XX:+UseConcMarkSweepGC -XX:CMSInitiatingOccupancyFraction=75 -XX:+UseCMSInitiatingOccupancyOnly -XX:+HeapDumpOnOutOfMemoryError -XX:+DisableExplicitGC -Dfile.encoding=UTF-8 -Djna.nosys=true -Des.path.home=/usr/src/es-node1 -cp /usr/src/es-node1/lib/elasticsearch-2.3.3.jar:/usr/src/es-node1/lib/* org.elasticsearch.bootstrap.Elasticsearch start -d
dev        2567      1  9 23:40 pts/3    00:00:07 /usr/src/jdk/bin/java -Xms256m -Xmx1g -Djava.awt.headless=true -XX:+UseParNewGC -XX:+UseConcMarkSweepGC -XX:CMSInitiatingOccupancyFraction=75 -XX:+UseCMSInitiatingOccupancyOnly -XX:+HeapDumpOnOutOfMemoryError -XX:+DisableExplicitGC -Dfile.encoding=UTF-8 -Djna.nosys=true -Des.path.home=/usr/src/es-node2 -cp /usr/src/es-node2/lib/elasticsearch-2.3.3.jar:/usr/src/es-node2/lib/* org.elasticsearch.bootstrap.Elasticsearch start -d
dev        2612   2326  0 23:42 pts/3    00:00:00 grep --color=auto elastic
[dev@master logs]$