一、Action名称的搜索顺序
1.获得请求路径的URI,例如url是:http://server/struts2/path1/path2/path3/test.action
2.首先寻找namespace为/path1/path2/path3的package,如果不存在这个package则执行步骤3;如果存在这个package,则在这个package中寻找名字为test的action,当在该package下寻找不到action 时就会直接跑到默认namaspace的package里面去寻找action(默认的命名空间为空字符串“” ) ,如果在默认namaspace的package里面还寻找不到该action,页面提示找不到action
3.寻找namespace为/path1/path2的package,如果不存在这个package,则转至步骤4;如果存在这个package,则在这个package中寻找名字为test的action,当在该package中寻找不到action 时就会直接跑到默认namaspace的package里面去找名字为test的action ,在默认namaspace的package里面还寻找不到该action,页面提示找不到action
4.寻找namespace为/path1的package,如果不存在这个package则执行步骤5;如果存在这个package,则在这个package中寻找名字为test的action,当在该package中寻找不到action 时就会直接跑到默认namaspace的package里面去找名字为test的action ,在默认namaspace的package里面还寻找不到该action,页面提示找不到action
5.寻找namespace为/的package,如果存在这个package,则在这个package中寻找名字为test的action,当在package中寻找不到action或者不存在这个package时,都会去默认namaspace的package里面寻找action,如果还是找不到,页面提示找不到action。
二、Action配置中的各项默认值
<package name="itcast" namespace="/test" extends="struts-default">
        <action name="helloworld" class="cn.itcast.action.HelloWorldAction" method="execute" >
    <result name="success">/WEB-INF/page/hello.jsp</result>
        </action>
  </package
1>如果没有为action指定class,默认是ActionSupport。
2>如果没有为action指定method,默认执行action中的execute() 方法。
3>如果没有指定result的name属性,默认值为success。
三、Action中result的各种转发类型
<action name="helloworld" class="cn.itcast.action.HelloWorldAction">
    <result name="success">/WEB-INF/page/hello.jsp</result>
</action>
result配置类似于struts1中的forward,但struts2中提供了多种结果类型,常用的类型有: dispatcher(默认值)、 redirect 、 redirectAction 、 plainText。
在result中还可以使用${属性名}表达式访问action中的属性,表达式里的属性名对应action中的属性。如下:
<result type="redirect">/view.jsp?id=${id}</result>
下面是redirectAction 结果类型的例子,如果重定向的action中同一个包下:
<result type="redirectAction">helloworld</result>
如果重定向的action在别的命名空间下:
<result type="redirectAction">
    <param name="actionName">helloworld</param>
    <param name="namespace">/test</param>
</result>
plaintext:显示原始文件内容,例如:当我们需要原样显示jsp文件源代码 的时候,我们可以使用此类型。
<result name="source" type="plainText ">
    <param name="location">/xxx.jsp</param>
    <param name="charSet">UTF-8</param><!-- 指定读取文件的编码 -->
</result>
多个Action共享一个视图--全局result配置
当多个action中都使用到了相同视图,这时我们应该把result定义为全局视图。struts1中提供了全局forward,struts2中也提供了相似功能:
<package ....>
    <global-results>
        <result name="message">/message.jsp</result>
    </global-results>
</package>
我的代码保留:
<?xml version="1.0" encoding="UTF-8" ?>
<!DOCTYPE struts PUBLIC
    "-//Apache Software Foundation//DTD Struts Configuration 2.0//EN"
    "http://struts.apache.org/dtds/struts-2.0.dtd">

<struts>
    <!--  全局包,供继承使用,各个包访问全视图-->
    <package name="base" extends="struts-default">
        <global-results>
            <result name="message">/WEB-INF/page/message.jsp</result>
        </global-results>
    </package>

    <package name="dzq" namespace="/test" extends="struts-default">
        <!-- 全局视图配置, 包内访问 -->
        <global-results>
            <result name="message">/WEB-INF/page/message.jsp</result>
        </global-results>

        <!-- 在action中返回视图,包内访问 -->
        <action name="manager" class="com.dzq.action.HelloWorldAction"
            method="add">
        </action>

        <action name="helloworld" class="com.dzq.action.HelloWorldAction"
            method="execute">
            <!-- 默认是服务器请求转发 -->
            <result name="success">/WEB-INF/page/hello.jsp</result>
        </action>

        <!-- action的各项默认值 ,不指定属性,使用默认值 -->
        <action name="addUI">
            <result>/WEB-INF/page/employeeAdd.jsp</result>
        </action>


        <!-- 浏览器重定向 指定type属性 -->
        <!-- <action name="redirect"> <result type="redirect">/employeeAdd.jsp?username=${username}</result>
            </action> -->

        <!-- 带参数的请求重定向 使用ognl表达式${} 参数有中文,在Action中URLEncoder对中文进行编码 -->
        <action name="list" class="com.dzq.action.HelloWorldAction"
            method="execute">
            <result name="success" type="redirect">/employeeAdd.jsp?username=${username}
            </result>
        </action>

        <!-- 请求重定向到同一个包下的Action,eg: list ,两次重定向 -->
        <action name="redirectAction">
            <result type="redirectAction">list</result>
        </action>

        <!-- 请求重定向到不同包下的Action,使用属性param,为属性注入值eg:hello -->
        <action name="redirectAction1">
            <result type="redirectAction">
                <param name="actionName">hello</param>
                <param name="namespace">/test1</param>
            </result>
        </action>


        <!-- 显示视图的源代码,指定type值为plainText <action name="plainText"> <result type="plainText">/index.jsp</result>
            </action> -->
        <!-- 显示视图的源代码,源代码中有中文,需要用param为其指定属性,指定type值为plainText -->
        <action name="plainText">
            <result type="plainText">
                <param name="location">/index.jsp</param>
                <param name="charSet">UTF-8</param><!-- 指定读取文件的编码 -->
            </result>
        </action>
    </package>

    <package name="other" namespace="/test1" extends="base">
        <action name="hello">
            <result>/WEB-INF/page/hello.jsp</result>
        </action>
        <!-- 在action中返回视图,包外访问 -->
    <action name="manager1" class="com.dzq.action.HelloWorldAction"
        method="add">
    </action>
    </package>

</struts>
四、 为Action的属性注入值
Struts2为Action中的属性提供了依赖注入功能,在struts2的配置文件中,我们可以很方便地为Action中的属性注入值。注意:属性必须提供setter方法。
public class HelloWorldAction{
    private String savePath;

    public String getSavePath() {
        return savePath;
    }
    public void setSavePath(String savePath) {
        this.savePath = savePath;
    }
       ......
}
<package name="itcast" namespace="/test" extends="struts-default">
    <action name="helloworld" class="cn.itcast.action.HelloWorldAction" >
        <param name="savePath">/images</param>
        <result name="success">/WEB-INF/page/hello.jsp</result>
    </action>
</package>
上面通过<param>节点为action的savePath属性注入“/images”
五、指定需要Struts 2处理的请求后缀
前面我们都是默认使用.action后缀访问Action。其实默认后缀是可以通过常量”struts.action.extension“进行修改的,例如:我们可以配置Struts 2只处理以.do为后缀的请求路径:
<?xml version="1.0" encoding="UTF-8"?>
<!DOCTYPE struts PUBLIC
    "-//Apache Software Foundation//DTD Struts Configuration 2.0//EN"
    "http://struts.apache.org/dtds/struts-2.0.dtd">
<struts>
    <constant name="struts.action.extension" value="do"/>
</struts>
如果用户需要指定多个请求后缀,则多个后缀之间以英文逗号(,)隔开。如:
<constant name="struts.action.extension" value="do,go"/>
六、细说常量定义
常量可以在struts.xml或struts.properties中配置,建议在struts.xml中配置,两种配置方式如下:
在struts.xml文件中配置常量
<struts>
    <constant name="struts.action.extension" value="do"/>
</struts>
在struts.properties中配置常量
struts.action.extension=do
因为常量可以在下面多个配置文件中进行定义,所以我们需要了解struts2加载常量的搜索顺序:
struts-default.xml
struts-plugin.xml
struts.xml
struts.properties
web.xml
如果在多个文件中配置了同一个常量,则后一个文件中配置的常量值会覆盖前面文件中配置的常量值.
常用的常量介绍:
<!-- 指定默认编码集,作用于HttpServletRequest的setCharacterEncoding方法 和freemarker 、velocity的输出 -->
    <constant name="struts.i18n.encoding" value="UTF-8"/>
    <!-- 该属性指定需要Struts 2处理的请求后缀,该属性的默认值是action,即所有匹配*.action的请求都由Struts2处理。
    如果用户需要指定多个请求后缀,则多个后缀之间以英文逗号(,)隔开。 -->
    <constant name="struts.action.extension" value="do"/>
    <!-- 设置浏览器是否缓存静态内容,默认值为true(生产环境下使用),开发阶段最好关闭 -->
    <constant name="struts.serve.static.browserCache" value="false"/>
    <!-- 当struts的配置文件修改后,系统是否自动重新加载该文件,默认值为false(生产环境下使用),开发阶段最好打开 -->
    <constant name="struts.configuration.xml.reload" value="true"/>
    <!-- 开发模式下使用,这样可以打印出更详细的错误信息 -->
    <constant name="struts.devMode" value="true" />
     <!-- 默认的视图主题 -->
    <constant name="struts.ui.theme" value="simple" />
    <!– 与spring集成时,指定由spring负责action对象的创建 -->
    <constant name="struts.objectFactory" value="spring" />
    <!–该属性设置Struts 2是否支持动态方法调用,该属性的默认值是true。如果需要关闭动态方法调用,则可设置该属性为false。 -->
<constant name="struts.enable.DynamicMethodInvocation" value="false"/>
 <!--上传文件的大小限制-->
<constant name="struts.multipart.maxSize" value=“10701096"/>
七、Struts2的处理流程
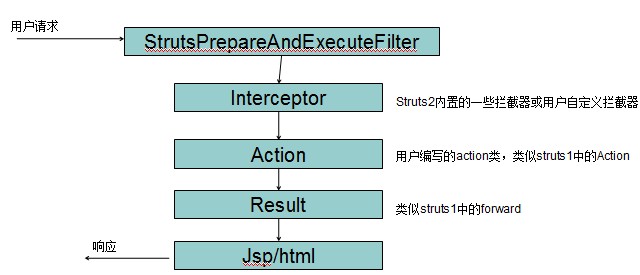
StrutsPrepareAndExecuteFilter是Struts 2框架的核心控制器,它负责拦截由<url-pattern>/*</url-pattern>指定的所有用户请求,当用户请求到达时,该Filter会过滤用户的请求。默认情况下,如果用户请求的路径不带后缀或者后缀以.action结尾,这时请求将被转入Struts 2框架处理,否则Struts 2框架将略过该请求的处理。当请求转入Struts 2框架处理时会先经过一系列的拦截器,然后再到Action。与Struts1不同,Struts2对用户的每一次请求都会创建一个Action,所以Struts2中的Action是线程安全的。
八、为应用指定多个struts配置文件
在大部分应用里,随着应用规模的增加,系统中Action的数量也会大量增加,导致struts.xml配置文件变得非常臃肿。为了避免struts.xml文件过于庞大、臃肿,提高struts.xml文件的可读性,我们可以将一个struts.xml配置文件分解成多个配置文件,然后在struts.xml文件中包含其他配置文件。下面的struts.xml通过<include>元素指定多个配置文件:
<?xml version="1.0" encoding="UTF-8"?>
<!DOCTYPE struts PUBLIC
    "-//Apache Software Foundation//DTD Struts Configuration 2.0//EN"
    "http://struts.apache.org/dtds/struts-2.0.dtd">
<struts>
    <include file="struts-user.xml"/>
    <include file="struts-order.xml"/>
</struts>
通过这种方式,我们就可以将Struts 2的Action按模块添加在多个配置文件中。
九、使用通配符定义action
<package name="itcast" namespace="/test" extends="struts-default">
    <action name="helloworld_*" class="cn.itcast.action.HelloWorldAction" method="{1}">
        <result name="success">/WEB-INF/page/hello.jsp</result>
    </action>
</package>
public class HelloWorldAction{
    private String message;
    ....
    public String execute() throws Exception{
        this.message = "我的第一个struts2应用";
        return "success";
    }

    public String other() throws Exception{
        this.message = "第二个方法";
        return "success";
    }
}
要访问other()方法,可以通过这样的URL访问:/test/helloworld_other.action
我的代码保留:
<?xml version="1.0" encoding="UTF-8" ?>
<!DOCTYPE struts PUBLIC
    "-//Apache Software Foundation//DTD Struts Configuration 2.0//EN"
    "http://struts.apache.org/dtds/struts-2.0.dtd">

<struts>

    <!-- 指定访问后缀 -->
    <constant name="struts.action.extension" value="do,action"/>
    <package name="department" namespace="/test/department" extends="struts-default">
        <action name="helloworld" class="com.dzq.action.HelloWorldAction"
            method="execute">
            <param name="savepath">department</param>
            <!-- 默认是服务器请求转发 -->
            <result name="success">/WEB-INF/page/message.jsp</result>
        </action>
        <!--使用通配符访问  -->
        <action name="list_*" class="com.dzq.action.HelloWorldAction" method="{1}">
            <result name="success">/WEB-INF/page/message.jsp</result>
        </action>
    </package>
    <!-- 包含其他配置文件
    <include file="department.xml"/>
    <include file="employee.xml"/>
    -->
</struts>
十、接收请求参数
•采用基本类型接收请求参数(get/post)
在Action类中定义与请求参数同名的属性,struts2便能自动接收请求参数并赋予给同名属性。
请求路径: http://localhost:8080/test/view.action?id=78
public class ProductAction {
      private Integer id;
      public void setId(Integer id) {//struts2通过反射技术调用与请求参数同名的属性的setter方法来获取请求参数值
             this.id = id;
      }
      public Integer getId() {return id;}
  }
采用复合类型接收请求参数
请求路径: http://localhost:8080/test/view.action?product.id=78
public class ProductAction {
   private Product product;
   public void setProduct(Product product) {  this.product = product;  }
   public Product getProduct() {return product;}
}
Struts2首先通过反射技术调用Product的默认构造器创建product对象,然后再通过反射技术调用product中与请求参数同名的属性的setter方法来获取请求参数值。
关于struts2.1.6接收中文请求参数乱码问题
struts2.1.6版本中存在一个Bug,即接收到的中文请求参数为乱码(以post方式提交),原因是struts2.1.6在获取并使用了请求参数后才调用HttpServletRequest的setCharacterEncoding()方法进行编码设置 ,导致应用使用的就是乱码请求参数。这个bug在struts2.1.8中已经被解决,如果你使用的是struts2.1.6,要解决这个问题,你可以这样做:新建一个Filter,把这个Filter放置在Struts2的Filter之前,然后在doFilter()方法里添加以下代码
public void doFilter(...){
    HttpServletRequest req = (HttpServletRequest) request;
    req.setCharacterEncoding("UTF-8");//应根据你使用的编码替换UTF-8
    filterchain.doFilter(request, response);
}
我的代码保留:


package com.dzq.domian;

public class Person {
    private int id;
    private String name;


    public int getId() {
        return id;
    }

    public void setId(int id) {
        this.id = id;
    }

    public String getName() {
        return name;
    }

    public void setName(String name) {
        this.name = name;
    }

}
package com.dzq.action;

import java.util.Date;

import com.dzq.domian.Person;

public class HelloWorldAction {

    private int id;
    private String name;
    private Date birthday;
    private Person person;


    public Date getBirthday() {
        return birthday;
    }

    public void setBirthday(Date birthday) {
        System.out.println(birthday);
        this.birthday = birthday;
    }

    public Person getPerson() {
        return person;
    }

    public void setPerson(Person person) {
        this.person = person;
    }

    public int getId() {
        return id;
    }

    public void setId(int id) {
        this.id = id;
    }

    public String getName() {
        return name;
    }

    public void setName(String name) {
        this.name = name;
    }

    public String addUI() {
        return "success";
    }

    public String execute() throws Exception {
        return "success";
    }

}
<?xml version="1.0" encoding="UTF-8" ?>
<!DOCTYPE struts PUBLIC
    "-//Apache Software Foundation//DTD Struts Configuration 2.0//EN"
    "http://struts.apache.org/dtds/struts-2.0.dtd">

<struts>

    <!-- 指定访问后缀 -->
    <constant name="struts.action.extension" value="do,action"/>
    <package name="department" namespace="/test/department" extends="struts-default">
        <action name="helloworld" class="com.dzq.action.HelloWorldAction"
            method="execute">
            <param name="savepath">department</param>
            <!-- 默认是服务器请求转发 -->
            <result name="success">/WEB-INF/page/message.jsp</result>
        </action>
        <!--使用通配符访问  -->
        <action name="list_*" class="com.dzq.action.HelloWorldAction" method="{1}">
            <result name="success">/WEB-INF/page/message.jsp</result>
        </action>
    </package>
</struts>
<%@ page language="java" contentType="text/html; charset=UTF-8"
    pageEncoding="UTF-8"%>
<!DOCTYPE html PUBLIC "-//W3C//DTD HTML 4.01 Transitional//EN" "http://www.w3.org/TR/html4/loose.dtd">
<html>
<head>
<meta http-equiv="Content-Type" content="text/html; charset=UTF-8">
<title>Insert title here</title>
</head>
<body>
<form action="${pageContext.request.contextPath }/test/department/list_addUI.do" method="post">
id:<input type="text" name="person.id"/><br>
name:<input type="text" name="person.name">
<input type="submit" value="提交"/>
</form>
</body>
</html>
十一、自定义类型转换器
java.util.Date类型的属性可以接收格式为2009-07-20的请求参数值。但如果我们需要接收格式为20091221的请求参数,我们必须定义类型转换器,否则struts2无法自动完成类型转换。
import java.util.Date;
public class HelloWorldAction {
    private Date createtime;

    public Date getCreatetime() {
        return createtime;
    }

    public void setCreatetime(Date createtime) {
        this.createtime = createtime;
    }
}
public class DateConverter extends DefaultTypeConverter {
                @Override  public Object convertValue(Map context, Object value, Class toType) {
    SimpleDateFormat dateFormat = new SimpleDateFormat("yyyyMMdd");
    try {
        if(toType == Date.class){//当字符串向Date类型转换时
            String[] params = (String[]) value;// Request.getParameterValues()
            return dateFormat.parse(params[0]);
        }else if(toType == String.class){//当Date转换成字符串时
            Date date = (Date) value;
            return dateFormat.format(date);
        }
    } catch (ParseException e) {}
    return null;
    }
}
将上面的类型转换器注册为局部类型转换器:
在Action类所在的包下放置ActionClassName-conversion.properties文件,ActionClassName是Action的类名,后面的-conversion.properties是固定写法,对于本例而言,文件的名称应为HelloWorldAction-conversion.properties 。在properties文件中的内容为:
属性名称=类型转换器的全类名
对于本例而言, HelloWorldAction-conversion.properties文件中的内容为:
createtime= cn.itcast.conversion.DateConverter
将上面的类型转换器注册为全局类型转换器:
在WEB-INF/classes下放置xwork-conversion.properties文件 。在properties文件中的内容为:
待转换的类型=类型转换器的全类名
对于本例而言, xwork-conversion.properties文件中的内容为:
java.util.Date= cn.itcast.conversion.DateConverter
十二、访问或添加request/session/application属性
public String scope() throws Exception{
   ActionContext ctx = ActionContext.getContext();
   ctx.getApplication().put("app", "应用范围");//往ServletContext里放入app
   ctx.getSession().put("ses", "session范围");//往session里放入ses
   ctx.put("req", "request范围");//往request里放入req
   return "scope";
}
<body>
    ${applicationScope.app} <br>
    ${sessionScope.ses}<br>
    ${requestScope.req}<br>
 </body>
获取HttpServletRequest / HttpSession / ServletContext / HttpServletResponse对象
方法一,通过ServletActionContext.类直接获取:
public String rsa() throws Exception{
    HttpServletRequest request = ServletActionContext.getRequest();
    ServletContext servletContext = ServletActionContext.getServletContext();
    request.getSession()
    HttpServletResponse response = ServletActionContext.getResponse();
    return "scope";
}
方法二,实现指定接口,由struts框架运行时注入:
public class HelloWorldAction implements ServletRequestAware, ServletResponseAware, ServletContextAware{
    private HttpServletRequest request;
    private ServletContext servletContext;
    private HttpServletResponse response;
    public void setServletRequest(HttpServletRequest req) {
        this.request=req;
    }
    public void setServletResponse(HttpServletResponse res) {
        this.response=res;
    }
    public void setServletContext(ServletContext ser) {
        this.servletContext=ser;
    }
}
我的代码保留:
package com.dzq.type.converter;

import java.text.SimpleDateFormat;
import java.util.Date;
import java.util.Map;

import com.opensymphony.xwork2.conversion.impl.DefaultTypeConverter;

public class DateTypeConverter extends DefaultTypeConverter {


    @Override
    public Object convertValue(Map<String, Object> context, Object value,
            Class toType) {
        SimpleDateFormat dateFormat=new SimpleDateFormat("yyyyMMdd");
        try {
            if(toType==Date.class){
                String [] params=(String[]) value;
                return dateFormat.parse(params[0]);
            }else if(toType==String.class){
                Date date=(Date) value;
                return dateFormat.format(date);
            }
        } catch (Exception e) {
            e.printStackTrace();
        }
        return null;
    }
}
package com.dzq.action;

import javax.servlet.ServletContext;
import javax.servlet.http.HttpServletRequest;
import org.apache.struts2.ServletActionContext;

import com.opensymphony.xwork2.ActionContext;

public class HelloWorldAction {
    public String execute () {
           ActionContext ctx = ActionContext.getContext();
           ctx.getApplication().put("app", "应用范围");//往ServletContext里放入app
           ctx.getSession().put("ses", "session范围");//往session里放入ses
           ctx.put("req", "request范围");//往request里放入req
           return "message";
        }

    public String rsa() throws Exception{
        HttpServletRequest request = ServletActionContext.getRequest();
        ServletContext servletContext = ServletActionContext.getServletContext();
        request.setAttribute("hello", "request域");
        request.getSession().setAttribute("hello", "session域");
        servletContext.setAttribute("hello", "application域");
        return "message";
    }


}
<?xml version="1.0" encoding="UTF-8" ?>
<!DOCTYPE struts PUBLIC
    "-//Apache Software Foundation//DTD Struts Configuration 2.0//EN"
    "http://struts.apache.org/dtds/struts-2.0.dtd">

<struts>

    <!-- 指定访问后缀 -->
    <constant name="struts.action.extension" value="do,action"/>
    <package name="department" namespace="/test/department" extends="struts-default">
        <action name="helloworld" class="com.dzq.action.HelloWorldAction"
            method="execute">
            <result name="success">/WEB-INF/page/message.jsp</result>
        </action>
        <!--使用通配符访问  -->
        <action name="list_*" class="com.dzq.action.HelloWorldAction" method="{1}">
            <result name="message">/WEB-INF/page/message.jsp</result>
        </action>
    </package>
</struts>
十三、文件上传
第一步:在WEB-INF/lib下加入commons-fileupload-1.2.1.jar、commons-io-1.3.2.jar。这两个文件可以从http://commons.apache.org/下载。
第二步:把form表的enctype设置为:“multipart/form-data“,如下:
<form enctype="multipart/form-data" action="${pageContext.request.contextPath}/xxx.action" method="post">
  <input  type="file" name="uploadImage">
</form>
第三步:在Action类中添加以下属性,属性红色部分对应于表单中文件字段的名称:
public class HelloWorldAction{
  private File uploadImage;//得到上传的文件
  private String uploadImageContentType;//得到文件的类型
  private String uploadImageFileName;//得到文件的名称
  //这里略省了属性的getter/setter方法
  public String upload() throws Exception{
    String realpath = ServletActionContext.getServletContext().getRealPath("/images");
    File file = new File(realpath);
    if(!file.exists()) file.mkdirs();
    FileUtils.copyFile(uploadImage, new File(file, uploadImageFileName));
    return "success";
  }
}
多文件上传
第一步:在WEB-INF/lib下加入commons-fileupload-1.2.1.jar、commons-io-1.3.2.jar。这两个文件可以从http://commons.apache.org/下载。
第二步:把form表的enctype设置为:“multipart/form-data“,如下
<form enctype="multipart/form-data" action="${pageContext.request.contextPath}/xxx.action" method="post">
  <input  type="file" name="uploadImages">
  <input  type="file" name="uploadImages">
</form>
第三步:在Action类中添加以下属性,属性红色部分对应于表单中文件字段的名称:
public class HelloWorldAction{
  private File[] uploadImages;//得到上传的文件
  private String[] uploadImagesContentType;//得到文件的类型
  private String[] uploadImagesFileName;//得到文件的名称
  //这里略省了属性的getter/setter方法
  public String upload() throws Exception{
    String realpath = ServletActionContext.getServletContext().getRealPath("/images");
    File file = new File(realpath);
    if(!file.exists()) file.mkdirs();
    for(int i=0 ;i<uploadImages.length; i++){ File uploadImage = uploadImages[i];
    FileUtils.copyFile(uploadImage, new File(file, uploadImagesFileName[i]));
}
    return "success";
  }}
我的代码保留:
package com.dzq.action;

import java.io.File;

import org.apache.commons.io.FileUtils;
import org.apache.struts2.ServletActionContext;

import com.opensymphony.xwork2.ActionContext;

public class FileUploadAction {
    private File image;
    private String imageFileName;
    private File[] image1;
    private String []image1FileName;


    public String getImageFileName() {
        return imageFileName;
    }

    public void setImageFileName(String imageFileName) {
        this.imageFileName = imageFileName;
    }

    public File getImage() {
        return image;
    }

    public void setImage(File image) {
        this.image = image;
    }


    public File[] getImage1() {
        return image1;
    }

    public void setImage1(File[] image1) {
        this.image1 = image1;
    }

    public String[] getImage1FileName() {
        return image1FileName;
    }

    public void setImage1FileName(String[] image1Filename) {
        this.image1FileName = image1Filename;
    }

    public String execute()  throws Exception{
        String savepath=ServletActionContext.getServletContext().getRealPath("/images");
        System.out.println(savepath);
        if(image!=null){
        File savefile=new File(new File(savepath),imageFileName);
        if(!savefile.getParentFile().exists()){
            savefile.getParentFile().mkdirs();
        }
        FileUtils.copyFile(image,savefile);
        ActionContext.getContext().put("message", "上传成功");
        }
        return "upload";
    }

    public String manyexecute()  throws Exception{
        String savepath=ServletActionContext.getServletContext().getRealPath("/images");
        System.out.println(savepath);
        if(image1!=null){
            File savedir=new File(savepath);
            if(!savedir.getParentFile().exists()){
                savedir.getParentFile().mkdirs();
            }
        for(int i=0;i<image1.length;i++){
            File savefile=new File(savedir,image1FileName[i]);
            FileUtils.copyFile(image1[i],savefile);

        }
        ActionContext.getContext().put("message", "上传成功");
        }
        return "upload1";
    }
}
<?xml version="1.0" encoding="UTF-8" ?>
<!DOCTYPE struts PUBLIC
    "-//Apache Software Foundation//DTD Struts Configuration 2.0//EN"
    "http://struts.apache.org/dtds/struts-2.0.dtd">

<struts>

    <!-- 指定访问后缀 -->
    <constant name="struts.action.extension" value="do,action"/>
    <!-- 设置文件上传大小限制 -->
    <constant name="struts.multipart.maxSize" value="10701096"/>
    <package name="department" namespace="/test/department" extends="struts-default">
        <action name="helloworld" class="com.dzq.action.HelloWorldAction"
            method="execute">
            <result name="success">/WEB-INF/page/message.jsp</result>
        </action>
        <!--使用通配符访问  -->
        <action name="list_*" class="com.dzq.action.HelloWorldAction" method="{1}">
            <result name="message">/WEB-INF/page/message.jsp</result>
        </action>
        <action name="upload" class="com.dzq.action.FileUploadAction" method="execute">
              <result name="upload">/WEB-INF/page/message.jsp</result>
        </action>
         <action name="upload1" class="com.dzq.action.FileUploadAction" method="manyexecute">
              <result name="upload1">/WEB-INF/page/message.jsp</result>
        </action>
    </package>
</struts>
<%@ page language="java" contentType="text/html; charset=UTF-8"
    pageEncoding="UTF-8"%>
<!DOCTYPE html PUBLIC "-//W3C//DTD HTML 4.01 Transitional//EN" "http://www.w3.org/TR/html4/loose.dtd">
<html>
<head>
<meta http-equiv="Content-Type" content="text/html; charset=UTF-8">
<title>Insert title here</title>
</head>
<body>
    <%-- <form action="${pageContext.request.contextPath }/test/department/list_addUI.do" method="post">
id:<input type="text" name="person.id"/><br>
name:<input type="text" name="person.name">

<input type="submit" value="提交"/>
</form> --%>
    <%-- <form
        action="${pageContext.request.contextPath }/test/department/upload.do"
        method="post" enctype="multipart/form-data">
        <input type="file" name="image" /> <input type="submit" value="上传" />
    </form> --%>

    <form
        action="${pageContext.request.contextPath }/test/department/upload1.do"
        method="post" enctype="multipart/form-data">
        <input type="file" name="image1" /> <br>
        <input type="file" name="image1" /><br>
        <input type="file" name="image1" /><br>
        <input type="submit" value="上传" />
    </form>
</body>
</html>