前言
本文是基于单体架构实现的角色的增删改查的功能。前台使用Bootstrap+Ajax+Jsp , 后端使用Spring+SpringMvc+MyBatis进行开发,相信使用过这些技术的小伙伴应该很好的理解以下的内容,也希望看了这篇文章小伙伴们有所收获。
准备工作
后端技术
| 技术 | 说明 | 官网 |
|---|---|---|
| Spring | Spring是一个轻量级控制反转(IoC)和面向切面(AOP)的容器框架。 | https://spring.io/ |
| SpringMvc | MVC框架 | https://spring.io/projects/spring-boot |
| MyBatis | 持久层框架 | https://mybatis.org/mybatis-3/zh/index.html |
| Druid | 数据库连接池 | https://github.com/alibaba/druid |
| log4j | 日志框架 | https://logging.apache.org/log4j/2.x/ |
前端技术
| Bootstrap | 简洁、直观、强悍的前端开发框架 | https://www.bootcss.com/ |
| Ajax | 前后端交互 | https://www.w3school.com.cn/ajax/index.asp |
| Jsp | 模板引擎 | https://www.runoob.com/jsp/jsp-intro.html |
| layer.js | 消息提示 | http://www.h-ui.net/lib/layer.js.shtml |
| Modal插件 | 模态框(Modal)是覆盖在父窗体上的子窗体 | https://www.runoob.com/bootstrap/bootstrap-modal-plugin.html |
| jquery.pagination.js | 分页插件 | http://www.jq22.com/yanshi5697/ |
角色维护-分页实现
分页前端功能实现

创建外部JavaScript源文件,role.js
在页面 role-page.jsp引入role.js文件
<script type="text/javascript" src="script/my-role.js"></script>
初始化全局函数
分页实现初始化全局函数,每页的条数,页码,模糊查询的关键词
//初始化全局变量
function initGlobalVariable() {
    window.pageSize = 5; //每页的条数
    window.pageNum = 1;  //页码
    window.keyword = ""; //关键词
}
声明分页函数
//给服务器发送请求获取分页数据(pageInfo),并在页面上显示分页效果(主体、页码导航条)
function showPage() {

    // 给服务器发送请求获取分页数据:PageInfo
    var pageInfo = getPageInfo();

    // 在页面上的表格中tbody标签内显示分页的主体数据
    generateTableBody(pageInfo);

    // 在页面上的表格中tfoot标签内显示分页的页码导航条
    initPagination(pageInfo);
}
获取分页数据
function getPageInfo() {

    // 以同步请求方式调用$.ajax()函数并获取返回值(返回值包含全部响应数据)
    var ajaxResult = $.ajax({
        "url": "role/search/by/keyword.action",
        "type": "post",
        "data": {
            "pageNum": (window.pageNum == undefined) ? 1 : window.pageNum,
            "pageSize": (window.pageSize == undefined) ? 5 : window.pageSize,
            "keyword": (window.keyword == undefined) ? "" : window.keyword
        },
        "dataType": "json",
        "async": false    // 为了保证getPageInfo()函数能够在Ajax请求拿到响应后获取PageInfo,需要设置为同步操作
    });

    // 从全部响应数据中获取JSON格式的响应体数据
    var resultEntity = ajaxResult.responseJSON;

    // 从响应体数据中获取result,判断当前请求是否成功
    var result = resultEntity.result;

    // 如果成功获取PageInfo
    if (result == "SUCCESS") {
        return resultEntity.data;
    }

    if (result == "FAILED") {
        layer.msg(resultEntity.message);
    }

    return null;
}
使用PageInfo数据在tbody标签内显示分页数据
function generateTableBody(pageInfo) {
    // 执行所有操作前先清空
    $("#roleTableBody").empty();   //这个对应页面的 <tbody id="roleTableBody"> </tbody>
    // 获取数据集合
    var list = pageInfo.list;

    // 判断list是否有效
    if (list == null || list.length == 0) {
        $("#roleTableBody").append("<tr><td colspan='4' style='text-align:center;'>没有查询到数据!</td></tr>");
        return;
    }

    for (var i = 0; i < list.length; i++) {

        var role = list[i];

        var checkBtn = "<button type='button' class='btn btn-success btn-xs'><i class=' glyphicon glyphicon-check'></i></button>";
        var pencilBtn = "<button type='button' id='roleTableBody'  roleid='" + role.id + "' class='btn btn-primary btn-xs  editBtn'><i class=' glyphicon glyphicon-pencil'></i></button>";
        var removeBtn = "<button type='button'   roleid='" + role.id + "'  class='btn btn-danger btn-xs  removeBtn'><i class=' glyphicon glyphicon-remove'></i></button>";

        var numberTd = "<td>" + (i + 1) + "</td>";
        var checkBoxTd = "<td><input class='itemBox' roleid='" + role.id + "' type='checkbox'></td>";
        var roleNameTd = "<td>" + role.name + "</td>";
        var btnTd = "<td>" + checkBtn + " " + pencilBtn + " " + removeBtn + "</td>";

        var tr = "<tr>" + numberTd + checkBoxTd + roleNameTd + btnTd + "</tr>";

        // 将前面拼好的HTML代码追加到#roleTableBody中
        $("#roleTableBody").append(tr);
    }
}
声明函数封装导航条初始化操作
function initPagination(pageInfo) {

    // 声明变量存储分页导航条显示时的属性设置
    var paginationProperties = {
        num_edge_entries: 3,            //边缘页数
        num_display_entries: 5,        //主体页数
        callback: pageselectCallback,    //回调函数
        items_per_page: window.pageSize,    //每页显示数据数量,就是pageSize
        current_page: (window.pageNum - 1),//当前页页码
        prev_text: "上一页",            //上一页文本
        next_text: "下一页"            //下一页文本
    };

    // 显示分页导航条 <div id="Pagination" class="pagination"> <!-- 这里显示分页 --> </div>
    $("#Pagination").pagination(pageInfo.total, paginationProperties);
}
在每一次点击“上一页”、“下一页”、“页码”时执行这个函数跳转页面
function pageselectCallback(pageIndex, jq) {

    // 将全局变量中的pageNum修改为最新值
    // pageIndex从0开始,pageNum从1开始
    window.pageNum = pageIndex + 1;

    // 调用分页函数重新执行分页
    showPage();

    return false;
}
页面初始化,就是我们点击角色维护页面需要加载的内容
$(function(){

    // 调用分页参数初始化方法
    initGlobalVariable();
    // 执行分页
    showPage();
});
关键词查询功能
在点击“查询”按钮后,获取文本框中填写的keyword值,赋值给全局变量keyword,调用showPage()函数即可。
//关键字查询实现
        $("#searchBtn").click(function () {
            //获取关键字查询的值
            var keywordInput = $.trim($("#keywordInput").val());
            /*if (keywordInput==null || keywordInput==""){
                layer.msg("请输入关键词");
                return;
            }*/
            window.keyword = keywordInput;
            //执行查询操作
            showPage();

        });
分页后端实现
点击角色维护加载页面数据两种思路:
第一种是我们请求后台把查询到的数据放到Model,前台遍历把数据展示出来。
第二种是我们请求后台把查询到的数据当PageInfo
Controller方法的实现
@ResponseBody
    @RequestMapping("/role/search/by/keyword")
    public ResultEntity<PageInfo<Role>> search(
            @RequestParam(value = "pageNum", defaultValue = "1") Integer pageNum,
            @RequestParam(value = "pageSize", defaultValue = "5") Integer pageSize,
            @RequestParam(value = "keyword", defaultValue = "") String keyword) {

        // 1.查询得到PageInfo对象
        PageInfo<Role> pageInfo = roleService.queryForKeywordWithPage(pageNum, pageSize, keyword);

        // 2.封装结果对象返回
        return ResultEntity.successWithData(pageInfo);
    }
Service方法的实现
public PageInfo<Role> queryForKeywordWithPage(Integer pageNum, Integer pageSize, String keyword) {
        // 1.开启分页功能
        PageHelper.startPage(pageNum, pageSize);

        // 2.执行查询
        List<Role> list = roleMapper.selectForKeywordSearch(keyword);

        // 3.封装为PageInfo对象
        return new PageInfo<Role>(list);
    }
Mapper方法的实现
List<Role> selectForKeywordSearch(String keyword);
Mapper.xml
<select id="selectForKeywordSearch" resultMap="BaseResultMap">
        SELECT
            id,
            `name`
        FROM
            t_role
        WHERE
            `name` LIKE CONCAT('%', #{keyword}, '%')
</select>
角色维护-全选功能
功能在页面的位置
具体实现
标记
role-page.jsp
<thead>
    <tr>
        <th width="30">#</th>
        <th width="30"><input id="summaryBox" type="checkbox"></th>
        <th>名称</th>
        <th width="100">操作</th>
    </tr>
</thead>
my-role.js
for (var i = 0; i < list.length; i++) {
        //省略
        var checkBoxTd = "<td><input class='itemBox' roleid='" + role.id + "' type='checkbox'></td>";
       //省略
}
给summaryBox绑定单击响应函数
 //全选/全不选功能实现
 $("#summaryBox").click(function () {
            //获取当前的选中状态
            var currentStatus = this.checked;
            $(".itemBox").prop("checked", currentStatus);
 });
角色维护-批量删除
准备模态框
先准备模态框的HTML标签,include-modal-role-confirm.jsp
<%@ page language="java" contentType="text/html; charset=UTF-8"
pageEncoding="UTF-8"%>
<div id="confirmModal" class="modal fade" tabindex="-1" role="dialog">
<div class="modal-dialog" role="document">
<div class="modal-content">
<div class="modal-header">
<button type="button" class="close" data-dismiss="modal"
aria-label="Close">
<span aria-hidden="true">×</span>
</button>
<h4 class="modal-title">角色维护删除</h4>
</div>
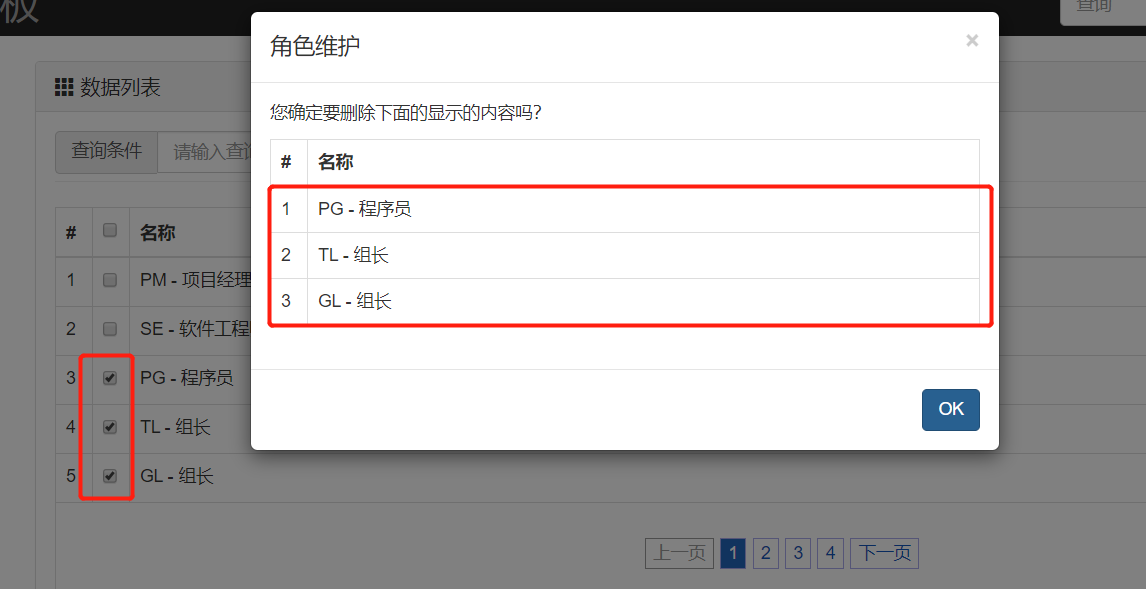
<div class="modal-body">
<p>您确定要删除下面的显示的内容吗?</p>
<table class="table table-bordered">
<thead>
<tr>
<th width="30">#</th>
<th>名称</th>
</tr>
</thead>
<tbody id="confirmModalTableBody"></tbody>
</table>
</div>
<div class="modal-footer">
<button id="confirmModalBtn" type="button" class="btn btn-primary">OK</button>
</div>
</div>
</div>
</div>
在role-page.jsp中包含include-modal-role-confirm.jsp文件, <%@ include file="/WEB-INF/include-modal-role-confirm.jsp" %>
getRoleListByRoleIdArray()函数
//id查询角色信息
function getRoleListByRoleIdArray(roleIdArray) {
    //roleIdArray转换成JSON字符串
    var roleIds = JSON.stringify(roleIdArray);

    var ajaxResult = $.ajax({
        "url": "role/get/list/by/id/list.action",
        "type": "post",
        "data": roleIds,
        "contentType": "application/json;charset=UTF-8",
        "dataType": "json",
        "async": false
    });
    // 3.获取JSON对象类型的响应体
    var resultEntity = ajaxResult.responseJSON;
    var result = resultEntity.result;
    if (result == "SUCCESS") {

        // 5.如果成功,则返回roleList
        return resultEntity.data;
    }

    if (result == "FAILED") {
        layer.msg(resultEntity.message);
        return null;
    }

    return null;

}
对应的后端代码:
 @ResponseBody
    @RequestMapping("role/get/list/by/id/list")
    public ResultEntity<List<Role>> getRoleListByIdList(@RequestBody List<Integer> roleIds) {
        List<Role> roleList = roleService.findRoleListByIdList(roleIds);
        return ResultEntity.successWithData(roleList);
 }
public List<Role> findRoleListByIdList(List<Integer> roleIds) {

        return roleMapper.findRoleListByIdList(roleIds);
    }
showRemoveConfirmModal()函数
// 打开删除确认模态框
function showRemoveConfirmModal() {
    // 1.将模态框显示出来
    $("#confirmModal").modal("show");
    //获取角色数据
    var roleList = getRoleListByRoleIdArray(window.roleIdArray);
    //清空表格数据
    $("#confirmModalTableBody").empty();
    //填充confirmModalTableBody的数据
    for (var i = 0; i < roleList.length; i++) {
        // 5.获取角色相关数据
        var role = roleList[i];

        var id = role.id;
        var name = role.name;
        var trHTML = "<tr><td>" + (i+1) + "</td><td>" + name + "</td></tr>";
        // 6.执行填充
        $("#confirmModalTableBody").append(trHTML);

    }
}
点击批量删除按钮绑定单击响应函数
标记批量删除按钮
 <button type="button" class="btn btn-danger" id="batchRemoveBtn"
                            style="float: right; margin-left: 10px;">
                        <i class=" glyphicon glyphicon-remove"></i> 删除
 </button>
检查itemBox是否被选中
 // 给批量删除按钮绑定单击响应函数
        $("#batchRemoveBtn").click(function () {
            //获取被选中的itemBox数组长度
            var length = $(".itemBox:checked").length;
            if (length == 0) {
                layer.msg("请选择要删除的记录!!");
                return;
            }
           // 未完待续...
        });
在弹出的模态框中显示confirm信息
 // 给批量删除按钮绑定单击响应函数
        $("#batchRemoveBtn").click(function () {
            //获取被选中的itemBox数组长度
            var length = $(".itemBox:checked").length;
            if (length == 0) {
                layer.msg("请选择要删除的记录!!");
                return;
            }
            window.roleIdArray = new Array();
            //遍历复选框
            $(".itemBox:checked").each(function () {
                //通过checkbox的roleid属性获取roleId值
                var roleId = $(this).attr("roleid");
                //存入数组
                window.roleIdArray.push(roleId);
            });
            // 调用函数打开模态框
            showRemoveConfirmModal();

        });
点击模态框的OK按钮执行删除
标记OK按
<button **id="confirmModalBtn"** type="button" class="btn btn-primary">OK</button>
绑定单击响应函数
$("#confirmModalBtn").click(function () {
            //数组转成Json
            var roleIds = JSON.stringify(window.roleIdArray);
            var ajaxResult = $.ajax({
                "url": "role/batch/remove.action",
                "type": "post",
                "data": roleIds,
                "contentType": "application/json;charset=UTF-8",
                "dataType": "json",
                "async": false,
                "success": function (response) {
                    var result = response.result;
                    if (result == "SUCCESS") {
                        layer.msg("操作成功!");
                        // 如果删除成功,则重新调用分页方法
                        showPage();
                    }
                    if (result == "FAILED") {
                        layer.msg(response.message);
                    }
                    // 不管成功还是失败,都需要关掉模态框
                    $("#confirmModal").modal("hide");
                },
                "error": function (response) {
                    if (result == "FAILED") {
                        layer.msg(response.message);
                    }
                }

            });

        });
后端代码
 @ResponseBody
    @RequestMapping(value = "role/batch/remove")
    public ResultEntity<String> batchAdminList(@RequestBody List<Integer> roleIds) {
        try {
            roleService.batchRoleList(roleIds);
            return ResultEntity.successWithoutData();
        } catch (Exception e) {
            return ResultEntity.failed(null, e.getMessage());
        }
    }
public void batchRoleList(List<Integer> roleIds) {
        roleMapper.batchRoleList(roleIds);
    }
<delete id="batchRoleList" parameterType="java.util.List">
        delete from  t_role where id in
        <foreach collection="list" item="item" open="(" separator="," close=")" >
           #{item}
        </foreach>
</delete>
角色维护-新增
大体步骤
给“新增”按钮绑定单击响应函数
打开模态框
给“保存”按钮绑定单击响应函数
收集文本框内容
发送请求
请求处理完成关闭模态框、重新分页、清理表单
给新增按钮绑定单击响应函数
标记新增按钮
 <button type="button" class="btn btn-primary" id="addBtn"
                            style="float: right;">
                        <i class="glyphicon glyphicon-plus"></i> 新增
 </button>
绑定单击响应函数
$("#addBtn").click(function(){ alert("aaa..."); });
准备模态框
先准备模态框的HTML代码,include-modal-role-add.jsp
<%@ page language="java" contentType="text/html; charset=UTF-8"
pageEncoding="UTF-8"%>
<div id="addModal" class="modal fade" tabindex="-1" role="dialog">
<div class="modal-dialog" role="document">
<div class="modal-content">
<form role="form">
<div class="modal-header">
<button type="button" class="close" data-dismiss="modal"
aria-label="Close">
<span aria-hidden="true">×</span>
</button>
<h4 class="modal-title">角色添加</h4>
</div>
<div class="modal-body">
<input type="text" id="roleNameInput" class="form-control" placeholder="请输入角色名称" />
</div>
<div class="modal-footer">
<button type="button" id="addModalBtn" class="btn btn-default"><i class="glyphicon glyphicon-plus"></i> 保存</button>
<button type="reset" class="btn btn-primary"><i class="glyphicon glyphicon-refresh"></i> 重置</button>
</div>
</form>
</div>
</div>
</div>
将include-modal-role-add.jsp包含到role-page.jsp , <%@ include file="/WEB-INF/include-modal-role-add.jsp" %>
打开模态框
$("#addBtn").click(function(){ $("#addModal").modal("show"); });
给“保存”按钮绑定单击响应函数
标记“保存”按钮
<button id="addModalBtn" type="button" class="btn btn-success"> <i class="glyphicon glyphicon-plus"></i>保存 </button>
绑定单击响应函数
$("#addModalBtn").click(function () {

            // 1.收集文本框内容
            var roleName = $.trim($("#roleNameInput").val());

            if (roleName == null || roleName == "") {
                layer.msg("请输入有效角色名称!");
                return;
            }

            // 2.发送请求
            $.ajax({
                "url": "role/save/role.action",
                "type": "post",
                "data": {
                    "roleName": roleName
                },
                "dataType": "json",
                "success": function (response) {

                    var result = response.result;

                    if (result == "SUCCESS") {
                        layer.msg("操作成功!");

                        // 3.操作成功重新分页
                        // 前往最后一页
                        window.pageNum = 999999;
                        showPage();
                    }

                    if (result == "FAILED") {
                        layer.msg(response.message);
                    }

                    // 4.不管成功还是失败,关闭模态框
                    $("#addModal").modal("hide");

                    // 5.清理本次在文本框填写的数据
                    $("#roleNameInput").val("");

                },
                "error": function (response) {
                    layer.msg(response.message);
                }
            });

        });
后端部分代码
 @ResponseBody
    @RequestMapping("role/save/role")
    public ResultEntity<String> saveRole(@RequestParam("roleName") String roleName) {
        try {
            roleService.saveRole(roleName);
            return ResultEntity.successWithoutData();
        } catch (Exception e) {
            return ResultEntity.failed(null, e.getMessage());
        }
    }
公共返回代码
public class ResultEntity<T> {
    public static final String SUCCESS = "SUCCESS";
    public static final String FAILED = "FAILED";
    public static final String NO_MESSAGE = "NO_MESSAGE";
    public static final String NO_DATA = "NO_DATA";

    // 方便返回成功结果(不携带查询结果情况)
    public static ResultEntity<String> successWithoutData() {
        return new ResultEntity<String>(SUCCESS, NO_MESSAGE, NO_DATA);
    }

    // 方便返回成功结果(携带查询结果情况)
    public static <E> ResultEntity<E> successWithData(E data) {
        return new ResultEntity<E>(SUCCESS, NO_MESSAGE, data);
    }

    // 方便返回失败结果
    public static <E> ResultEntity<E> failed(E data, String message) {
        return new ResultEntity<E>(FAILED, message, data);
    }

    private String result;
    private String message;
    private T data;

    public ResultEntity() {

    }

    public ResultEntity(String result, String message, T data) {
        super();
        this.result = result;
        this.message = message;
        this.data = data;
    }

    @Override
    public String toString() {
        return "ResultEntity [result=" + result + ", message=" + message + ", data=" + data + "]";
    }

    public String getResult() {
        return result;
    }

    public void setResult(String result) {
        this.result = result;
    }

    public String getMessage() {
        return message;
    }

    public void setMessage(String message) {
        this.message = message;
    }

    public T getData() {
        return data;
    }

    public void setData(T data) {
        this.data = data;
    }

}
角色维护-更新
大体步骤
给编辑按钮绑定单击响应函数
打开模态框
- 准备模态框
- 把roleId保存到全局变量
- 获取到当前按钮所在行的roleName
- 使用roleName回显模态框中的表单
- 给“更新”按钮绑定单击响应函数
- 收集文本框内容
- 发送请求
- 请求处理完成关闭模态框、重新分页
给编辑按钮绑定单击响应函数
标记编辑按钮
my-role.js文件
function generateTableBody(pageInfo) {
        //省略
        var pencilBtn = "<button type='button'   roleid='" + role.id + "' class='btn btn-primary btn-xs  editBtn'><i class=' glyphicon glyphicon-pencil'></i></button>";
      //省略
    }
}
准备模态框
<%@ page language="java" contentType="text/html; charset=UTF-8"
pageEncoding="UTF-8" %>
<div id="editModal" class="modal fade" tabindex="-1" role="dialog">
<div class="modal-dialog" role="document">
<div class="modal-content">
<form role="form">
<div class="modal-header">
<button type="button" class="close" data-dismiss="modal"
aria-label="Close">
<span aria-hidden="true">×</span>
</button>
<h4 class="modal-title">尚筹网系统弹窗</h4>
</div>
<div class="modal-body">
<input type="text" id="roleNameInputEdit" class="form-control"
placeholder="请输入角色名称" />
</div>
<div class="modal-footer">
<button id="editModalBtn" type="button" class="btn btn-warning">
<i class="glyphicon glyphicon-edit"></i> 更新
</button>
<button type="reset" class="btn btn-primary">
<i class="glyphicon glyphicon-refresh"></i> 重置
</button> </div>
</form>
</div>
</div>
</div>
将include-modal-role-add.jsp包含到role-page.jsp , <%@ include file="/WEB-INF/include-modal-role-edit.jsp" %>
绑定单击响应函数
 $("#roleTableBody").on("click", ".editBtn", function () {

            // 1.获取当前按钮的roleId
            window.roleId = $(this).attr("roleId");

            // 2.获取当前按钮所在行的roleName
            var roleName = $(this).parents("tr").children("td:eq(2)").text();

            // 3.修改模态框中文本框的value值,目的是在显示roleName
            $("#roleNameInputEdit").val(roleName);

            // 4.打开模态框
            $("#editModal").modal("show");
        });
给“更新”按钮绑定单击响应函数
$("#editModalBtn").click(function () {

            // 1.获取文本框值
            var roleName = $.trim($("#roleNameInputEdit").val());

            if (roleName == null || roleName == "") {
                layer.msg("请输入有效角色名称!");

                return;
            }

            // 2.发送请求
            $.ajax({
                "url": "role/update.action",
                "type": "post",
                "data": {
                    "id": window.roleId,
                    "name": roleName
                },
                "dataType": "json",
                "success": function (response) {
                    var result = response.result;

                    if (result == "SUCCESS") {
                        layer.msg("操作成功!");

                        // 3.操作成功重新分页
                        showPage();
                    }

                    if (result == "FAILED") {
                        layer.msg(response.message);
                    }

                    // 4.不管成功还是失败,关闭模态框
                    $("#editModal").modal("hide");

                }
            });
        });
后端部分代码
 @ResponseBody
    @RequestMapping("role/update")
    public ResultEntity<String> updateRole(@RequestParam("id") Integer id,
                                           @RequestParam("name") String name) {
        Role role = new Role();
        role.setId(id);
        role.setName(name);
        try {
            roleService.updateRole(role);
            return ResultEntity.successWithoutData();
        } catch (Exception e) {
            return ResultEntity.failed(null, e.getMessage());
        }
    }
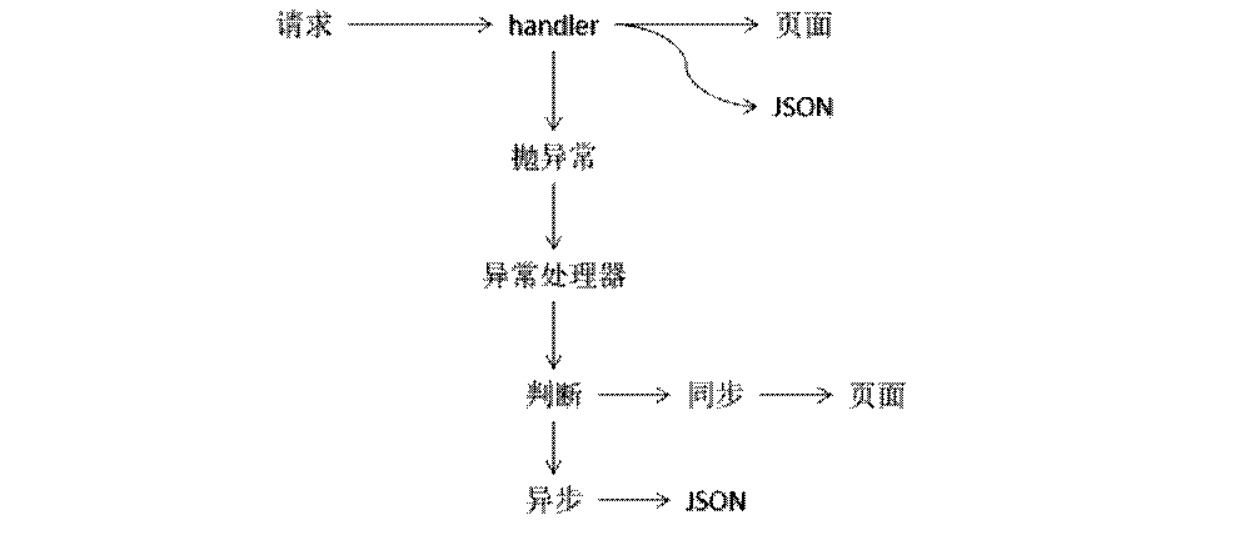
异常映射兼容异步请求
问题表现
Ajax请求在服务器端处理过程中抛出异常,经过异常处理器:
@ControllerAdvice
public class CrowdFundingExceptionResolever {

    @ExceptionHandler(value=Exception.class)
    public ModelAndView catchException(Exception exception) {

        ModelAndView mav = new ModelAndView();

        mav.addObject("exception", exception);

        mav.setViewName("system-error");

        return mav;
    }

}
目前这个异常处理机制,只能返回页面,而不能针对Ajax请求返回JSON格式的响应数据。所以Ajax请求处理过程中,如果抛出异常,返回异常信息页面,Ajax程序无法正常解析,导致页面不能正常显示和工作,也不能给出友好的错误提示。
问题解决思路
异步请求特点
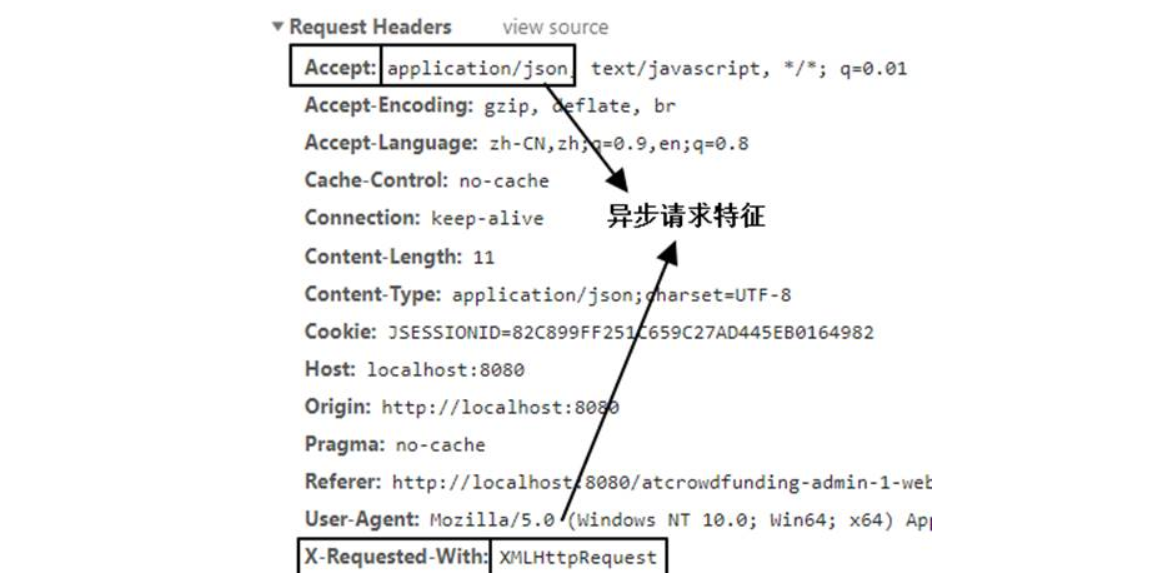
分辨异步请求的工具方法
    /**
     * 用于判断一个请求是否是异步请求
     * @param request
     * @return
     */
    public static boolean checkAsyncRequest(HttpServletRequest request) {

        // 1.获取相应请求消息头
        String accept = request.getHeader("Accept");
        String xRequested = request.getHeader("X-Requested-With");

        // 2.判断请求消息头数据中是否包含目标特征
        if(
            (stringEffective(accept) && accept.contains("application/json"))
            ||
            (stringEffective(xRequested) && xRequested.contains("XMLHttpRequest")) ) {
            return true;
        }

        return false;
    }

    /**
     * 判断字符串是否有效
     * @param source 待验证字符串
     * @return true表示有效,false表示无效
     */
    public static boolean stringEffective(String source) {

        return source != null && source.length() > 0;
    }
升级后的异常处理器
首先引入:
<dependency>
            <groupId>com.google.code.gson</groupId>
            <artifactId>gson</artifactId>
            <version>2.8.5</version>
</dependency>
@ControllerAdvice
public class CrowdFundingExceptionResolever {
    @ExceptionHandler(value = Exception.class)
    public ModelAndView catchException(
            Exception exception,
            HttpServletRequest request,
            HttpServletResponse response) throws IOException {

        // 1.对当前请求进行检查
        boolean checkAsyncRequestResult = CrowdFundingUtils.checkAsyncRequest(request);

        // 2.如果是异步请求
        if(checkAsyncRequestResult) {

            // 根据异常类型在常量中的映射,使用比较友好的文字显示错误提示消息
            String exceptionClassName = exception.getClass().getName();

            String message = CrowdFundingConstant.EXCEPTION_MESSAGE_MAP.get(exceptionClassName);

            if(message == null) {
                message = "系统未知错误";
            }

            // 3.创建ResultEntity对象
            ResultEntity<String> resultEntity = ResultEntity.failed(ResultEntity.NO_DATA, message);

            // 4.将resultEntity转换为JSON格式
            Gson gson = new Gson();
            String json = gson.toJson(resultEntity);

            // 5.将json作为响应数据返回给浏览器
            response.setContentType("application/json;charset=UTF-8");
            response.getWriter().write(json);

            return null;
        }

        ModelAndView mav = new ModelAndView();

        mav.addObject("exception", exception);

        mav.setViewName("system-error");

        return mav;
    }
}
常量类
public class CrowdFundingConstant {

    public static final Map<String, String> EXCEPTION_MESSAGE_MAP = new HashMap<String, String>();

    static {
        EXCEPTION_MESSAGE_MAP.put("java.lang.ArithmeticException", "系统在进行数学运算时发生错误");
        EXCEPTION_MESSAGE_MAP.put("java.lang.RuntimeException", "系统在运行时发生错误");
        EXCEPTION_MESSAGE_MAP.put("com.atguigu.crowd.funding.exception.LoginException", "登录过程中运行错误");
    }
}
我是阿福,公众号「阿福聊编程」作者,对后端技术保持学习爱好者,我会经常更新JAVA技术文章,在进阶的路上,共勉!
