DefaultChannelPipeline
回顾下事件处理机制

Netty 服务端启动后,BossEventLoopGroup 会负责监听客户端的 Accept 事件。当有客户端新连接接入时,BossEventLoopGroup 中的 NioEventLoop 首先会新建客户端 Channel,然后在 NioServerSocketChannel 中触发 channelRead 事件传播,NioServerSocketChannel 中包含了一种特殊的处理器 ServerBootstrapAcceptor,最终通过 ServerBootstrapAcceptor 的 channelRead() 方法将新建的客户端 Channel 分配到 WorkerEventLoopGroup 中。WorkerEventLoopGroup 中包含多个 NioEventLoop,它会选择其中一个 NioEventLoop 与新建的客户端 Channel 绑定。
完成客户端连接注册之后,就可以接收客户端的请求数据了。当客户端向服务端发送数据时,NioEventLoop 会监听到 OP_READ 事件,然后分配 ByteBuf 并读取数据,读取完成后将数据传递给 Pipeline 进行处理。一般来说,数据会从 ChannelPipeline 的第一个 ChannelHandler 开始传播,将加工处理后的消息传递给下一个 ChannelHandler,整个过程是串行化执行。
Pipeline 的初始化
我们知道 ChannelPipeline 是在创建 Channel 时被创建的,它是 Channel 中非常重要的一个成员变量。回到 AbstractChannel 的构造函数,以此为切入点,我们一起看下 ChannelPipeline 是如何一步步被构造出来的。
// AbstractChannel
protected AbstractChannel(Channel parent) {
    this.parent = parent;
    id = newId();
    unsafe = newUnsafe();
    pipeline = newChannelPipeline();
}

// AbstractChannel#newChannelPipeline
protected DefaultChannelPipeline newChannelPipeline() {
    return new DefaultChannelPipeline(this);
}
DefaultChannelPipeline属性
   private static final String HEAD_NAME = generateName0(HeadContext.class);//头结点名字
    private static final String TAIL_NAME = generateName0(TailContext.class);//尾结点名字
  //为当前线程存放类型和名字的映射,避免重名
    private static final FastThreadLocal<Map<Class<?>, String>> nameCaches =
            new FastThreadLocal<Map<Class<?>, String>>() {
        @Override
        protected Map<Class<?>, String> initialValue() {
            return new WeakHashMap<Class<?>, String>();
        }
    };
  //消息大小估算器更新
    private static final AtomicReferenceFieldUpdater<DefaultChannelPipeline, MessageSizeEstimator.Handle> ESTIMATOR =
            AtomicReferenceFieldUpdater.newUpdater(
                    DefaultChannelPipeline.class, MessageSizeEstimator.Handle.class, "estimatorHandle");
    final AbstractChannelHandlerContext head;//头处理器上下文
    final AbstractChannelHandlerContext tail;//尾处理器上下文

    private final Channel channel;//通道
    private final ChannelFuture succeededFuture;//通道异步结果
    private final VoidChannelPromise voidPromise;//任意类型的异步结果
    private final boolean touch = ResourceLeakDetector.isEnabled();//是否要资源泄露检测

    private Map<EventExecutorGroup, EventExecutor> childExecutors;//事件循环组合对应的执行器
    private volatile MessageSizeEstimator.Handle estimatorHandle;//消息大小评估处理器
    private boolean firstRegistration = true;//第一次注册

    /**
     * This is the head of a linked list that is processed by {@link #callHandlerAddedForAllHandlers()} and so process
     * all the pending {@link #callHandlerAdded0(AbstractChannelHandlerContext)}.
     *
     * We only keep the head because it is expected that the list is used infrequently and its size is small.
     * Thus full iterations to do insertions is assumed to be a good compromised to saving memory and tail management
     * complexity.
     */
    private PendingHandlerCallback pendingHandlerCallbackHead;//如果在通道没注册到事件循环之前添加了处理器,则HandlerAdded暂时不触发,被添加到pendingHandlerCallbackHead链表中,到时候就会处理。

    /**
     * Set to {@code true} once the {@link AbstractChannel} is registered.Once set to {@code true} the value will never
     * change.
     */
    private boolean registered;//通道只注册一次,不会变了
创建通道处理上下文
private AbstractChannelHandlerContext newContext(EventExecutorGroup group, String name, ChannelHandler handler) {
        return new DefaultChannelHandlerContext(this, childExecutor(group), name, handler);
    }
构造方法
// DefaultChannelPipeline
protected DefaultChannelPipeline(Channel channel) {
    this.channel = ObjectUtil.checkNotNull(channel, "channel");
    succeededFuture = new SucceededChannelFuture(channel, null);
    voidPromise =  new VoidChannelPromise(channel, true);
    tail = new TailContext(this);
    head = new HeadContext(this);
    head.next = tail;
    tail.prev = head;
}
当 ChannelPipeline 初始化完成后,会构成一个由 ChannelHandlerContext 对象组成的双向链表,默认 ChannelPipeline 初始化状态的最小结构仅包含 HeadContext 和 TailContext 两个节点,如下图所示。

HeadContext 和 TailContext 属于 ChannelPipeline 中两个特殊的节点,它们都继承自 AbstractChannelHandlerContext,根据源码看下 AbstractChannelHandlerContext 有哪些实现类,如下图所示。除了 HeadContext 和 TailContext,还有一个默认实现类 DefaultChannelHandlerContext,我们可以猜到 DefaultChannelHandlerContext 封装的是用户在 Netty 启动配置类中添加的自定义业务处理器,DefaultChannelHandlerContext 会插入到 HeadContext 和 TailContext 之间。
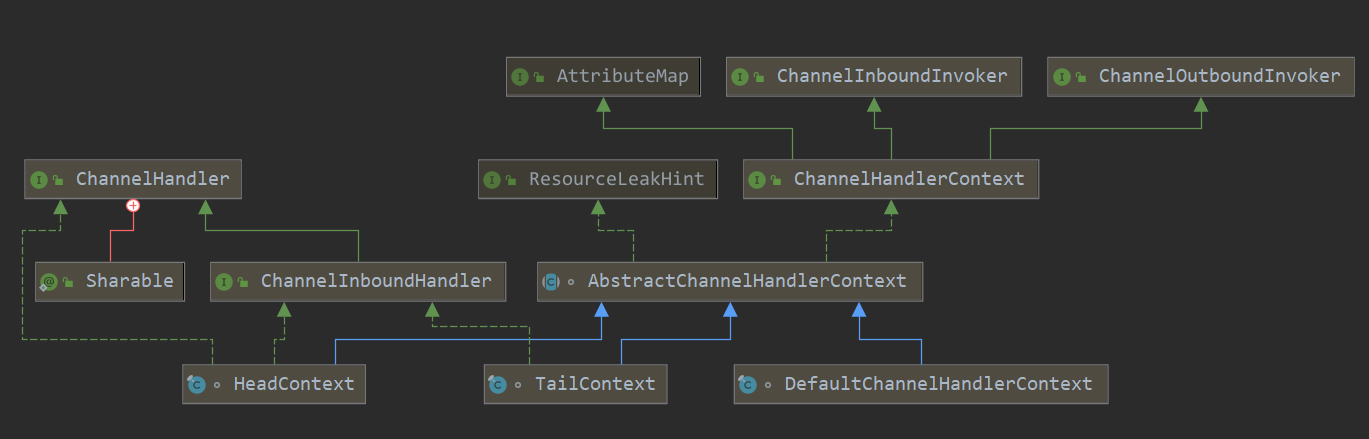
接着我们比较一下上述三种 AbstractChannelHandlerContext 实现类的内部结构,发现它们都包含当前 ChannelPipeline 的引用、处理器 ChannelHandler。有一点不同的是 HeadContext 节点还包含了用于操作底层数据读写的 unsafe 对象。对于 Inbound 事件,会先从 HeadContext 节点开始传播,所以 unsafe 可以看作是 Inbound 事件的发起者;对于 Outbound 事件,数据最后又会经过 HeadContext 节点返回给客户端,此时 unsafe 可以看作是 Outbound 事件的处理者。
用户自定义的处理器加入 ChannelPipeline 的双向链表的过程之前说过,这就不细说了。
头添加处理器
添加到head后 可以用EventExecutorGroup来执行耗时的任务,这个就是可以传入一个事件循环组来执行相应的操作。
先生成一个上下文newCtx ,DefaultChannelHandlerContext类型的,处理器是传进上下文中的,然后addFirst0将上下文newCtx 添加到双向链表中,再判断通道是否有注册到事件循环上,如果没有,就将上下文设置为待添加状态,callHandlerCallbackLater设置后续来回调HandlerAdded方法,返回,如果上下文的执行器的线程不是当前线程,就添加任务到执行器里,返回,否则就触发HandlerAdded回调。
public final ChannelPipeline addFirst(EventExecutorGroup group, String name, ChannelHandler handler) {
        final AbstractChannelHandlerContext newCtx;
        synchronized (this) {//添加结点的时候要同步,多线程安全
            checkMultiplicity(handler);
            name = filterName(name, handler);

            newCtx = newContext(group, name, handler);//创建上下文

            addFirst0(newCtx);//添加到双向链表中

            // If the registered is false it means that the channel was not registered on an eventLoop yet.
            // In this case we add the context to the pipeline and add a task that will call
            // ChannelHandler.handlerAdded(...) once the channel is registered.
            if (!registered) {//通道还没注册
                newCtx.setAddPending();//设置为待添加
                callHandlerCallbackLater(newCtx, true);//设置后续的待添加的回调
                return this;
            }

            EventExecutor executor = newCtx.executor();//从通道获取获取执行器
            if (!executor.inEventLoop()) {//判断执行器的线程不是当前线程
                callHandlerAddedInEventLoop(newCtx, executor);//添加任务到执行器
                return this;
            }
        }
        callHandlerAdded0(newCtx);//触发HandlerAdded回调
        return this;
    }
addFirst0(AbstractChannelHandlerContext newCtx)
private void addFirst0(AbstractChannelHandlerContext newCtx) {
        AbstractChannelHandlerContext nextCtx = head.next;
        newCtx.prev = head;
        newCtx.next = nextCtx;
        head.next = newCtx;
        nextCtx.prev = newCtx;
    }
callHandlerCallbackLater方法
延迟触发HandlerAdded,通道注册到事件循环上异步的,需要事件循环线程启动执行任务,可能在此之前已经有添加了执行器,这个时候就不能触发HandlerAdded
//添加处理器待执行的任务
private void callHandlerCallbackLater(AbstractChannelHandlerContext ctx, boolean added) {
        assert !registered;

        PendingHandlerCallback task = added ? new PendingHandlerAddedTask(ctx) : new PendingHandlerRemovedTask(ctx);//添加一个处理器待执行的任务 添加或者删除
        PendingHandlerCallback pending = pendingHandlerCallbackHead;
        if (pending == null) {
            pendingHandlerCallbackHead = task;//如果没有设置过就设置为第一个
        } else {//否则就添加到最后,其实就是个单链表
            // Find the tail of the linked-list.
            while (pending.next != null) {
                pending = pending.next;
            }
            pending.next = task;
        }
    }
callHandlerAddedInEventLoop(newCtx, executor);
添加触发HandlerAdded任务
private void callHandlerAddedInEventLoop(final AbstractChannelHandlerContext newCtx, EventExecutor executor) {
        newCtx.setAddPending();
        executor.execute(new Runnable() {
            @Override
            public void run() {
                callHandlerAdded0(newCtx);
            }
        });
    }
callHandlerAdded0(newCtx);
触发处理器上下文的callHandlerAdded方法,内部会去触发处理器的handlerAdded方法:
private void callHandlerAdded0(final AbstractChannelHandlerContext ctx) {
        try {
            ctx.callHandlerAdded();
        } catch (Throwable t) {
            boolean removed = false;
            try {
                atomicRemoveFromHandlerList(ctx);//原子的删除处理器
                ctx.callHandlerRemoved();/触发删除回调
                removed = true;
            } catch (Throwable t2) {
                if (logger.isWarnEnabled()) {
                    logger.warn("Failed to remove a handler: " + ctx.name(), t2);
                }
            }

            if (removed) {
                fireExceptionCaught(new ChannelPipelineException(
                        ctx.handler().getClass().getName() +
                        ".handlerAdded() has thrown an exception; removed.", t));
            } else {
                fireExceptionCaught(new ChannelPipelineException(
                        ctx.handler().getClass().getName() +
                        ".handlerAdded() has thrown an exception; also failed to remove.", t));
            }
        }
    }
callHandlerAdded()
final void callHandlerAdded() throws Exception {
        // We must call setAddComplete before calling handlerAdded. Otherwise if the handlerAdded method generates
        // any pipeline events ctx.handler() will miss them because the state will not allow it.
        if (setAddComplete()) {
            handler().handlerAdded(this);
        }
    }
删除处理器remove
ChannelInitializer 在服务端 Channel 注册完成之后会从 Pipeline 的双向链表中移除,我们一起回顾下这段代码:
    private boolean initChannel(ChannelHandlerContext ctx) throws Exception {
        if (initMap.add(ctx)) { // Guard against re-entrance.
            try {
                initChannel((C) ctx.channel());// 调用 ChannelInitializer 实现的 initChannel() 方法
            } catch (Throwable cause) {
                // Explicitly call exceptionCaught(...) as we removed the handler before calling initChannel(...).
                // We do so to prevent multiple calls to initChannel(...).
                exceptionCaught(ctx, cause);
            } finally {
                ChannelPipeline pipeline = ctx.pipeline();
                if (pipeline.context(this) != null) {
                    pipeline.remove(this);// 将 ChannelInitializer 自身从 Pipeline 中移出
                }
            }
            return true;
        }
        return false;
    }
继续跟进 pipeline.remove() 的源码。
@Override
public final ChannelPipeline remove(ChannelHandler handler) {
    // 1. getContextOrDie 用于查找需要删除的节点
    remove(getContextOrDie(handler));
    return this;
}
private AbstractChannelHandlerContext remove(final AbstractChannelHandlerContext ctx) {
    assert ctx != head && ctx != tail;
    synchronized (this) {
        // 删除双向链表中的 Handler 节点
        atomicRemoveFromHandlerList(ctx);
        if (!registered) {
            callHandlerCallbackLater(ctx, false);
            return ctx;
        }
        EventExecutor executor = ctx.executor();
        if (!executor.inEventLoop()) {
            executor.execute(new Runnable() {
                @Override
                public void run() {
                    callHandlerRemoved0(ctx);
                }
            });
            return ctx;
        }
    }

    // 3. 回调用户函数
    callHandlerRemoved0(ctx);
    return ctx;

}
整个删除 Handler 的过程可以分为三步,分别为:
- 查找需要删除的 Handler 节点;
- 然后删除双向链表中的 Handler 节点;
- 最后回调用户函数。
我们对每一步逐一进行拆解。
第一步查找需要删除的 Handler 节点,我们自然可以想到通过遍历双向链表实现。一起看下 getContextOrDie() 方法的源码:
    private AbstractChannelHandlerContext getContextOrDie(ChannelHandler handler) {
        AbstractChannelHandlerContext ctx = (AbstractChannelHandlerContext) context(handler);
        if (ctx == null) {
            throw new NoSuchElementException(handler.getClass().getName());
        } else {
            return ctx;
        }
    }

public final ChannelHandlerContext context(ChannelHandler handler) {
    if (handler == null) {
        throw new NullPointerException("handler");
    }
    // 遍历双向链表查找
    AbstractChannelHandlerContext ctx = head.next;
    for (;;) {
        if (ctx == null) {
            return null;
        }
        // 如果 Handler 相同,返回当前的 Context 节点
        if (ctx.handler() == handler) {
            return ctx;
        }
        ctx = ctx.next;
    }
}
Netty 确实是从双向链表的头结点开始依次遍历,如果当前 Context 节点的 Handler 要被删除的 Handler 相同,那么便找到了要删除的 Handler,然后返回当前 Context 节点。
找到需要删除的 Handler 节点之后,接下来就是将节点从双向链表中删除,再跟进atomicRemoveFromHandlerList() 方法的源码:
    private synchronized void atomicRemoveFromHandlerList(AbstractChannelHandlerContext ctx) {
        AbstractChannelHandlerContext prev = ctx.prev;
        AbstractChannelHandlerContext next = ctx.next;
        prev.next = next;
        next.prev = prev;
    }
删除节点和添加节点类似,都是基本的链表操作,通过调整双向链表的指针即可实现。
删除完节点之后,最后 Netty 会回调用户自定义实现的 handlerRemoved() 方法,回调的实现过程与添加节点时是类似的,在这里我就细说了。
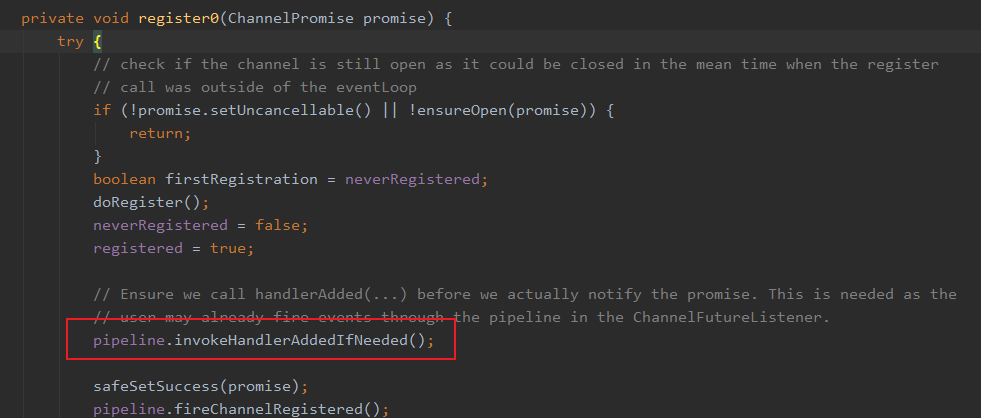
DefaultChannelPipeline.invokeHandlerAddedIfNeeded
触发通道未注册时候添加的处理器的handlerAdded事件
 final void invokeHandlerAddedIfNeeded() {
        assert channel.eventLoop().inEventLoop();
        if (firstRegistration) {
            firstRegistration = false;
            // We are now registered to the EventLoop. It's time to call the callbacks for the ChannelHandlers,
            // that were added before the registration was done.
            callHandlerAddedForAllHandlers();
        }
    }
在AbstractUnsafe.register0(ChannelPromise promise)方法中调用
callHandlerAddedForAllHandlers()
private void callHandlerAddedForAllHandlers() { //回调待添加的所有处理器HandlerAdded方法
        final PendingHandlerCallback pendingHandlerCallbackHead;
        synchronized (this) {
            assert !registered;

            // This Channel itself was registered.
            registered = true;

            pendingHandlerCallbackHead = this.pendingHandlerCallbackHead;
            // Null out so it can be GC'ed.
            this.pendingHandlerCallbackHead = null;
        }

        // This must happen outside of the synchronized(...) block as otherwise handlerAdded(...) may be called while
        // holding the lock and so produce a deadlock if handlerAdded(...) will try to add another handler from outside
        // the EventLoop.需要在synchronized (this)外,否则在其他线程中的处理器的handlerAdded方法又添加另外一个处理器,会对管道对象进行synchronized加锁,发生死锁
        PendingHandlerCallback task = pendingHandlerCallbackHead;
        while (task != null) {
            task.execute();
            task = task.next;
        }
    }
PendingHandlerCallback待处理任务
private abstract static class PendingHandlerCallback implements Runnable {
        final AbstractChannelHandlerContext ctx;
        PendingHandlerCallback next;

        PendingHandlerCallback(AbstractChannelHandlerContext ctx) {
            this.ctx = ctx;
        }

        abstract void execute();
    }
PendingHandlerAddedTask待处理添加事件任务
private final class PendingHandlerAddedTask extends PendingHandlerCallback {

        PendingHandlerAddedTask(AbstractChannelHandlerContext ctx) {
            super(ctx);
        }

        @Override
        public void run() {
            callHandlerAdded0(ctx);
        }

        @Override
        void execute() {
            EventExecutor executor = ctx.executor();
            if (executor.inEventLoop()) {//判断是否在当前线程
                callHandlerAdded0(ctx);
            } else {
                try {
                    executor.execute(this);
                } catch (RejectedExecutionException e) {
                    if (logger.isWarnEnabled()) {
                        logger.warn(
                                "Can't invoke handlerAdded() as the EventExecutor {} rejected it, removing handler {}.",
                                executor, ctx.name(), e);
                    }
                    atomicRemoveFromHandlerList(ctx);
                    ctx.setRemoved();
                }
            }
        }
    }
PendingHandlerRemovedTask 待处理删除事件任务
private final class PendingHandlerRemovedTask extends PendingHandlerCallback {

        PendingHandlerRemovedTask(AbstractChannelHandlerContext ctx) {
            super(ctx);
        }

        @Override
        public void run() {
            callHandlerRemoved0(ctx);
        }

        @Override
        void execute() {
            EventExecutor executor = ctx.executor();
            if (executor.inEventLoop()) {
                callHandlerRemoved0(ctx);
            } else {
                try {
                    executor.execute(this);
                } catch (RejectedExecutionException e) {
                    if (logger.isWarnEnabled()) {
                        logger.warn(
                                "Can't invoke handlerRemoved() as the EventExecutor {} rejected it," +
                                        " removing handler {}.", executor, ctx.name(), e);
                    }
                    // remove0(...) was call before so just call AbstractChannelHandlerContext.setRemoved().
                    ctx.setRemoved();
                }
            }
        }
    }
pipeline.fireChannelRegistered();传递入站事件
public final ChannelPipeline fireChannelRegistered() {
        AbstractChannelHandlerContext.invokeChannelRegistered(head);
        return this;
    }
从head开始传递事件
static void invokeChannelRegistered(final AbstractChannelHandlerContext next) {
        EventExecutor executor = next.executor();//获取next的执行器
        if (executor.inEventLoop()) {
            next.invokeChannelRegistered();//如果执行器线程就是当前线程,就调用管道上下文的处理方法
        } else {//否则给executor提交任务
            executor.execute(new Runnable() {
                @Override
                public void run() {
                    next.invokeChannelRegistered();
                }
            });
        }
    }

headContext的invokeChannelRegistered()
private void invokeChannelRegistered() {
        if (invokeHandler()) {//尽最大努力检测ChannelHandler.handlerAdded(ChannelHandlerContext)已被调用。 如果不返回false并且如果调用或无法检测到返回true 。 如果此方法返回false我们将不会调用ChannelHandler而只是转发事件。 这是必需的,因为DefaultChannelPipeline可能已经将ChannelHandler放在链表中,但没有调用ChannelHandler.handlerAdded(ChannelHandlerContext) 。
            try {
                ((ChannelInboundHandler) handler()).channelRegistered(this);//调用通道上下文的channelRead方法
            } catch (Throwable t) {
                invokeExceptionCaught(t);
            }
        } else {
            fireChannelRegistered();
        }
    }
channelRegistered(this)
 public void channelRegistered(ChannelHandlerContext ctx) {
            invokeHandlerAddedIfNeeded();//触发通道未注册时候添加的处理器的handlerAdded事件
            ctx.fireChannelRegistered();
        }
invokeHandlerAddedIfNeeded()在之前已经执行过,所以firstRegistration 为false,
ctx.fireChannelRegistered();
public ChannelHandlerContext fireChannelRegistered() {
        invokeChannelRegistered(findContextInbound(MASK_CHANNEL_REGISTERED));
        return this;
    }
findContextInbound(MASK_CHANNEL_REGISTERED)
获取相应入站MASK_CHANNEL_REGISTERED的处理器上下文
private AbstractChannelHandlerContext findContextInbound(int mask) {
        AbstractChannelHandlerContext ctx = this;
        EventExecutor currentExecutor = executor();
        do {
            ctx = ctx.next;
        } while (skipContext(ctx, currentExecutor, mask, MASK_ONLY_INBOUND));
        return ctx;
    }
然后又调用invokeChannelRegistered方法,只是这次的AbstractChannelHandlerContext不是headContext,而是后续的ChannelHandlerContext
static void invokeChannelRegistered(final AbstractChannelHandlerContext next) {
        EventExecutor executor = next.executor();
        if (executor.inEventLoop()) {
            next.invokeChannelRegistered();
        } else {
            executor.execute(new Runnable() {
                @Override
                public void run() {
                    next.invokeChannelRegistered();
                }
            });
        }
    }

数据在 Pipeline 中的运转
我们知道,根据数据的流向,ChannelPipeline 分为入站 ChannelInboundHandler 和出站 ChannelOutboundHandler 两种处理器。Inbound 事件和 Outbound 事件的传播方向相反,Inbound 事件的传播方向为 Head -> Tail,而 Outbound 事件传播方向是 Tail -> Head。今天我们就以客户端和服务端请求-响应的场景,深入研究 ChannelPipeline 的事件传播机制。
Inbound 事件传播
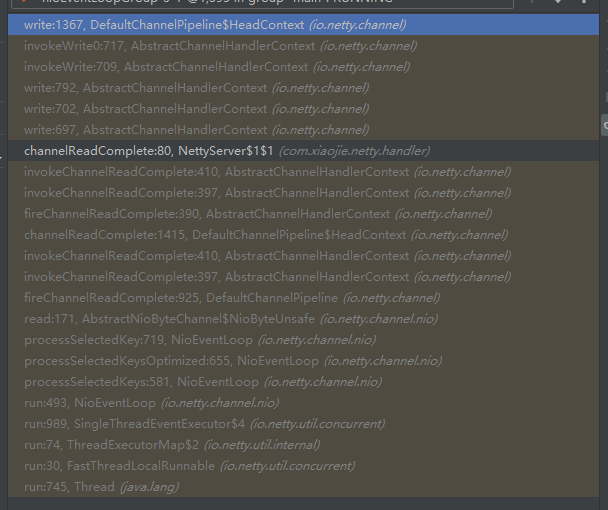
当客户端向服务端发送数据时,首先 NioEventLoop 会不断轮询 OP_ACCEPT 和 OP_READ 事件,当事件就绪时,NioEventLoop 会及时响应。首先定位到 NioEventLoop 中源码的入口:
// NioEventLoop#processSelectedKey
if ((readyOps & (SelectionKey.OP_READ | SelectionKey.OP_ACCEPT)) != 0 || readyOps == 0) {
    unsafe.read();
}
可以看出 unsafe.read() 会触发后续事件的处理,有一点需要避免混淆,在服务端 Channel 和客户端 Channel 中绑定的 unsafe 对象是不一样的,因为服务端 Channel 只关心如何接收客户端连接,而客户端 Channel 需要关心数据的读写。这里我们重点分析一下客户端 Channel 读取数据的过程,跟进 unsafe.read() 的源码:
public final void read() {
    final ChannelConfig config = config();
    // 省略其他代码
    final ChannelPipeline pipeline = pipeline();
    final ByteBufAllocator allocator = config.getAllocator();
    final RecvByteBufAllocator.Handle allocHandle = recvBufAllocHandle();
    allocHandle.reset(config);
    ByteBuf byteBuf = null;
    boolean close = false;
    try {
        do {
            byteBuf = allocHandle.allocate(allocator); // 分配 ByteBuf
            allocHandle.lastBytesRead(doReadBytes(byteBuf)); // 将 Channel 中的数据读到 ByteBuf 中
            if (allocHandle.lastBytesRead() <= 0) {
                byteBuf.release();
                byteBuf = null;
                close = allocHandle.lastBytesRead() < 0;
                if (close) {
                    readPending = false;
                }
                break;
            }
            allocHandle.incMessagesRead(1);
            readPending = false;
            pipeline.fireChannelRead(byteBuf); // 传播 ChannelRead 事件
            byteBuf = null;
        } while (allocHandle.continueReading());
        allocHandle.readComplete();
        pipeline.fireChannelReadComplete(); // 传播 readComplete 事件
        if (close) {
            closeOnRead(pipeline);
        }
    } catch (Throwable t) {
        handleReadException(pipeline, byteBuf, t, close, allocHandle);
    } finally {
        if (!readPending && !config.isAutoRead()) {
            removeReadOp();
        }
    }
}
Netty 会不断从 Channel 中读取数据到分配的 ByteBuf 中,然后通过 pipeline.fireChannelRead() 方法触发 ChannelRead 事件的传播,fireChannelRead() 是我们需要重点分析的对象。
fireChannelRead(Object msg)
都是从head开始传递事件
public final ChannelPipeline fireChannelRead(Object msg) {
        AbstractChannelHandlerContext.invokeChannelRead(head, msg);
        return this;
    }
调用链路

head的channelRead
public void channelRead(ChannelHandlerContext ctx, Object msg) {
            ctx.fireChannelRead(msg);
        }
AbstractChannelHandlerContext的fireChannelRead
获取相应入站MASK_CHANNEL_READ的处理器上下文,然后调用invokeChannelRead获取相应的处理器来处理读事件
public ChannelHandlerContext fireChannelRead(final Object msg) {
        invokeChannelRead(findContextInbound(MASK_CHANNEL_READ), msg);
        return this;
    }

 private AbstractChannelHandlerContext findContextInbound(int mask) {
        AbstractChannelHandlerContext ctx = this;
        EventExecutor currentExecutor = executor();
        do {
            ctx = ctx.next;
        } while (skipContext(ctx, currentExecutor, mask, MASK_ONLY_INBOUND));
        return ctx;
    }

    static void invokeChannelRead(final AbstractChannelHandlerContext next, Object msg) {
        final Object m = next.pipeline.touch(ObjectUtil.checkNotNull(msg, "msg"), next);
        EventExecutor executor = next.executor();
        if (executor.inEventLoop()) {
            next.invokeChannelRead(m);
        } else {
            executor.execute(new Runnable() {
                @Override
                public void run() {
                    next.invokeChannelRead(m);
                }
            });
        }
    }
Netty 首先会以 Head 节点为入参,直接调用一个静态方法 invokeChannelRead()。如果当前是在 Reactor 线程内部,会直接执行 next.invokeChannelRead() 方法。如果是外部线程发起的调用,Netty 会把 next.invokeChannelRead() 调用封装成异步任务提交到任务队列。通过之前对 NioEventLoop 源码的学习,我们知道这样可以保证执行流程全部控制在当前 NioEventLoop 线程内部串行化执行,确保线程安全性。我们抓住核心逻辑 next.invokeChannelRead() 继续跟进。
// AbstractChannelHandlerContext
private void invokeChannelRead(Object msg) {
    if (invokeHandler()) {
        try {
            ((ChannelInboundHandler) handler()).channelRead(this, msg);
        } catch (Throwable t) {
            notifyHandlerException(t);
        }
    } else {
        fireChannelRead(msg);
    }
}
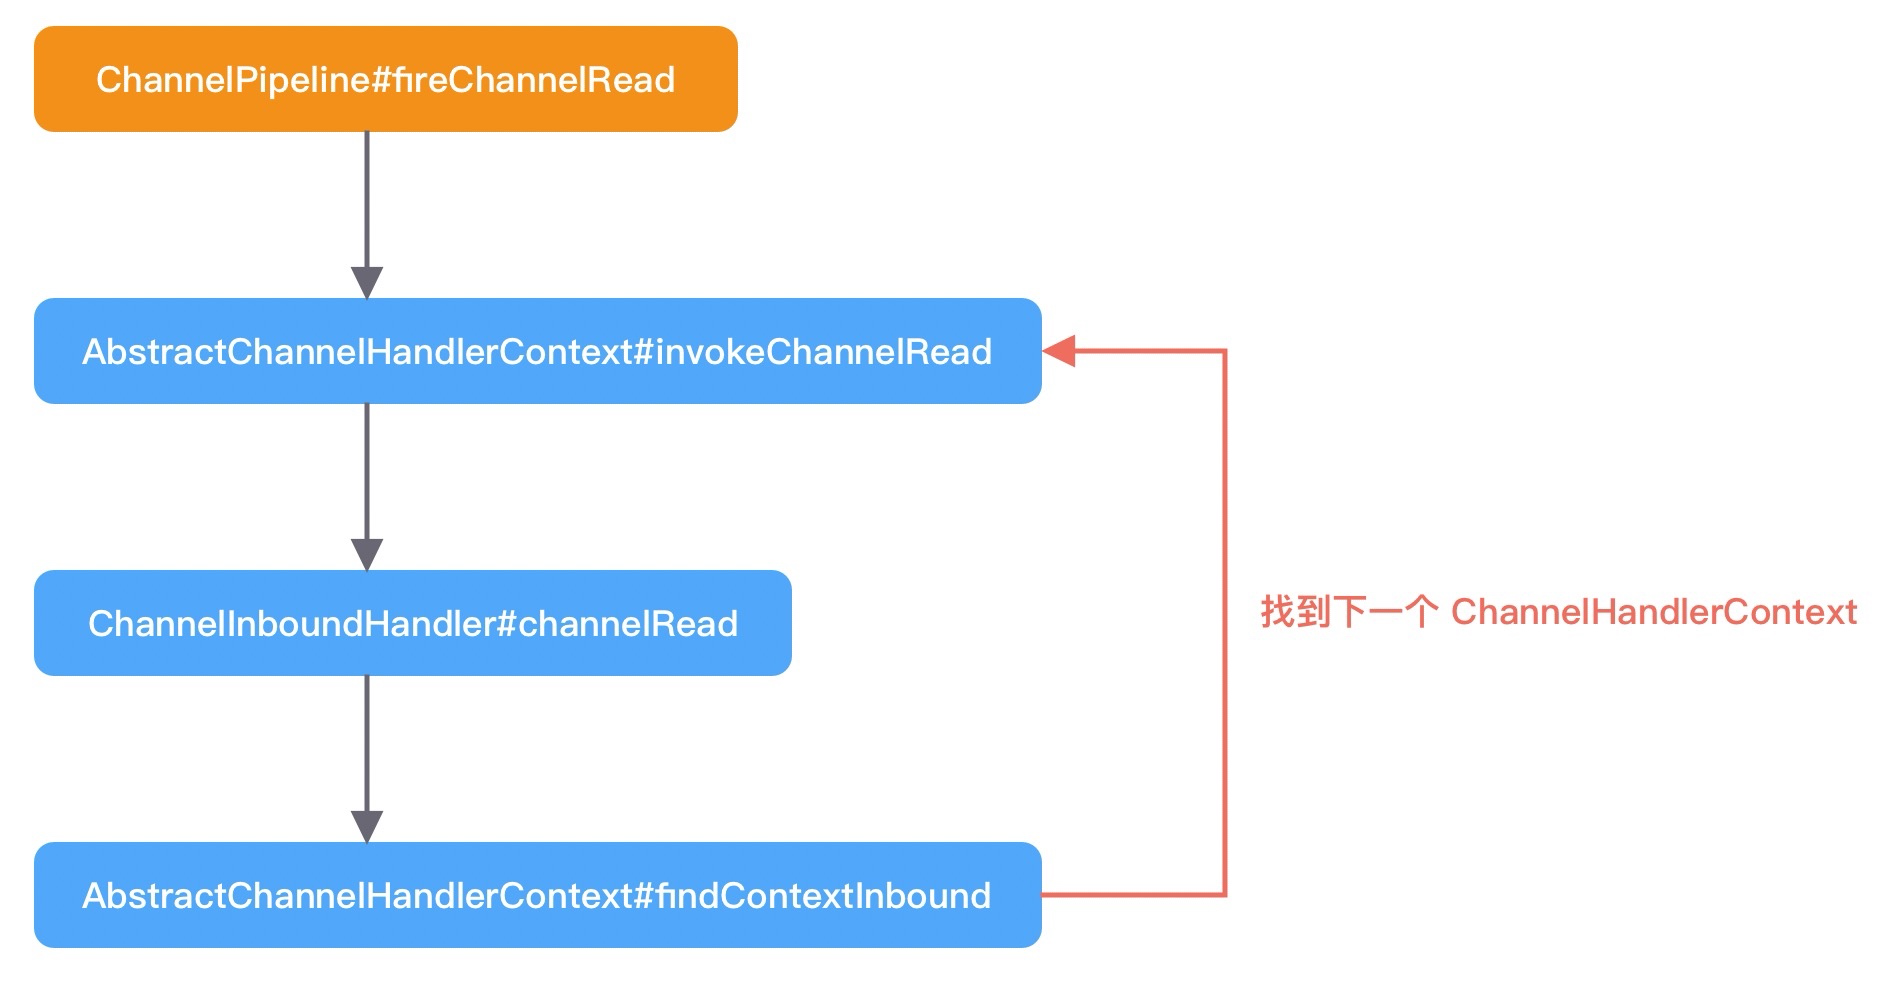
可以看出,当前 ChannelHandlerContext 节点会取出自身对应的 Handler,执行 Handler 的 channelRead 方法。此时当前节点是 HeadContext,所以 Inbound 事件是从 HeadContext 节点开始进行传播的,看下 HeadContext.channelRead() 是如何实现的。
// HeadContext
public void channelRead(ChannelHandlerContext ctx, Object msg) {
    ctx.fireChannelRead(msg);
}

// AbstractChannelHandlerContext
public ChannelHandlerContext fireChannelRead(final Object msg) {
    // 找到下一个节点,执行 invokeChannelRead
    invokeChannelRead(findContextInbound(MASK_CHANNEL_READ), msg);
    return this;
}
我们发现 HeadContext.channelRead() 并没有做什么特殊操作,而是直接通过 fireChannelRead() 方法继续将读事件继续传播下去。接下来 Netty 会通过 findContextInbound(MASK_CHANNEL_READ), msg) 找到 HeadContext 的下一个节点,然后继续执行我们之前介绍的静态方法 invokeChannelRead(),从而进入一个递归调用的过程,直至某个条件结束。以上 channelRead 的执行过程我们可以梳理成一幅流程图:
Netty 是如何判断 InboundHandler 是否关心 channelRead 事件呢?这就涉及findContextInbound(MASK_CHANNEL_READ), msg) 中的一个知识点,和上文中我们介绍的 executionMask 掩码运算是息息相关的。首先看下 findContextInbound() 的源码:
private AbstractChannelHandlerContext findContextInbound(int mask) {
    AbstractChannelHandlerContext ctx = this;
    do {
        ctx = ctx.next;
    } while ((ctx.executionMask & mask) == 0);
    return ctx;
}
MASK_CHANNEL_READ 的值为 1 << 5,表示 channelRead 事件所在的二进制位已被置为 1。在代码示例中,ServerHandler 是我们添加的 Inbound 类型的自定义处理器,它所对应的 executionMask 掩码和 MASK_CHANNEL_READ 进行与运算的结果如果不为 0,表示 ServerHandler 对 channelRead 事件感兴趣,需要触发执行 ServerHandler 的 channelRead() 方法。
Inbound 事件在上述递归调用的流程中什么时候能够结束呢?有以下两种情况:
- 用户自定义的 Handler 没有执行 fireChannelRead() 操作,则在当前 Handler 终止 Inbound 事件传播。
- 如果用户自定义的 Handler 都执行了 fireChannelRead() 操作,Inbound 事件传播最终会在 TailContext 节点终止。
接下来,我们着重看下 TailContext 节点做了哪些工作。
public void channelRead(ChannelHandlerContext ctx, Object msg) {
    onUnhandledInboundMessage(ctx, msg);
}

protected void onUnhandledInboundMessage(Object msg) {
    try {
        logger.debug(
                "Discarded inbound message {} that reached at the tail of the pipeline. " +
                        "Please check your pipeline configuration.", msg);
    } finally {
        ReferenceCountUtil.release(msg);
    }
}
可以看出 TailContext 只是日志记录了丢弃的 Inbound 消息,并释放 ByteBuf 做一个兜底保护,防止内存泄漏。
到此为止,Inbound 事件的传播流程已经介绍完了,Inbound 事件在 ChannelPipeline 中的传播方向是 Head -> Tail。Netty 会从 ChannelPipeline 中找到对传播事件感兴趣的 Inbound 处理器,执行事件回调方法,然后继续向下一个节点传播,整个事件传播流程是一个递归调用的过程。
channelReadComplete
channelRead表示接收消息,可以看到msg转换成了ByteBuf,然后打印,也就是把Client传过来的消息打印了一下,你会发现每次打印完后,channelReadComplete也会调用,如果你试着传一个超长的字符串过来,超过1024个字母长度,你会发现channelRead会调用多次,而channelReadComplete只调用一次。
所以这就比较清晰了吧,因为ByteBuf是有长度限制的,所以超长了,就会多次读取,也就是调用多次channelRead,而channelReadComplete则是每条消息只会调用一次,无论你多长,分多少次读取,只在该条消息最后一次读取完成的时候调用。
Outbound 事件传播
分析完 Inbound 事件的传播流程之后,再学习 Outbound 事件传播就会简单很多。Outbound 事件传播的方向是从 Tail -> Head,与 Inbound 事件的传播方向恰恰是相反的。Outbound 事件最常见的就是写事件,执行 writeAndFlush() 方法时就会触发 Outbound 事件传播。我们直接从 TailContext 跟进 writeAndFlush() 源码:
@Override
public final ChannelFuture writeAndFlush(Object msg) {
    return tail.writeAndFlush(msg);
}
继续跟进 tail.writeAndFlush() 的源码,最终会定位到 AbstractChannelHandlerContext 中的 write 方法。该方法是 writeAndFlush 的核心逻辑,具体源码如下。
private void write(Object msg, boolean flush, ChannelPromise promise) {
    // ...... 省略部分非核心代码 ......
    // 找到 Pipeline 链表中下一个 Outbound 类型的 ChannelHandler 节点
    final AbstractChannelHandlerContext next = findContextOutbound(flush ?
            (MASK_WRITE | MASK_FLUSH) : MASK_WRITE);
    final Object m = pipeline.touch(msg, next);
    EventExecutor executor = next.executor();
    // 判断当前线程是否是 NioEventLoop 中的线程
    if (executor.inEventLoop()) {
        if (flush) {
            // 因为 flush == true,所以流程走到这里
            next.invokeWriteAndFlush(m, promise);
        } else {
            next.invokeWrite(m, promise);
        }
    } else {
        final AbstractWriteTask task;
        if (flush) {
            task = WriteAndFlushTask.newInstance(next, m, promise);
        }  else {
            task = WriteTask.newInstance(next, m, promise);
        }
        if (!safeExecute(executor, task, promise, m)) {
           task.cancel();
        }
    }
}
假设我们在代码示例中 调用了 writeAndFlush() 方法,那么 Netty 会调用 findContextOutbound() 方法找到 Pipeline 链表中下一个 Outbound 类型的 ChannelHandler,然后调用 next.invokeWriteAndFlush(m, promise),我们跟进去:
private void invokeWriteAndFlush(Object msg, ChannelPromise promise) {
    if (invokeHandler()) {
        invokeWrite0(msg, promise);
        invokeFlush0();
    } else {
        writeAndFlush(msg, promise);
    }
}

private void invokeWrite0(Object msg, ChannelPromise promise) {
    try {
        ((ChannelOutboundHandler) handler()).write(this, msg, promise);
    } catch (Throwable t) {
        notifyOutboundHandlerException(t, promise);
    }
}
我们发现,invokeWriteAndFlush() 方法最终会它会执行下一个 ChannelHandler 节点的 write 方法。一般情况下,用户在实现 outBound 类型的 ChannelHandler 时都会继承 ChannelOutboundHandlerAdapter,一起看下它的 write() 方法是如何处理 outBound 事件的。
public void write(ChannelHandlerContext ctx, Object msg, ChannelPromise promise) throws Exception {
    ctx.write(msg, promise);
}
ChannelOutboundHandlerAdapter.write() 只是调用了 AbstractChannelHandlerContext 的 write() 方法,是不是似曾相识?与之前介绍的 Inbound 事件处理流程类似,此时流程又回到了 AbstractChannelHandlerContext 中重复执行 write 方法,继续寻找下一个 Outbound 节点,也是一个递归调用的过程。
编码器是用户经常需要自定义实现的处理器,然而为什么用户的编码器里并没有重写 write(),只是重写一个 encode() 方法呢?用户自定义的编码器基本都会继承 MessageToByteEncoder,MessageToByteEncoder 重写了 ChanneOutboundHandler 的 write() 方法,其中会调用子类实现的 encode 方法完成数据编码。
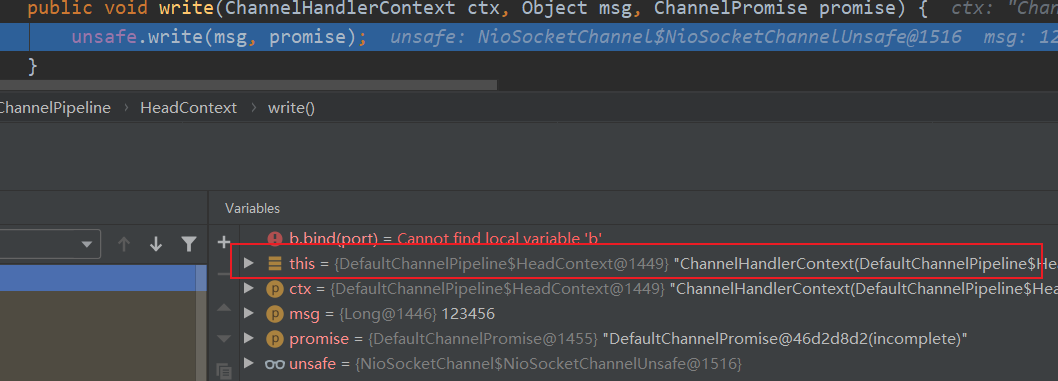
那么 OutBound 事件什么时候传播结束呢?也许你已经猜到了,OutBound 事件最终会传播到 HeadContext 节点。所以 HeadContext 节点既是 Inbound 处理器,又是 OutBound 处理器,继续看下 HeadContext 是如何拦截和处理 write 事件的。
public void write(ChannelHandlerContext ctx, Object msg, ChannelPromise promise) {
    unsafe.write(msg, promise);
}
HeadContext 最终调用了底层的 unsafe 写入数据,数据在执行 write() 方法时,只会写入到一个底层的缓冲数据结构,然后等待 flush 操作将数据冲刷到 Channel 中。
到此为止,outbound 事件传播也介绍完了,它的传播方向是 Tail -> Head,与 Inbound 事件的传播是相反的。MessageToByteEncoder 是用户在实现编码时经常用到的一个抽象类,MessageToByteEncoder 中已经重写了 ChanneOutboundHandler 的 write() 方法,大部分情况下用户只需要重写 encode() 即可。
异常事件传播
举个例子,异常拦截器的简单实现
public class ExceptionHandler extends ChannelDuplexHandler {
    @Override
    public void exceptionCaught(ChannelHandlerContext ctx, Throwable cause) {
        if (cause instanceof RuntimeException) {
            System.out.println("Handle Business Exception Success.");
        }
    }
}
异常处理器 ExceptionHandler 一般会继承 ChannelDuplexHandler,ChannelDuplexHandler 既是一个 Inbound 处理器,又是一个 Outbound 处理器。ExceptionHandler 应该被添加在自定义处理器的尾部,如下图所示:

那么异常处理器 ExceptionHandler 什么时候被执行呢?我们分别从 Inbound 异常事件传播和 Outbound 异常事件传播两种场景进行分析。
首先看下 Inbound 异常事件的传播。还是从数据读取的场景入手,发现 Inbound 事件传播的时候有异常处理的相关逻辑,我们再一起重新分析下数据读取环节的源码。
// AbstractChannelHandlerContext
private void invokeChannelRead(Object msg) {
    if (invokeHandler()) {
        try {
            ((ChannelInboundHandler) handler()).channelRead(this, msg);
        } catch (Throwable t) {
            notifyHandlerException(t);
        }
    } else {
        fireChannelRead(msg);
    }
}

// AbstractChannelHandlerContext
private void notifyHandlerException(Throwable cause) {
    // 省略其他代码
    invokeExceptionCaught(cause);
}

// AbstractChannelHandlerContext
private void invokeExceptionCaught(final Throwable cause) {
    if (invokeHandler()) {
        try {
            handler().exceptionCaught(this, cause); // 调用 Handler 实现的 exceptionCaught 方法
        } catch (Throwable error) {
            // 省略其他代码
        }
    } else {
        fireExceptionCaught(cause);
    }
}
如果 ServerHandler 在读取数据时发生了异常,invokeChannelRead 会捕获异常,并执行 notifyHandlerException() 方法进行异常处理。我们一步步跟进,发现最终会调用 Handler 的 exceptionCaught() 方法,所以用户可以通过重写 exceptionCaught() 实现自定义的异常处理。
我们知道,统一异常处理器 ExceptionHandler 是在 ChannelPipeline 的末端,如果 ServerHandler 没有重写 exceptionCaught() 方法,那么 ServerHandler 产生的异常是如何传播到 ExceptionHandler 中呢?用户实现的 Inbound 处理器一般都会继承 ChannelInboundHandlerAdapter 抽象类,果然我们在 ChannelInboundHandlerAdapter 中发现了 exceptionCaught() 的实现:
// ChannelInboundHandlerAdapter
public void exceptionCaught(ChannelHandlerContext ctx, Throwable cause)
        throws Exception {
    ctx.fireExceptionCaught(cause);
}

// AbstractChannelHandlerContext
public ChannelHandlerContext fireExceptionCaught(final Throwable cause) {
    invokeExceptionCaught(findContextInbound(MASK_EXCEPTION_CAUGHT), cause);
    return this;
}
ChannelInboundHandlerAdapter 默认调用 fireExceptionCaught() 方法传播异常事件,而 fireExceptionCaught() 执行时会先调用 findContextInbound() 方法找到下一个对异常事件关注的 Inbound 处理器,然后继续向下传播异常。所以这里应该明白为什么统一异常处理器 ExceptionHandler 为什么需要添加在 ChannelPipeline 的末端了吧?这样 ExceptionHandler 可以接收所有 Inbound 处理器发生的异常。
接下来,我们分析 Outbound 异常事件传播。你可能此时就会有一个疑问,Outbound 事件的传播方向与 Inbound 事件是相反的,为什么统一异常处理器 ExceptionHandler 没有添加在 ChannelPipeline 的头部呢?我们通过 writeAndFlush() 的调用过程再来一探究竟。
// AbstractChannelHandlerContext
private void invokeFlush0() {
    try {
        ((ChannelOutboundHandler) handler()).flush(this);
    } catch (Throwable t) {
        notifyHandlerException(t);
    }
}
我们发现,flush 发送数据时如果发生异常,那么异常也会被捕获并交由同样的 notifyHandlerException() 方法进行处理。因为 notifyHandlerException() 方法中会向下寻找 Inbound 处理器,此时又会回到 Inbound 异常事件的传播流程。所以说,异常事件的传播方向与 Inbound 事件几乎是一样的,最后一定会传播到统一异常处理器 ExceptionHandler。
到这里,整个异常事件的传播过程已经分析完了。你需要记住的是,异常事件的传播顺序与 ChannelHandler 的添加顺序相同,会依次向后传播,与 Inbound 事件和 Outbound 事件无关。
总结
这节点我们学习了数据在 Netty 中的完整处理流程,其中重点分析了数据是如何在 ChannelPipeline 中流转的。我们做一个知识点总结:
- ChannelPipeline 是双向链表结构,包含 ChannelInboundHandler 和 ChannelOutboundHandler 两种处理器。
- Inbound 事件和 Outbound 事件的传播方向相反,Inbound 事件的传播方向为 Head -> Tail,而 Outbound 事件传播方向是 Tail -> Head。
- 异常事件的处理顺序与 ChannelHandler 的添加顺序相同,会依次向后传播,与 Inbound 事件和 Outbound 事件无关。
再整体回顾下 ChannelPipeline 中事件传播的实现原理:
- Inbound 事件传播从 HeadContext 节点开始,Outbound 事件传播从 TailContext 节点开始。
- AbstractChannelHandlerContext 抽象类中实现了一系列 fire 和 invoke 方法,如果想让事件想下传播,只需要调用 fire 系列的方法即可。fire 和 invoke 的系列方法结合 findContextInbound() 和 findContextOutbound() 可以控制 Inbound 和 Outbound 事件的传播方向,整个过程是一个递归调用。
HeadContext
channelActive(ChannelHandlerContext ctx)
先往后传递通道激活事件,最后判断是否可以自动读,因为通道注册完了之后就会触发激活,所以就可以开始读取数据了,读取到有连接也是读取事件:
public void channelActive(ChannelHandlerContext ctx) {
            ctx.fireChannelActive();

            readIfIsAutoRead();
        }
readIfIsAutoRead();
如果配置了自动读,就会开始去设置监听通道事件:
默认自动读
private void readIfIsAutoRead() {
            if (channel.config().isAutoRead()) {
                channel.read();
            }
        }
管道的read
public Channel read() {
        pipeline.read();
        return this;
    }
尾结点tail的read:
public final ChannelPipeline read() {
        tail.read();
        return this;
    }
AbstractChannelHandlerContext的read:
public ChannelHandlerContext read() {
        final AbstractChannelHandlerContext next = findContextOutbound(MASK_READ);//从尾到头找到一个出站的读,开始初始化的时候next就是head,如果你自定了,没处理好的话,可能后面就读不到数据了
        EventExecutor executor = next.executor();
        if (executor.inEventLoop()) {
            next.invokeRead();
        } else {
            Tasks tasks = next.invokeTasks;
            if (tasks == null) {
                next.invokeTasks = tasks = new Tasks(next);
            }
            executor.execute(tasks.invokeReadTask);
        }

        return this;
    }

调用头结点的invokeRead方法,继续调用read方法
public void read(ChannelHandlerContext ctx) {
            unsafe.beginRead();
        }
AbstractChannel.AbstractUnsafe.beginRead()方法
public final void beginRead() {
            assertEventLoop();

            if (!isActive()) {
                return;
            }

            try {
                doBeginRead();
            } catch (final Exception e) {
                invokeLater(new Runnable() {
                    @Override
                    public void run() {
                        pipeline.fireExceptionCaught(e);
                    }
                });
                close(voidPromise());
            }
        }
AbstractNioChannel.doBeginRead();
初始化的时候事件循环执行的最后一个任务,即设置相应的监听事件,当然可以监听读写事件:
protected void doBeginRead() throws Exception {
        // Channel.read() or ChannelHandlerContext.read() was called
        final SelectionKey selectionKey = this.selectionKey;
        if (!selectionKey.isValid()) {
            return;
        }

        readPending = true;

        final int interestOps = selectionKey.interestOps();
        if ((interestOps & readInterestOp) == 0) {
            selectionKey.interestOps(interestOps | readInterestOp);
        }
    }
自己自定义的处理器不要随意去覆盖read方法,因为处理器上下文的read方法会从尾部开始遍历,找到第一个可以处理read的处理器,如果是你自定义的,你又没处理好,那就可能再也收不到消息了。
TailContext
AbstractChannelHandlerContext的write(Object msg)
一般我们就是在处理器channelRead读数据之后要写操作,都是调用这个方法,当然还有其他的重载方法。

private void write(Object msg, boolean flush, ChannelPromise promise) {
        ObjectUtil.checkNotNull(msg, "msg");
        try {
            if (isNotValidPromise(promise, true)) {
                ReferenceCountUtil.release(msg);
                // cancelled
                return;
            }
        } catch (RuntimeException e) {
            ReferenceCountUtil.release(msg);
            throw e;
        }

        final AbstractChannelHandlerContext next = findContextOutbound(flush ?
                (MASK_WRITE | MASK_FLUSH) : MASK_WRITE);//获取 Pipeline 链表中前一个符合的出站的上下文
        final Object m = pipeline.touch(msg, next);
        EventExecutor executor = next.executor();
        if (executor.inEventLoop()) {
            if (flush) {
                next.invokeWriteAndFlush(m, promise);//写并且冲刷
            } else {
                next.invokeWrite(m, promise);//写
            }
        } else {
            final WriteTask task = WriteTask.newInstance(next, m, promise, flush);
            if (!safeExecute(executor, task, promise, m, !flush)) {
                // We failed to submit the WriteTask. We need to cancel it so we decrement the pending bytes
                // and put it back in the Recycler for re-use later.
                //
                // See https://github.com/netty/netty/issues/8343.
                task.cancel();
            }
        }
    }
首先我们确认下方法的入参,因为我们只执行 write 动作,所以 flush == false;如果调用的是writeAndFlush 方法,flush == true,write 方法还需要 ChannelPromise 参数,可见写操作是个异步的过程。AbstractChannelHandlerContext 会默认初始化一个 ChannelPromise 完成该异步操作,ChannelPromise 内部持有当前的 Channel 和 EventLoop,此外你可以向 ChannelPromise 中注册回调监听 listener 来获得异步操作的结果。
write 方法的核心逻辑主要分为三个重要步骤。
第一步,调用 findContextOutbound 方法找到 Pipeline 链表中下一个 Outbound 类型的 ChannelHandler。即 TailContext 的prev。
第二步,通过 inEventLoop 方法判断当前线程的身份标识,如果当前线程和 EventLoop 分配给当前 Channel 的线程是同一个线程的话,那么所提交的任务将被立即执行。否则当前的操作将被封装成一个 Task 放入到 EventLoop 的任务队列,稍后执行。所以 writeAndFlush 是线程安全的。
第三步,因为 flush== false,将会直接执行 next.invokeWrite(m, promise) 这行代码,我们跟进去源码。发现最终会它会执行下一个 ChannelHandler 节点的 write 方法,那么流程又回到了 到 AbstractChannelHandlerContext 中重复执行 write 方法,继续寻找下一个 Outbound 节点。
AbstractChannelHandlerContext的invokeWrite0
private void invokeWrite0(Object msg, ChannelPromise promise) {
        try {
            ((ChannelOutboundHandler) handler()).write(this, msg, promise);
        } catch (Throwable t) {
            notifyOutboundHandlerException(t, promise);
        }
    }
最终调用的是HeadContext的write方法,写入出站缓冲区是在head写入的,如果在自定义的出站处理器里没有继续向前传递的话,就会失去写的作用。
调用链路
不覆盖ChannelOutboundHandlerAdapter默认就跳过这个处理器,传到一下个去了。
最后会传递到head的write,内部就是调用unsafe写入出站缓冲区:
public void write(ChannelHandlerContext ctx, Object msg, ChannelPromise promise) {
            unsafe.write(msg, promise);
        }
这个unsafe是NioSocketChannelUnsafe类。他继承NioByteUnsafe,NioByteUnsafe继承AbstractNioUnsafe。AbstractNioUnsafe有两个子类,一个就是AbstractNioMessageChannel的NioMessageUnsafe,这个是用于NioServerSocketChannel的unsafe类,另外一个AbstractNioByteChannel的NioByteUnsafe,用于NioSocketChannel,其实也就是一些读取方法不一样,毕竟一个是取接受连接,一个是读取数据,不一样。
NioSocketChannelUnsafe专门用来操作写和刷新的。
public final void write(Object msg, ChannelPromise promise) {
            assertEventLoop();

            ChannelOutboundBuffer outboundBuffer = this.outboundBuffer;
            if (outboundBuffer == null) {
                try {
                    // release message now to prevent resource-leak
                    ReferenceCountUtil.release(msg);
                } finally {
                    // If the outboundBuffer is null we know the channel was closed and so
                    // need to fail the future right away. If it is not null the handling of the rest
                    // will be done in flush0()
                    // See https://github.com/netty/netty/issues/2362
                    safeSetFailure(promise,
                            newClosedChannelException(initialCloseCause, "write(Object, ChannelPromise)"));
                }
                return;
            }

            int size;
            try {
                msg = filterOutboundMessage(msg);//封装成直接缓冲区
                size = pipeline.estimatorHandle().size(msg);//获取缓冲区大小
                if (size < 0) {
                    size = 0;
                }
            } catch (Throwable t) {
                try {
                    ReferenceCountUtil.release(msg);
                } finally {
                    safeSetFailure(promise, t);
                }
                return;
            }

            outboundBuffer.addMessage(msg, size, promise);//往出站缓冲区添加消息
        }
Head 节点是通过调用 unsafe 对象完成数据写入的,unsafe 对应的是 NioSocketChannelUnsafe 对象实例,最终调用到 AbstractChannel 中的 write 方法,该方法有两个重要的点需要指出:
- filterOutboundMessage 方法会对待写入的 msg 进行过滤,如果 msg 使用的不是 DirectByteBuf,那么它会将 msg 转换成 DirectByteBuf。
- ChannelOutboundBuffer 可以理解为一个缓存结构,从源码最后一行 outboundBuffer.addMessage 可以看出是在向这个缓存中添加数据,所以 ChannelOutboundBuffer 才是理解数据发送的关键。
调用 write 方法,数据并不会被真正发送出去,而是存储在 ChannelOutboundBuffer 的缓存内。
filterOutboundMessage(Object msg)
这个是专门把数据封装成直接缓冲区,以便于进行零拷贝,利用堆外内存,提高效率,
protected final Object filterOutboundMessage(Object msg) {
        if (msg instanceof ByteBuf) {
            ByteBuf buf = (ByteBuf) msg;
            if (buf.isDirect()) {//如果是直接缓冲区就返回
                return msg;
            }

            return newDirectBuffer(buf);//否则封装成直接缓冲区就可以零拷贝
        }

        if (msg instanceof FileRegion) {//文件缓冲区也可以零拷贝
            return msg;
        }

        throw new UnsupportedOperationException(
                "unsupported message type: " + StringUtil.simpleClassName(msg) + EXPECTED_TYPES);
    }
AbstractNioChannel的newDirectBuffer(ByteBuf buf)
获得一个新的直接缓冲区,把旧的缓冲区释放了
protected final ByteBuf newDirectBuffer(ByteBuf buf) {
        final int readableBytes = buf.readableBytes();
        if (readableBytes == 0) {//如果没有数据,就释放,返回一个空的
            ReferenceCountUtil.safeRelease(buf);
            return Unpooled.EMPTY_BUFFER;
        }
     //字节缓冲区分配器
        final ByteBufAllocator alloc = alloc();
        if (alloc.isDirectBufferPooled()) {//是直接缓冲区池化的
            ByteBuf directBuf = alloc.directBuffer(readableBytes);//申请直接缓冲区
            directBuf.writeBytes(buf, buf.readerIndex(), readableBytes);//写入直接缓冲区
            ReferenceCountUtil.safeRelease(buf);//释放原来的缓冲区
            return directBuf;//返回直接缓冲区
        }

        final ByteBuf directBuf = ByteBufUtil.threadLocalDirectBuffer();//线程中的直接缓冲区
        if (directBuf != null) {
            directBuf.writeBytes(buf, buf.readerIndex(), readableBytes);
            ReferenceCountUtil.safeRelease(buf);
            return directBuf;
        }

        // Allocating and deallocating an unpooled direct buffer is very expensive; give up.
        return buf;//如果申请或者释放未池化的直接缓冲区消耗太大,就直接返回原来的
    }
ChannelOutboundBuffer的addMessage
将直接缓冲区添加到出站缓冲区中,不过是会创建一个实体Entry,然后用一个单链表结构来存取的
 public void addMessage(Object msg, int size, ChannelPromise promise) {
        Entry entry = Entry.newInstance(msg, size, total(msg), promise);
        if (tailEntry == null) {
            flushedEntry = null;
        } else {
            Entry tail = tailEntry;
            tail.next = entry;
        }
        tailEntry = entry;
        if (unflushedEntry == null) {
            unflushedEntry = entry;
        }

        // increment pending bytes after adding message to the unflushed arrays.
        // See https://github.com/netty/netty/issues/1619
        incrementPendingOutboundBytes(entry.pendingSize, false);//增加待冲刷的消息
    }
ChannelOutboundBuffer的incrementPendingOutboundBytes
增加待出站的字节数
private void incrementPendingOutboundBytes(long size, boolean invokeLater) {
        if (size == 0) {
            return;
        }

        long newWriteBufferSize = TOTAL_PENDING_SIZE_UPDATER.addAndGet(this, size);
        if (newWriteBufferSize > channel.config().getWriteBufferHighWaterMark()) {//如果大于配置的16位大小
            setUnwritable(invokeLater);//设置不可写
        }
    }
ChannelOutboundBuffer的setUnwritable
将unwritable原子操作改为非0,然后触发fireChannelWritabilityChanged
private void setUnwritable(boolean invokeLater) {
        for (;;) {
            final int oldValue = unwritable;
            final int newValue = oldValue | 1;
            if (UNWRITABLE_UPDATER.compareAndSet(this, oldValue, newValue)) {
                if (oldValue == 0) {
                    fireChannelWritabilityChanged(invokeLater);
                }
                break;
            }
        }
    }
如果是立即改变,就会调用pipeline.fireChannelWritabilityChanged();,就会从头结点开始传递这个事件,否则就给通道的事件循环提交个任务
private void fireChannelWritabilityChanged(boolean invokeLater) {
        final ChannelPipeline pipeline = channel.pipeline();
        if (invokeLater) {
            Runnable task = fireChannelWritabilityChangedTask;
            if (task == null) {
                fireChannelWritabilityChangedTask = task = new Runnable() {
                    @Override
                    public void run() {
                        pipeline.fireChannelWritabilityChanged();
                    }
                };
            }
            channel.eventLoop().execute(task);
        } else {
            pipeline.fireChannelWritabilityChanged();
        }
    }
ChannelOutboundBuffer 缓存是一个链表结构,每次传入的数据都会被封装成一个 Entry 对象添加到链表中。ChannelOutboundBuffer 包含三个非常重要的指针:第一个被写到缓冲区的节点 flushedEntry、第一个未被写到缓冲区的节点 unflushedEntry和最后一个节点 tailEntry。
在初始状态下这三个指针都指向 NULL,当我们每次调用 write 方法是,都会调用 addMessage 方法改变这三个指针的指向,可以参考下图理解指针的移动过程会更加形象。
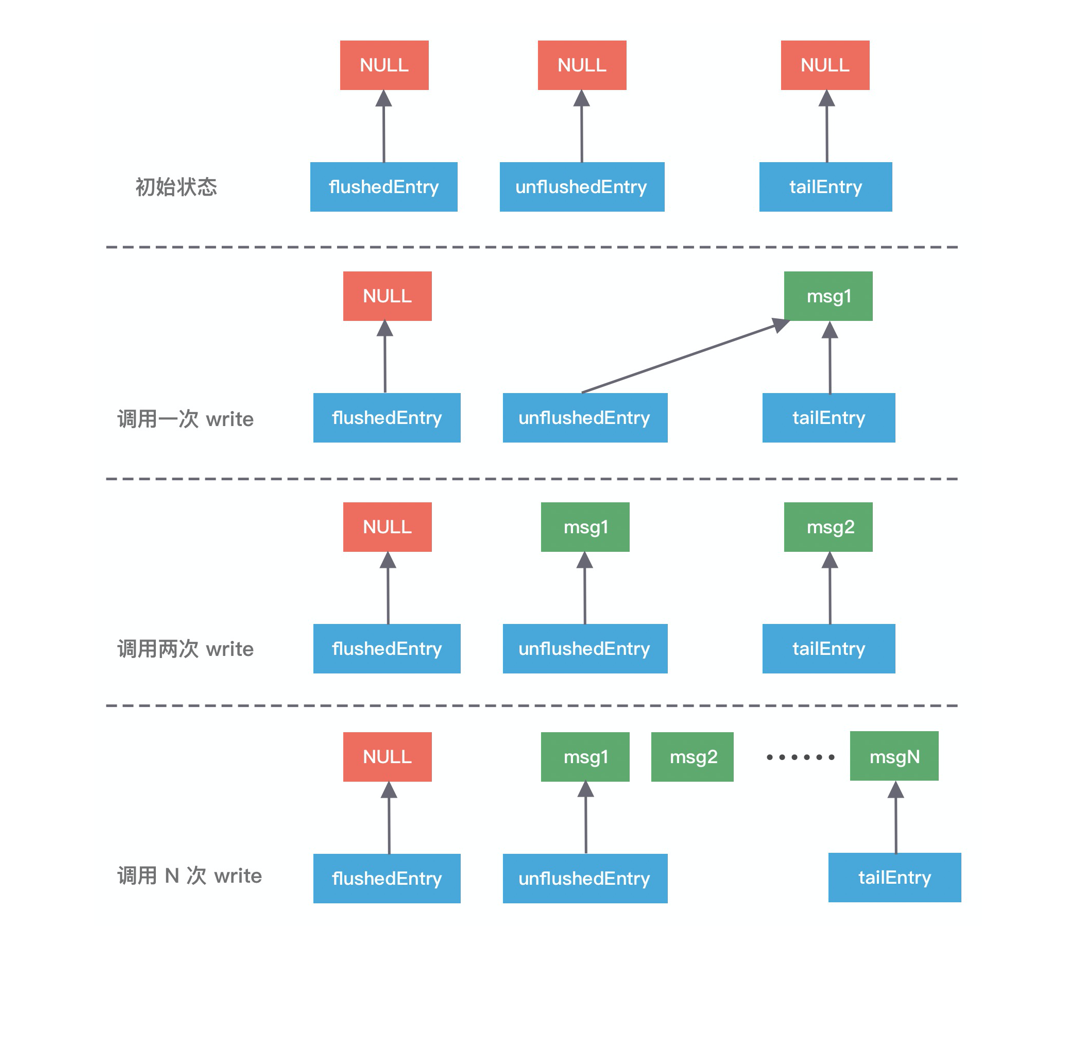
第一次调用 write,因为链表里只有一个数据,所以 unflushedEntry 和 tailEntry 指针都指向第一个添加的数据 msg1。flushedEntry 指针在没有触发 flush 动作时会一直指向 NULL。
第二次调用 write,tailEntry 指针会指向新加入的 msg2,unflushedEntry 保持不变。
第 N 次调用 write,tailEntry 指针会不断指向新加入的 msgN,unflushedEntry 依然保持不变,unflushedEntry 和 tailEntry 指针之间的数据都是未写入 Socket 缓冲区的。
以上便是写 Buffer 队列写入数据的实现原理,但是我们不可能一直向缓存中写入数据,所以 addMessage 方法中每次写入数据后都会调用 incrementPendingOutboundBytes 方法判断缓存的水位线。
至此,write写数据就完成了,其实就是写入出站缓冲区里面,并没有将数据冲刷到对端,要进行flush才会将数据发出去。
flush()
与 write 方法类似,flush 方法同样会从 Tail 节点开始传播到 Head 节点。
AbstractChannelHandlerContext的flush
public ChannelHandlerContext flush() {
        final AbstractChannelHandlerContext next = findContextOutbound(MASK_FLUSH);
        EventExecutor executor = next.executor();
        if (executor.inEventLoop()) {
            next.invokeFlush();
        } else {
            Tasks tasks = next.invokeTasks;
            if (tasks == null) {
                next.invokeTasks = tasks = new Tasks(next);
            }
            safeExecute(executor, tasks.invokeFlushTask, channel().voidPromise(), null, false);
        }

        return this;
    }
和write方法一样,最终调用的也是NioSocketChannelUnsafe的flush方法
public final void flush() {
            assertEventLoop();

            ChannelOutboundBuffer outboundBuffer = this.outboundBuffer;//获得出站缓冲区
            if (outboundBuffer == null) {
                return;
            }

            outboundBuffer.addFlush();//添加冲刷计数
            flush0();//冲刷
        }
ChannelOutboundBuffer的addFlush
这里会将flushedEntry设置为要冲刷的第一个entry,然后遍历链表,冲刷计数flushed+1,如果此时请求取消的话,就进行取消和出站字节数的减少,最后将为冲刷实体unflushedEntry设为空,表示这些都已经要冲刷的了,后续会根据flushed来进行冲刷;
public void addFlush() {

        Entry entry = unflushedEntry;//第一个没冲刷的数据,也是链表的第一个
        if (entry != null) {//有数据才刷了
            if (flushedEntry == null) {
                // there is no flushedEntry yet, so start with the entry
                flushedEntry = entry;//设置第一个要冲刷的实体
            }
            do {
                flushed ++;//冲刷数+1
                if (!entry.promise.setUncancellable()) {//如果取消的话需要回收内存
                    // Was cancelled so make sure we free up memory and notify about the freed bytes
                    int pending = entry.cancel();
                    decrementPendingOutboundBytes(pending, false, true);// 减去待发送的数据,如果总字节数低于低水位,那么 Channel 将变为可写状态
                }
                entry = entry.next;
            } while (entry != null);//遍历冲刷是否有取消的

            // All flushed so reset unflushedEntry
            unflushedEntry = null;//重置未冲刷的
        }
    }
addFlush 方法同样也会操作 ChannelOutboundBuffer 缓存数据。在执行 addFlush 方法时,缓存中的指针变化
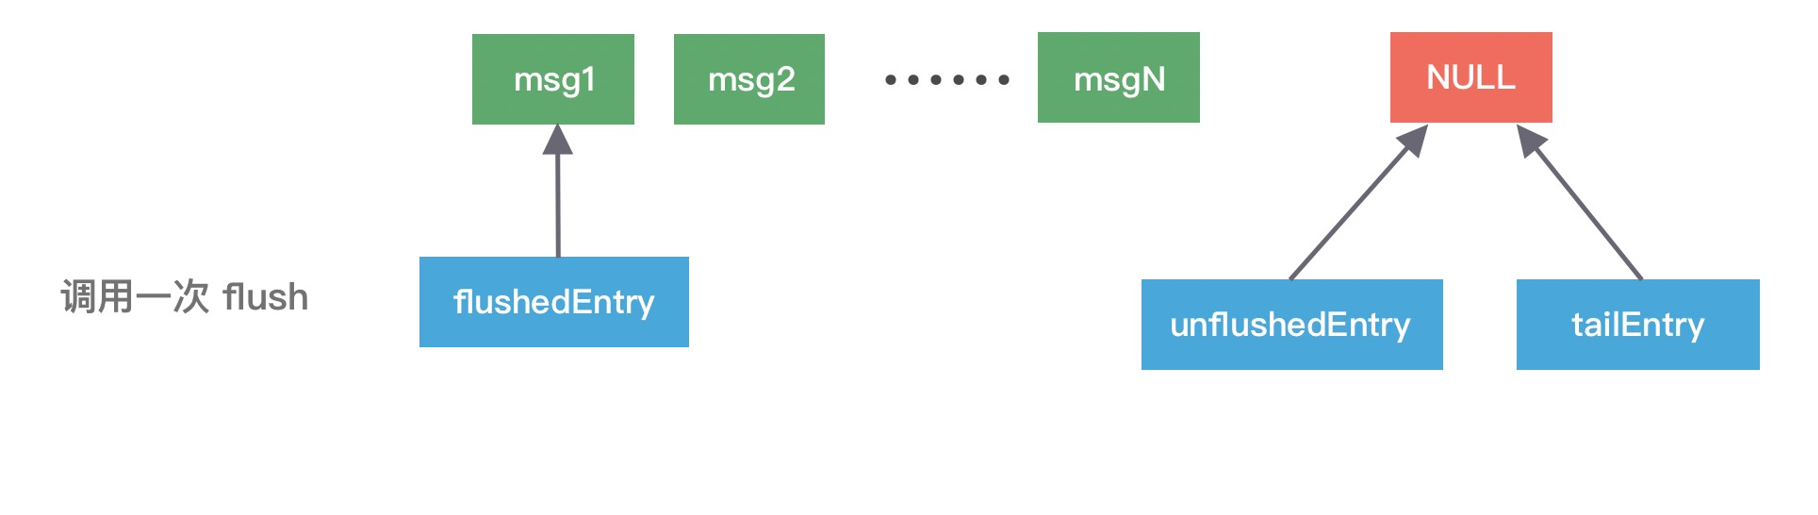
此时 flushedEntry 指针有所改变,变更为 unflushedEntry 指针所指向的数据,然后 unflushedEntry 指针指向 NULL,flushedEntry 指针指向的数据才会被真正发送到 Socket 缓冲区。
在 addFlush 源码中 decrementPendingOutboundBytes 与之前 addMessage 源码中的 incrementPendingOutboundBytes 是相对应的。decrementPendingOutboundBytes 主要作用是减去待发送的数据字节,如果缓存的大小已经小于低水位,那么 Channel 会恢复为可写状态。
AbstractNioUnsafe的flush0
protected final void flush0() {
            if (!isFlushPending()) {//没有待冲刷的操作
                super.flush0();
            }
        }
AbstractNioUnsafe的isFlushPending
判断下是否已经有待冲刷存在,也就是有设置OP_WRITE事件
private boolean isFlushPending() {
            SelectionKey selectionKey = selectionKey();
            return selectionKey.isValid() && (selectionKey.interestOps() & SelectionKey.OP_WRITE) != 0;
        }
AbstractUnsafe的flush0
protected void flush0() {
            if (inFlush0) {
                // Avoid re-entrance
                return;
            }

            final ChannelOutboundBuffer outboundBuffer = this.outboundBuffer;
            if (outboundBuffer == null || outboundBuffer.isEmpty()) {
                return;
            }

            inFlush0 = true;

            // Mark all pending write requests as failure if the channel is inactive.
            if (!isActive()) {
                try {
                    // Check if we need to generate the exception at all.
                    if (!outboundBuffer.isEmpty()) {
                        if (isOpen()) {
                            outboundBuffer.failFlushed(new NotYetConnectedException(), true);
                        } else {
                            // Do not trigger channelWritabilityChanged because the channel is closed already.
                            outboundBuffer.failFlushed(newClosedChannelException(initialCloseCause, "flush0()"), false);
                        }
                    }
                } finally {
                    inFlush0 = false;
                }
                return;
            }

            try {
                doWrite(outboundBuffer);
            } catch (Throwable t) {
                handleWriteError(t);
            } finally {
                inFlush0 = false;
            }
        }
NioSocketChannel的doWrite(ChannelOutboundBuffer in)
封装了NIO的SocketChannel的write方法来进行写数据啦,他会进行16次自旋尝试,来写消息,直到出站缓冲区的数据全部写出去了,然后就clearOpWrite清除OP_WRITE设置,返回,否则要去设置任务是否写操作incompleteWrite
protected void doWrite(ChannelOutboundBuffer in) throws Exception {
        SocketChannel ch = javaChannel();//内部还是用NIO的操作的
        int writeSpinCount = config().getWriteSpinCount();//写自旋的次数,默认是16次
        do {
            if (in.isEmpty()) {
                // All written so clear OP_WRITE
                clearOpWrite();
                // Directly return here so incompleteWrite(...) is not called.
                return;
            }

            // Ensure the pending writes are made of ByteBufs only.
            int maxBytesPerGatheringWrite = ((NioSocketChannelConfig) config).getMaxBytesPerGatheringWrite();
            ByteBuffer[] nioBuffers = in.nioBuffers(1024, maxBytesPerGatheringWrite);//获取ByteBuffer数组
            int nioBufferCnt = in.nioBufferCount();

            // Always use nioBuffers() to workaround data-corruption.
            // See https://github.com/netty/netty/issues/2761
            switch (nioBufferCnt) {
                case 0:
                    // We have something else beside ByteBuffers to write so fallback to normal writes.
                    writeSpinCount -= doWrite0(in);
                    break;
                case 1: {
                    // Only one ByteBuf so use non-gathering write
                    // Zero length buffers are not added to nioBuffers by ChannelOutboundBuffer, so there is no need
                    // to check if the total size of all the buffers is non-zero.
                    ByteBuffer buffer = nioBuffers[0];
                    int attemptedBytes = buffer.remaining();
                    final int localWrittenBytes = ch.write(buffer);
                    if (localWrittenBytes <= 0) {
                        incompleteWrite(true);
                        return;
                    }
                    adjustMaxBytesPerGatheringWrite(attemptedBytes, localWrittenBytes, maxBytesPerGatheringWrite);
                    in.removeBytes(localWrittenBytes);
                    --writeSpinCount;
                    break;
                }
                default: {
                    // Zero length buffers are not added to nioBuffers by ChannelOutboundBuffer, so there is no need
                    // to check if the total size of all the buffers is non-zero.
                    // We limit the max amount to int above so cast is safe
                    long attemptedBytes = in.nioBufferSize();
                    final long localWrittenBytes = ch.write(nioBuffers, 0, nioBufferCnt);
                    if (localWrittenBytes <= 0) {
                        incompleteWrite(true);
                        return;
                    }
                    // Casting to int is safe because we limit the total amount of data in the nioBuffers to int above.
                    adjustMaxBytesPerGatheringWrite((int) attemptedBytes, (int) localWrittenBytes,
                            maxBytesPerGatheringWrite);
                    in.removeBytes(localWrittenBytes);
                    --writeSpinCount;
                    break;
                }
            }
        } while (writeSpinCount > 0);

        incompleteWrite(writeSpinCount < 0);
    }
doWrite 方法负责将数据真正写入到 Socket 缓冲区。
处理流程主要分为三步:
第一,根据配置获取自旋锁的次数 writeSpinCount。这个自旋锁的次数作用在于:当我们向 Socket 底层写数据的时候,如果每次要写入的数据量很大,是不可能一次将数据写完的,所以只能分批写入。Netty 在不断调用执行写入逻辑的时候,EventLoop 线程可能一直在等待,这样有可能会阻塞其他事件处理。所以这里自旋锁的次数相当于控制一次写入数据的最大的循环执行次数,如果超过所设置的自旋锁次数,那么写操作将会被暂时中断。
第二,根据自旋锁次数重复调用 doWriteInternal 方法发送数据,每成功发送一次数据,自旋锁的次数 writeSpinCount 减 1,当 writeSpinCount 耗尽,那么 doWrite 操作将会被暂时中断。doWriteInternal 的源码涉及 JDK NIO 底层,在这里我们不再深入展开,它的主要作用在于删除缓存中的链表节点以及调用底层 API 发送数据,有兴趣的同学可以自行研究。
第三,调用 incompleteWrite 方法确保数据能够全部发送出去,因为自旋锁次数的限制,可能数据并没有写完,所以需要继续 OP_WRITE 事件;如果数据已经写完,清除 OP_WRITE 事件即可。
无论是写还是冲刷,都是从一个处理器传递到前一个出站处理器,如果不是head的话,一定要继续传递,否则这个消息就没了,不会写入缓冲区,也不会冲刷出去,除非你自定义的出站处理器做了这些事,比如你调用ctx.channel().unsafe().write(buf,ctx.newPromise())。另外,所有的这些操作最终都是通过通道的unsafe的对象操作的,内部最后还是NIO的通道去做的。