ByteBuf
ByteBuf 是 Netty 的数据容器,所有网络通信中字节流的传输都是通过 ByteBuf 完成的。与JDK NIO 包中提供的 ByteBuffer 类类似。
我们首先介绍下 JDK NIO 的 ByteBuffer。下图展示了 ByteBuffer 的内部结构:
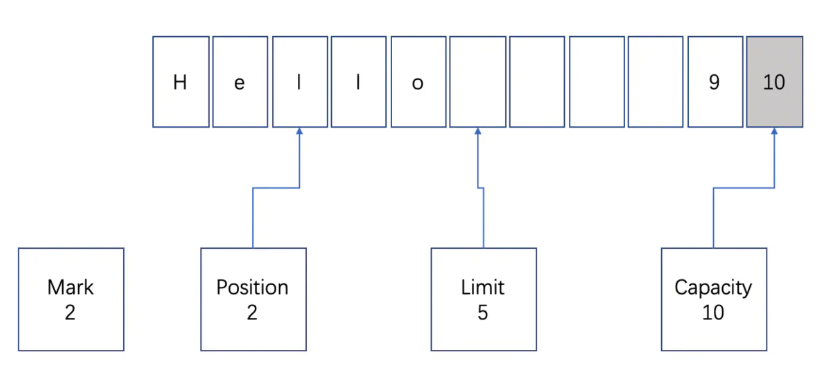
ByteBuffer 包含以下四个基本属性:
- mark:为某个读取过的关键位置做标记,方便回退到该位置;
- position:当前读取的位置;
- limit:buffer 中有效的数据长度大小;
- capacity:初始化时的空间容量。
以上四个基本属性的关系是:mark <= position <= limit <= capacity。
他有以下问题:
第一,ByteBuffer 分配的长度是固定的,无法动态扩缩容,所以很难控制需要分配多大的容量。如果分配太大容量,容易造成内存浪费;如果分配太小,存放太大的数据会抛出 BufferOverflowException 异常。在使用 ByteBuffer 时,为了避免容量不足问题,你必须每次在存放数据的时候对容量大小做校验,如果超出 ByteBuffer 最大容量,那么需要重新开辟一个更大容量的 ByteBuffer,将已有的数据迁移过去。整个过程相对烦琐,对开发者而言是非常不友好的。
第二,ByteBuffer 只能通过 position 获取当前可操作的位置,因为读写共用的 position 指针,所以需要频繁调用 flip、rewind 方法切换读写状态,开发者必须很小心处理 ByteBuffer 的数据读写,稍不留意就会出错。
ByteBuffer 作为网络通信中高频使用的数据载体,显然不能够满足 Netty 的需求,Netty 重新实现了一个性能更高、易用性更强的 ByteBuf,相比于 ByteBuffer 它提供了很多非常酷的特性:
- 容量可以按需动态扩展,类似于 StringBuffer;
- 读写采用了不同的指针,读写模式可以随意切换,不需要调用 flip 方法;
- 通过内置的复合缓冲类型可以实现零拷贝;
- 支持引用计数;
- 支持缓存池。
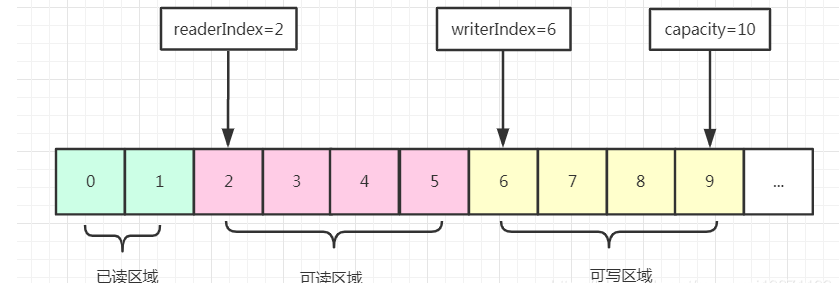
从图中可以看出,ByteBuf 包含三个指针:读指针 readerIndex、写指针 writeIndex、最大容量 maxCapacity,根据指针的位置又可以将 ByteBuf 内部结构可以分为四个部分:
第一部分是废弃字节,表示已经丢弃的无效字节数据。
第二部分是可读字节,表示 ByteBuf 中可以被读取的字节内容,可以通过 writeIndex - readerIndex 计算得出。从 ByteBuf 读取 N 个字节,readerIndex 就会自增 N,readerIndex 不会大于 writeIndex,当 readerIndex == writeIndex 时,表示 ByteBuf 已经不可读。
第三部分是可写字节,向 ByteBuf 中写入数据都会存储到可写字节区域。向 ByteBuf 写入 N 字节数据,writeIndex 就会自增 N,当 writeIndex 超过 capacity,表示 ByteBuf 容量不足,需要扩容。
第四部分是可扩容字节,表示 ByteBuf 最多还可以扩容多少字节,当 writeIndex 超过 capacity 时,会触发 ByteBuf 扩容,最多扩容到 maxCapacity 为止,超过 maxCapacity 再写入就会出错。
由此可见,Netty 重新设计的 ByteBuf 有效地区分了可读、可写以及可扩容数据,解决了 ByteBuffer 无法扩容以及读写模式切换烦琐的缺陷。
继承关系图

- ByteBuf 是一个抽象类,实现 ReferenceCounted 和 Comparable 两个接口,分别具有引用计数和两个 ByteBuf 比较的能力。
- AbstractByteBuf 是重要的抽象类,它是实现一个 Buffer 的骨架。重写了绝大部分 ByteBuf 抽象类的抽象方法,封装了 ByteBuf 操作的共同逻辑,比如在获取数据前检查索引是否有效等等。在 AbstractByteBuf 中定义了两个重要的指针变量简化用户降低 ByteBuf 的难度:
- readerIndex
- writerIndex
- AbstractReferenceCountedByteBuf 也是重要的抽象类,主要实现了引用计数相关逻辑。内部维护一个 volatile int refCnt 变量。但是所有对 refCnt 的操作都需要通过 ReferenceCountUpdater 实例。AbstractReferenceCountedByteBuf 的子类实现可太多了。重要的有
- PooledByteBuf: 抽象类,它是拥有池化能力的 ByteBuf 的骨架,内部定义了许多关于池化相关的类和变量。这个后续会详细讲解。
- UnpooledHeapByteBuf: 实现类,非池化堆内内存ByteBuf。内部使用 byte[] array 字节数组存储数据。底层使用 HeapByteBufUtil 静态方法完成对数组的操作。为了提高性能,使用位移方式处理数据,值得好好体会。
- CompositeByteBuf: 实现类,可组合的ByteBuf。底层实现通过内部类 Component 包装 ByteBuf,然后使用 Component[] 存储多个 Component 对象从而实现组合模式。
- UnpooledDirectByteBuf: 实现类,非池化堆外ByteBuf。底层是持有 java.nio.ByteBuffer 对象的引用。
- FixedCompositeByteBuf: 实现类,固定的可组合ByteBuf。允许以只读模式包装 ByteBuf 数组。
ByteBuf 核心 API
// 立即「丢弃」所有已读数据(需要做数据拷贝,将未读内容复制到最前面)
// 即便只有一个字节剩余可写,也执行「丢弃动作」
public abstract ByteBuf discardReadBytes();

// 会判断 readerIndex 指针是否超过了 capacity的一半
// 如果超过了就执行「丢弃」动作
// 这个方法相比 discardReadBytes() 智能一点
public abstract ByteBuf discardSomeReadBytes();

// 确保 minWritableBytes 字节数可写
// 如果容量不够的话,会触发「扩容」动作
// 扩容后的容量范围[64Byte, 4MB]
public abstract ByteBuf ensureWritable(int minWritableBytes);

// 返回一个int类型的值
// 0: 当前ByteBuf有足够可写容量,capacity保持不变
// 1: 当前ByteBuf没有足够可写容量,capacity保持不变
// 2: 当前ByteBuf有足够的可写容量,capacity增加
// 3: 当前ByteBuf没有足够的可写容量,但capacity已增长到最大值
public abstract int ensureWritable(int minWritableBytes, boolean force);

/**
 * 通过set/get方法还是需要将底层数据看成一个个由byte组成的数组,
 * 索引值是根据基本类型长度而增长的。
 * set/get 并不会改变readerIndex和writerIndex的值,
 * 你可以理解为对某个位进行更改操作
 * 至于大端小端,这个根据特定需求选择的。现阶段的我对这个理解不是特别深刻
 */
public abstract int   getInt(int index);
public abstract int   getIntLE(int index);

 * 方法getBytes(int, ByteBuf, int, int)也能实现同样的功能。
 * 两者的区别是:
 *        「当前方法」会增加目标Buffer对象的「writerIndex」的值,
 *     getBytes(int, ByteBuf, int, int)方法不会更改。

/**
 * 从指定的绝对索引处开始,将此缓冲区的数据传输到指定的目标Buffer对象,直到目标对象变为不可写。
 *
 * 「writerIndex」 「readerIndex」
 *   数据源: 都不修改
 * 目标对象: 增加「writerIndex」
 *
 * @param index  索引值
 * @param dst    目标对象
 * @return       源对象
 */
public abstract ByteBuf getBytes(int index, ByteBuf dst);

/**
 * 从指定的绝对索引处开始,将此缓冲区的数据传输到指定的目标Buffer对象,传输长度为length
 * 方法getBytes(int, ByteBuf, int, int)也能实现同样的功能。
 *
 * 「writerIndex」 「readerIndex」
 *   数据源: 都不修改
 * 目标对象: 增加「writerIndex」
 * @param index  索引值
 * @param dst    目标对象
 * @param length 拷贝长度
 * @return       源对象
 */
public abstract ByteBuf getBytes(int index, ByteBuf dst, int length);

/**
 * 把数据拷贝到目标数组中
 *
 * 「writerIndex」 「readerIndex」
 *   数据源: 都不修改
 * 目标对象: 无
 */
public abstract ByteBuf getBytes(int index, byte[] dst);

/**
 * 把数据拷贝到目标数组中
 *
 * 「writerIndex」 「readerIndex」
 *   数据源: 都不修改
 * 目标对象: 无
 */
public abstract ByteBuf getBytes(int index, byte[] dst, int dstIndex, int length);

/**
 * 把数据拷贝到目标数组中
 *
 * 「writerIndex」 「readerIndex」
 *   数据源: 都不修改
 * 目标对象: 增加「writerIndex」
 */
public abstract ByteBuf getBytes(int index, ByteBuffer dst);

/**
 * 把数据拷贝到目标对象
 * 以上关于将数据复制给ByteBuf对象的方法最终还是调用此方法进行数据复制
 *
 * 「writerIndex」 「readerIndex」
 *   数据源: 都不修改
 * 目标对象: 都不修改
 */
public abstract ByteBuf getBytes(int index, ByteBuf dst, int dstIndex, int length);

/**
 * 把数据拷贝到目标流中
 *
 * 「writerIndex」 「readerIndex」
 *   数据源: 都不修改
 * 目标对象: 无
 */
public abstract ByteBuf getBytes(int index, OutputStream out, int length) throws IOException;

/**
 * 把数据拷贝到指定通道
 *
 * 「writerIndex」 「readerIndex」
 *   数据源: 都不修改
 * 目标对象: 无
 */
public abstract int getBytes(int index, GatheringByteChannel out, int length) throws IOException;

/**
 * 把数据拷贝到指定通道,不会修改通道的「position」
 *
 * 「writerIndex」 「readerIndex」
 *   数据源: 都不修改
 * 目标对象: 无
 */
public abstract int getBytes(int index, FileChannel out, long position, int length) throws IOException;

/**
 * 把对象src的 「可读数据(writerIndex-readerIndex)」 拷贝到this.ByteBuf对象中
 * 剩下的参数凡是带有ByteBuf对象的,都和这个处理逻辑类似。
 * 但是setBytes(int index, ByteBuf src, int srcIndex, int length)这个方法就有点与众不同
 * 这个方法都不会修改这两个指针变量的值。
 *
 * 「writerIndex」 「readerIndex」
 *    src: 增加「readerIndex」的值
 *   this: 都不修改
 */
public abstract ByteBuf setBytes(int index, ByteBuf src);
public abstract ByteBuf setBytes(int index, ByteBuf src, int length);
public abstract ByteBuf setBytes(int index, ByteBuf src, int srcIndex, int length);
public abstract ByteBuf setBytes(int index, byte[] src);
public abstract ByteBuf setBytes(int index, byte[] src, int srcIndex, int length);
public abstract ByteBuf setBytes(int index, ByteBuffer src);
public abstract int setBytes(int index, InputStream in, int length) throws IOException;
public abstract int setBytes(int index, ScatteringByteChannel in, int length) throws IOException;
public abstract int setBytes(int index, FileChannel in, long position, int length) throws IOException;
// 使用 NUL(0x00)填充
public abstract ByteBuf setZero(int index, int length);

/**
 * 以下是read操作
 * readerIndex 会按照对应类型增长。
 * 比如readByte()对应readerIndex+1,readShort()对应readerIndex+2
 */
public abstract byte  readByte();
public abstract short readShort();
public abstract short readShortLE();
public abstract int   readUnsignedShort();
public abstract int   readUnsignedShortLE();
public abstract int   readMedium();

/**
 * 从当前的 readerIndex 开始,将这个缓冲区的数据传输到一个新创建的缓冲区,
 * 并通过传输的字节数(length)增加 readerIndex。
 * 返回的缓冲区的 readerIndex 和 writerIndex 分别为0 和 length。
 *
 * @return 一个新创建的ByteBuf对象
 */
public abstract ByteBuf readBytes(int length);

/**
 * 返回一个新的ByteBuf对象。它是一个包装对象,里面有一个指向源Buffer的引用。
 * 该对象只是一个视图,只不过有几个指针独立源Buffer
 * 但是readerIndex(0)和writerIndex(=length)的值是初始的。
 * 另外,需要注意的是当前方法并不会调用 retain()去增加引用计数
 * @return 一个新创建的ByteBuf对象
 */
public abstract ByteBuf readSlice(int length);
public abstract ByteBuf readRetainedSlice(int length);


/**
 * 读取数据到 dst,直到不可读为止。
 *
 * 「writerIndex」 「readerIndex」
 *    dst: 增加「writerIndex」的值
 *   this: 增加「readerIndex」
 * @return 一个新创建的ByteBuf对象
 */
public abstract ByteBuf readBytes(ByteBuf dst);
public abstract ByteBuf readBytes(ByteBuf dst, int length);

/**
 * 读取数据到 dst,直到不可读为止。
 *
 * 「writerIndex」 「readerIndex」
 *    dst: 都不修改
 *   this: 都不修改
 * @return 一个新创建的ByteBuf对象
 */
public abstract ByteBuf readBytes(ByteBuf dst, int dstIndex, int length);

public abstract CharSequence readCharSequence(int length, Charset charset);
public abstract int readBytes(FileChannel out, long position, int length) throws IOException;
public abstract ByteBuf skipBytes(int length);


/**
 * 写入下标为 writerIndex 指向的内存。
 * 如果容量不够,会尝试扩容
 *
 * 「writerIndex」 「readerIndex」
 *    dst: 无
 *   this: 「writerIndex」 + 1
 * @return 一个新创建的ByteBuf对象
 */
public abstract ByteBuf writeByte(int value);

/**
 * 写入下标为 writerIndex 指向的内存。
 * 如果容量不够,会尝试扩容
 *
 * 「writerIndex」 「readerIndex」
 *    dst: 无
 *   this: 「writerIndex」 + 1
 * @return 一个新创建的ByteBuf对象
 */
public abstract ByteBuf writeBytes(ByteBuf src);
public abstract ByteBuf writeBytes(ByteBuf src, int length);
public abstract ByteBuf writeBytes(ByteBuf src, int srcIndex, int length);
public abstract ByteBuf writeBytes(byte[] src);
public abstract ByteBuf writeBytes(byte[] src, int srcIndex, int length);
public abstract ByteBuf writeBytes(ByteBuffer src);
public abstract int writeBytes(FileChannel in, long position, int length) throws IOException;
public abstract ByteBuf writeZero(int length);
public abstract int writeCharSequence(CharSequence sequence, Charset charset);

/**
 * 从「fromIndex」到「toIndex」查找value并返回索引值
 * @return 首次出现的位置索引,-1表示未找到
 */
public abstract int indexOf(int fromIndex, int toIndex, byte value);

/**
 * 定位此缓冲区中指定值的第一个匹配项。
 * 搜索范围[readerIndex, writerIndex)。
 *
 * @return -1表示未找到
 */
public abstract int bytesBefore(byte value);

/**
 * 搜索范围[readerIndex,readerIndex + length)
 *
 * @return -1表示未找到
 *
 * @throws IndexOutOfBoundsException
 */
public abstract int bytesBefore(int length, byte value);

/**
 * 搜索范围[index, idnex+length)
 *
 * @return -1表示未找到
 *
 * @throws IndexOutOfBoundsException
 */
public abstract int bytesBefore(int index, int length, byte value);

/**
 * 使用指定的处理器按升序迭代该缓冲区的「可读字节」
 *
 * @return -1表示未找到; 如果ByteProcessor.process(byte)返回false,则返回上次访问的索引值
 */
public abstract int forEachByte(ByteProcessor processor);

/**
 * 迭代范围[index, index+length-1)
 */
public abstract int forEachByte(int index, int length, ByteProcessor processor);
public abstract int forEachByteDesc(ByteProcessor processor);
public abstract int forEachByteDesc(int index, int length, ByteProcessor processor);

/**
 * 返回此缓冲区可读字节的副本。两个ByteBuf内容独立。
 * 类似 buf.copy(buf.readerIndex(), buf.readableBytes());
 * 源ByteBuf的指针都不会被修改
 */
public abstract ByteBuf copy();
public abstract ByteBuf copy(int index, int length);

/**
 * 返回该缓冲区可读字节的一个片段。
 * 修改返回的缓冲区或这个缓冲区的内容会影响彼此的内容,同时它们维护单独的索引和标记。
 * 此方法与 buf.slice (buf.readerIndex () ,buf.readableBytes ()相同。
 * 此方法不修改此缓冲区的 readerIndex 或 writerIndex。
 */
public abstract ByteBuf slice();

/**
 * 与 slice().retain() 行为一样
 */
public abstract ByteBuf retainedSlice();
public abstract ByteBuf slice(int index, int length);
public abstract ByteBuf retainedSlice(int index, int length);

/**
 * 内容共享。各自维护独立的索引的标记。
 * 新的ByteBuf的可读内容是和slice()方法返回的一样。但是由于共享底层的ByteBuf对象,
 * 所以底层的所有内容都是可见的。
 * read和write标志并不是复制的。同时也需要注意此方法并不会调用retain()给引用计数+1
 */
public abstract ByteBuf duplicate();
public abstract ByteBuf retainedDuplicate();

/**
 * 返回组成这个缓冲区的 NIO bytebuffer 的最大数目。一般默认是1,对于组合的ByteBuf则计算总和。
 *
 * @return -1 表示底层没有ByteBuf
 * @see #nioBuffers(int, int)
 */
public abstract int nioBufferCount();

/**
 * 将该缓冲区的可读字节作为 NIO ByteBuffer 公开。共享内容。
 * buf.nioBuffer(buf.readerIndex(), buf.readableBytes()) 结果一样。
 * 请注意,如果这个缓冲区是一个动态缓冲区并调整了其容量,那么返回的NIO缓冲区将不会看到这些变化
 */
public abstract ByteBuffer nioBuffer();
public abstract ByteBuffer nioBuffer(int index, int length);

/**
 * 仅内部使用: 公开内部 NIO 缓冲区。
 */
public abstract ByteBuffer internalNioBuffer(int index, int length);
public abstract ByteBuffer[] nioBuffers();
public abstract ByteBuffer[] nioBuffers(int index, int length);

/**
 * 如果当前ByteBuf拥有支持数据则返回true
 */
public abstract boolean hasArray();
public abstract byte[] array();

/**
 * 返回此缓冲区的支撑字节数组中第一个字节的偏移量。
 */
public abstract int arrayOffset();

/**
 * 当且仅当此缓冲区具有指向「backing data」的低级内存地址的引用时才返回true
 */
public abstract boolean hasMemoryAddress();
public abstract long memoryAddress();

/**
 * 如果此 ByteBuf 内部为单个内存区域则返回true。复合类型的缓冲区必须返回false,即使只包含一个ByteBuf对象。
 */
public boolean isContiguous() {
    return false;
}

public abstract String toString(Charset charset);

public abstract String toString(int index, int length, Charset charset);

@Override
public abstract int hashCode();

@Override
public abstract boolean equals(Object obj);

@Override
public abstract int compareTo(ByteBuf buffer);

@Override
public abstract String toString();

@Override
public abstract ByteBuf retain(int increment);

@Override
public abstract ByteBuf retain();

@Override
public abstract ByteBuf touch();

@Override
public abstract ByteBuf touch(Object hint);

boolean isAccessible() {
    return refCnt() != 0;
}
getXX() 从源 Buffer 复制数据到目标 Buffer。可能会修改目标 Buffer 的 writerIndex。
setXX() 将目标 Buffer 中的数据复制到源 Buffer。可能会修改目标 Buffer 的 readerIndex。
readXX() 表示从 Buffer 中读取数据,会根据基本类型增长源 Buffer 的 readerIndex。
get 和 set 都是相对于 this 而言,比如 this.getXX() 意味着获取 this.buffer 的信息并复制到目标ByteBuf对象中。而 this.setXX() 表示从目标ByteBuf对象中复制数据到 this.buffer。
ByteBuf demo
public class ByteBufTest {

    public static void main(String[] args) {

        ByteBuf buffer = ByteBufAllocator.DEFAULT.buffer(6, 10);

        printByteBufInfo("ByteBufAllocator.buffer(5, 10)", buffer);

        buffer.writeBytes(new byte[]{1, 2});

        printByteBufInfo("write 2 Bytes", buffer);

        buffer.writeInt(100);

        printByteBufInfo("write Int 100", buffer);

        buffer.writeBytes(new byte[]{3, 4, 5});

        printByteBufInfo("write 3 Bytes", buffer);

        byte[] read = new byte[buffer.readableBytes()];

        buffer.readBytes(read);

        printByteBufInfo("readBytes(" + buffer.readableBytes() + ")", buffer);

        printByteBufInfo("BeforeGetAndSet", buffer);

        System.out.println("getInt(2): " + buffer.getInt(2));

        buffer.setByte(1, 0);

        System.out.println("getByte(1): " + buffer.getByte(1));

        printByteBufInfo("AfterGetAndSet", buffer);

    }

    private static void printByteBufInfo(String step, ByteBuf buffer) {

        System.out.println("------" + step + "-----");

        System.out.println("readerIndex(): " + buffer.readerIndex());

        System.out.println("writerIndex(): " + buffer.writerIndex());

        System.out.println("isReadable(): " + buffer.isReadable());

        System.out.println("isWritable(): " + buffer.isWritable());

        System.out.println("readableBytes(): " + buffer.readableBytes());

        System.out.println("writableBytes(): " + buffer.writableBytes());

        System.out.println("maxWritableBytes(): " + buffer.maxWritableBytes());

        System.out.println("capacity(): " + buffer.capacity());

        System.out.println("maxCapacity(): " + buffer.maxCapacity());

    }

}
ReferenceCounted
定义和引用计数相关的接口。方法的实现一般是在抽象类 io.netty.util.AbstractReferenceCounted中完成。
AbstractByteBuf
它是 ByteBuf 的基本实现骨架,实现了 io.netty.buffer.ByteBuf 大部分的抽象方法,子类只需根据特定功能实现对应抽象方法即可。在 io.netty.buffer.AbstractByteBuf 抽象类中做了以下事情:
- 定义并维护 5 个指定变量。分别是 readerIndex 、writerIndex 、markedReaderIndex、markedWriterIndex 和 maxCapacity。因此,此抽象类的主要工作也是维护这 5 个变量。比如在 getXX() 方法前判断一下是否满足等等。
- 初始化 ResourceLeakDetector<ByteBuf> 内存泄漏检测对象。它记录 Netty 各种的 ByteBuf 使用情况,能对占用资源的对象进行监控,无论是否池化、无论堆外堆内。有 4 种级别可选: DISABLED、SIMPLE、ADVANCED 和 PARANOID。监控级别也由低到高,级别越高,可监控的 ByteBuf 数量越多,可获得的信息也越多,但是性能影响也越大。一般建议在 DEBUG 模式下可使用 ADVANCED 或 PARANOID,生产环境使用 SMPLE。其实实现逻辑也是比较简单的,就是对 ByteBuf 对象进行包装,在执行相关API 时记录必要的数据,然后根据这些数据分析哪里出现了内存泄漏,并通过日志告知用户需要进行排查。
// io.netty.buffer.AbstractByteBuf
public abstract class AbstractByteBuf extends ByteBuf {
    static final ResourceLeakDetector<ByteBuf> leakDetector =
        ResourceLeakDetectorFactory.instance().newResourceLeakDetector(ByteBuf.class);
    int readerIndex;
    int writerIndex;
    private int markedReaderIndex;
    private int markedWriterIndex;
    private int maxCapacity;

    @Override
    public ByteBuf setByte(int index, int value) {
        checkIndex(index);
        _setByte(index, value);
        return this;
    }

    protected abstract void _setByte(int index, int value);

    @Override
    public byte getByte(int index) {
        checkIndex(index);
        return _getByte(index);
    }

    protected abstract byte _getByte(int index);

    @Override
    public byte readByte() {
        checkReadableBytes0(1);
        int i = readerIndex;
        byte b = _getByte(i);
        readerIndex = i + 1;
        return b;
    }
    // ...
}
此外 Netty 可以利用引用计数的特点实现内存泄漏检测工具。JVM 并不知道 Netty 的引用计数是如何实现的,当 ByteBuf 对象不可达时,一样会被 GC 回收掉,但是如果此时 ByteBuf 的引用计数不为 0,那么该对象就不会释放或者被放入对象池,从而发生了内存泄漏。Netty 会对分配的 ByteBuf 进行抽样分析,检测 ByteBuf 是否已经不可达且引用计数大于 0,判定内存泄漏的位置并输出到日志中,你需要关注日志中 LEAK 关键字。
AbstractByteBuf.leakDetector
泄露检测器,用来帮助检测内存泄露。
static final ResourceLeakDetector<ByteBuf> leakDetector =
            ResourceLeakDetectorFactory.instance().newResourceLeakDetector(ByteBuf.class);
AbstractReferenceCountedByteBuf
抽象类,实现了引用计数器接口,内部使用 ReferenceCountUpdater 对象对变量 refCnt 进行增/减操作,操作 refCnt 的唯一入口就是 updater 对象。内部实现还是比较简洁的,因为所有的操作都委派给 ReferenceCountedByteBuf 对象来完成。
public abstract class AbstractReferenceCountedByteBuf extends AbstractByteBuf {
    private static final long REFCNT_FIELD_OFFSET = //refCnt属性的内存偏移地址
            ReferenceCountUpdater.getUnsafeOffset(AbstractReferenceCountedByteBuf.class, "refCnt");
    private static final AtomicIntegerFieldUpdater<AbstractReferenceCountedByteBuf> AIF_UPDATER =//原子更新器
            AtomicIntegerFieldUpdater.newUpdater(AbstractReferenceCountedByteBuf.class, "refCnt");
   // 核心对象,操作变量refCnt的唯一入口
    private static final ReferenceCountUpdater<AbstractReferenceCountedByteBuf> updater =
            new ReferenceCountUpdater<AbstractReferenceCountedByteBuf>() {
        @Override
        protected AtomicIntegerFieldUpdater<AbstractReferenceCountedByteBuf> updater() {
            return AIF_UPDATER;
        }
        @Override
        protected long unsafeOffset() {
            return REFCNT_FIELD_OFFSET;
        }
    };

    // Value might not equal "real" reference count, all access should be via the updater
    @SuppressWarnings("unused")
    private volatile int refCnt = updater.initialValue();

    protected AbstractReferenceCountedByteBuf(int maxCapacity) {
        super(maxCapacity);
    }

    @Override
    boolean isAccessible() {
        // Try to do non-volatile read for performance as the ensureAccessible() is racy anyway and only provide
        // a best-effort guard.
        return updater.isLiveNonVolatile(this);//是否还能用,释放了就不能用了
    }

    @Override
    public int refCnt() {
        return updater.refCnt(this);//获取真实引用计数
    }

    /**
     * An unsafe operation intended for use by a subclass that sets the reference count of the buffer directly
     */
    protected final void setRefCnt(int refCnt) {
        updater.setRefCnt(this, refCnt);//直接设置真实引用计数
    }

    /**
     * An unsafe operation intended for use by a subclass that resets the reference count of the buffer to 1
     */
    protected final void resetRefCnt() {
        updater.resetRefCnt(this);//重新设置真实计数
    }

    @Override
    public ByteBuf retain() {
        return updater.retain(this);//真实计数+1
    }

    @Override
    public ByteBuf retain(int increment) {
        return updater.retain(this, increment);//真实计数+increment
    }

    @Override
    public ByteBuf touch() {
        return this;//获取当前对象
    }

    @Override
    public ByteBuf touch(Object hint) {
        return this;
    }

    @Override
    public boolean release() {
     // 首先通过 updater 更新「refCnt」的值,refCnt=refCnt-2
     // 如果旧值「refCnt」==2,则update.release(this)会返回true,表示当前「ByteBuf」引用计数为0了,是时候需要释放了
     // 释放内存
        return handleRelease(updater.release(this));//外部可以调用的尝试释放资源,内部是用引用更新器来判断的
    }

    @Override
    public boolean release(int decrement) {
        return handleRelease(updater.release(this, decrement));
    }
//真正返回才去释放
    private boolean handleRelease(boolean result) {
        if (result) {
            deallocate();
        }
        return result;
    }

    /**
     * Called once {@link #refCnt()} is equals 0.
     */
    protected abstract void deallocate();//一旦真实计数为0就释放资源
}
PooledByteBuf#deallocate
protected final void deallocate() {
        if (handle >= 0) {// 判断句柄变量是否>=0
            final long handle = this.handle;
            this.handle = -1;
            memory = null;
            chunk.arena.free(chunk, tmpNioBuf, handle, maxLength, cache);//使用「PoolArena#free」释放
            tmpNioBuf = null;
            chunk = null;
            recycle();// 回收「ByteBuf」对象
        }
    }
PoolArena#free
void free(PoolChunk<T> chunk, ByteBuffer nioBuffer, long handle, int normCapacity, PoolThreadCache cache) {
        if (chunk.unpooled) {
       // 待回收「ByteBuf」所属的「Chunk」为非池化,直接销毁
       // 根据底层实现方式不同采取不同销毁策略。
       // 如果是「ByteBuf」对象,根据有无「Cleaner」分类,采取不同的销毁方法
       // 如果是「byte[]」,不做任何处理,JVM GC 会回收这部分内存
            int size = chunk.chunkSize();
            destroyChunk(chunk);
            activeBytesHuge.add(-size);
            deallocationsHuge.increment();
        } else {//池化的「Chunk」
            SizeClass sizeClass = sizeClass(handle);
        // 尝试添加到本地缓存,内部会使用「MermoryRegionCache」缓存内存信息,比如句柄值,容量大小、属于哪个「chunk」等
        // 待后面这个线程申请等容量大小时就可以从本地线程中分配
        // PoolThreadCache会维持添加计数,达到某个阈值则会触发回收动作,并不会造成内存泄漏
            if (cache != null && cache.add(this, chunk, nioBuffer, handle, normCapacity, sizeClass)) {
                // cached so not free it.
                return;
            }
       // 本地缓存添加失败,那就交给由「PoolArena」完成释放
            freeChunk(chunk, handle, normCapacity, sizeClass, nioBuffer, false);
        }
    }
PoolArena#freeChunk
void freeChunk(PoolChunk<T> chunk, long handle, int normCapacity, SizeClass sizeClass, ByteBuffer nioBuffer,
                   boolean finalizer) {
        final boolean destroyChunk;
        synchronized (this) {
            // We only call this if freeChunk is not called because of the PoolThreadCache finalizer as otherwise this
            // may fail due lazy class-loading in for example tomcat.
       // 这里应对懒加载所做出的判断。比如「Tomcat」卸载某个应用时,会把对应的「ClassLoader」卸载掉,
       // 但对于线程回收finalizer而言可能需要这个类加载器的类信息,因此这里判断一下
            if (!finalizer) {
                switch (sizeClass) {
                    case Normal:
                        ++deallocationsNormal;
                        break;
                    case Small:
                        ++deallocationsSmall;
                        break;
                    default:
                        throw new Error();
                }
            }
            destroyChunk = !chunk.parent.free(chunk, handle, normCapacity, nioBuffer);
        }
        if (destroyChunk) {
            // destroyChunk not need to be called while holding the synchronized lock.
            destroyChunk(chunk);
        }
    }
PoolChunkList#free
boolean free(PoolChunk<T> chunk, long handle, int normCapacity, ByteBuffer nioBuffer) {
     //先通过PoolChunk#free回收内存块,handle记录树的位置信息,PoolChunk会缓存nioBuffer对象,用于下次使用
        chunk.free(handle, normCapacity, nioBuffer);
     //判断当前「PoolChunk」的使用率,是否需要移到前一个节点链表中
        if (chunk.freeBytes > freeMaxThreshold) {
            remove(chunk);
            // Move the PoolChunk down the PoolChunkList linked-list.
            return move0(chunk);
        }
        return true;
    }
PoolChunk#free
free的进行释放操作,主要操作如果是subpage,利用PoolSubpage进行释放。对于多页的释放则会利用runsAvailMap合并其前后的空闲的内存块,因为runsAvailMap中存储了空闲内存块的头和尾,所以对内存块的合并很简单,即为以当前的头和尾的前一个或者后一个为key能否找到对应的空闲内存合并即可。
void free(long handle, int normCapacity, ByteBuffer nioBuffer) {
        //释放的是subpage
        if (isSubpage(handle)) {
            int sizeIdx = arena.size2SizeIdx(normCapacity);
            PoolSubpage<T> head = arena.findSubpagePoolHead(sizeIdx);

            int sIdx = runOffset(handle);
            PoolSubpage<T> subpage = subpages[sIdx];
            assert subpage != null && subpage.doNotDestroy;

            // Obtain the head of the PoolSubPage pool that is owned by the PoolArena and synchronize on it.
            // This is need as we may add it back and so alter the linked-list structure.
            synchronized (head) {
                //PoolSubpage释放这块内存,返回true则表示这块PoolSubPage还在意
                if (subpage.free(head, bitmapIdx(handle))) {
                    //the subpage is still used, do not free it
                    return;
                }
                assert !subpage.doNotDestroy;
                // Null out slot in the array as it was freed and we should not use it anymore.
                subpages[sIdx] = null;
            }
        }

        //计算释放的page数量
        //start free run
        int pages = runPages(handle);

        synchronized (runsAvail) {
            // collapse continuous runs, successfully collapsed runs
            // will be removed from runsAvail and runsAvailMap
            //与这块内存前后相邻的内存空闲内存进行合并
            long finalRun = collapseRuns(handle);

            //set run as not used
            //将IS_USED和IS_SUBPAGE标志位设置为0
            finalRun &= ~(1L << IS_USED_SHIFT);

            //if it is a subpage, set it to run
            finalRun &= ~(1L << IS_SUBPAGE_SHIFT);
            //将合并后的句柄存储到runAvail和runsAvailMap中
            insertAvailRun(runOffset(finalRun), runPages(finalRun), finalRun);
            freeBytes += pages << pageShifts;
        }
        //将这个ByteBuf创建的ByteBuffer存到cachedNioBuffers缓存中
        if (nioBuffer != null && cachedNioBuffers != null &&
            cachedNioBuffers.size() < PooledByteBufAllocator.DEFAULT_MAX_CACHED_BYTEBUFFERS_PER_CHUNK) {
            cachedNioBuffers.offer(nioBuffer);
        }
    }
ReferenceCountUpdater
ReferenceCountUpdater 对实现 ReferenceCounted 接口的 ByteBuf 进行引用计数相关的操作。只要引用计数大于 0,表示 ByteBuf 还在被使用;当 ByteBuf 不再被其他对象所引用时,引用计数为 0,那么代表该对象可以被释放。一般的堆内的内存可以由GC来回收,但是如果是堆外的话,就要自己手动来释放啦,不然会造成内存泄露的。touch方法就是辅助调试用的,另外就是引用计数增加retain和减少release。当新创建一个 ByteBuf 对象时,它的初始引用计数为 1,当 ByteBuf 调用 release() 后,引用计数减 1。
但是他并不是用普通的那种引用一次计数器加1,释放一次减1,而是用了奇数和偶数,如果还存在引用那么引用数是偶数,否则是奇数。同时引用一次会加2,释放一次也减2,获取真实的计数是引用计数无符号右移1位,看起来好像很奇怪,不过基本都是位操作和直接比较操作性能应该会提高点。比如我们初始的时候真实引用计数=1,但是内部引用计数=2。如果有一次释放就内部引用计数-2,两次就内部引用计数-4,当然引用的时候也一样,你会发现只要有引用,内部引用计数值就是偶数。我们举个例子,我引用了3次,内部引用计数=6,获取真实引用计数刚好6>>>1=3,如果释放了3次,前2次会将内部引用计数=2,但是最后一次如果发现内部引用计数=2的话,就会设置成1,这样内部引用计数刚好是奇数,真实引用计数刚好是1>>>1=0,就可以释放内存了。
引用计数对于 Netty 设计缓存池化有非常大的帮助,当引用计数为 0,该 ByteBuf 可以被放入到对象池中,避免每次使用 ByteBuf 都重复创建,对于实现高性能的内存管理有着很大的意义。
最终对 volatinle int refCnt 的赋值等操作是通过魔法类 java.util.concurrent.atomic.AtomicIntegerFieldUpdater 来完成对该值的增/减操作。但是这个对象不能内存持有,因此提供一个抽象方法由对应使用者赋予:
protected abstract AtomicIntegerFieldUpdater<T> updater();

    protected abstract long unsafeOffset();
在 io.netty.buffer.AbstractReferenceCountedByteBuf 抽象中是这样实现的:
public abstract class AbstractReferenceCountedByteBuf extends AbstractByteBuf {
    private static final long REFCNT_FIELD_OFFSET =
            ReferenceCountUpdater.getUnsafeOffset(AbstractReferenceCountedByteBuf.class, "refCnt");
    private static final AtomicIntegerFieldUpdater<AbstractReferenceCountedByteBuf> AIF_UPDATER =
            AtomicIntegerFieldUpdater.newUpdater(AbstractReferenceCountedByteBuf.class, "refCnt");

    private static final ReferenceCountUpdater<AbstractReferenceCountedByteBuf> updater =
            new ReferenceCountUpdater<AbstractReferenceCountedByteBuf>() {
     // 获取AtomicIntegerFieldUpdater对象,底层使用此对象对属性操作
        @Override
        protected AtomicIntegerFieldUpdater<AbstractReferenceCountedByteBuf> updater() {
            return AIF_UPDATER;
        }
     // 获取属性变量 refCnt 的偏移量
        @Override
        protected long unsafeOffset() {
            return REFCNT_FIELD_OFFSET;
        }
    };
realRefCnt
这个就是获取真实的计数,是引用计数>>>1,同时前面会判断引用计数是否是偶数,偶数才有引用,奇数就直接返回0了,这里开始并不是直接用&判断奇偶,而是直接用是否等于,这个比位操作更加快,可见netty在这提高性能方面真的做到了细节中的细节了,因为大部分真实的计数可能就是1或者2,所以前面两个只要直接判断相等即可:
//获得真实计数 引用计数是奇数就返回0,说明已经释放了 偶数就无符号右移1 返回
private static int realRefCnt(int rawCnt) {
        return rawCnt != 2 && rawCnt != 4 && (rawCnt & 1) != 0 ? 0 : rawCnt >>> 1;
    }
toLiveRealRefCnt
//获取真实计数,如果真实引用已经是0了,就抛异常
private static int toLiveRealRefCnt(int rawCnt, int decrement) {
        if (rawCnt == 2 || rawCnt == 4 || (rawCnt & 1) == 0) {
            return rawCnt >>> 1;//偶数就无符号右移1
        }
        // odd rawCnt => already deallocated
        throw new IllegalReferenceCountException(0, -decrement);
    }
refCnt
获取真实计数,但是不会抛异常。
public final int refCnt(T instance) {
        return realRefCnt(updater().get(instance));
    }
nonVolatileRawCnt
这个可以获取内部的引用计数,不是真实的。
//可以根据偏移量获得引用计数,不是真实的计数
private int nonVolatileRawCnt(T instance) {
        // TODO: Once we compile against later versions of Java we can replace the Unsafe usage here by varhandles.
        final long offset = unsafeOffset();
        return offset != -1 ? PlatformDependent.getInt(instance, offset) : updater().get(instance);
    }
isLiveNonVolatile
这个就是判断是否还存在引用,即内部的引用是否是偶数,是的话表示还有引用计数,返回true,不是就表示释放了,返回false,最后也是先判断是否相等来优化。
public final boolean isLiveNonVolatile(T instance) {
        final long offset = unsafeOffset();
        final int rawCnt = offset != -1 ? PlatformDependent.getInt(instance, offset) : updater().get(instance);

        // The "real" ref count is > 0 if the rawCnt is even.
        return rawCnt == 2 || rawCnt == 4 || rawCnt == 6 || rawCnt == 8 || (rawCnt & 1) == 0;
    }
setRefCnt
直接设置真实引用计数,可以看到如果正数就会乘以2,负数就直接是1,也就是说没设置成功。但是这里要注意refCnt << 1可能会是负数,溢出了,比如1173741824<<1 =-1947483648。
public final void setRefCnt(T instance, int refCnt) {
        updater().set(instance, refCnt > 0 ? refCnt << 1 : 1); // overflow OK here
    }
retain
这几个方法都是增加引用的,里面会判断溢出的问题。
//真实计数+1,即引用计数+2
public final T retain(T instance) {
        return retain0(instance, 1, 2);
    }

//increment为正的才可以,但是rawIncrement 可能是负的,溢出了,后面会处理
public final T retain(T instance, int increment) {
        // all changes to the raw count are 2x the "real" change - overflow is OK
        int rawIncrement = checkPositive(increment, "increment") << 1;
        return retain0(instance, increment, rawIncrement);
    }

   // rawIncrement == increment << 1 增量=真实增量x2
    private T retain0(T instance, final int increment, final int rawIncrement) {
        int oldRef = updater().getAndAdd(instance, rawIncrement);//获取旧值并增加引用计数器的原始值
        if (oldRef != 2 && oldRef != 4 && (oldRef & 1) != 0) {//如果老的是奇数的话 说明当前ByteBuf对象已被释放,无法对已释放的ByteBuf对象维持引用
            throw new IllegalReferenceCountException(0, increment);
        }
        // don't pass 0! 经过0就说明有溢出了,要处理掉
        if ((oldRef <= 0 && oldRef + rawIncrement >= 0)//比如setRefCnt的时候设置了负数进去,oldRef =-1173741824,increment=1003741824 rawIncrement=2007483648
                || (oldRef >= 0 && oldRef + rawIncrement < oldRef)) {//比如setRefCnt的时候设置了正数进去,oldRef =2,increment=1103741824 rawIncrement=-2087483648
            // overflow case
            updater().getAndAdd(instance, -rawIncrement);// 修正
            throw new IllegalReferenceCountException(realRefCnt(oldRef), increment);
        }
        return instance;
    }
release
释放的时候会先调用nonVolatileRawCnt获得引用计数,然后判断引用计数是否是2或者减的值就是真实引用计数值,是的话就可以尝试直接设置的方法tryFinalRelease0,如果失败会去尝试释放方法retryRelease0,这个是自旋,直到成功为止。如果不是的话就普通的引用计数器值的修改即可nonFinalRelease0。当然这里可能会对引用已经是1的再进行释放,这样就会在retryRelease0中的toLiveRealRefCnt检测报异常,避免了重复释放,而且里面修改值都是原子操作,线程安全的。
//减少计数1,返回是否真正释放
    public final boolean release(T instance) {
        int rawCnt = nonVolatileRawCnt(instance);//获取引用计数 如果引用计数rawCnt == 2 说明真实计数是1,就可以直接尝试最终释放,否则就真实计数减1,这个就算已经释放也不会报错
     // #2 rawCnt==2():直接将refCnt置为1,tryFinalRelease0: 只尝试一次,通过 CAS 设置refCnt值为1,尝试失败,则 retryRelease0,则在for(;;) 中更新计数引用的值,直到成功为止,rawCnt != 2,表示此次释放并非是彻底释放,
        return rawCnt == 2 ? tryFinalRelease0(instance, 2) || retryRelease0(instance, 1)
                : nonFinalRelease0(instance, 1, rawCnt, toLiveRealRefCnt(rawCnt, 1));
    }
//减少计数decrement,返回是否真正释放
    public final boolean release(T instance, int decrement) {
        int rawCnt = nonVolatileRawCnt(instance);//获取引用计数
        int realCnt = toLiveRealRefCnt(rawCnt, checkPositive(decrement, "decrement"));//获取真实计数
        return decrement == realCnt ? tryFinalRelease0(instance, rawCnt) || retryRelease0(instance, decrement)
                : nonFinalRelease0(instance, decrement, rawCnt, realCnt);//
    }
//尝试最终释放 如果引用计数是2的话,就直接设为1,释放内存,否则就失败
    private boolean tryFinalRelease0(T instance, int expectRawCnt) {
     // 将refCnt的值从期望值expectRawCnt变成1
        return updater().compareAndSet(instance, expectRawCnt, 1); // any odd number will work
    }

    private boolean nonFinalRelease0(T instance, int decrement, int rawCnt, int realCnt) {
        if (decrement < realCnt //更新引用计数
                // all changes to the raw count are 2x the "real" change - overflow is OK
                && updater().compareAndSet(instance, rawCnt, rawCnt - (decrement << 1))) {
            return false;
        }
        return retryRelease0(instance, decrement);
    }
//自旋设置引用计数或者尝试释放: 将对象 instance 的refCnt值逻辑-1,物理-2
    private boolean retryRelease0(T instance, int decrement) {
        for (;;) {
       // #1 获取refCnt物理值,获取实际的引用数,如果为奇数,则抛出异常,因为当前 ByteBuf 不存在引用,也就不存在释放这一说法
            int rawCnt = updater().get(instance), realCnt = toLiveRealRefCnt(rawCnt, decrement);// 获取refCnt逻辑值
            if (decrement == realCnt) {//真实的计数和要减去的计数一样的话,表示该ByteBuf需要释放,即refCnt=1
                if (tryFinalRelease0(instance, rawCnt)) {//尝试最终释放
                    return true;
                }
            } else if (decrement < realCnt) {//真实计数大于减去的计数,还不能释放,只是减去decrement,rawCnt-2
                // all changes to the raw count are 2x the "real" change
                if (updater().compareAndSet(instance, rawCnt, rawCnt - (decrement << 1))) {
                    return false;
                }
            } else {
                throw new IllegalReferenceCountException(realCnt, -decrement);
            }
            Thread.yield(); // this benefits throughput under high contention 提示释放CPU,增加吞吐量,线程让步: 担心当前线程对CPU资源占用过多,所以主要让自己从执行状态变为就绪状态,和其他线程竞争上岗
        }
    }
ByteBuf 分类
ByteBuf 有多种实现类,每种都有不同的特性,可以划分为三个不同的维度:Heap/Direct、Pooled/Unpooled和Unsafe/非 Unsafe。
- Heap/Direct 就是堆内和堆外内存。Heap 指的是在 JVM 堆内分配,底层依赖的是字节数据;Direct 则是堆外内存,不受 JVM 限制,分配方式依赖 JDK 底层的 ByteBuffer。
- Pooled/Unpooled 表示池化还是非池化内存。Pooled 是从预先分配好的内存中取出,使用完可以放回 ByteBuf 内存池,等待下一次分配。而 Unpooled 是直接调用系统 API 去申请内存,确保能够被 JVM GC 管理回收。
- Unsafe/非 Unsafe 的区别在于操作方式是否安全。 Unsafe 表示每次调用 JDK 的 Unsafe 对象操作物理内存,依赖 offset + index 的方式操作数据。非 Unsafe 则不需要依赖 JDK 的 Unsafe 对象,直接通过数组下标的方式操作数据。
非池化 ByteBuf
- UnpooledHeapByteBuf
- UnpooledDirectByteBuf
UnpooledHeapByteBuf
// io.netty.buffer.UnpooledHeapByteBuf
/**
 * 非池化堆内内存,底层使用 byte[] 数组存储数据
 */
public class UnpooledHeapByteBuf extends AbstractReferenceCountedByteBuf {

    // 每个 ByteBuf 对象都会持有一个创建这个ByteBuf的 ByteBufAllocator 分配器的引用
    // 方法 alloc() 会返回当前ByteBuf所对应的分配器
    // 因此,可以从任意一个ByteBuf对象获取内存分配器,可以用来分配内存或做一些判断之类的事情
    private final ByteBufAllocator alloc;

    // 数据存储的地方
    byte[] array;
    // 属于Java NIO的ByteBuffer,用过Netty的ByteBuf到ByteBuffer的转换
    private ByteBuffer tmpNioBuf;

    /**
     * 获取index下标的值
     * 这个方法覆盖抽象类「AbstractByteBuf」方法,两者有什么区别呢?
     * 「AbstractByteBuf」使用 checkIndex(index) 包含了「refCnt」校验以及索引检查,
     * 而当前对象只包含ensureAccessible()校验
     */
    @Override
    public byte getByte(int index) {

        // #1 判断是否进行读取操作
        ensureAccessible();

        // #2 读取index的值
        return _getByte(index);
    }

    @Override
    protected byte _getByte(int index) {
        // 使用工具类「HeapByteBufUtil」完成(底层是数组,所以直接array[index]完成)
        return HeapByteBufUtil.getByte(array, index);
    }

    /**
     * 从指定的绝对索引值开始,将长度为 length 的数据传送到指定目的地。
     * 此方法不会修改源ByteBuf的readerIndex、writerIndex指针。
     * 这个API需要交由子类实现
     * @param index        源ByteBuf对象的index的值
     * @param dst        目的ByteBuf对象
     * @param dstIndex    目标ByteBufindex的值
     * @param length    长度
     * @return
     */
    @Override
    public ByteBuf getBytes(int index, ByteBuf dst, int dstIndex, int length) {

        // #1 检查index、length、capacity、refCnt 是否满足
        checkDstIndex(index, length, dstIndex, dst.capacity());

        // #2 根据目标ByteBuf类型不同,使用不同的拷贝策略
        if (dst.hasMemoryAddress()) {
            // #2-1 如果目标ByteBuf类型包含memoryAddress,则与Unsafe相关,
            // 那就通过「Unsafe」来完成数据拷贝工作
            PlatformDependent.copyMemory(array, index, dst.memoryAddress() + dstIndex, length);
        } else if (dst.hasArray()) {
            // #2-2 如果目标类ByteBuf类型包含「支撑数组」,则与 byte[] 字节数组相关,
            // 那就通过本地方法 System.arraycopy() 完成数据拷贝工作
            getBytes(index, dst.array(), dst.arrayOffset() + dstIndex, length);
        } else {
            // #2-3 两者都不是的话,则调用对应 ByteBuf#setBytes 方法完成数据复制
            // 目标ByteBuf会根据自己的实现选择合适的方法拷贝
            dst.setBytes(dstIndex, array, index, length);
        }
        return this;
    }

    /**
     * 赋值操作
     */
    @Override
    public ByteBuf setByte(int index, int value) {
        ensureAccessible();
        _setByte(index, value);
        return this;
    }

    @Override
    protected void _setByte(int index, int value) {
        // 由于是数组,也是直接通过array[index]=value完成赋值
        HeapByteBufUtil.setByte(array, index, value);
    }

    /**
     * 大体上和getBytes(int index, ByteBuf dst, int dstIndex, int length),只不过是从数据复制方向变了而已
     */
    @Override
    public ByteBuf setBytes(int index, ByteBuf src, int srcIndex, int length) {

        // #1 检查index、length、capacity、refCnt 是否满足
        checkSrcIndex(index, length, srcIndex, src.capacity());

        // #2 根据不同的数据源ByteBuf实例,使用不同的拷贝策略
        if (src.hasMemoryAddress()) {
            // #2-1 借助「Unsafe」完成
            PlatformDependent.copyMemory(src.memoryAddress() + srcIndex, array, index, length);
        } else  if (src.hasArray()) {
            // #2-2 借助「System.arraycopy()」完成
            setBytes(index, src.array(), src.arrayOffset() + srcIndex, length);
        } else {
            // #2-3 借助 「ByteBuf#getBytes」方法完成
            src.getBytes(srcIndex, array, index, length);
        }
        return this;
    }

    /**
     * 释放ByteBuf对象
     */
    @Override
    protected void deallocate() {
        freeArray(array);
        array = EmptyArrays.EMPTY_BYTES;
    }

    // 使用GC进行垃圾回收
    protected void freeArray(byte[] array) {
        // NOOP
    }
}

// io.netty.util.internal.MathUtil#isOutOfBounds
public static boolean isOutOfBounds(int index, int length, int capacity) {
    return (index | length | (index + length) | (capacity - (index + length))) < 0;
}

// io.netty.util.internal.PlatformDependent#copyMemory(byte[], int, long, long)
public static void copyMemory(byte[] src, int srcIndex, long dstAddr, long length) {
    PlatformDependent0.copyMemory(src, BYTE_ARRAY_BASE_OFFSET + srcIndex, null, dstAddr, length);
}

// io.netty.util.internal.PlatformDependent0#copyMemory(java.lang.Object, long, java.lang.Object, long, long)
static void copyMemory(Object src, long srcOffset, Object dst, long dstOffset, long length) {
    // Manual safe-point polling is only needed prior Java9:
    // See https://bugs.openjdk.java.net/browse/JDK-8149596
    // 两个底层都是通过UNSAFE.copyMemory()拷贝数据,但是由于在JDK版本低于1.9会由于安全点导致数据复制不全
    // 因此Netty通过while+length保证完整复制,从而修复该BUG
    if (javaVersion() <= 8) {
        copyMemoryWithSafePointPolling(src, srcOffset, dst, dstOffset, length);
    } else {
        UNSAFE.copyMemory(src, srcOffset, dst, dstOffset, length);
    }
}

// io.netty.util.internal.PlatformDependent0#copyMemoryWithSafePointPolling
private static void copyMemoryWithSafePointPolling(
    Object src, long srcOffset, Object dst, long dstOffset, long length) {
    while (length > 0) {
        long size = Math.min(length, UNSAFE_COPY_THRESHOLD);
        UNSAFE.copyMemory(src, srcOffset, dst, dstOffset, size);
        length -= size;
        srcOffset += size;
        dstOffset += size;
    }
}

// io.netty.buffer.HeapByteBufUtil
static void setByte(byte[] memory, int index, int value) {
    memory[index] = (byte) value;
}
UnpooledHeapByteBuf 底层是数组,根据目标 ByteBuf 对象的不同,选取不同的策略完成读取/写入等操作。由于底层是由数据来存储数据,所以一般实现相对比较简单。
UnpooledHeapByteBuf 有两个子类实现:
- UnpooledUnsafeHeapByteBuf: 使用 UnsafeByteBufUtil 管理 byte[] 数组。它也有一个子类
- InstrumentedUnpooledUnsafeHeapByteBuf: 属于 UnpooledByteBufAllocator 私有的类,
- InstrumentedUnpooledHeapByteBuf : Instrumented 表示增加了某些装置的,其实就是在内存分配、释放后修改已分配内存大小而已,用作内存监控管理。带有 Instrumented 前缀的总共有 5 个类,它们都是 UnpooledByteBufAllocatory 分配器的私有的类。一般地,创建 ByteBuf 对象是通过分配器来创建的,好处之一是统一入口,这样我们就可以做一些数据记录: 已分配内存大小。当分配内存时则加上申请的内存大小的值,释放内存时则减去相应的归还内存大小的值。对应的 5 个类如下所示:
- InstrumentedUnpooledUnsafeHeapByteBuf
- InstrumentedUnpooledHeapByteBuf
- InstrumentedUnpooledUnsafeNoCleanerDirectByteBuf
- InstrumentedUnpooledUnsafeDirectByteBuf
- InstrumentedUnpooledDirectByteBuf
UnpooledDirectByteBuf
// io.netty.buffer.UnpooledDirectByteBuf
/**
 * 非池化堆外内存,基于「java.nio.ByteBuffer」实现。
 * 推荐使用「UnpooledByteBufAllocator.directBuffer(int, int)」
 *           「Unpooled.directBuffer(int)」
 *          「Unpooled.wrappedBuffer(ByteBuffer)」来显示分配ByteBuf对象,而非直接使用构造器创建 ByteBuf对象
 */
public class UnpooledDirectByteBuf extends AbstractReferenceCountedByteBuf {

    private final ByteBufAllocator alloc;

    ByteBuffer buffer; // accessed by UnpooledUnsafeNoCleanerDirectByteBuf.reallocateDirect()
    private ByteBuffer tmpNioBuf;
    private int capacity;
    private boolean doNotFree;

    @Override
    public byte getByte(int index) {
        ensureAccessible();
        return _getByte(index);
    }

    @Override
    protected byte _getByte(int index) {
        return buffer.get(index);
    }

    @Override
    public short getShort(int index) {
        ensureAccessible();
        return _getShort(index);
    }

    @Override
    protected short _getShort(int index) {
        return buffer.getShort(index);
    }

    /**
     * 将this.bytebuf中的数据复制到目标对象「dst」中
     */
    @Override
    public ByteBuf getBytes(int index, ByteBuf dst, int dstIndex, int length) {

        // #1 国际惯例,先严格检查
        checkDstIndex(index, length, dstIndex, dst.capacity());

        // #2 根据目标对象实现不同,采取不同复制策略
        if (dst.hasArray()) {
            // #2-1 如果目标ByteBuf持有「支撑数组」,则最后交给ByteBuffer#get()方法完成数据拷贝,
            // 它的底层也是通过for循环挨个复制。
            getBytes(index, dst.array(), dst.arrayOffset() + dstIndex, length);
        } else if (dst.nioBufferCount() > 0) {
            // #2-2 由ByteBuffer组成,挨个复制数据
            for (ByteBuffer bb: dst.nioBuffers(dstIndex, length)) {
                int bbLen = bb.remaining();
                getBytes(index, bb);
                index += bbLen;
            }
        } else {
            // #2-3 反过来,调用dst#setBytes方法复制数据
            dst.setBytes(dstIndex, this, index, length);
        }
        return this;
    }

    @Override
    public ByteBuf setByte(int index, int value) {
        ensureAccessible();
        _setByte(index, value);
        return this;
    }

    @Override
    protected void _setByte(int index, int value) {
        // 交给ByteBuffer完成
        buffer.put(index, (byte) value);
    }

    @Override
    public ByteBuf setShort(int index, int value) {
        ensureAccessible();
        _setShort(index, value);
        return this;
    }

    @Override
    protected void _setShort(int index, int value) {
        buffer.putShort(index, (short) value);
    }

    /**
     * 底层尝试使用Cleaner对象完成ByteBuffer对象的清理
     */
    @Override
    protected void deallocate() {
        ByteBuffer buffer = this.buffer;
        if (buffer == null) {
            return;
        }

        this.buffer = null;

        if (!doNotFree) {
            freeDirect(buffer);
        }
    }

    protected void freeDirect(ByteBuffer buffer) {
        PlatformDependent.freeDirectBuffer(buffer);
    }
}
对比 UnpooledHeapByteBuf 和 UnpooledDirectByteBuf 来看,一个是对 byte[] 封装了一系列 API ,另一个是对 java.nio.ByteBuffer 封装了一系列 API。
我们都知道,java.nio.ByteBuffer 主要特点是用于底层 I/O 操作时速度比较快,它减少了一次内存拷贝,但如果用于内存计算(比如查找等字节操作)那么性能反而不如使用底层为 byte[] 的 ByteBuf 。因此,我们需要根据实际情况选择不同类型的 ByteBuf 实例,追求极致性能。
UnpooledDirectByteBuf 有很多子类:
- UnpooledUnsafeDirectByteBuf: 非池化的、使用魔法类 Unsafe 的、堆外内存的 ByteBuf。其中有一个很关键的参数 memoryAddress,看见它就想到 Unsafe 类。因此,该对象的分配和释放也是和 Unsafe 息息相关。
- UnpooledUnsafeNoCleanerDirectByteBuf: 无 Cleaner 回收器。在调用 ByteBuf#release() 方法释放内存时,底层通过 Unsafe#freeMemory(long address) 完成堆外内存的释放。
- InstrumentedUnpooledUnsafeNoCleanerDirectByteBuf: 前面述说过,主要用于 UnpooledByteBufAllocator 分配器分配 ByteBuf 对象。
- ThreadLocalUnsafeDirectByteBuf: ByteBufUtil 内存类。用轻量级对象缓存池提高 ByteBuf 分配效率。
- UnpooledUnsafeNoCleanerDirectByteBuf: 无 Cleaner 回收器。在调用 ByteBuf#release() 方法释放内存时,底层通过 Unsafe#freeMemory(long address) 完成堆外内存的释放。
- InstrumentedUnpooledDirectByteBuf: UnpooledByteBufAllocator 内部类,主要在分配内存的逻辑上添加了使用内存容量计数。
- ThreadLocalDirectByteBuf: ByteBufUtil 内部类。使用轻量级对象缓存池提高 ByteBuf 分配效率。
UnpooledDirectByteBuf 是对 java.nio.ByteBuffer 对象的封装。派生出两种不同理念的 DirectByteBuf: UnpooledUnsafeDirectByteBuf 和 ThreadLocalDirectByteBuf。前者有一个特殊的变量 long address 是给 Unsafe 用的,通过 Unsafe 完成数据读/写操作。而后者是使用轻量级对象缓存池提高 ByteBuf 分配效率,至于数据的读取操作还是继承父类来完成。
使用哪种数据类型/对象存储数据。堆内内存使用 byte[] ,堆外内存使用 java.nio.ByteBuffer 对象。
对于堆外内存有两种回收方式,分别是 Cleaner 和 Unsafe(当然 Cleaner 也是通过 Unsafe 释放内存,但 Cleaner 是 JDK 提供堆外内存回收的另一种方式)。
使用轻量级对象缓存池提高内存分配效率。这样,分配和回收动作会由缓冲池来完成。
PooledByteBuf
PooledByteBuf 是一个抽象类,是子类实现池化能力的骨架,定义了与池化相关的属性和变量。在 Netty 4.1.44 版本之前(包括)采用 jemalloc3.x 算法思想,而后面则采用 jemalloc4.x 算法思想进行重构。
// io.netty.buffer.PooledByteBuf
/**

 */
abstract class PooledByteBuf<T> extends AbstractReferenceCountedByteBuf {

    // 当前ByteBuf所属分配器
    private ByteBufAllocator allocator;

    // 对象回收器
    private final Handle<PooledByteBuf<T>> recyclerHandle;

    // T是泛型,可以为byte[]或ByteBuffer
    protected T memory;

    // 该ByteBuf实例所属的PoolChunk
    protected PoolChunk<T> chunk;

    // 内存句柄,64位可分为上下两部分,各为32位,分别表示不同的含义,
    // 主要是定位当前ByteBuf对象包含的内存位置
    protected long handle;

    // 偏移量,起始值为0(单位: Byte),用于数据容器为「byte[]」
    // 首先,我们需要知道,对于非Huge级别的内存,Netty向JVM一次性申请的内存容量大小为16MB(16777216)。
    // 这块内存可以通过两种方式寻址。对于「byte[]」就是偏移量offset,而对于直接内存则使用「memoryAddress」+ index。
    // 这个offset是针对「byte[]」所使用的变量。比如当创建PooledHeapByteBuf,Netty会在一个长度为16777216的字节
    // 数组中选取合适大小的一段长度分配给当前ByteBuf。而这个「offset」偏移量就是相对数组下标为0的偏移量。
    // 后续向该数组写入数据时只需要通过 offset+index 就可以定位该ByteBuf所分配的内存区域。
    // 简单的说,底层的byte[](16MB)是大家共享的,通过偏移量来表示起始位置。
    protected int offset;
    // 申请内存的大小
    protected int length;
    // 最大长度
    int maxLength;

    // 本地缓存
    PoolThreadCache cache;

    // 临时的ByteBuffer
    ByteBuffer tmpNioBuf;

    /**
     * 这是一个非常重要的内存释放代码
     */
    @Override
    protected final void deallocate() {
        // #1 判断句柄变量是否>0
        if (handle >= 0) {
            final long handle = this.handle;
            this.handle = -1;
            memory = null;
            // 通过Arena完成释放动作(内存池)
            chunk.arena.free(chunk, tmpNioBuf, handle, maxLength, cache);
            tmpNioBuf = null;
            chunk = null;
            // 回收ByteBuf对象(对象池)
            recycle();
        }
    }

    private void recycle() {
        recyclerHandle.recycle(this);
    }

    // ...

}
简单做一个小结:
- Netty 推荐使用分配器而非构造器实例化 ByteBuf 对象。一般来说每个 ByteBuf 有属于自己的ByteBufAllocator 对象。
- 每个 ByteBuf 持有 PoolChunk 对象引用,该对象持有 Arena 引用,可利用 Arena 管理内存分配。这个后续再详说。
- ByteBuf 是某段物理内存的类的表示形式。我们使用变量 handle 表示这块内存的具体位置。
- 每个 ByteBuf 持有对象回收器 recyclerHandler 的引用,当 ByteBuf 所分配的内存被回收后,通过 recyclerHandler 对该 ByteBuf 对象进行回收并重新使用。
- 由于底层数据存储有两种表现形式: 分别是 byte[] 和 java.nio.ByteBuffer 对象。为了方便,使用泛型 ( T )表示,并没有根据不同的底层类型使用单独的类加以区分。
- 本地线程池 PoolThreadCache 的加入进一步提高内存分配的效率。
PooledByteBuf 子类
PooledHeapByteBuf: 可池化的堆内内存ByteBuf。
PooledUnsafeHeapByteBuf: 使用Unsafe完成读/写操作。
PooledDirectByteBuf: 可池化的堆外内存ByteBuf。
PooledUnsafeDirectByteBuf: 可池化的使用Unsafe的堆外内存ByteBuf。
ByteBuf 小结
ByteBuf 是对物理存储区域的类的抽象。它按两种维度进行分类: Unpooled 和 Pooled、Heap 和 DirectByteBuffer。两种维度相互重叠互相结合。可组合成:
- UnpooledHeapByteBuf
- UnpooledDirectByteBuf
- PooledHeapByteBuf
- PooledDirectByteBuf
- 还存在相对比较重要的一些 ByteBuf,如 CompositeByteBuf,它可以提高编程效率。
Netty 推荐使用分配器创建 ByteBuf 对象,因此也衍生出了带有 Instrument 前缀命名的 ByteBuf,主要目的是追踪分配的 ByteBuf 生命周期,可以向用户提供更多关于内存分配的详情,帮助用户更好管理内存。
引用计数是减少内存泄漏的关键手段之一。
根据实际情况选择合适的 ByteBuf,熟悉各类 ByetBuf 实例的优劣势:
堆外内存
- 优点
- 减少一次内存拷贝
- 降低 GC 压力
- 实现进程之间、JVM 多实例之间的数据共享
- 适合大内存分配场景
- 缺点
- 需手动释放,稍有不慎会造成堆外内存泄漏,出现问题排查困难
堆内内存
- 优点
- 可在没有池化情况下提供快速分配和释放内存的能力
- 内存的释放交由 JVM 管理。用户不需要操心
- 适合小内存分配场景
- 缺点
- 当进行网络 I/O 操作、文件读写时,堆内内存都需要转换为堆外内存,然后再与底层设备进行交互
池化
- 优点:
- 提高内存分配速度、提高内存利用率
- 缺点
- 管理内存需要花费一定的开销
- 可能会造成内存泄漏
非池化
- 优点
- 适用于小内存分配,快速分配和快速释放
- 缺点:
- 没有缓冲
在引用计数还没有成熟之前,Netty 默认分配非池化的 ByteBuf,但随着各种监控的成熟,Netty 4.1 默 认分配池化的 ByteBuf
ByteBuf 分配
按需分配 ByteBufAllocator
ByteBufAllocator 继承结构图

其实只有池化和非池化两种 ByteBufAllocator,而以 Preferred 只不过是为了方便使用,对 AbstractByteBufAllocator 子类进一步封装了部分 API 而已。所以我们关注点在 PoolBytesBufAllocator 和 UnpooledByteBufAllocator 两个子类实现上。
AbstractByteBufAllocator
抽象类 AbstractByteBufAllocator 实现了 ByteBufAllocator 所有的接口,它是 ByteBufAllocator 的骨架。我们知道,使用 Allocator 是为了更好地管理 ByteBuf 对象的分配,可以判断分配的内存容量是否超标、跟踪已分配的 ByteBuf 并判断是否存在内存泄漏问题。因此,抽象类 AbstractByteBufAllocator 内部有两个方法分别包装 ByteBuf 和 CompositeByteBuf 对象,用于检测内存泄漏。抽象类并没有定义太多的变量,不过有一个比较重要的 boolean 类型变量 directDefault ,它控制着 buffer() API 所返回的对象是否为堆内内存还是堆外内存。相关源码如下:
public abstract class AbstractByteBufAllocator implements ByteBufAllocator {
    // 默认初始容量
    static final int DEFAULT_INITIAL_CAPACITY = 256;
    // 默认最大容量
    static final int DEFAULT_MAX_CAPACITY = Integer.MAX_VALUE;
    // 默认最多组合ByteBuf
    static final int DEFAULT_MAX_COMPONENTS = 16;
    // 当需要扩容很操作时需要进行新容量计算,以CALCULATE_THRESHOLD大小进行增长
    // 而非粗暴*2
    static final int CALCULATE_THRESHOLD = 1048576 * 4; // 4 MiB page

    static {
        ResourceLeakDetector.addExclusions(AbstractByteBufAllocator.class, "toLeakAwareBuffer");
    }

    /**
     * 追踪ByteBuf对象,判断是否发生内存泄漏
     * 对于SIMPLE级别,使用SimpleLeakAwareByteBuf包装ByteBuf
     * 对于ADVANCED、PARANOID级别,使用AdvancedLeakAwareByteBuf包装ByteBuf
     * 也就是通过包装类,当调用ByteBuf相关API时,包装类会根据动作的不同记录数据,
     * 比如 release() 动作会执行 leak.record();函数,可以理解这个函数记录当前ByteBuf的使用情况,
     * 因此,通过回溯记录就可以判断哪些ByteBuf对象存在内存泄漏
     */
    protected static ByteBuf toLeakAwareBuffer(ByteBuf buf) {
        ResourceLeakTracker<ByteBuf> leak;
        switch (ResourceLeakDetector.getLevel()) {
            case SIMPLE:
                leak = AbstractByteBuf.leakDetector.track(buf);
                if (leak != null) {
                    buf = new SimpleLeakAwareByteBuf(buf, leak);
                }
                break;
            case ADVANCED:
            case PARANOID:
                leak = AbstractByteBuf.leakDetector.track(buf);
                if (leak != null) {
                    buf = new AdvancedLeakAwareByteBuf(buf, leak);
                }
                break;
            default:
                break;
        }
        return buf;
    }
    private final boolean directByDefault;
    private final ByteBuf emptyBuf;

    protected AbstractByteBufAllocator(boolean preferDirect) {
        // 由铁氧磁带preferDirect和平台是否支持Unsafe决定
        directByDefault = preferDirect && PlatformDependent.hasUnsafe();
        emptyBuf = new EmptyByteBuf(this);
    }

    @Override
    public ByteBuf buffer() {
        if (directByDefault) {
            return directBuffer();
        }
        return heapBuffer();
    }

    // 这是子类需要实现的抽象方法,返回堆内内存和堆外内存的ByteBuf
    protected abstract ByteBuf newHeapBuffer(int initialCapacity, int maxCapacity);
    protected abstract ByteBuf newDirectBuffer(int initialCapacity, int maxCapacity);

    // ...
}
PooledByteBufAllocator
初始化阶段
池化分配器 PooledByteBufAllocator 初始化分为两个阶段,分别是静态代码块和构造器。静态代码块初始化需要用的默认参数。
参数:
  private static final int DEFAULT_NUM_HEAP_ARENA;//堆内内存Arena数组长度 默认16(8核)
    private static final int DEFAULT_NUM_DIRECT_ARENA;//直接内存Arena数组长度 默认16

    private static final int DEFAULT_PAGE_SIZE;//内存页大小 默认8192
    private static final int DEFAULT_MAX_ORDER; // 8192 << 11 = 16 MiB per chunk 内存池二叉树最大深度
    private static final int DEFAULT_SMALL_CACHE_SIZE;//线程缓存中small类型内存缓存个数 默认256
    private static final int DEFAULT_NORMAL_CACHE_SIZE;//线程缓存中normal类型内存缓存个数 默认64
    static final int DEFAULT_MAX_CACHED_BUFFER_CAPACITY;//线程缓存中普通内存最大的缓存内存大小 默认32768
    private static final int DEFAULT_CACHE_TRIM_INTERVAL;//线程缓存中触发缓存整理的间隔次数 8192
    private static final long DEFAULT_CACHE_TRIM_INTERVAL_MILLIS;//线程缓存中触发缓存整理的时间间隔 0
    private static final boolean DEFAULT_USE_CACHE_FOR_ALL_THREADS;//是否对所有线程使用线程缓存 true
    private static final int DEFAULT_DIRECT_MEMORY_CACHE_ALIGNMENT;//默认直接内存缓存对齐值 0
    static final int DEFAULT_MAX_CACHED_BYTEBUFFERS_PER_CHUNK;//ArrayDeque队列大小,该队列用来缓存可重复使用的ByteBuffer对象 1023

    private static final int MIN_PAGE_SIZE = 4096;
    private static final int MAX_CHUNK_SIZE = (int) (((long) Integer.MAX_VALUE + 1) / 2);

    private final Runnable trimTask = new Runnable() {//释放缓存的异步任务
        @Override
        public void run() {
            PooledByteBufAllocator.this.trimCurrentThreadCache();
        }
    };
static {
        int defaultPageSize = SystemPropertyUtil.getInt("io.netty.allocator.pageSize", 8192);
        Throwable pageSizeFallbackCause = null;
        try {
            validateAndCalculatePageShifts(defaultPageSize);//校验并计算页偏移量,当defaultPageSize=8192,计算结果为13
        } catch (Throwable t) {
            pageSizeFallbackCause = t;
            defaultPageSize = 8192;
        }
        DEFAULT_PAGE_SIZE = defaultPageSize;

        int defaultMaxOrder = SystemPropertyUtil.getInt("io.netty.allocator.maxOrder", 11);//满二叉树的高度,默认高度为11,最高不超过14
        Throwable maxOrderFallbackCause = null;
        try {
            validateAndCalculateChunkSize(DEFAULT_PAGE_SIZE, defaultMaxOrder);//校验并计算chunksize大小,
        } catch (Throwable t) {
            maxOrderFallbackCause = t;
            defaultMaxOrder = 11;
        }
        DEFAULT_MAX_ORDER = defaultMaxOrder;

        // Determine reasonable default for nHeapArena and nDirectArena.
        // Assuming each arena has 3 chunks, the pool should not consume more than 50% of max memory.
        final Runtime runtime = Runtime.getRuntime();

        /*
         * We use 2 * available processors by default to reduce contention as we use 2 * available processors for the
         * number of EventLoops in NIO and EPOLL as well. If we choose a smaller number we will run into hot spots as
         * allocation and de-allocation needs to be synchronized on the PoolArena.
         *
         * See https://github.com/netty/netty/issues/3888.
         */
        final int defaultMinNumArena = NettyRuntime.availableProcessors() * 2;//默认最小Arena数量=运行时处理器*2 我的是8核 所以是16
        final int defaultChunkSize = DEFAULT_PAGE_SIZE << DEFAULT_MAX_ORDER; //8192<<11=16M
        DEFAULT_NUM_HEAP_ARENA = Math.max(0,
                SystemPropertyUtil.getInt(
                        "io.netty.allocator.numHeapArenas",
                        (int) Math.min(
                                defaultMinNumArena,
                                runtime.maxMemory() / defaultChunkSize / 2 / 3)));//也可以通过配置io.netty.allocator.numHeapArenas。一般是CPU核心数*2
        DEFAULT_NUM_DIRECT_ARENA = Math.max(0,
                SystemPropertyUtil.getInt(
                        "io.netty.allocator.numDirectArenas",
                        (int) Math.min(
                                defaultMinNumArena,
                                PlatformDependent.maxDirectMemory() / defaultChunkSize / 2 / 3)));

        // cache sizes
        DEFAULT_SMALL_CACHE_SIZE = SystemPropertyUtil.getInt("io.netty.allocator.smallCacheSize", 256);
        DEFAULT_NORMAL_CACHE_SIZE = SystemPropertyUtil.getInt("io.netty.allocator.normalCacheSize", 64);

        // 32 kb is the default maximum capacity of the cached buffer. Similar to what is explained in
        // 'Scalable memory allocation using jemalloc'
        DEFAULT_MAX_CACHED_BUFFER_CAPACITY = SystemPropertyUtil.getInt(
                "io.netty.allocator.maxCachedBufferCapacity", 32 * 1024);//最大缓存buffer容量为32KB,超过就不会缓存

        // the number of threshold of allocations when cached entries will be freed up if not frequently used
        DEFAULT_CACHE_TRIM_INTERVAL = SystemPropertyUtil.getInt(
                "io.netty.allocator.cacheTrimInterval", 8192);
     //系统是否配置了io.netty.allocation.cacheTrimIntervalMillis 和 io.netty.allocator.cacheTrimIntervalMillis 来配置线程缓存中触发缓存整理的时间间隔
        if (SystemPropertyUtil.contains("io.netty.allocation.cacheTrimIntervalMillis")) {
            logger.warn("-Dio.netty.allocation.cacheTrimIntervalMillis is deprecated," +
                    " use -Dio.netty.allocator.cacheTrimIntervalMillis");

            if (SystemPropertyUtil.contains("io.netty.allocator.cacheTrimIntervalMillis")) {
                // Both system properties are specified. Use the non-deprecated one.
                DEFAULT_CACHE_TRIM_INTERVAL_MILLIS = SystemPropertyUtil.getLong(
                        "io.netty.allocator.cacheTrimIntervalMillis", 0);
            } else {
                DEFAULT_CACHE_TRIM_INTERVAL_MILLIS = SystemPropertyUtil.getLong(
                        "io.netty.allocation.cacheTrimIntervalMillis", 0);
            }
        } else {
            DEFAULT_CACHE_TRIM_INTERVAL_MILLIS = SystemPropertyUtil.getLong(
                    "io.netty.allocator.cacheTrimIntervalMillis", 0);
        }

        DEFAULT_USE_CACHE_FOR_ALL_THREADS = SystemPropertyUtil.getBoolean(
                "io.netty.allocator.useCacheForAllThreads", true);

        DEFAULT_DIRECT_MEMORY_CACHE_ALIGNMENT = SystemPropertyUtil.getInt(
                "io.netty.allocator.directMemoryCacheAlignment", 0);

        // Use 1023 by default as we use an ArrayDeque as backing storage which will then allocate an internal array
        // of 1024 elements. Otherwise we would allocate 2048 and only use 1024 which is wasteful.
        DEFAULT_MAX_CACHED_BYTEBUFFERS_PER_CHUNK = SystemPropertyUtil.getInt(
                "io.netty.allocator.maxCachedByteBuffersPerChunk", 1023);

        if (logger.isDebugEnabled()) {
            logger.debug("-Dio.netty.allocator.numHeapArenas: {}", DEFAULT_NUM_HEAP_ARENA);
            logger.debug("-Dio.netty.allocator.numDirectArenas: {}", DEFAULT_NUM_DIRECT_ARENA);
            if (pageSizeFallbackCause == null) {
                logger.debug("-Dio.netty.allocator.pageSize: {}", DEFAULT_PAGE_SIZE);
            } else {
                logger.debug("-Dio.netty.allocator.pageSize: {}", DEFAULT_PAGE_SIZE, pageSizeFallbackCause);
            }
            if (maxOrderFallbackCause == null) {
                logger.debug("-Dio.netty.allocator.maxOrder: {}", DEFAULT_MAX_ORDER);
            } else {
                logger.debug("-Dio.netty.allocator.maxOrder: {}", DEFAULT_MAX_ORDER, maxOrderFallbackCause);
            }
            logger.debug("-Dio.netty.allocator.chunkSize: {}", DEFAULT_PAGE_SIZE << DEFAULT_MAX_ORDER);
            logger.debug("-Dio.netty.allocator.smallCacheSize: {}", DEFAULT_SMALL_CACHE_SIZE);
            logger.debug("-Dio.netty.allocator.normalCacheSize: {}", DEFAULT_NORMAL_CACHE_SIZE);
            logger.debug("-Dio.netty.allocator.maxCachedBufferCapacity: {}", DEFAULT_MAX_CACHED_BUFFER_CAPACITY);
            logger.debug("-Dio.netty.allocator.cacheTrimInterval: {}", DEFAULT_CACHE_TRIM_INTERVAL);
            logger.debug("-Dio.netty.allocator.cacheTrimIntervalMillis: {}", DEFAULT_CACHE_TRIM_INTERVAL_MILLIS);
            logger.debug("-Dio.netty.allocator.useCacheForAllThreads: {}", DEFAULT_USE_CACHE_FOR_ALL_THREADS);
            logger.debug("-Dio.netty.allocator.maxCachedByteBuffersPerChunk: {}",
                    DEFAULT_MAX_CACHED_BYTEBUFFERS_PER_CHUNK);
        }
    }
主要的功能有以下几点:
- 值校验。判断设定值是否越界、状态是否异常等。
- 初始化 PoolThreadLocalCache。
- 初始化 Arena。包括 DirectArena 和 HeapArena。Arena 是 jemalloc 算法思想重要的概念,一个 PooledByteBufAllocator 对象拥有多个 Arena,目的是减少资源竞争,在多线程环境下提高内存分配效率。
- 配置监控。
接口实现
PooledByteBufAllocator 会实现两个抽象方法,这两个方法与创建 ByteBuf 对象密切相关:
@Override
    protected ByteBuf newHeapBuffer(int initialCapacity, int maxCapacity) {
        PoolThreadCache cache = threadCache.get();
        PoolArena<byte[]> heapArena = cache.heapArena;

        final ByteBuf buf;
        if (heapArena != null) {
            buf = heapArena.allocate(cache, initialCapacity, maxCapacity);
        } else {
            buf = PlatformDependent.hasUnsafe() ?
                    new UnpooledUnsafeHeapByteBuf(this, initialCapacity, maxCapacity) :
                    new UnpooledHeapByteBuf(this, initialCapacity, maxCapacity);
        }

        return toLeakAwareBuffer(buf);
    }

    @Override
    protected ByteBuf newDirectBuffer(int initialCapacity, int maxCapacity) {
        PoolThreadCache cache = threadCache.get();
        PoolArena<ByteBuffer> directArena = cache.directArena;

        final ByteBuf buf;
        if (directArena != null) {
            buf = directArena.allocate(cache, initialCapacity, maxCapacity);
        } else {
            buf = PlatformDependent.hasUnsafe() ?
                    UnsafeByteBufUtil.newUnsafeDirectByteBuf(this, initialCapacity, maxCapacity) :
                    new UnpooledDirectByteBuf(this, initialCapacity, maxCapacity);
        }

        return toLeakAwareBuffer(buf);
    }
小结(PooledByteBufAllocator)
PooledByteBufAllocator 做的事情主要有
- 初始化
- 静态参数初始化(包含校验)。如 DEFAULT_PAGE_SIZE(页大小)、DEFALUT_MAX_ORDER(树高度)等。在静态代码块完成。
- 实例化 heapArenas 和 directArenas 两个数组。Arena 与内存分配有关,Allocator 将内存分配委托给相应的 Arenas 完成。
- 各类的 size。如 smallCacheSize、normalCacheSize、chunkSize 。
- 分配器监控。List<PoolArenaMetric>。
- 本地线程缓存 PoolThreadLocalCache。
- 内存分配是委托 Arena 对象完成。
- 有一个重要的内部类 PoolThreadLocalCache,它属于本地线程缓存,用于提高内存分配效率。
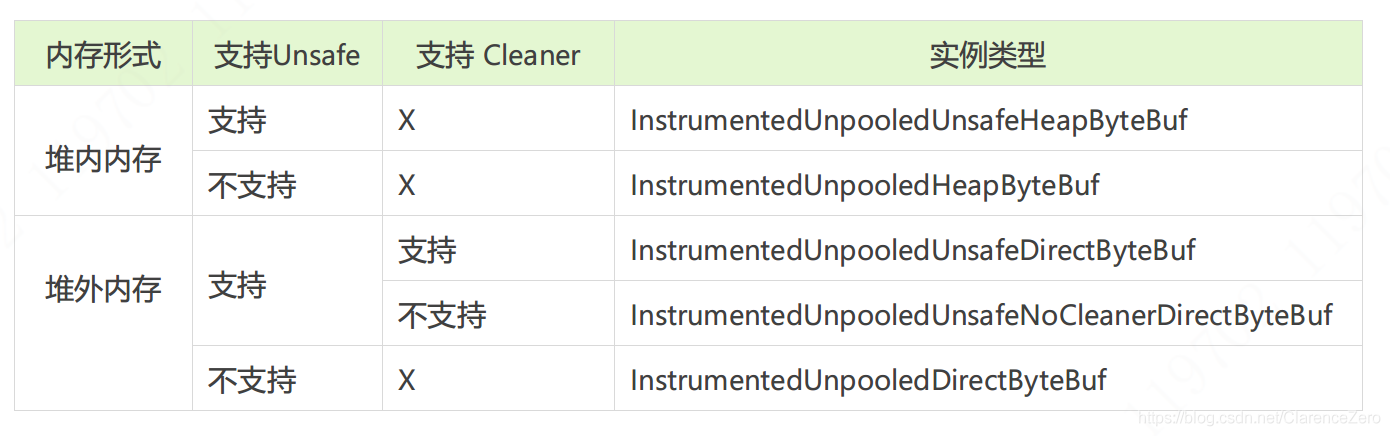
UnpooledByteBufAllocator
UnpooledByteBufAllocator 相对 PooledByteBufAllocator 简单,没有复杂的内存管理变量和逻辑。内部有 5 个以 Instrumented 前缀开头的内部类。
UnpooledByteBufAllocator 到底选择哪个 ByteBuf 是根据:
- 平台是否支持
Unsafe。 - 有无
Cleaner。
// io.netty.buffer.UnpooledByteBufAllocator
public final class UnpooledByteBufAllocator
    extends AbstractByteBufAllocator implements ByteBufAllocatorMetricProvider {

    private final UnpooledByteBufAllocatorMetric metric = new UnpooledByteBufAllocatorMetric();
    private final boolean disableLeakDetector;

    private final boolean noCleaner;

        public UnpooledByteBufAllocator(boolean preferDirect, boolean disableLeakDetector, boolean tryNoCleaner) {
        super(preferDirect);
        this.disableLeakDetector = disableLeakDetector;
        // 初始化「noCleaner」变量
        noCleaner = tryNoCleaner && PlatformDependent.hasUnsafe()
                && PlatformDependent.hasDirectBufferNoCleanerConstructor();
    }

    /**
     * 获取一个非池化的堆内内存「ByteBuf」实例
     */
    @Override
    protected ByteBuf newHeapBuffer(int initialCapacity, int maxCapacity) {
        // 根据平台是否支持Unsafe而创建不同类型的ByteBuf对象
        return PlatformDependent.hasUnsafe() ?
                new InstrumentedUnpooledUnsafeHeapByteBuf(this, initialCapacity, maxCapacity) :
                new InstrumentedUnpooledHeapByteBuf(this, initialCapacity, maxCapacity);
    }

    /**
     * 获取一个非池化的堆外内存「ByteBuf」实例
     */
    @Override
    protected ByteBuf newDirectBuffer(int initialCapacity, int maxCapacity) {
        final ByteBuf buf;
        // 直接内存除了判断平台是否支持Unsafe外,还判断有无Cleaner
        if (PlatformDependent.hasUnsafe()) {
            buf = noCleaner ? new InstrumentedUnpooledUnsafeNoCleanerDirectByteBuf(this, initialCapacity, maxCapacity) :
                    new InstrumentedUnpooledUnsafeDirectByteBuf(this, initialCapacity, maxCapacity);
        } else {
            buf = new InstrumentedUnpooledDirectByteBuf(this, initialCapacity, maxCapacity);
        }
        return disableLeakDetector ? buf : toLeakAwareBuffer(buf);
    }
}
从源码中可以看到,有两个条件可以左右 UnpooledByteBufAllocator 分配策略。分别是Unsafe和 noCleaner,最后都是返回不同类型的 ByteBuf 实现类。
Unpooled
Unpooled 可以方便创建一个非池化的 ByteBuf 实例,可以把它看成是一个工具类。内部持有一个 UnpooledByteBufAllocator 对象用来分配内存。

ByteBufUtil
ByteBufUtil 提供了用于操作 ByteBuf 的静态的辅助方法。