
如果你之前没有深入了解 Angular 依赖注入系统,那你现在可能认为 Angular 程序内的根注入器包含所有合并的服务提供商,每一个组件都有它自己的注入器,延迟加载模块有它自己的注入器。
但是,仅仅知道这些可能还不够呢?
不久前有个叫 Tree-Shakeable Tokens feature 被合并到 master 分支,如果你和我一样充满好奇心,可能也想知道这个 feature 改变了哪些东西。
所以现在去看看,可能有意外收获嗷。
注入器树(Injector Tree)
大多数开发者知道,Angular 会创建根注入器,根注入器内的服务都是单例的。但是,貌似还有其他注入器是它的父级。
作为一名开发者,我想知道 Angular 是怎么构建注入器树的,下图是注入器树的顶层部分:
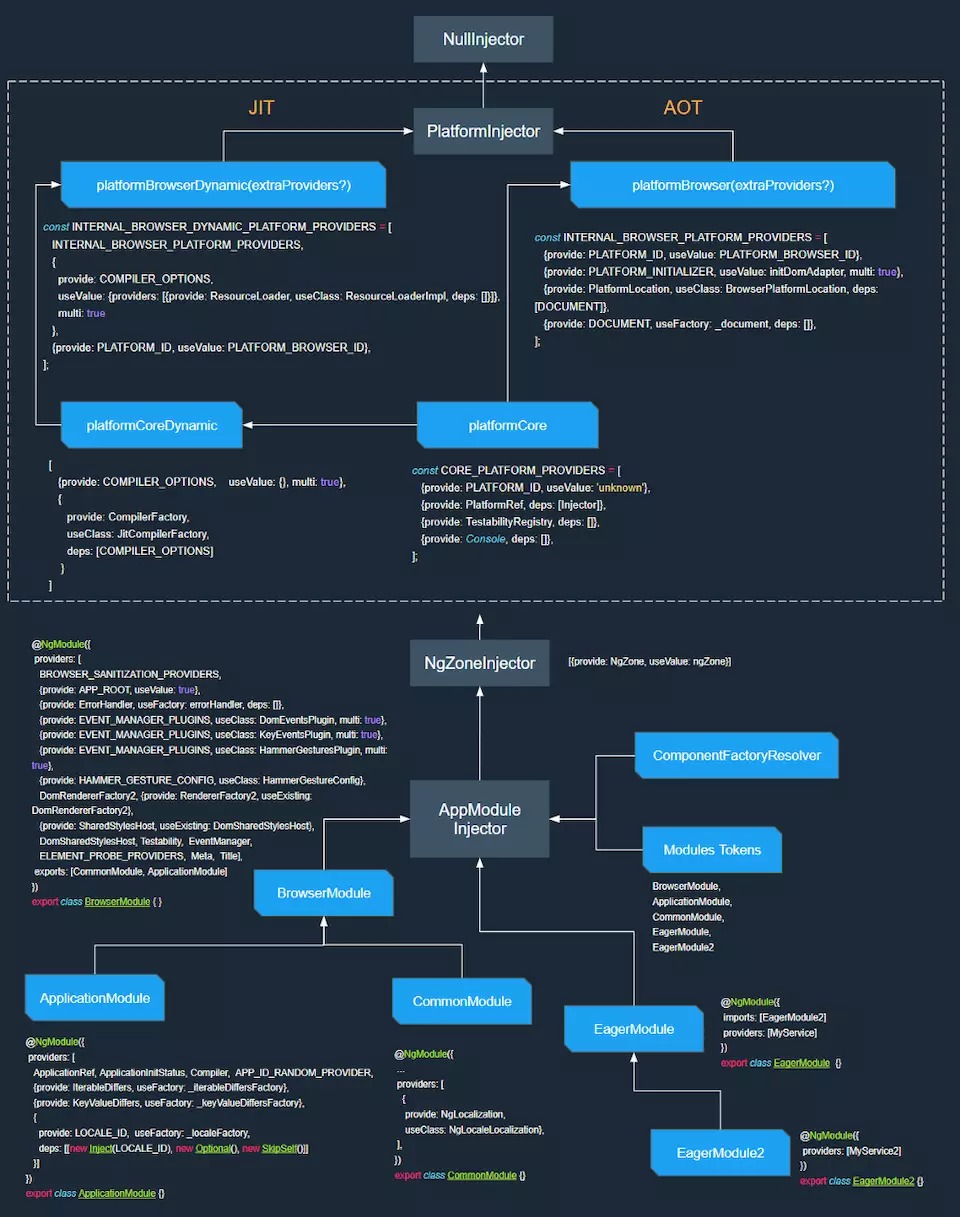
这不是整棵树,目前还没有任何组件呢,后面会继续画树的剩余部分。但是现在先看下根注入器 AppModule Injector,因为它是最常使用的。
根注入器(Root AppModule Injector)
我们知道 Angular 程序根注入器 就是上图的 AppModule Injector,上文说了,这个根注入器包含所有中间模块的服务提供商,也就是说(注:不翻译):
If we have a module with some providers and import this module directly in AppModule or in any other module, which has already been imported in AppModule, then those providers become application-wide providers.
根据这个规则,上图中 EagerModule2 的 MyService2 也会被包含在根注入器 AppModule Injector 中。
ComponentFactoryResolver 也会被 Angular 添加 到这个根注入器对象内,它主要用来创建动态组件,因为它存储了 entryComponents 属性指向的组件数组。
值得注意的是,所有服务提供商中有 Module Tokens,它们都是被导入模块的类名。后面探索到 tree-shakeable tokens 时候,还会回到这个 Module Tokens 话题。
Angular 使用 AppModule 工厂函数来实例化根注入器 AppModule Injector,这个 AppModule 工厂函数就在所谓的 module.ngfactory.js 文件内:
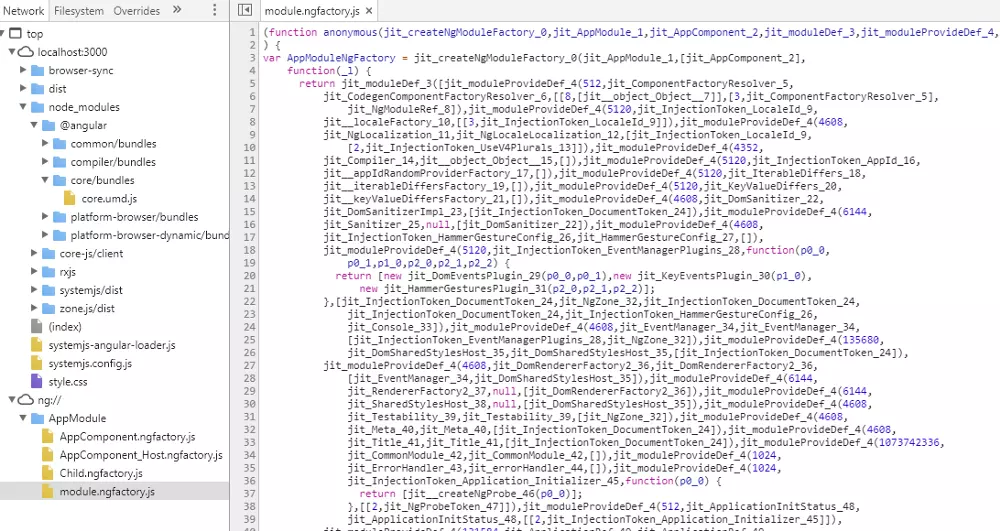
我们可以看到这个工厂函数返回一个包含所有被合并服务提供商的模块对象,所有开发者都应当熟悉这个(注:可以查看 译 Angular 的 @Host 装饰器和元素注入器)。
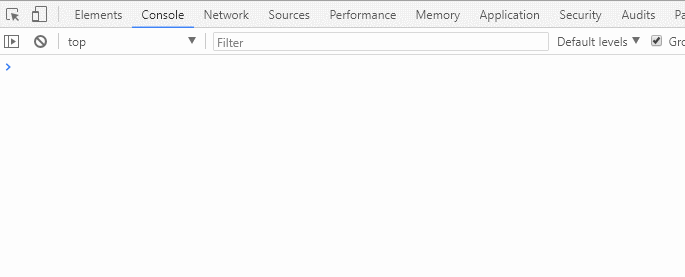
Tip: If you have angular application in dev mode and want to see all providers from root AppModule injector then just open devtools console and write:
ng.probe(getAllAngularRootElements()[0]).injector.view.root.ngModule._providers

还有很多其他知识点,我在这里没有描述,因为官网上已经谈到了:
angular.io/guide/ngmod…
angular.io/guide/hiera…
Platform Injector
实际上,根注入器 AppModule Injector 有个父注入器 NgZoneInjector,而它又是 PlatformInjector 的子注入器。
PlatformInjector 会在 PlatformRef 对象初始化的时候,包含内置的服务提供商,但也可以额外包含服务提供商:
const platform = platformBrowserDynamic([ {
provide: SharedService,
deps:[]
}]);
platform.bootstrapModule(AppModule);
platform.bootstrapModule(AppModule2);
这些额外的服务提供商是由我们开发者传入的,且必须是 StaticProviders。如果你不熟悉 StaticProviders 和 Provider 两者间的区别,可以查看这个 StackOverflow 的答案。
Tip: If you have angular application in dev mode and want to see all providers from Platform injector then just open devtools console and write:
ng.probe(getAllAngularRootElements()[0]).injector.view.root.ngModule._parent.parent._records;
// to see stringified value use
ng.probe(getAllAngularRootElements()[0]).injector.view.root.ngModule._parent.parent.toString();
尽管根注入器以及其父注入器解析依赖的过程清晰明了,但是组件级别的注入器如何解析依赖却让我很困惑,所以,我接着去深入了解。
EntryComponent and RootData
我在上文聊到 ComponentFactoryResolver 时,就涉及到 entryComponents 入口组件。这些入口组件会在 NgModule 的 bootstrap 或 entryComponents 属性中声明,@angular/router 也会用它们动态创建组件。
Angular 会为所有入口组件创建宿主工厂函数,这些宿主工厂函数就是其他视图的根视图,也就是说(注:不翻译):
Every time we create dynamic component angular creates root view with root data, that contains references to elInjector and ngModule injector.
function createRootData(
elInjector: Injector, ngModule: NgModuleRef
projectableNodes: any[][], rootSelectorOrNode: any): RootData {
const sanitizer = ngModule.injector.get(Sanitizer);
const errorHandler = ngModule.injector.get(ErrorHandler);
const renderer = rendererFactory.createRenderer(null, null);
return {
ngModule,
injector: elInjector, projectableNodes,
selectorOrNode: rootSelectorOrNode, sanitizer, rendererFactory, renderer, errorHandler
};
}
假设现在正在运行一个 Angular 程序。
下面代码执行时,其内部发生了什么:
platformBrowserDynamic().bootstrapModule(AppModule);
事实上,其内部发生了很多事情,但是我们仅仅对 Angular 是 如何创建入口组件 这块感兴趣:
const compRef = componentFactory.create(Injector.NULL, [], selectorOrNode, ngModule);
Angular 注入树就是从这里开始,分叉为两颗并行树。
Element Injector vs Module Injector
不久前,当延迟加载模块被广泛使用时,在 github 上 有人报告了一个奇怪的案例:依赖注入系统会两次实例化延迟加载模块。结果,一个新的设计被引入。所以,从那开始,Angular 有两个并行注入树:元素注入树和模块注入树。
主要规则是:当组件或指令需要解析依赖时,Angular 使用 Merge Injector 来遍历 element injector tree,如果没找到该依赖,则遍历 module injector tree 去查找依赖。
Please note I don’t use phrase “component injector” but rather “element injector”.
什么是 Merge Injector?
你以前可能写过如下类似代码:
@Directive({
selector: '[someDir]'
}
export class SomeDirective {
constructor(private injector: Injector) {}
}
这里的 injector 就是 Merge Injector,当然你也可以在组件中注入这个 Merge Injector。
Merge Injector 对象的定义如下:
class Injector_ implements Injector {
constructor(private view: ViewData, private elDef: NodeDef|null) {}
get(token: any, notFoundValue: any = Injector.THROW_IF_NOT_FOUND): any {
const allowPrivateServices =
this.elDef ? (this.elDef.flags & NodeFlags.ComponentView) !== 0 : false;
return Services.resolveDep(
this.view, this.elDef, allowPrivateServices,
{flags: DepFlags.None, token, tokenKey: tokenKey(token)}, notFoundValue);
}
}
如上代码显示了 Merge Injector 仅仅是视图和元素的组合,这个注入器充当依赖解析时 element injector tree 和 module injector tree 之间的桥梁。
Merge Injector 也可以解析内置的对象,如 ElementRef,ViewContainerRef,TemplateRef,ChangeDetectorRef 等等,更有趣的是,它还可以返回 Merge Injector。
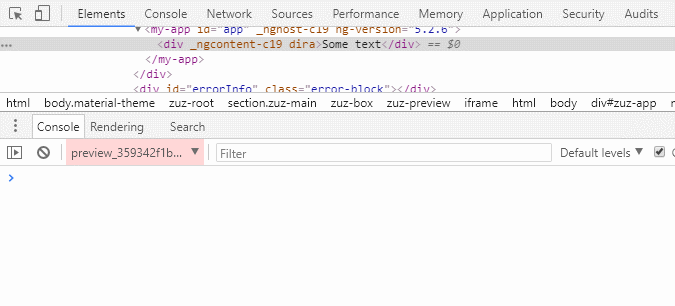
基本上每一个 DOM 元素都有一个 merge injector,即使没有提供任何令牌。
Tip: to get merge injector just open console and write:
ng.probe($0).injector
但是你可能会问 element injector 是什么?
我们知道 @angular/compiler 会编译组件模板生成工厂函数,该函数实际上只是调用 viewDef() 函数返回 ViewDefinition 类型对象,视图仅仅是模板的一种表现形式,里面包含各种类型节点,如 directive,text,provider 和 query 等等。其中有元素节点 element node 用来表示 DOM 元素的。实际上,元素注入器 element injector 就在这个节点内。Angular 会把该元素节点上所有的服务提供商都存储在该节点的两个属性里:
export interface ElementDef {
...
/**
- visible public providers for DI in the view,
- as see from this element. This does not include private providers.
/
publicProviders: {[tokenKey: string]: NodeDef}|null;
/* - same as visiblePublicProviders, but also includes private providers
- that are located on this element.
*/
allProviders: {[tokenKey: string]: NodeDef}|null;
}
让我们看看 元素注入器是如何解析依赖的:
const providerDef =
(allowPrivateServices ? elDef.element!.allProviders :
elDef.element!.publicProviders)![tokenKey];
if (providerDef) {
let providerData = asProviderData(searchView, providerDef.nodeIndex);
if (!providerData) {
providerData = { instance: _createProviderInstance(searchView, providerDef) };
searchView.nodes[providerDef.nodeIndex] = providerData as any;
}
return providerData.instance;
}
这里仅仅检查 allProviders 属性,或依据私有性检查 publicProviders。
这个注入器包含组件/指令对象,和其中的所有服务提供商。
视图实例化阶段 时主要由 ProviderElementContext 对象提供这些服务提供商,该对象也是 @angular/compiler Angular 编译器的一部分。如果我们深入挖掘这个对象,会发现一些有趣的事情。
比如说,当使用 @Host 装饰器时会有一些 限制,可以使用宿主元素的 viewProviders 属性来解决这些限制,可以查看 medium.com/@a.yurich.z… 。
另一个有趣的事情是,如果组件宿主元素上挂载指令,但组件和指令提供相同的令牌,则指令的服务提供商会 胜出。
Tip: to get element injector just open console and write:
ng.probe($0).injector.elDef.element
依赖解析算法
视图内依赖解析算法代码是 resolveDep() 函数,merge injector 在 get() 方法中也是使用这个函数来解析依赖(Services.resolveDep)。为了理解依赖解析算法,我们首先需要知道视图和父视图元素概念。
如果根组件有模板 ,我们就会有三个视图:
HostView_AppComponent
View_AppComponent
View_ChildComponent
some content
依赖解析算法会根据多级视图来解析:
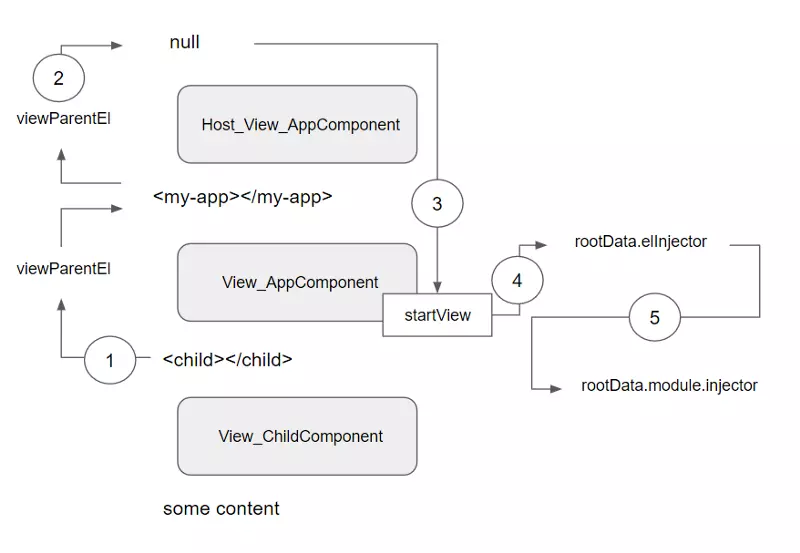
如果子组件需要解析依赖,那 Angular 会首先查找该组件的元素注入器,也就是检查 elRef.element.allProviders|publicProviders,然后 向上遍历父视图元素 检查元素注入器的服务提供商(1),直到父视图元素等于 null(2), 则返回 startView(3),然后检查 startView.rootData.elnjector(4),最后,只有当令牌没找到,再去检查 startView.rootData module.injector(5)。(注:元素注入器 -> 组件注入器 -> 模块注入器)
当向上遍历组件视图来解析依赖时,会搜索 视图的父元素而不是元素的父元素。Angular 使用 viewParentEl() 函数获取视图父元素:
/**
- for component views, this is the host element.
- for embedded views, this is the index of the parent node
- that contains the view container.
*/
export function viewParentEl(view: ViewData): NodeDef|null {
const parentView = view.parent;
if (parentView) {
return view.parentNodeDef !.parent;
} else {
return null;
}
}
比如说,假设有如下的一段小程序:
@Component({
selector: 'my-app',
template: <my-list></my-list>
})
export class AppComponent {}
@Component({
selector: 'my-list',
template: <div class="container"> <grid-list> <grid-tile>1</grid-tile> <grid-tile>2</grid-tile> <grid-tile>3</grid-tile> </grid-list> </div>
})
export class MyListComponent {}
@Component({
selector: 'grid-list',
template: <ng-content></ng-content>
})
export class GridListComponent {}
@Component({
selector: 'grid-tile',
template: ...
})
export class GridTileComponent {
constructor(private gridList: GridListComponent) {}
}
假设 grid-tile 组件依赖 GridListComponent,我们可以成功拿到该组件对象。但是这是怎么做到的?
这里父视图元素究竟是什么?
下面的步骤回答了这个问题:
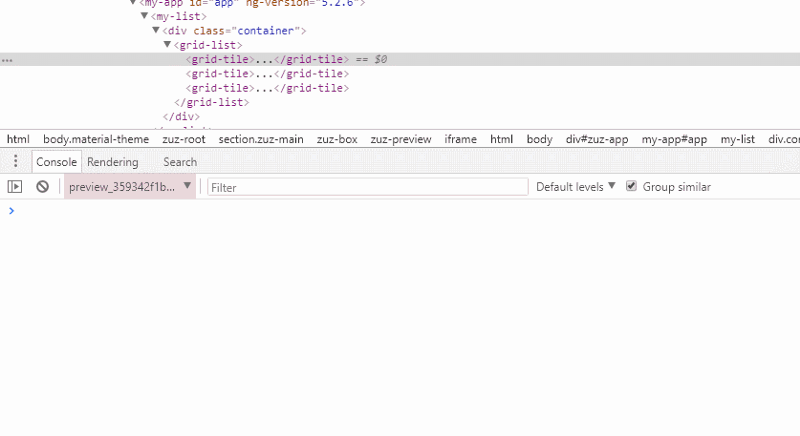
查找 起始元素。GridListComponent 组件模板里包含 grid-tile 元素选择器,因此需要找到匹配 grid-tile 选择器的元素。所以起始元素就是 grid-tile 元素。
查找拥有 grid-tile 元素的 模板,也就是 MyListComponent 组件模板。
决定该元素的视图。如果没有父嵌入视图,则为组件视图,否则为嵌入视图。grid-tile 元素之上没有任何 ng-template 或 *structuralDirective,所以这里是组件视图 View_MyListComponent。
查找视图的父元素。这里是视图的父元素,而不是元素的父元素。
这里有两种情况:
对于嵌入视图,父元素则为包含该嵌入视图的视图容器。
比如,假设 grid-list 上挂载有结构指令:
@Component({
selector: 'my-list',
template: <div class="container"> <grid-list *ngIf="1"> <grid-tile>1</grid-tile> <grid-tile>2</grid-tile> <grid-tile>3</grid-tile> </grid-list> </div>
})
export class MyListComponent {}
则 grid-tile 视图的父元素则是 div.container。
对于组件视图,父元素则为宿主元素。
我们上面的小程序也就是组件视图,所以父视图元素是 my-list 元素,而不是 grid-list。
现在,你可能想知道如果 Angular 跳过 grid-list,则它是怎么解析 GridListComponent 依赖的?
关键是 Angular 使用 原型链继承 来搜集服务提供商:
每次我们为一个元素提供服务提供商时,Angular 会新创建继承于父节点的 allProviders 和 publicProviders 数组,否则不会新创建,仅仅会共享父节点的这两个数组。
这就表示了 grid-tile 包含当前视图内所有父元素的所有服务提供商。
下图基本说明了 Angular 是如何为模板内元素收集服务提供商:
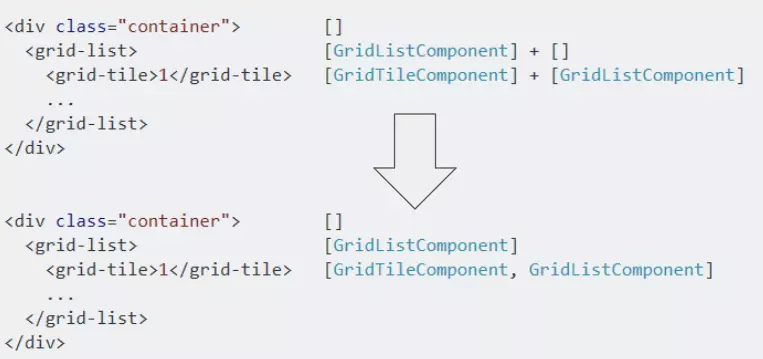
正如上图显示的,grid-tile 使用元素注入器通过 allProviders 成功拿到 GridListComponent 依赖,因为 grid-tile 元素注入器包含来自于父元素的服务提供商。

想要了解更多,可以查看 StackOverflow answer。
元素注入器的服务提供商使用了原型链继承,导致我们不能使用 multi 选项来提供同一令牌多个服务。但是由于依赖注入系统很灵活,也有办法去解决这个问题,可以查看 stackoverflow.com/questions/4…
可以把上文的解释装入脑中,现在继续画注入树。
Simple my-app->child->grand-child application
假设有如下简单程序:
@Component({
selector: 'my-app',
template: <child></child>,
})
export class AppComponent {}
@Component({
selector: 'child',
template: <grand-child></grand-child>
})
export class ChildComponent {}
@Component({
selector: 'grand-child',
template: grand-child
})
export class GrandChildComponent {
constructor(private service: Service) {}
}
@NgModule({
imports: [BrowserModule],
declarations: [
AppComponent,
ChildComponent,
GrandChildComponent
],
bootstrap: [AppComponent]
})
export class AppModule { }
我们有三层树结构,并且 GrandChildComponent 依赖于 Service:
my-app
child
grand-child(ask for Service dependency)
下图解释了 Angular 内部是如何解析 Service 依赖的:
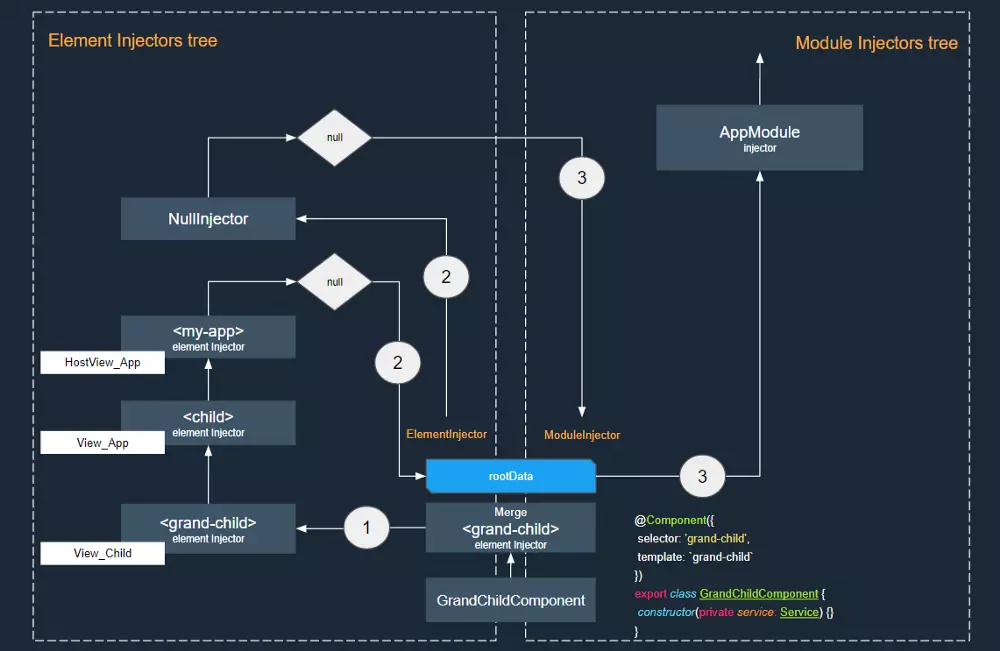
上图从 View_Child (1)的 grand-child 元素开始,并向上遍历查找所有视图的父元素,当视图没有父元素时,本实例中 may-app 没有父元素,则 使用根视图的注入器查找(2):
startView.root.injector.get(depDef.token, NOT_FOUND_CHECK_ONLY_ELEMENT_INJECTOR);
本实例中 startView.root.injector 就是 NullInjector,由于 NullInjector 没有任何服务提供商,则 Angular 就会 切换到模块注入器(3):
startView.root.ngModule.injector.get(depDef.token, notFoundValue);
所以 Angular 会按照以下顺序解析依赖:
AppModule Injector
||
/
ZoneInjector
||
/
Platform Injector
||
/
NullInjector
||
/
Error
路由程序
让我们修改程序,添加路由器:
@Component({
selector: 'my-app',
template: <router-outlet></router-outlet>,
})
export class AppComponent {}
...
@NgModule({
imports: [
BrowserModule,
RouterModule.forRoot([
{ path: 'child', component: ChildComponent },
{ path: '', redirectTo: '/child', pathMatch: 'full' }
])
],
declarations: [
AppComponent,
ChildComponent,
GrandChildComponent
],
bootstrap: [ AppComponent ]
})
export class AppModule { }
这样视图树就类似为:
my-app
router-outlet
child
grand-child(dynamic creation)
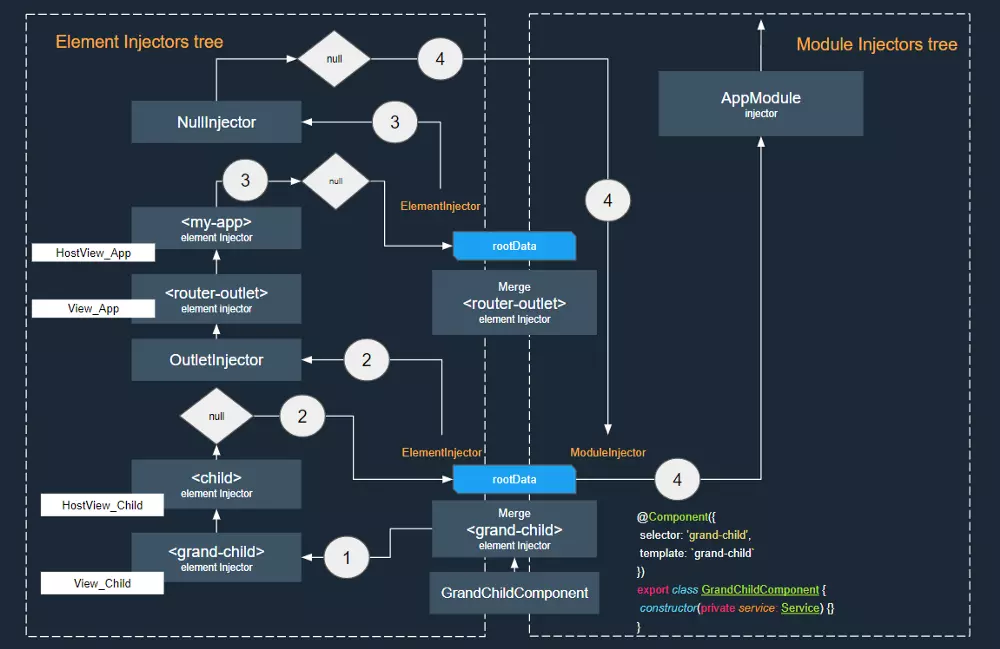
现在让我们看看 路由是如何创建动态组件的:
const injector = new OutletInjector(activatedRoute, childContexts, this.location.injector);
this.activated = this.location.createComponent(factory, this.location.length, injector);
这里 Angular 使用新的 rootData 对象创建一个新的根视图,同时传入 OutletInjector 作为根元素注入器 elInjector。OutletInjector 又依赖于父注入器 this.location.injector,该父注入器是 router-outlet 的元素注入器。
OutletInjector 是一种特别的注入器,行为有些像路由组件和父元素 router-outlet 之间的桥梁,该对象代码可以看 这里:
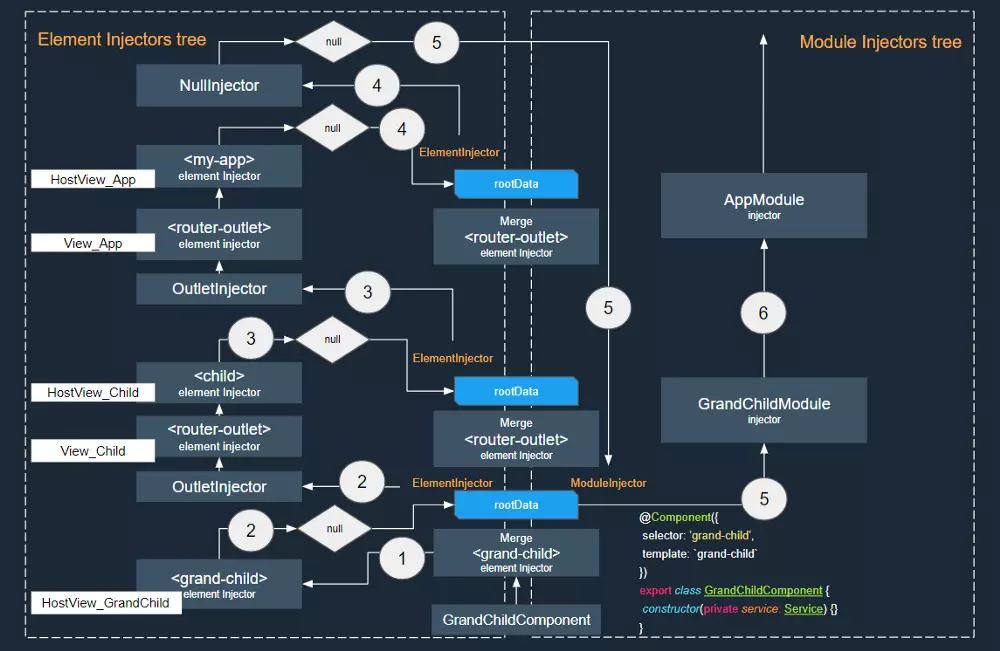
延迟加载程序
最后,让我们把 GrandChildComponent 移到延迟加载模块,为此需要在子组件中添加 router-outlet,并修改路由配置:
@Component({
selector: 'child',
template: Child <router-outlet></router-outlet>
})
export class ChildComponent {}
...
@NgModule({
imports: [
BrowserModule,
RouterModule.forRoot([
{
path: 'child', component: ChildComponent,
children: [
{
path: 'grand-child',
loadChildren: './grand-child/grand-child.module#GrandChildModule'}
]
},
{ path: '', redirectTo: '/child', pathMatch: 'full' }
])
],
declarations: [
AppComponent,
ChildComponent
],
bootstrap: [AppComponent]
})
export class AppModule {}
my-app
router-outlet
child (dynamic creation)
router-outlet
+grand-child(lazy loading)
让我们为延迟加载程序画两颗独立的树:
Tree-shakeable tokens are on horizon
Angular 团队为让框架变得更小,后续又做了大量工作,从 version 6 开始,提供了另一种注册服务提供商的方式。
Injectable
之前由 Injectable 装饰的类不能说明它是否有依赖,与它如何被使用也无关。所以,如果一个服务没有依赖,那 Injectable 装饰器是可以被移除的。
随着 API 变得稳定,可以配置 Injectable 装饰器来告诉 Angular,该服务是属于哪一个模块的,以及它是被如何实例化的:
export interface InjectableDecorator {
(): any;
(options?: {providedIn: Type
new (): Injectable;
new (options?: {providedIn: Type
}
export type InjectableProvider = ValueSansProvider | ExistingSansProvider |
StaticClassSansProvider | ConstructorSansProvider | FactorySansProvider | ClassSansProvider;
下面是一个简单实用案例:
@Injectable({
providedIn: 'root'
})
export class SomeService {}
@Injectable({
providedIn: 'root',
useClass: MyService,
deps: []
})
export class AnotherService {}
与 ngModule factory 包含所有服务提供商不同,这里把有关服务提供商的信息存储在 Injectable 装饰器内。这个技术会让我们程序代码变得更小,因为没有被使用的服务会被摇树优化掉。如果我们使用 Injectable 来注册服务提供商,而使用者又不导入我们的服务提供商,那最后被打包的代码不包含这些服务提供商,所以,
Prefer registering providers in Injectables over NgModule.providers over Component.providers
本文开始时我提到过根注入器的 Modules Tokens,所以 Angular 能够区分哪一个模块出现在特定的模块注入器内。
依赖解析器会使用这个信息来 判断可摇树优化令牌是否属于模块注入器。
InjectionToken
可以使用 InjectionToken 对象来定义依赖注入系统如何构造一个令牌以及该令牌应用于哪一个注入器:
export class InjectionToken
constructor(protected _desc: string, options?: {
providedIn?: Type
factory: () => T
}) {}
}
所以应该这样使用:
export const apiUrl = new InjectionToken('tree-shakeable apiUrl token', {
providedIn: 'root',
factory: () => 'someUrl'
});
结论
依赖注入是 Angular 框架中的一个非常复杂的话题,知道其内部工作原理会让你对你做的事情更有信心,所以我强烈建议偶尔去深入研究 Angular 源代码。
注:这篇文章很有深度,很长也很难,加油吧!
作者:lx1036
链接:https://juejin.im/post/5b72f3bce51d4566295cf160
来源:掘金
著作权归作者所有。商业转载请联系作者获得授权,非商业转载请注明出处。