vue基于类的写法,和基于对象的写法并不一致。
使用vue-cli3创建的项目,src目录下的文件结构并没有多大区别,store、router、app、view、components、aeests该有的还是有的。
但是,多了一个东西:vue-property-decorator,vue-property-decorator是vue-class-component的超集。
import { Component, Emit, Inject, Model, Prop, Provide, Vue, Watch } from 'vue-property-decorator'
最主要的区别就是这里,组件的定义,参数的接受,方法的定义,等等。
但是本文主要讲的是router的监听。
路由监听
用vue2的vue-cli创建项目,在src下有App.vue,main.js,其中如果要做路由权限控制,可以通过在main.js添加以下代码来控制:
import router from './router'

router.beforeEach((to, from, next) => {
    /*如果需要登录,当前没有登录,直接跳转到登录页*/
    if (to.meta.Auth && !store.state.loginStatus) {
        return next({ name: 'Login', query: {path: to.name}})
    }
    next()
})
这个功能,在新版本的vue3中依然可以使用,因为使用了typescript,所以应该是main.ts文件。
但是如果要在组件内部使用路由监听,就遇到问题了,路由钩子beforeRouteEnter,beforeRouteLeave,beforeRouteUpdate不生效。
解决方案:
// main.ts
import Component from 'vue-class-component'

Component.registerHooks([
  'beforeRouteEnter',//进入路由之前
  'beforeRouteLeave',//离开路由之前
  'beforeRouteUpdate'
])
路由规则文件:
//router.ts
import Vue from 'vue';
import Router from 'vue-router';
import Home from './views/Home.vue';

Vue.use(Router);

export default new Router({
  mode: 'history',
  base: process.env.BASE_URL,
  routes: [
    {
      path: '/',
      name: 'home',
      component: Home,
    },
    {
      path: '/about',
      name: 'about',
      // route level code-splitting
      // this generates a separate chunk (about.[hash].js) for this route
      // which is lazy-loaded when the route is visited.
      component: () => import(/* webpackChunkName: "about" */ './views/About.vue'),
    },
  ],
});
路由载入组件:
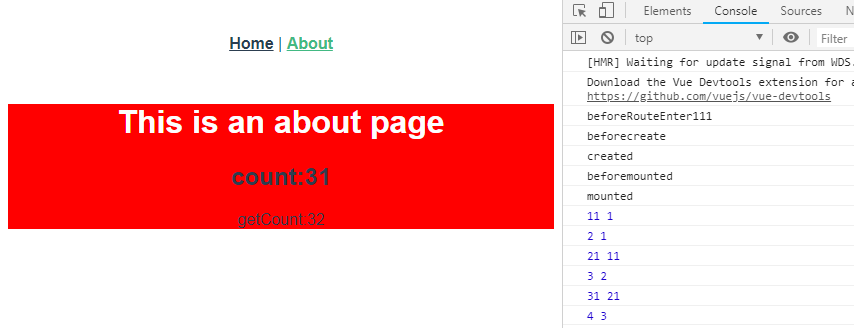
//About.vue

<template>
  <div class="about">
    <h1>This is an about page</h1>
    <h2 @click="click(10)">count:{{count}}</h2>
   <p>getCount:{{getCount}}</p>
  </div>
</template>
<script lang="ts">
  import { Component, Emit, Inject, Model, Prop, Provide, Vue, Watch } from 'vue-property-decorator'

  @Component
  export default class About extends Vue {
    private count: number = 1;
    private num: number = 1;

    private click(num: number) {
      this.count = num + this.count;
      this.num++
    }

  // 相当于computed属性
     get getCount() {
       return this.count + 1
     }

    beforeCreate() {
      console.log('beforecreate');
    }
    created() {
      console.log('created')
    }
    beforeMount() {
      console.log('beforemounted');
    }
    mounted() {
      console.log('mounted');
    }
    beforeRouteEnter(to: any, from: any, next: () => void): void {
      console.log('beforeRouteEnter111');
      next();
    }
    beforeRouteUpdate(to: any, from: any, next: () => void): void {
      console.log('beforeRouteUpdate111');
      next();
    }
    beforeRouteLeave(to: any, from: any, next: () => void): void {
      console.log('beforeRouteLeave111');
      next();
    }

    @Watch('count') // 监听count
    private aaa(val: any, oldval: any) {
      console.log(val, oldval);
    }

    @Watch('num') // 监听num
    private bbb(a: number, b: number) {
      console.log(a, b)
    }

  }

</script>
<style lang="less">
  .about {
    background-color: red;
    h1 {
      color: #fdfdfd;
    }
  }
</style>
效果图:
prop传值及component组件
// home.vue

<template>
  <div class="home">
    <img alt="Vue logo" src="../assets/logo.png">
    <HelloWorld :msg='msg' :title='title'/>
  </div>
</template>

<script lang="ts">
  import { Component, Vue } from 'vue-property-decorator';
  import HelloWorld from '@/components/HelloWorld.vue'; // @ is an alias to /src

  @Component({
    components: {
      HelloWorld,
    },
  })
  export default class Home extends Vue {
    private msg: String = "Welcome to Your Vue.js + TypeScript App"
    private title: String = 'I am title'
  }

</script>
// helloworld.vue
<template>
  <div class="hello">
    <h2>title:{{title}}</h2>
    <h1>msg:{{ msg }}</h1>
  </div>
</template>

<script lang="ts">
import { Component, Prop, Vue } from 'vue-property-decorator';

@Component
export default class HelloWorld extends Vue {
  @Prop() private msg !: string;
  @Prop() private title !: string;
}
</script>

<!-- Add "scoped" attribute to limit CSS to this component only -->
<style scoped lang="less">
h3 {
  margin: 40px 0 0;
}
ul {
  list-style-type: none;
  padding: 0;
}
li {
  display: inline-block;
  margin: 0 10px;
}
a {
  color: #42b983;
}
</style>
效果展示:
