参考文章:
使用pm2部署项目提高工作效率 https://www.jianshu.com/p/51bf8cf5227c?from=groupmessage
上传图片网址: https://imgchr.com/
1 使用码云的git仓库保存代码 https://gitee.com/
首先建立代码库-->然后复制本地的用户主目录下的.ssh/id_rsa.pub文件的内容粘贴进去-->生成公钥;
然后把本地代码关联到mayun上
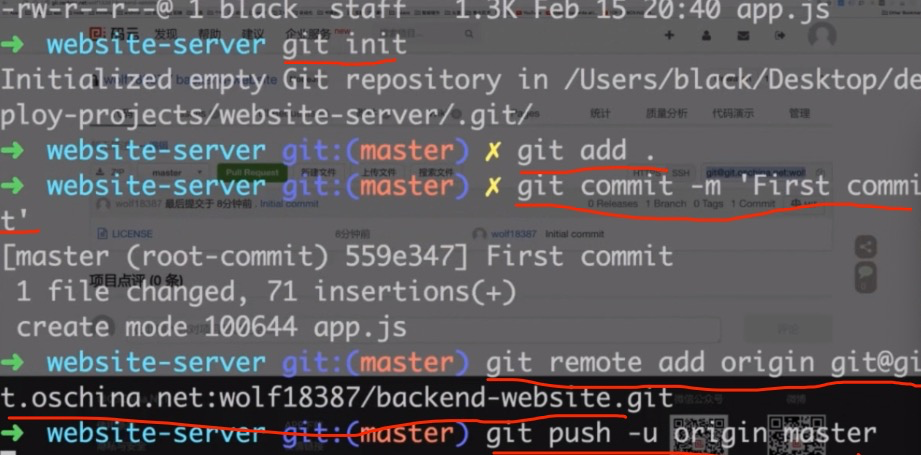
然后开发服务器,复制公钥:

然后把这段代码放在码云的公钥中:
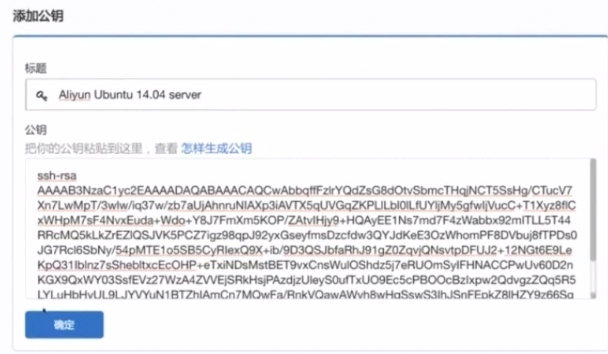
这样服务器也就有权限获取码云上的代码了
注意的是要在服务器上安装git: sudo apt-get install git
1 首先在服务器上把码云上的代码clone下来 git clone xxxx (和平时的git操作命令一样)
PS:
方法2、本地初始化一个仓库,设置远程仓库地址后再做push
和方法1的差别,在于先创建仓库。
$ git init
$ git remote add origin https://gitee.com/用户个性地址/HelloGitee.git
上面的代码是,在本地新建的文件,然后设置远程的仓库地址,一般来说我习惯先在远程设置仓库,然后clone下来初始化的仓库,再把代码放进去,所以不需要上面的步骤
==============
不使用ssh方法,如果使用的是http,是不是就不用设置ssh的一些公钥了?这样在服务器端clone http的代码也不需要公钥了?
最终的效果是在服务器上clone代码库。
PM2的地址: http://pm2.keymetrics.io/
查看其文档:http://pm2.keymetrics.io/docs/usage/pm2-doc-single-page/
目的:在服务器上使用pm2部署代码:
http://pm2.keymetrics.io/docs/usage/deployment/
首先在服务器端新建www/website文件夹: sudo mkdir website
在本地代码的根目录下新建配置文件:ecosystem.json
{
  "apps":[{
    "name": "myblog", //部署的应用的名字
    "script": "app.js",//启动的入口脚本
    "env": {
      "COMMON_VARIABLE": "true"//启动时传入的变量
    },
    // Environment variables injected when starting with --env production
    // http://pm2.keymetrics.io/docs/usage/application-declaration/#switching-to-different-environments
    "env_production" : {
      "NODE_ENV": "production" //生产环境的变量
    }
  }],
  // Deployment part
  // Here you describe each environment
  "deploy" : { //部署的任务
    "production" : {
      "user" : "zyl", //服务器上用来发布的用户名
      // Multi host is possible, just by passing IPs/hostname as an array
      "host" : ["39.106.194.136"],//主机ip
    "port":"22",//端口号
// Branch
      "ref"  : "origin/master", //指定主分支master
      // Git repository to clone
      "repo" : "git@github.com:zhenyulei/server-blog.git", //仓库地址
      // Path of the application on target servers
      "path" : "/home/zyl/www/website/myblog", //把项目部署到服务器的那个目录下
      // Can be used to give options in the format used in the configura-
      // tion file.  This is useful for specifying options for which there
      // is no separate command-line flag, see 'man ssh'
      // can be either a single string or an array of strings
      "ssh_options": "StrictHostKeyChecking=no", //把ssh的key校验取消掉
      // To prepare the host by installing required software (eg: git)
      // even before the setup process starts
      // can be multiple commands separated by the character ";"
      // or path to a script on your local machine
      "pre-setup" : "",
      // Commands / path to a script on the host machine
      // This will be executed on the host after cloning the repository
      // eg: placing configurations in the shared dir etc
      "post-setup": "ls -la",
      // Commands to execute locally (on the same machine you deploy things)
      // Can be multiple commands separated by the character ";"
      "pre-deploy-local" : "echo 'This is a local executed command'",
      // Commands to be executed on the server after the repo has been cloned
      "post-deploy" : "npm install && npm run prd && pm2 startOrRestart ecosystem.json --env production", //项目发布到服务器上执行的命令
// Environment variables that must be injected in all applications on this env
      "env" : { "NODE_ENV": "production" } } }
}
其中本地代码命令:
{
  "scripts": {
    "start": "node bin/www",
    "dev": "./node_modules/.bin/nodemon bin/www",
    "prd": "pm2 start bin/www",
    "test": "echo "Error: no test specified" && exit 1"
  }
}
首先把该文件git--push到远程代码库中
然后在本地项目中运行: pm2 deploy ecosystem.json production setup // 让pm2 连接上服务器,第一次部署
其中 production 是ecosystem.json 中的配置参数名字
执行命令后发现失败:setup paths failed 是因为该用户在服务器端的website文件夹上没有新建文件的权限,
在服务器上执行 sudo chmod 777 website //给当前用户的website文件夹设置权限为 可读写可操作
切换到服务器上发现 website/production文件夹下多了三个文件夹
current/ shared/ source/
其中
current 是当前服务所运行的文件夹
shared 是日志文件等共享的数据
source 是clone下来的源代码
然后在本地执行: pm2 deploy ecosystem.json production //运行
首先在本地控制台登陆服务器,然后通过本地的pm2的配置文件ecosystem.json
和命令: pm2 deploy ecosystem.json production setup
通知服务器在远程代码库中clone代码,
并部署到服务器上相应的文件夹中,然后在发布部署。
如果依赖与数据库的话,一定要保证在服务器上能够让数据库跑起来
但是通常会遇到下面的错误:
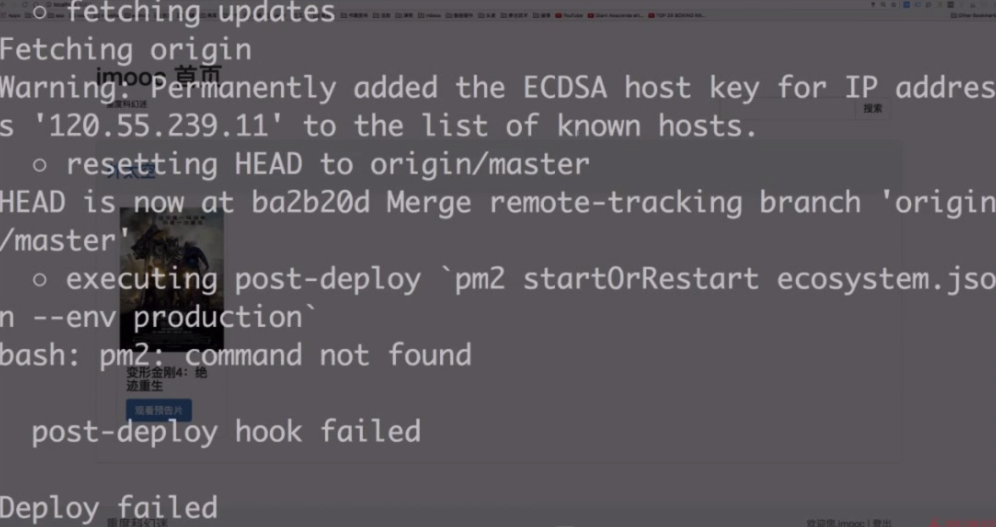
报错pm2在服务器上找不到,原因是因为它在服务器上用的是非交互的形式。
所以切换到服务器端,在根目录下编辑.bash文件:
cd //cd不带参数就是切换到根目录上
vi .bashrc  //编辑 .bashrc文件
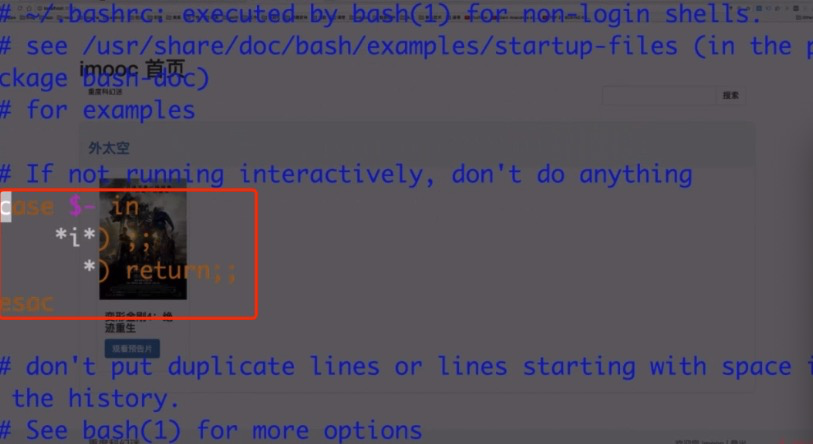
加上#号,保存后退出
然后通过命令加载文件 source .bashrc
然后重新切换到本地终端再次执行:pm2 deploy ecosystem.json production 进行发布
启动服务后有以下样子表示成功:
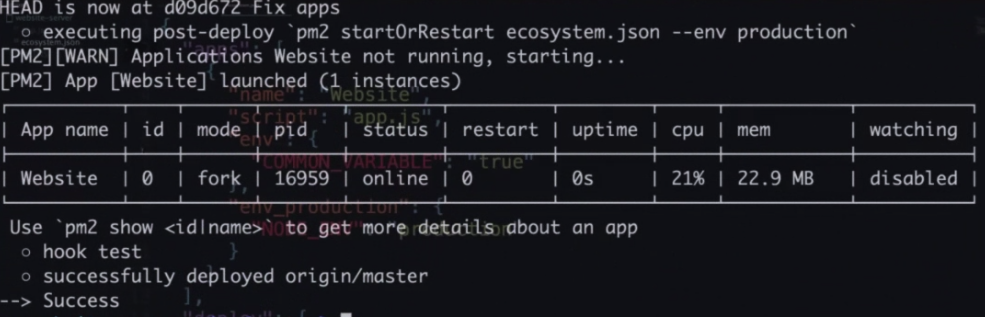
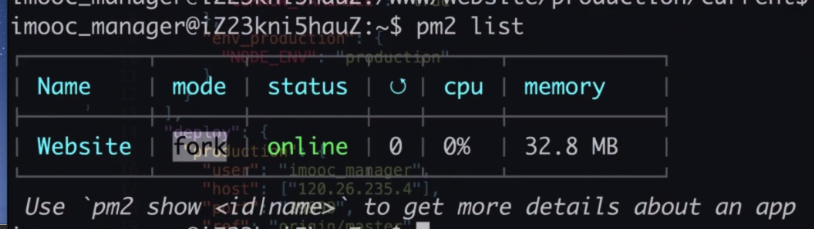
执行 pm2 list。可以查看当前的list应用
最后要
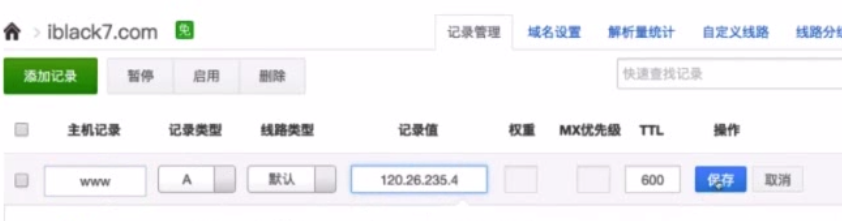
1 修改域名指向
2 修改nginx配置文件,让nginx识别域名之后,转发到服务器上的3000端口(因为该项目是用在了3000端口)
cd /etc/nginx/conf.d
ls
sudo vi imooc-com-8081.conf

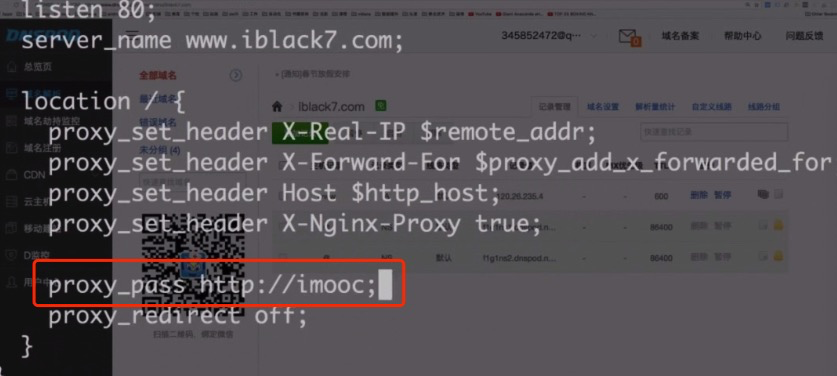
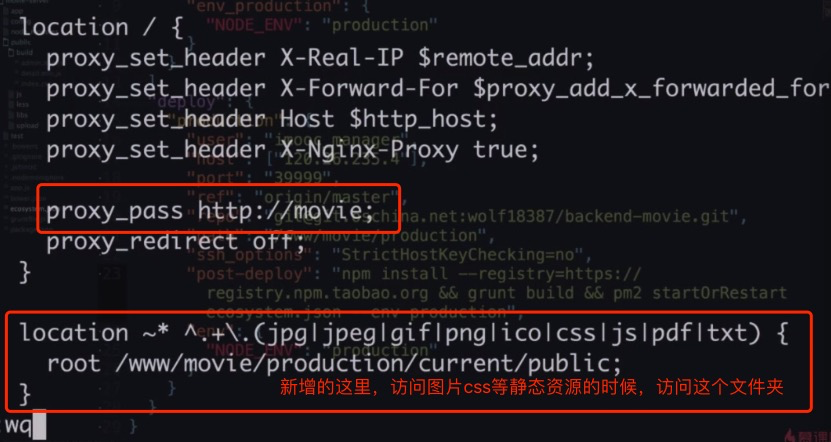
把上面红框中的内容改成下面:
这里的意思是网站所有访问 39.106.194.136服务器的默认端口80,也就是访问 39.106.194.136:80 都会被引导到 proxy_pass http://myblog;
对应的就是 server 127.0.0.1:8081;
引导到8081端口上。
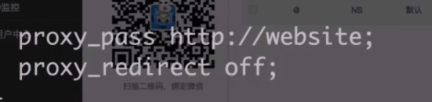
upstream myblog{
  server 127.0.0.1:8081;
}
server {
  listen 80;
  server_name 39.106.194.136;
  location / {
    proxy_set_header X-Real-IP $remote_addr;
    proxy_set_header X-Forward-For $proxy_add_x_forwarded_for;
    proxy_set_header Host $http_host;
    proxy_set_header X-Nginx-Proxy true;
    proxy_set_header   X-Forwarded-Host $server_name;

    proxy_pass http://myblog;
    proxy_redirect off;
  }
}
多个端口配置如下:
upstream myblog{
  server 127.0.0.1:8081;
}
upstream myweixin{
  server 127.0.0.1:8082;
}
server {
  listen 80;
  server_name www.blog.xiaozhumaopao.com;
  //url中访问这个url--就是通过proxy_pass的http://myblog--upstream myblog--
  //也就是server访问本机127.0.0.1:8081; 的8081端口
  location / {
    proxy_set_header X-Real-IP $remote_addr;
    proxy_set_header X-Forward-For $proxy_add_x_forwarded_for;
    proxy_set_header Host $http_host;
    proxy_set_header X-Nginx-Proxy true;
    proxy_set_header   X-Forwarded-Host $server_name;

    proxy_pass http://myblog;
    proxy_redirect off;
  }
}
server {
  listen 80;
  server_name www.weixin.xiaozhumaopao.com;
  location / {
    proxy_set_header X-Real-IP $remote_addr;
    proxy_set_header X-Forward-For $proxy_add_x_forwarded_for;
    proxy_set_header Host $http_host;
    proxy_set_header X-Nginx-Proxy true;
    proxy_set_header   X-Forwarded-Host $server_name;

    proxy_pass http://myweixin;
    proxy_redirect off;
  }
}
然后通过 sudo nginx -s reload 重启nginx。
如果报下面的警告:
zyl@iZ2ze1mqd75ujzu1ar18ngZ:/etc/nginx/conf.d$ sudo nginx -s reload
sudo: unable to resolve host iZ2ze1mqd75ujzu1ar18ngZ
nginx: [warn] conflicting server name "39.106.194.136" on 0.0.0.0:80, ignored
注意是不是写了多个conf文件,
最后设置防火墙可以访问3000端口!!!!!
sudo vi /etc/iptables.up.rules
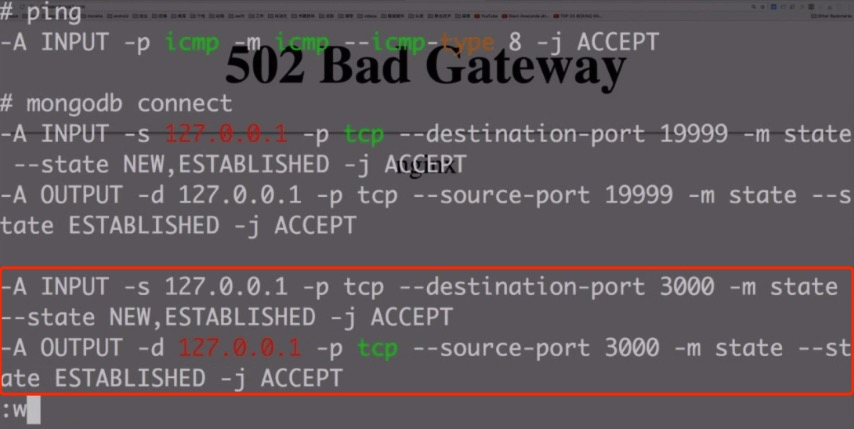
然后重启防火墙: sudo iptbles-restore < /etc/iptables.up.rules
PS: 也可以在阿里云的控制台上设置: https://help.aliyun.com/knowledge_detail/39922.html?spm=5176.13394938.0.0.2bda3ce4vcGqJY
然后就可以在服务器上访问该域名了。
===============
此外,修改代码后如何部署呢?
1.本地修改代码
2.上传到git库
3. 执行命令: pm2 deploy ecosystem.json production
刷新浏览器即可!
----------
部署新的项目,该项目带有数据库,
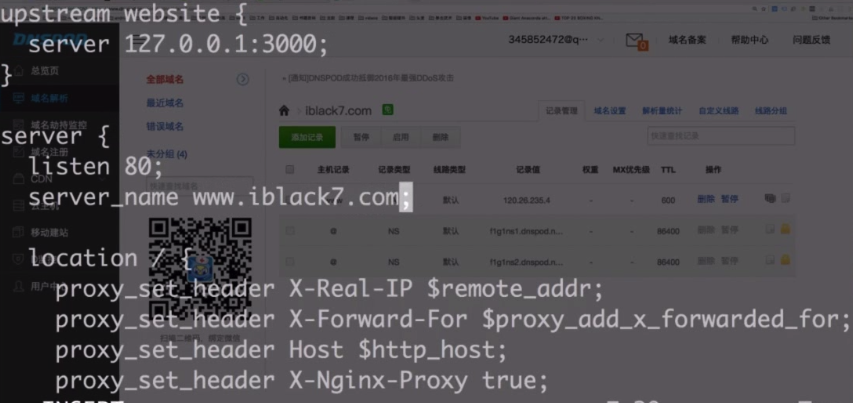
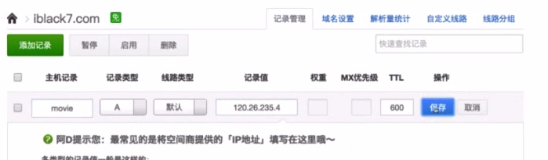
1 首先配置域名:这样用 movie.iblack7.com 来进行访问
2 确认新项目的端口是3001,和之前的3000用的是不同的端口
3. 修改数据库
var mongoose = require('mongoose);
//imooc_movie_runner 表示数据库用户名
//F**k9001$ 数据库的密码
//访问数据库的ip地址,因为是本地访问的,所以是 127.0.0.1:19999(数据库的端口号,这里做过修改,所以是19999)
//imooc-movie 是数据库的名字
var dbUrl = 'mongodb://imooc_movie_runner:F**k9001$@127.0.0.1:19999/imooc-movie'
if(env === 'development'){
  dbUrl = 'mongodb://localhost/imooc-movie'
}
mongoose.connect(dbUrl)
4 新建 ecosystem.json 文件:
{
  "apps":[{
    "name": "myblog", //部署的应用的名字
    "script": "app.js",//启动的入口脚本
    "env": {
      "COMMON_VARIABLE": "true"//启动时传入的变量
    },
    // Environment variables injected when starting with --env production
    // http://pm2.keymetrics.io/docs/usage/application-declaration/#switching-to-different-environments
    "env_production" : {
      "NODE_ENV": "production" //生产环境的变量
    }
  }],
  // Deployment part
  // Here you describe each environment
  "deploy" : { //部署的任务
    "production" : {
      "user" : "zyl", //服务器上用来发布的用户名
      // Multi host is possible, just by passing IPs/hostname as an array
      "host" : ["39.106.194.136"],//主机ip
    "port":"22",//端口号
// Branch
      "ref"  : "origin/master", //指定主分支master
      // Git repository to clone
      "repo" : "git@github.com:zhenyulei/server-blog.git", //仓库地址
      // Path of the application on target servers
      "path" : "/home/zyl/www/website/myblog", //把项目部署到服务器的那个目录下
      // Can be used to give options in the format used in the configura-
      // tion file.  This is useful for specifying options for which there
      // is no separate command-line flag, see 'man ssh'
      // can be either a single string or an array of strings
      "ssh_options": "StrictHostKeyChecking=no", //把ssh的key校验取消掉
      // To prepare the host by installing required software (eg: git)
      // even before the setup process starts
      // can be multiple commands separated by the character ";"
      // or path to a script on your local machine
      "pre-setup" : "",
      // Commands / path to a script on the host machine
      // This will be executed on the host after cloning the repository
      // eg: placing configurations in the shared dir etc
      "post-setup": "ls -la",
      // Commands to execute locally (on the same machine you deploy things)
      // Can be multiple commands separated by the character ";"
      "pre-deploy-local" : "echo 'This is a local executed command'",
      // Commands to be executed on the server after the repo has been cloned
      "post-deploy" : "npm install && npm run prd && pm2 startOrRestart ecosystem.json --env production", //项目发布到服务器上执行的命令
// Environment variables that must be injected in all applications on this env
      "env" : { "NODE_ENV": "production" } } }
}
注意这里要执行:
"post-deploy" : "npm install && npm run prd && pm2 startOrRestart ecosystem.json --env production", //项目发布到服务器上执行的命令
其中本地代码:
{
  "scripts": {
    "start": "node bin/www",
    "dev": "./node_modules/.bin/nodemon bin/www",
    "prd": "pm2 start bin/www",
    "test": "echo "Error: no test specified" && exit 1"
  }
}
如果本地执行的是
"post-deploy" : "npm install && npm start && pm2 startOrRestart ecosystem.json --env production",
提示8081端口被占用:
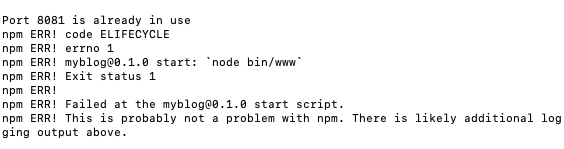
PM2用sudu是有权限的,但是执行命令的是由PM2fork出来的新进程进行处理,新进程是没有root权限的,所以,用启动文件的方式,让PM2自己去启动脚本。
所以执行脚本中,要使用 pm2 去开启服务。
"post-deploy" : "npm install && npm run prd && pm2 startOrRestart ecosystem.json --env production",
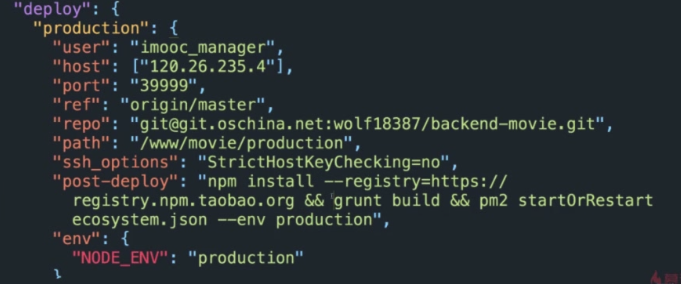
所以对应的要在服务器上新建一个movie的文件夹:
cd /www
ls
sudo mkdir movie
sudo chmod 777 -R movie //给当前用户授权
然后修改nginx的配置文件:新增一个movie的配置文件,复制原来的文件:
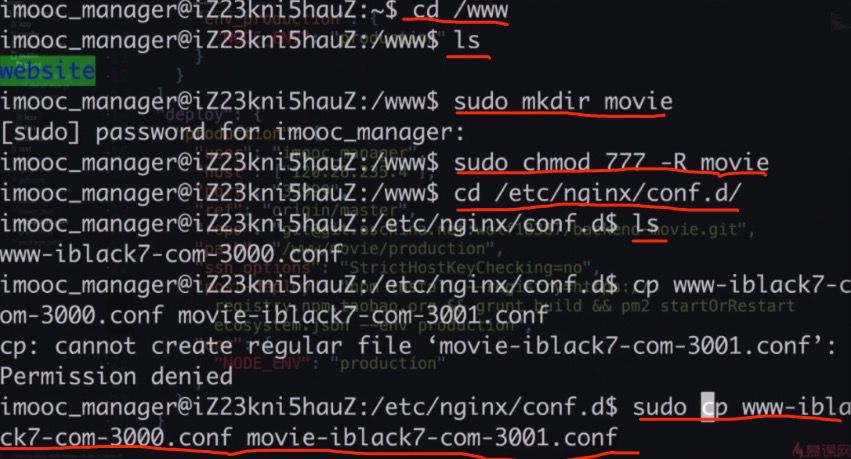
修改新增的配置文件:
sudo vi movie-iblack7-com-3001.conf
这里使用nginx 配置就是 监听服务器上所有访问 movie.iblack7.com:80 域名的访问,都引导到本机的3001 端口上,
注意的是可以新建多个配置i 文件,但是 server对象中的 server_name 不要一样 否则服务器会报警告,不知道该定位到那个端口上了。

保证本地修改代码提交之后
最后在本地执行:
pm2 deploy ecosystem.json production setup //第一次部署
pm2 deploy ecosystem.json production
发现movie重启了9次,说明有问题:

执行 pm2 logs 查看日志,发现mongodb连接错误:

首先停止掉该服务 pm2 stop Movie
在本地修改安装更新依赖后,重新部署: pm2 deploy ecosystem.json production
修改防火墙,允许从 nginx 转发的movie请求,转发到后端的3001端口
vi /etc/iptables.up.rules //修改防火墙配置
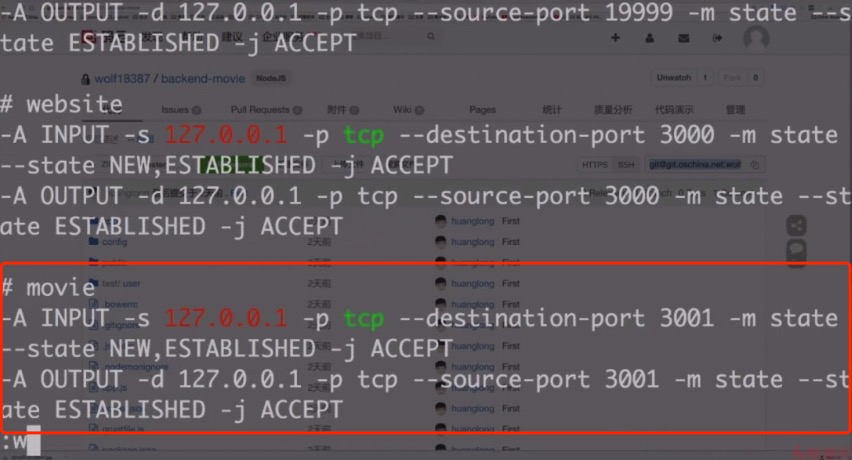
然后重启防火墙: sudo iptbles-restore < /etc/iptables.up.rules
重启nginx: sudo nginx -s reload
--------
如果本地执行
pm2 deploy ecosystem.json production
报错:
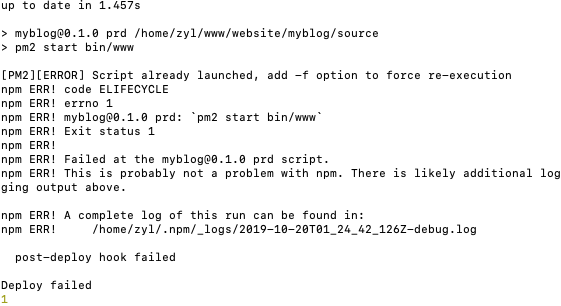
则需要在服务器端先关掉 pm2服务,然后在本地重新执行pm2 deploy ecosystem.json production 命名。
注意,代码库中忽略代码上传的文件是: .gitignore 名字一定不要写错!!!!
-----------------
网站上传代码后使用nginx进行压缩代码:
nginx开启gzip压缩功能遇到的坑
    gzip on;
    gzip_min_length 1k;
    gzip_buffers 4 16k;
    #gzip_http_version 1.0;
    gzip_comp_level 8;
    gzip_types text/plain application/javascript application/x-javascript text/css application/xml text/javascript application/x-httpd-php image/jpeg image/gif;
    gzip_vary off;
    gzip_disable "MSIE [1-6].";
========================
最后把协议改成https在视频的最后一章