react相关知识汇总
react的相关知识汇总
1. react的绑定事件
1.1 使用 bind 在 constructor 中绑定this;
1.2 使用箭头函数,因为箭头函数没有this,this指向当前实例;
1.3 event事件是react的模拟事件
1. event 是 SyntheticEvent ,模拟出来 DOM 事件所有能力
2. event.nativeEvent 是原生事件对象
3. currentTarget 所有的事件,都被挂载到 document 上
4. 和 DOM 事件不一样,和 Vue 事件也不一样
1.4 传参方式,最后追加一个event
import React from 'react'
class EventDemo extends React.Component {
    constructor(props) {
        super(props)
        this.state = {
            name: 'zhangsan',
            list: [
                {
                    id: 'id-1',
                    title: '标题1'
                },
                {
                    id: 'id-2',
                    title: '标题2'
                },
                {
                    id: 'id-3',
                    title: '标题3'
                }
            ]
        }
        // 修改方法的 this 指向,只用执行一次即可,不用在render中加bind,否则每次渲染组件都去绑定this
        this.clickHandler1 = this.clickHandler1.bind(this)
    }
    render() {
        // // this - 使用 bind
        // return <p onClick={this.clickHandler1}>
        //     {this.state.name}
        // </p>
        // // this - 使用静态方法
        // return <p onClick={this.clickHandler2}>
        //     clickHandler2 {this.state.name}
        // </p>
        // // event
        // return <a href="https://imooc.com/" onClick={this.clickHandler3}>
        //     click me
        // </a>
        // 传递参数 - 用 bind(this, a, b)
        return <ul>{this.state.list.map((item, index) => {
            return <li key={item.id} onClick={this.clickHandler4.bind(this, item.id, item.title)}>
                index {index}; title {item.title}
            </li>
        })}</ul>
    }
    clickHandler1() {
        // console.log('this....', this) // this 默认是 undefined
        this.setState({
            name: 'lisi'
        })
    }
    // 静态方法,this 指向当前实例
    clickHandler2 = () => {
        this.setState({
            name: 'lisi'
        })
    }
    // 获取 event
    clickHandler3 = (event) => {
        event.preventDefault() // 阻止默认行为
        event.stopPropagation() // 阻止冒泡
        console.log('target', event.target) // 指向当前元素,即当前元素触发
        console.log('current target', event.currentTarget) // 指向当前元素,假象!!!
        // 注意,event 其实是 React 封装的。可以看 __proto__.constructor 是 SyntheticEvent 组合事件
        console.log('event', event) // 不是原生的 Event ,原生的 MouseEvent
        console.log('event.__proto__.constructor', event.__proto__.constructor)
        // 原生 event 如下。其 __proto__.constructor 是 MouseEvent
        console.log('nativeEvent', event.nativeEvent)
        console.log('nativeEvent target', event.nativeEvent.target)  // 指向当前元素,即当前元素触发
        console.log('nativeEvent current target', event.nativeEvent.currentTarget) // 指向 document !!!
        // 1. event 是 SyntheticEvent ,模拟出来 DOM 事件所有能力
        // 2. event.nativeEvent 是原生事件对象
        // 3. 所有的事件,都被挂载到 document 上
        // 4. 和 DOM 事件不一样,和 Vue 事件也不一样
    }
    // 传递参数
    clickHandler4(id, title, event) {
        console.log(id, title)
        console.log('event', event) // 最后追加一个参数,即可接收 event
    }
}
export default EventDemo
表单组件【受控组件】
- render中 设置 value、onChange事件
render(){
  return
  <div>
      <p>{this.state.name}</p>
      <label htmlFor="inputName">姓名:</label> {/* 用 htmlFor 代替 for */}
      <input id="inputName" value={this.state.name} onChange={this.onInputChange}/>
  </div>
}
onInputChange = (e) => { //这里使用了箭头函数,否则使用bind绑定this
    this.setState({
        name: e.target.value
    })
}
其他表单组件
// select - 使用 value
return <div>
    <select value={this.state.city} onChange={this.onSelectChange}>
        <option value="beijing">北京</option>
        <option value="shanghai">上海</option>
        <option value="shenzhen">深圳</option>
    </select>
    <p>{this.state.city}</p>
</div>

// checkbox
return <div>
    <input type="checkbox" checked={this.state.flag} onChange={this.onCheckboxChange}/>
    <p>{this.state.flag.toString()}</p>
</div>

// radio
return <div>
    male <input type="radio" name="gender" value="male" checked={this.state.gender === 'male'} onChange={this.onRadioChange}/>
    female <input type="radio" name="gender" value="female" checked={this.state.gender === 'female'} onChange={this.onRadioChange}/>
    <p>{this.state.gender}</p>
</div>
props的类型检查
import React from 'react';
import PropTypes from 'prop-types';
class List extends React.Component{
  constructor(props){
    super(props);
    this.state = {
        title: ''
    }
  }
  render() {}
}
List.propTypes = {
  list:PropTypes.arrayof(PropTypes.object).isRequired
}
父组件中向子组件中传递参数
- 传递参数(相当于vue中的props)
- 传递函数(相当于vue中的监听事件:@evntClick)
例如父组件中定义:
render() {
  return <div>
      <Input submitTitle={this.onSubmitTitle}/>{/*父组件中给子组件传入的函数props,相当于vue中父组件的监听函数*/}
      <List list={this.state.list}/>{/*这里是给子组件传递的props*/}
  </div>
}
在子组件 input中定义
class Input extends React.Component {
    constructor(props) {
        super(props)
        this.state = {
            title: ''
        }
    }
    render() {
        return <div>
            <input value={this.state.title} onChange={this.onTitleChange}/>
            <button onClick={this.onSubmit}>提交</button>
        </div>
    }
    onTitleChange = (e) => {
        this.setState({
            title: e.target.value
        })
    }
    onSubmit = () => {
        const { submitTitle } = this.props
        submitTitle(this.state.title) // 相当于vue的 $.emit('submitTitle',this.state.title)
        this.setState({
            title: ''
        })
    }
}
setState
state的初始化放在 constructor 中,函数组件,默认没有state;
class StateDemo extends React.Component {
    constructor(props) {
        super(props)
        // 第一,state 要在构造函数中定义
        this.state = {
            count: 0
        }
    }
}
1. 不可变值,不能改变state本身
对比:Vue中可以直接对data数据赋值,但是监听数组发生变化,不能直接改变数组的值。而react中不要直接改变state的值,不但无法实现页面的渲染,而且也会影响性能
如 this.state.count++
// 不可变值(函数式编程,纯函数) - 数组
const list5Copy = this.state.list5.slice()//生成副本(算是浅拷贝)
list5Copy.splice(2, 0, 'a') // 中间插入/删除
this.setState({
    list1: this.state.list1.concat(100), // 追加
    list2: [...this.state.list2, 100], // 追加
    list3: this.state.list3.slice(0, 3), // 截取。slice也不影响原来的数据
    list4: this.state.list4.filter(item => item > 100), // 筛选
    list5: list5Copy // 其他操作
})
// 注意,不能直接对 this.state.list 进行 push pop splice 等,这样违反不可变值
// 比如 push 操作就改变了state.list的值,一定要记得如果要改变 state 的值,使用this.setState方法
// 不可变值 - 对象
this.setState({
    obj1: Object.assign({}, this.state.obj1, {a: 100}),
    obj2: {...this.state.obj2, a: 100}
})
// 注意,不能直接对 this.state.obj 进行属性设置,这样违反不可变值
- 可能是异步更新
2.1 直接定义是异步的
this.setState({
    count: this.state.count + 1
}, () => {
    // 联想 Vue $nextTick - DOM
    console.log('count by callback', this.state.count) // 回调函数中可以拿到最新的 state
})
console.log('count', this.state.count) // 异步的,拿不到最新值
2.2 在setTimeout中是同步的
// setTimeout 中 setState 是同步的
setTimeout(() => {
    this.setState({
        count: this.state.count + 1
    })
    console.log('count in setTimeout', this.state.count)
}, 0)
2.3 自定义的事件状态是同步的
bodyClickHandler = () => {
    this.setState({
        count: this.state.count + 1
    })
    console.log('count in body event', this.state.count)
}
componentDidMount() {
    // 自己定义的 DOM 事件,setState 是同步的
    document.body.addEventListener('click', this.bodyClickHandler)
}
componentWillUnmount() {
    // 及时销毁自定义 DOM 事件
    document.body.removeEventListener('click', this.bodyClickHandler)
    // clearTimeout
}
- 可能会被合并
类似于vue,改变状态是异步的,放在了 this.$nextTick 中,待页面中同步事件完成后,才去执行异步函数,而多次定义同一个状态数据,相当于后面的会覆盖前面数据。
// 传入对象,会被合并(类似 Object.assign )。执行结果只一次 +1
this.setState({
    count: this.state.count + 1
})
this.setState({
    count: this.state.count + 1
})
this.setState({
    count: this.state.count + 1
})
传入函数,不会被合并。执行结果是 +3,类似于vue中定义data用的也是函数,函数不会被合并,因为函数是一段可执行的代码。
this.setState((prevState, props) => {
    return {
        count: prevState.count + 1
    }
})
this.setState((prevState, props) => {
    return {
        count: prevState.count + 1
    }
})
this.setState((prevState, props) => {
    return {
        count: prevState.count + 1
    }
})
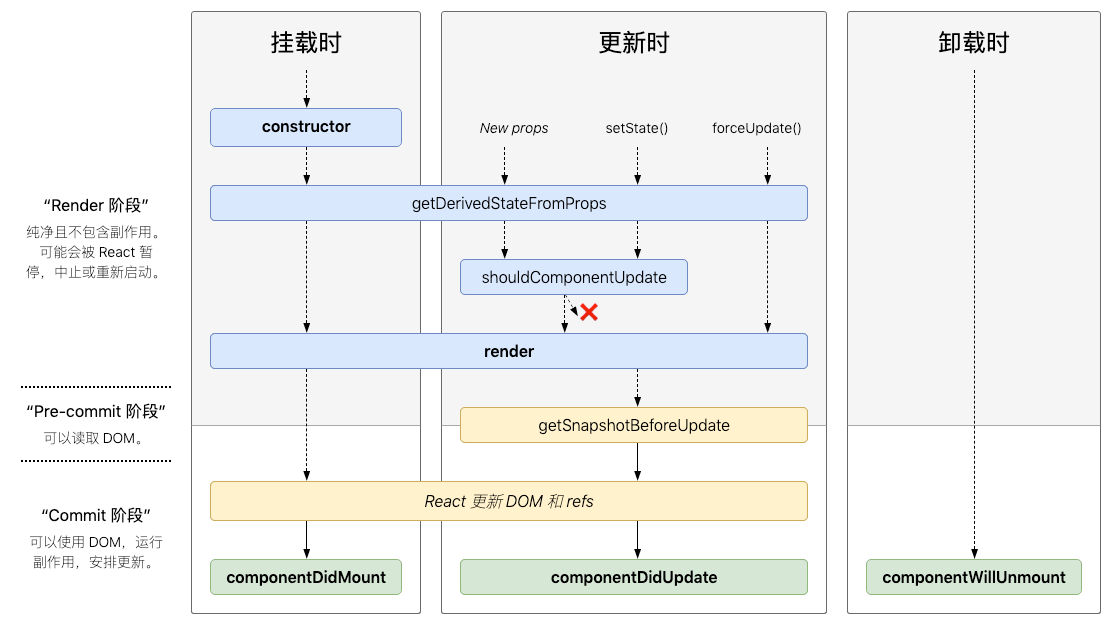
react的生命周期
函数组件
函数组件特点:
- 纯函数,输入props,输出jsx;
- 没有实例,没有生命周期,没有state,
- 不能扩展其他方法
function List(props){
  const {list} = this.props;
  return
  <ul>{list.map((item,index)=>{
    return
      <li key={item.id}>
        <span>{item.title}</span>
      </li>
    })
  }
  </ul>
}
非受控组件
区别于受控组件:
render(){
  return
  <div>
      <p>{this.state.name}</p>
      <label htmlFor="inputName">姓名:</label> {/* 用 htmlFor 代替 for */}
      <input id="inputName" value={this.state.name} onChange={this.onInputChange}/>
  </div>
}
onInputChange = (e) => { //这里使用了箭头函数,否则使用bind绑定this
    this.setState({
        name: e.target.value
    })
}
非受控组件:
- ref
- defaultValue-defaultChecked
- 手动操作DOM元素
下面的示例:没有设置onChange事件,所以文本中的state不会随着input传入的参数而变化;但是可以根据ref,获取dom的数据;
state.name 只是给input赋值了初始值,input输入并不会改变 state.name
import React from 'react'

class App extends React.Component {
    constructor(props) {
        super(props)
        this.state = {
            name: 'xx',
            flag: true,
        }
        this.nameInputRef = React.createRef() // 创建 ref
        this.fileInputRef = React.createRef()
    }
    render() {
        // input defaultValue
        // return <div>
        //     {/* 使用 defaultValue 而不是 value ,使用 ref */}
        //     <input defaultValue={this.state.name} ref={this.nameInputRef}/>
        //     {/* state 并不会随着改变 */}
        //     <span>state.name: {this.state.name}</span>
        //     <br/>
        //     <button onClick={this.alertName}>alert name</button>
        // </div>
        // // checkbox defaultChecked
        // return <div>
        //     <input
        //         type="checkbox"
        //         defaultChecked={this.state.flag}
        //     />
        // </div>
        // file文件上传功能,实用场景,必须手动操作DOM,
        return <div>
            <input type="file" ref={this.fileInputRef}/>
            <button onClick={this.alertFile}>alert file</button>
        </div>
    }
    alertName = () => {
        const elem = this.nameInputRef.current // 通过 ref 获取 DOM 节点
        alert(elem.value) // 不是 this.state.name
    }
    alertFile = () => {
        const elem = this.fileInputRef.current // 通过 ref 获取 DOM 节点
        alert(elem.files[0].name)
    }
}
export default App
受控组件VS非受控组件:
- 优先使用受控组件,符合React设计原则;
- 必须操作DOM时,再使用非受控组件;
Portals
- 组件默认会按照既定层次嵌套渲染;
- 如何让组件渲染到父组件以外?
PS : this.props.children相当于vue的slot,可以获取父组件中两个标签中的内容
父组件调用:
render(){
  return (
    <PortalsDemo>Modal 内容</PortalsDemo>
  )
}
子组件:
import React from 'react'
import ReactDOM from 'react-dom'
import './style.css'
class App extends React.Component {
    constructor(props) {
        super(props)
    }
    render() {
        // 正常渲染
        return <div className="modal">
            {this.props.children} {/* vue slot */}
        </div>
        使用 Portals 渲染到 body 上。
        fixed 元素要放在 body 上,有更好的浏览器兼容性。
    }
}
export default App
对应的css,该弹窗是一个fixed固定位置:
.modal {
    position: fixed;
     300px;
    height: 100px;
    top: 100px;
    left: 50%;
    margin-left: -150px;
    background-color: #000;
    /* opacity: .2; */
    color: #fff;
    text-align: center;
}
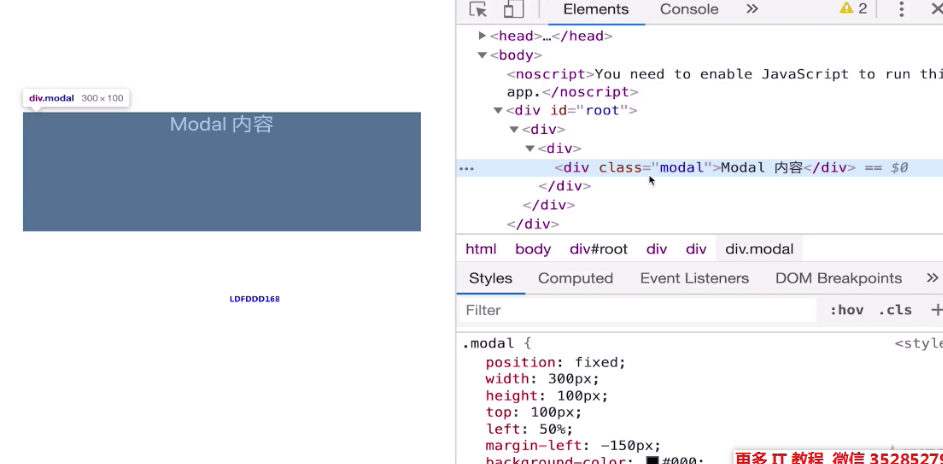
可以看到图片层级在组件中层层嵌套,过深,所以如何将其放在最外层呢?
import React from 'react'
import ReactDOM from 'react-dom'//增加这里++
import './style.css'
class App extends React.Component {
    constructor(props) {
        super(props)
    }
    render() {
        return ReactDOM.createPortal(//createPortal
            <div className="modal">{this.props.children}</div>,
            document.body // 加载到哪个 DOM 节点
        )
    }
}
export default App
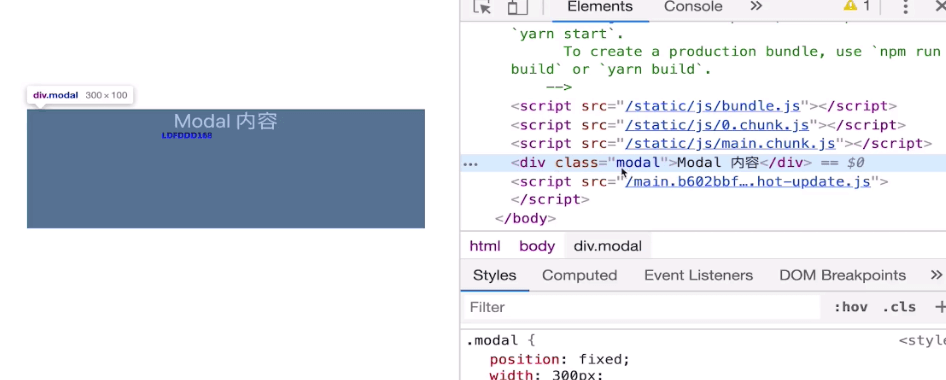
有图可以看出,该弹窗虽然放在了子组件中,但是已经hack到body层去了。
使用场景:
-
- 父组件使用了 oveflow:hidden;
联想起在PC端plus会员的react中,头部卡片的气泡,使用position超出了本身的层级,使用 Portals 可以轻松外迁移该气泡组件。
- 父组件使用了 oveflow:hidden;
-
- 父组件z-index值太小
-
- fixed 需要放在 body 第一层
context
- 公共信息(语言、主题)如何传递给各个组件?
- 用props 太繁琐
- 用 redux 小题大做 ,本身没有什么逻辑,只是一些变量的传递
import React from 'react'
// 创建 Context 填入默认值(任何一个 js 变量)
const ThemeContext = React.createContext('light')
class App extends React.Component {
    constructor(props) {
        super(props)
        this.state = {
            theme: 'light'
        }
    }
    render() { //那些组件使用 context ,则在其外层包裹 ThemeContext 组件
        return
        <ThemeContext.Provider value={this.state.theme}>
            <Toolbar />
            <hr/>
            <button onClick={this.changeTheme}>change theme</button>
        </ThemeContext.Provider>
    }
    changeTheme = () => {
        this.setState({ //父组件中统一修改 theme
            theme: this.state.theme === 'light' ? 'dark' : 'light'
        })
    }
}
export default App
Toolbar 组件没有使用context:
// 中间的组件再也不必指明往下传递 theme 了。
function Toolbar(props) {
    return (
        <div>
            <ThemedButton />
            <ThemeLink />
        </div>
    )
}
孙子组件:
// 底层组件 - class 组件
class ThemedButton extends React.Component {
    // 指定 contextType 读取当前的 theme context。
    // static contextType = ThemeContext // 也可以用 ThemedButton.contextType = ThemeContext
    render() {
        const theme = this.context // React 会往上找到最近的 theme Provider,然后使用它的值。
        return <div>
            <p>button's theme is {theme}</p>
        </div>
    }
}
ThemedButton.contextType = ThemeContext // 指定 contextType 读取当前的 theme context。
对于函数组件,没有实例,没有this
// 底层组件 - 函数是组件
function ThemeLink (props) {
    // const theme = this.context // 会报错。函数式组件没有实例,即没有 this
    // 函数式组件可以使用 Consumer
    return <ThemeContext.Consumer>
        { value => <p>link's theme is {value}</p> }
    </ThemeContext.Consumer>
}
异步组件
import React from 'react'
const ContextDemo = React.lazy(() => import('./ContextDemo'))
class App extends React.Component {
    constructor(props) {
        super(props)
    }
    render() {
        return <div>
            <p>引入一个动态组件</p>
            <hr />
            <React.Suspense fallback={<div>Loading...</div>}>
                <ContextDemo/>
            </React.Suspense>
        </div>
        // 1. 强制刷新,可看到 loading (看不到就限制一下 chrome 网速)
        // 2. 看 network 的 js 加载
    }
}
export default App
react 的性能优化
- shouldComponentUpdate(简称SCU)
- PureComponent 和 React.memo
- 不可变值 immutable.js
shouldComponentUpdate 的基本方法
react默认:父组件更新,子组件无条件也更新
shouldComponentUpdate(nextProps,nextState){
  if(nextState.count !== this.state.count){
    return true; //可以渲染
  }
  return false; //不重复渲染
}
为啥 React 不在 SCU 中默认比较前后数据不相同再去渲染页面?
例如,react中用下面的方式在SCU中深度比较:
import _ from 'lodash'
// 增加 shouldComponentUpdate
shouldComponentUpdate(nextProps, nextState) {
    // _.isEqual 做对象或者数组的深度比较(一次性递归到底),耗费性能,不建议使用,推荐使用浅度比较:PureComponent
    if (_.isEqual(nextProps.list, this.props.list)) {
        // 相等,则不重复渲染
        return false
    }
    return true // 不相等,则渲染
}
如果在父组件中用户这样去写:
// 为了演示 SCU ,故意写的错误用法
this.state.list.push({
    id: `id-${Date.now()}`,
    title
})
this.setState({
    list: this.state.list
})
这样先改变list,再赋值给list。
nextProps.list和this.props.list则永远相等,SCU导致页面不再渲染!!引起严重的BUG!!
所以在SCU中 react 不能去做深度比较,但是建议用户 react的data一定不要改变原来的data数据,而是在新的数据基础上改动。这样SCU则可以用来深度比较,性能优化!
// 注意,不能直接对 this.state.list 进行 push pop splice 等,这样违反不可变值
// 比如 push 操作就改变了state.list的值,一定要记得如果要改变 state 的值,使用this.setState方法
PureComponent 和 memo
因为在SCU中中使用深度比较,会带来性能问题,所以react推荐使用浅比较,用户的数据对应的也要设置成简单的数据;
PureComponent,在SCU中实现了浅比较
memo,函数组件中的PureComponent
浅比较已使用大部分情况,数据做扁平化处理
class List extends React.PureComponent {
    constructor(props) {
        super(props)
    }
    render() {
        const { list } = this.props
        return <ul>{list.map((item, index) => {
            return <li key={item.id}>
                <span>{item.title}</span>
            </li>
        })}</ul>
    }
    shouldComponentUpdate() {/*在PureComponent中默认设置了浅比较*/}
}
immutable.js
- 彻底拥抱"不可变值"
- 基于共享数据,但不是深拷贝(深拷贝性能不好),速度好
- 有一定学习和迁移成本,按需使用
const map1 = Immutable.Map({a:1,b:2});
const map2 = map1.set('b',50)
map1.get('b'); //2
map2.get('b'); //50
高阶组件
HOC 和 render props
两个方式都是抽离公共逻辑;
1. HOC 简单示例:
//高阶组件不是一种功能,而是一种模式
const HOCFactory = (Component)=>{
  class HOC extendes React.Component {
    //在此定义多个组件的公共逻辑
    render(){ //返回拼装的结果,带上原组件的props
      return <Component {...this.props}/>
    }
  }
  return HOC
}
const EnhanceComponent1 = HOCFactory(component1);
const EnhanceComponent2 = HOCFactory(component2);
实际使用例子,在页面中显示鼠滑动过的坐标:
import React from 'react'

// 高阶组件
const withMouse = (Component) => {
    class withMouseComponent extends React.Component {
        constructor(props) {
            super(props)
            this.state = { x: 0, y: 0 }
        }
        handleMouseMove = (event) => {
            this.setState({
                x: event.clientX,
                y: event.clientY
            })
        }

        render() {
            return (
                <div style={{ height: '500px' }} onMouseMove={this.handleMouseMove}>
                    {/* 1. 透传所有 props 2. 增加 mouse 属性 */}
                    <Component {...this.props} mouse={this.state}/>
                </div>
            )
        }
    }
    return withMouseComponent
}

const App = (props) => {
    const a = props.a
    const { x, y } = props.mouse // 接收 mouse 属性
    return (
        <div style={{ height: '500px' }}>
            <h1>The mouse position is ({x}, {y})</h1>
            <p>{a}</p>
        </div>
    )
}

export default withMouse(App) // 返回高阶函数
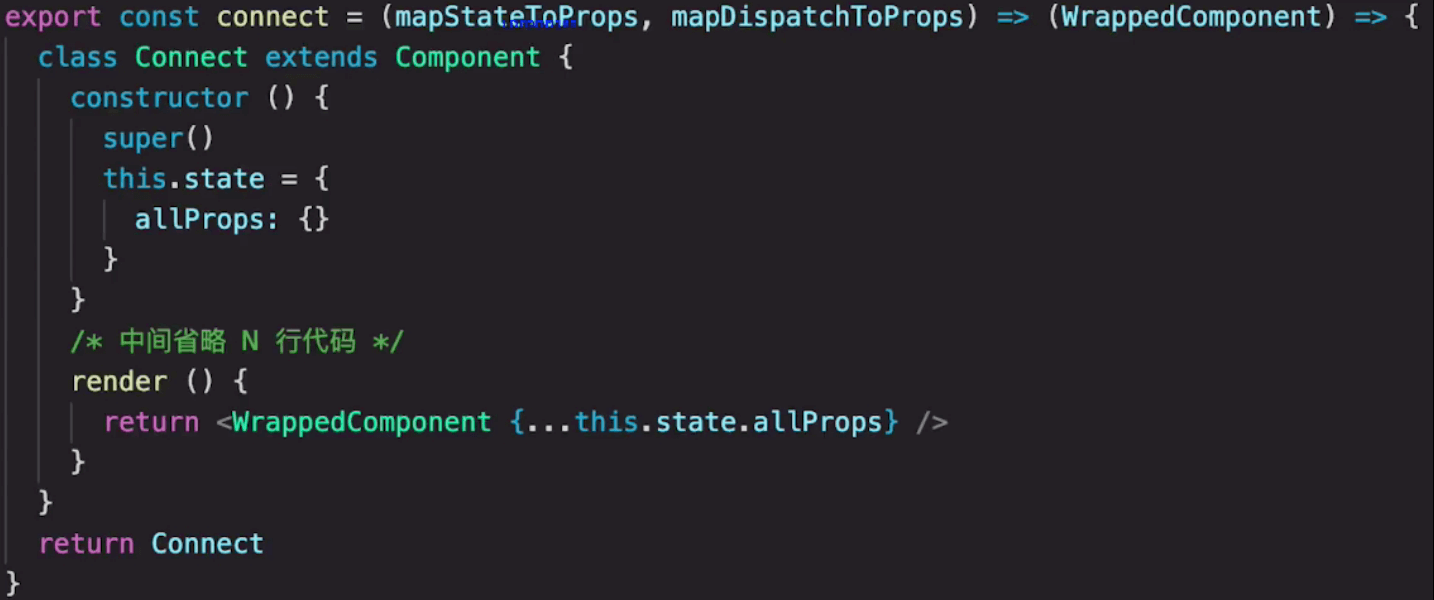
实际应用中,redux中的connect就是一个高阶组件:
import { connect } from 'react-redux'
//connect 是高阶组件
const VisibleTodoList = connect(
  mapStateToProps,
  mapDIspatchToProps
)(TodoList)
export default VisibleTodoList;
2. render Props
import React from 'react'
import PropTypes from 'prop-types'

class Mouse extends React.Component {
    constructor(props) {
        super(props)
        this.state = { x: 0, y: 0 }
    }

    handleMouseMove = (event) => {
      this.setState({
        x: event.clientX,
        y: event.clientY
      })
    }

    render() {
      return (
        <div style={{ height: '500px' }} onMouseMove={this.handleMouseMove}>
            {/* 将当前 state 作为 props ,传递给 render (render 是一个函数组件) */}
            {this.props.render(this.state)}
        </div>
      )
    }
}
Mouse.propTypes = {
    render: PropTypes.func.isRequired // 必须接收一个 render 属性,而且是函数
}

const App = (props) => (
    <div style={{ height: '500px' }}>
        <p>{props.a}</p>
        <Mouse render={
            /* render 是一个函数组件 */
            ({ x, y }) => <h1>The mouse position is ({x}, {y})</h1>
        }/>

    </div>
)

/**
 * 即,定义了 Mouse 组件,只有获取 x y 的能力。
 * 至于 Mouse 组件如何渲染,App 说了算,通过 render prop 的方式告诉 Mouse 。
 */

export default App
高阶组件
Parent(Child)
//Parent、Child 都是一个函数
//Parent 中定义返回组件
const Parent = (Component) => {
  class ParentComponent extends React.Component {
      render(){
        //Parent 中定义公共逻辑
        return <Component {...props}/>
      }
  }
  return ParentComponent
}

const Child = (props)=>{
  return (
    <div>props.x</div>
  )
}
const Child2 = (props)=>{
  return (
    <div>my name is {props.x}</div>
  )
}
export default Parent(Child)
render props
//Child 中定义公共逻辑
class Child extends React.Component {
    render() {
      return (
        <div>
            {this.props.render(this.state)}
        </div>
      )
    }
}

const Parent = (props) => (
  <Child render={
      ({ x, y }) => <h1>is ({x}, {y})</h1>
  }/>
)
const Parent2 = (props) => (
  <Child render={
      ({ x }) => <h1>my is ({x})</h1>
  }/>
)
export default Parent