Shiro
什么是 Shiro
是一款主流的 Java 安全框架,不依赖任何容器,可以运行在 Java SE 和 Java EE 项目中,它的主要作用是对访问系统的用户进行身份认证、授权、会话管理、加密等操作。
Shiro 就是用来解决安全管理的系统化框架。
Shiro 核心组件
用户、角色、权限
会给角色赋予权限,给用户赋予角色
1、UsernamePasswordToken,Shiro 用来封装用户登录信息,使用用户的登录信息来创建令牌 Token。
2、SecurityManager,Shiro 的核心部分,负责安全认证和授权。
3、Suject,Shiro 的一个抽象概念,包含了用户信息。
4、Realm,开发者自定义的模块,根据项目的需求,验证和授权的逻辑全部写在 Realm 中。
5、AuthenticationInfo,用户的角色信息集合,认证时使用。
6、AuthorzationInfo,角色的权限信息集合,授权时使用。
7、DefaultWebSecurityManager,安全管理器,开发者自定义的 Realm 需要注入到 DefaultWebSecurityManager 进行管理才能生效。
8、ShiroFilterFactoryBean,过滤器工厂,Shiro 的基本运行机制是开发者定制规则,Shiro 去执行,具体的执行操作就是由 ShiroFilterFactoryBean 创建的一个个 Filter 对象来完成。
Spring Boot 整合 Shiro
1、创建 Spring Boot 应用,集成 Shiro 及相关组件,pom.xml
<dependencies>
        <dependency>
            <groupId>org.apache.shiro</groupId>
            <artifactId>shiro-spring</artifactId>
            <version>1.6.0</version>
        </dependency>

        <dependency>
            <groupId>mysql</groupId>
            <artifactId>mysql-connector-java</artifactId>
        </dependency>
        <dependency>
            <groupId>com.baomidou</groupId>
            <artifactId>mybatis-plus-boot-starter</artifactId>
            <version>3.3.2</version>
        </dependency>

        <dependency>
            <groupId>org.springframework.boot</groupId>
            <artifactId>spring-boot-starter-thymeleaf</artifactId>
        </dependency>
        <dependency>
            <groupId>org.springframework.boot</groupId>
            <artifactId>spring-boot-starter-web</artifactId>
        </dependency>

        <dependency>
            <groupId>org.projectlombok</groupId>
            <artifactId>lombok</artifactId>
            <optional>true</optional>
        </dependency>
        <dependency>
            <groupId>org.springframework.boot</groupId>
            <artifactId>spring-boot-starter-test</artifactId>
            <scope>test</scope>
            <exclusions>
                <exclusion>
                    <groupId>org.junit.vintage</groupId>
                    <artifactId>junit-vintage-engine</artifactId>
                </exclusion>
            </exclusions>
        </dependency>
    </dependencies>
2、数据库建表
CREATE DATABASE `shiro` ;

USE `shiro`;

DROP TABLE IF EXISTS `account`;

CREATE TABLE `account` (
  `id` int(10) NOT NULL AUTO_INCREMENT,
  `username` varchar(50) DEFAULT NULL,
  `password` varchar(50) DEFAULT NULL,
  `perms` varchar(50) DEFAULT NULL,
  `role` varchar(50) DEFAULT NULL,
  PRIMARY KEY (`id`)
) ENGINE=InnoDB AUTO_INCREMENT=4 DEFAULT CHARSET=utf8;

insert  into `account`(`id`,`username`,`password`,`perms`,`role`) values (1,'zs','123123',NULL,NULL),(2,'ls','123123','manage',NULL),(3,'ww','123123','manage','administrator');
3、编辑配置文件,把原有的配置文件application.properties改名改成application.yml
server:
  port: 8080
spring:
  datasource:
    username: root
    password: root
    driver-class-name: com.mysql.cj.jdbc.Driver
    url: jdbc:mysql://localhost:3306/shiro?useUnicode=true&characterEncoding=UTF-8&serverTimezone=Asia/Shanghai
  thymeleaf:
    prefix: classpath:/templates/
    suffix: .html
    mode: HTML
    encoding: UTF-8

mybatis-plus:
  configuration:
    log-impl: org.apache.ibatis.logging.stdout.StdOutImpl
4、创建entity包,创建Account实体类
import lombok.Data;

/**
 * @author ximensama
 */
@Data
public class Account {
    private int id;
    private String username;
    private String password;
    private String perms;
    private String role;
}
5、创建mapper包,创建mapper接口
import com.baomidou.mybatisplus.core.mapper.BaseMapper;

import org.springframework.stereotype.Repository;

/**
 * @author ximensama
 */
@Repository
public interface AccountMapper extends BaseMapper<Account> {
}
注意在springboot启动类上加上注解开启包扫描@MapperScan("com.ximen.mapper")
6、创建service包,创建AccountService接口
/**
 * @author ximensama
 */
public interface AccountService {

    Account findByName(String username);

}
7、在service包下创建实现类impl包,创建AccountServiceImpl实现类
import com.baomidou.mybatisplus.core.conditions.query.QueryWrapper;
import org.springframework.beans.factory.annotation.Autowired;
import org.springframework.stereotype.Service;

/**
 * @author ximensama
 */
@Service
public class AccountServiceImpl implements AccountService {

    @Autowired
    private AccountMapper accountMapper;

    @Override
    public Account findByName(String username) {
        return accountMapper.selectOne(new QueryWrapper<Account>().eq("username", username));
    }
}
8、创建realm包,创建AccountRealm类自定义 Shiro 过滤器
import org.apache.shiro.SecurityUtils;
import org.apache.shiro.authc.*;
import org.apache.shiro.authz.AuthorizationInfo;
import org.apache.shiro.authz.SimpleAuthorizationInfo;
import org.apache.shiro.realm.AuthorizingRealm;
import org.apache.shiro.subject.PrincipalCollection;
import org.apache.shiro.subject.Subject;
import org.springframework.beans.factory.annotation.Autowired;

import java.util.HashSet;

/**
 * @author ximensama
 */
public class AccountRealm extends AuthorizingRealm {

    @Autowired
    private AccountService accountService;

    //再授权
    @Override
    protected AuthorizationInfo doGetAuthorizationInfo(PrincipalCollection principalCollection) {
        //获取用户信息
        Subject subject = SecurityUtils.getSubject();
        Account account = (Account) subject.getPrincipal();

        //设置角色
        HashSet<String> roles = new HashSet<>();
        roles.add(account.getRole());
        SimpleAuthorizationInfo info = new SimpleAuthorizationInfo(roles);

        //设置权限
        info.addStringPermission(account.getPerms());

        return info;
    }


    //先认证
    @Override
    protected AuthenticationInfo doGetAuthenticationInfo(AuthenticationToken authenticationToken) throws AuthenticationException {
        UsernamePasswordToken token = (UsernamePasswordToken) authenticationToken;
        Account account = accountService.findByName(token.getUsername());
        if (account != null){
            return new SimpleAuthenticationInfo(account,account.getPassword(),getName());
        }
        return null;
    }
}
9、创建config包,创建ShiroConfig配置类
import org.apache.shiro.spring.web.ShiroFilterFactoryBean;
import org.apache.shiro.web.mgt.DefaultWebSecurityManager;
import org.springframework.beans.factory.annotation.Qualifier;
import org.springframework.context.annotation.Bean;
import org.springframework.context.annotation.Configuration;

import java.util.Hashtable;
import java.util.Map;

/**
 * @author ximensama
 */
@Configuration
public class ShiroConfig {

    @Bean
    public ShiroFilterFactoryBean shiroFilterFactoryBean(@Qualifier("securityManager") DefaultWebSecurityManager manager){
        ShiroFilterFactoryBean factoryBean = new ShiroFilterFactoryBean();
        factoryBean.setSecurityManager(manager);

        //权限设置
        Map<String, String> map = new Hashtable<>();
        map.put("/main","authc");
        map.put("/manage","perms[manage]");
        map.put("/administrator","roles[administrator]");
        factoryBean.setFilterChainDefinitionMap(map);
        //设置登录页面
        factoryBean.setLoginUrl("/login");
        //设置未授权界面
        factoryBean.setUnauthorizedUrl("/unauthorized");
        return factoryBean;
    }


    @Bean
    public DefaultWebSecurityManager securityManager(@Qualifier("accountRealm") AccountRealm accountRealm){
        DefaultWebSecurityManager manager = new DefaultWebSecurityManager();
        manager.setRealm(accountRealm);
        return manager;
    }

    @Bean
    public AccountRealm accountRealm(){
        return new AccountRealm();
    }
}
编写认证和授权规则:
认证过滤器
anon:无需认证。
authc:必须认证。
authcBasic:需要通过 HTTPBasic 认证。
user:不一定通过认证,只要曾经被 Shiro 记录即可,比如:记住我。
授权过滤器
perms:必须拥有某个权限才能访问。
roles:必须拥有某个角色才能访问。
port:请求的端口必须是指定值才可以。
rest:请求必须基于 RESTful,POST、PUT、GET、DELETE。
ssl:必须是安全的 URL 请求,协议 HTTPS。
创建 3 个页面,main.html、manage.html、administrator.html
访问权限如下:
1、必须登录才能访问 main.html
2、当前用户必须拥有 manage 授权才能访问 manage.html
3、当前用户必须拥有 administrator 角色才能访问 administrator.html
10、创建controller包,创建AccountController控制器
import org.apache.shiro.SecurityUtils;
import org.apache.shiro.authc.IncorrectCredentialsException;
import org.apache.shiro.authc.UnknownAccountException;
import org.apache.shiro.authc.UsernamePasswordToken;
import org.apache.shiro.subject.Subject;
import org.springframework.stereotype.Controller;
import org.springframework.web.bind.annotation.GetMapping;
import org.springframework.web.bind.annotation.PathVariable;
import org.springframework.web.bind.annotation.PostMapping;
import org.springframework.web.bind.annotation.ResponseBody;

/**
 * @author ximensama
 */
@Controller
public class AccountController {

    @GetMapping("/{url}")
    public String url(@PathVariable String url){
        return url;
    }

    @PostMapping("/login")
    public String login(String username, String password){
        Subject subject = SecurityUtils.getSubject();
        UsernamePasswordToken token = new UsernamePasswordToken(username, password);
        try {
            subject.login(token);
            return "index";
        } catch (UnknownAccountException e) {
            //用户名错误
            System.out.println("用户名错误:"+e.getMessage());
        } catch (IncorrectCredentialsException e) {
            //密码错误
            System.out.println("密码错误:"+e.getMessage());
        }
        return "login";
    }

	//未授权拦截显示页面
    @GetMapping("/unauthorized")
    @ResponseBody
    public String unauthorized(){
        return "<link rel=\"shortcut icon\" href=\"#\"/>未授权,请登录!";
    }

    //退出登录
    @GetMapping("/logout")
    public String logout(){
        Subject subject = SecurityUtils.getSubject();
        subject.logout();
        return "index";
    }
}
3、创建index.html、login.html、main.html、manage.html、administrator.html作为shiro权限测试
注:如果页面没有
<link rel="shortcut icon" href="#"/>
这句,就会报错xxxicon错误什么的
- index.html
<!DOCTYPE html>
<html lang="en">
<head>
    <meta charset="UTF-8">
    <title>Title</title>
    <link rel="shortcut icon" href="#"/>
</head>
<body>
<a href="main">main</a> | <a href="manage">manage</a> | <a href="administrator">administrator</a>
</body>
</html>
- login.html
<!DOCTYPE html>
<html lang="en">
<head>
    <meta charset="UTF-8">
    <title>Title</title>
    <link rel="shortcut icon" href="#"/>
</head>
<body>
<h1>Login</h1>
<form action="/login" method="post">
    <table>
        <tr>
            <td>用户名</td>
            <td>
                <label>
                    <input type="text" name="username"/>
                </label>
            </td>
        </tr>
        <tr>
            <td>密码</td>
            <td>
                <label>
                    <input type="password" name="password"/>
                </label>
            </td>
        </tr>
        <tr>
            <td>提交</td>
            <td>
                <label>
                    <input type="submit"/>
                </label>
            </td>
        </tr>
    </table>
</form>
</body>
</html>
- main.html
<!DOCTYPE html>
<html lang="en">
<head>
    <meta charset="UTF-8">
    <title>Title</title>
    <link rel="shortcut icon" href="#"/>
</head>
<body>
<h1>main</h1>
</body>
</html>
- manage.html
<!DOCTYPE html>
<html lang="en">
<head>
    <meta charset="UTF-8">
    <title>Title</title>
    <link rel="shortcut icon" href="#"/>
</head>
<body>
<h1>manage</h1>
</body>
</html>
- adminstrator.html
<!DOCTYPE html>
<html lang="en">
<head>
    <meta charset="UTF-8">
    <title>Title</title>
    <link rel="shortcut icon" href="#"/>
</head>
<body>
<h1>administrator</h1>
</body>
</html>
然后大家就可以打开http://localhost:8080/login
分别试试数据库三个账号的登陆后浏览三个页面的效果了
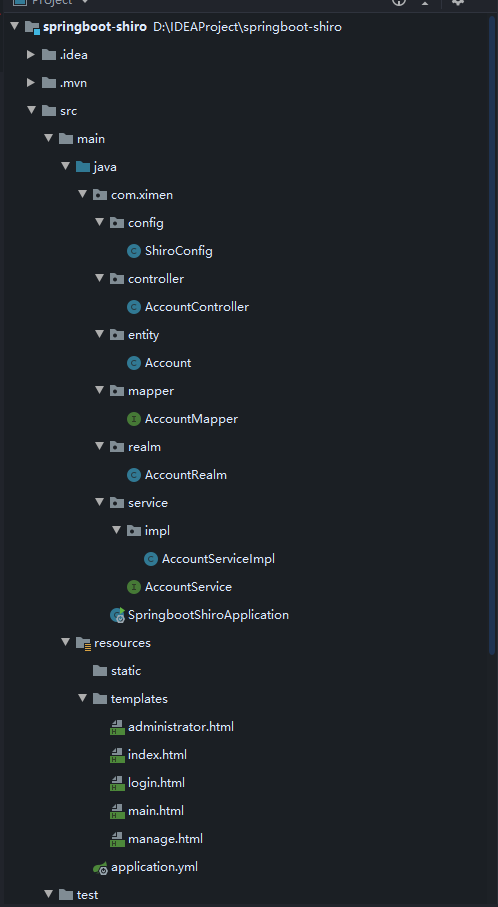
本小demo整体目录结构如下
