环境搭建(建议先备份一个系统快照)
1. FastDFS是C语言编写的,故要确保安装了C编译器 gcc,如果没有gcc环境,需要安装gcc:
yum -y install gcc gcc-c++
2. 若要使用解压命令(unzip),检查是否安装,若没请自行安装:
yum -y install zip unzip
3. 安装libenvent(fastdfs环境)
yum -y install libevent
4. 安装libfastcommon环境【 fastdfs环境 (容易遇到坑)】
4.1 下载:libfastcommon-master.zip,可以在百度搜下安装包,刚开始在官网下载了libfastcommon_v1.04.tar.gz之后,在编译安装完后,再去FastDFS目录中编译安装会报错。
报缺少文件建议从github中余庆提供的 libfastcommon-master 中下载。
4.2 上传到Linux服务器: 解压缩 unzip libfastcommon-master.zip
4.3 cd libfastcommon-master
4.4 ./make.sh
4.5 ./make.sh install
5. 安装FastDFS
5.1 下载 FastDFS_v5.08.tar.gz
5.2 上传到Linux服务器: 解压缩 tar -zxvf FastDFS_v5.08.tar.gz
5.3 cd FastDFS
5.4 ./make.sh
5.5 ./make.sh install
6. 验证是否安装成功
6.1 命令: ll /etc/init.d/ | grep fdfs

fdfs_storaged 是storage启动脚本
fdfs_trackerd 是tracker启动脚本
6.2 命令: ll /etc/fdfs/

client.conf.sample 是tracker的配置文件模板
storage.conf.sample 是storage的配置文件模板
tracker.conf.sample 是tracker的配置文件模板
7. 配置Tracker服务
7.1 cp /etc/fdfs/tracker.conf.sample /etc/fdfs/tracker.conf
7.2 编辑文件 vim /etc/fdfs/tracker.conf
7.3 改变存储数据的根路径 base_path=/home/yangw/fastdfs_root/tracker (自己创建的路径)
7.4 关闭防火墙 systemctl stop firewalld.service
7.5 启动/停止tracker服务器 /etc/init.d fdfs_trackerd start/stop
7.6 也可以使用 service fdfs_trackerd start/stop
7.7 设置开机启动: chkconfig fdfs_trackerd on

8. 配置Storage服务
8.1 cp /etc/fdfs/storage.conf.sample /etc/fdfs/storage.conf
8.2 编辑文件 vim /etc/fdfs/storage.conf
8.3 改变存储数据的根路径 base_path=/home/yangw/fastdfs_root/storage (自己创建的路径)
改变第一个存储目录: store_path0=/home/yangw/fastdfs_root/storage (自己创建的路径)
tracker服务器IP和端口: tracker_server=192.168.47.128:22122(你自己的tracker在哪台服务器就写哪个IP地址)
8.4 关闭防火墙 systemctl stop firewalld.service
8.5 启动/停止Storage /etc/init.d fdfs_storaged start/stop
8.6 也可以使用启停 service fdfs_storaged start/stop
8.7 chkconfig fdfs_storaged on
8.8 ln -s /home/yangw/fastdfs_root/storage/data/ /home/yangw/fastdfs_root/storage/data/M00 (创建软连接)
9. 查看进程
ps -ef | grep fdfs

10. 安装
10.1 下载 fastdfs-nginx-module_v1.16.tar.gz
10.2 解压缩 tar -zxvf fastdfs-nginx-module_v1.16.tar.gz
10.3 cd fastdfs-nginx-module/src
10.4 编辑 文件 vim config 使用底行命令:
:%s+/usr/local/+/usr/+g 将所有的/usr/local替换为 /usr

10.5 cp mod_fastdfs.conf /etc/fdfs/
10.6 vim /etc/fdfs/mod_fastdfs.conf
connect_timeout=10 #客户端访问文件连接超时时长(单位:秒)
tracker_server=192.168.47.128:22122 # tracker服务IP和端口
url_have_group_name=true # 访问链接前缀加上组名
store_path0=/home/yangw/fastdfs_root/storage # 文件存储路径
10.7 复制 FastDFS 的配置文件mime.types到/etc/fdfs 目录
cd /home/yangw/software/sources/FastDFS/conf
cp http.conf mime.types /etc/fdfs/
11. 安装(首次)
nginx-1.16.1.tar.gz
./configure --prefix=/usr/local/nginx --sbin-path=/usr/local/sbin --with-http_stub_status_module --with-http_ssl_module --add-module=/home/yangw/software/sources/fastdfs-nginx-module/src
#将bin文件放在该目录 #http访问支持 #https访问支持 #指定模块
11.5 编译并安装 make && make install
12. 配置nginx
12.1 cd /usr/local/nginx/conf
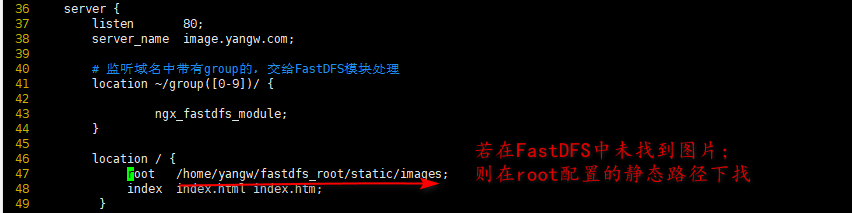
12.2 编辑文件 vim nginx.conf , 将原来的server {80...} 替换为如下内容
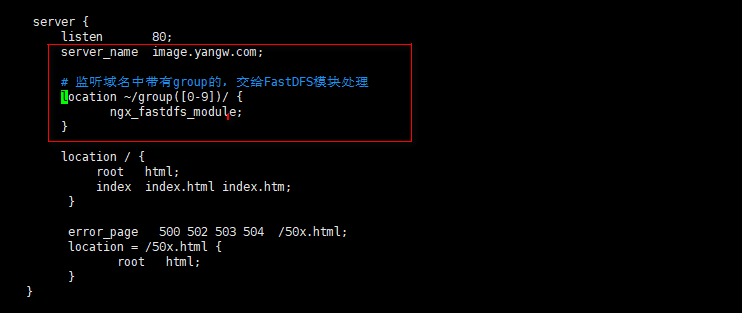
server_name image.yangw.com;
# 监听域名中带有group的,交给FastDFS模块处理
location ~/group([0-9])/ {
ngx_fastdfs_module;
}
13. nginx命令
/usr/local/sbin/nginx start 启动;
/usr/local/sbin/nginx -s stop 停止
/usr/local/sbin/nginx -s reload 重新加载
/usr/local/sbin/nginx -v 查看版本
因为之前我们已将命令设置到了path中,故可以直接使用命令nginx 后面跟参数

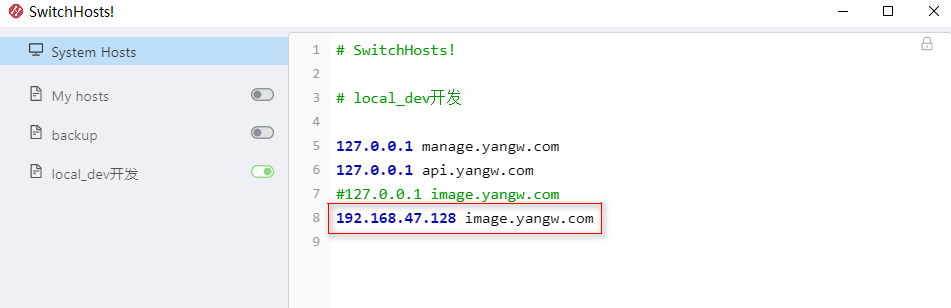
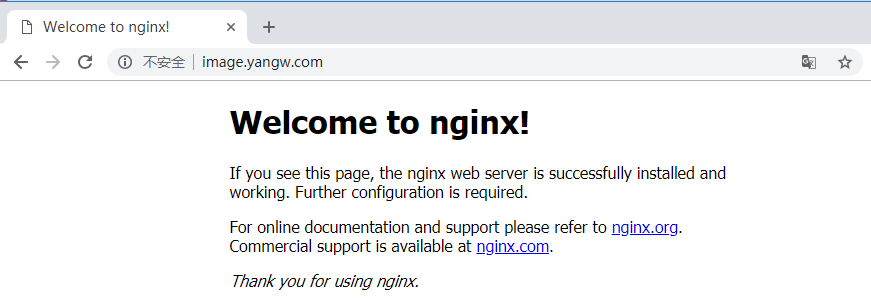
14. hosts文件添加域名映射 并验证
windows上操作的hosts,在windows系统的浏览器上运行效果
Java程序调用
我们不使用余庆提供的java客户端,而是使用开源的增强版的FastDFS客户端,支持SpringBoot2.1,支持缩略图,支持连接池


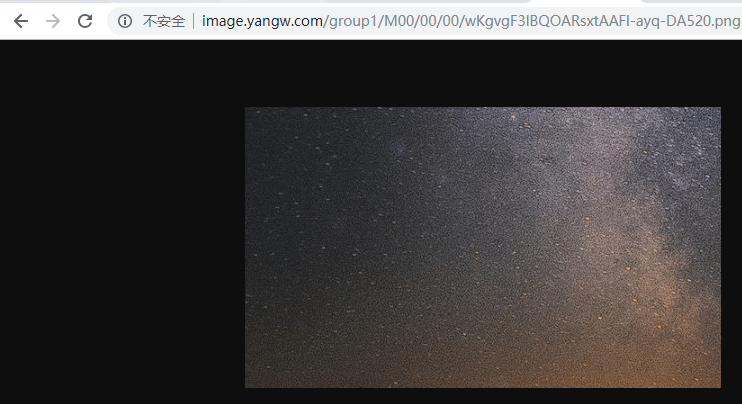
我们通过前端页面上传一个图片,结果程序返回的图片地址是
http://image.yangw.com/group1/M00/00/00/wKgvgF3lBQOARsxtAAFl-ayq-DA520.png
查询服务器存储情况:

浏览器访问: 明明文件上传成功,却报404.

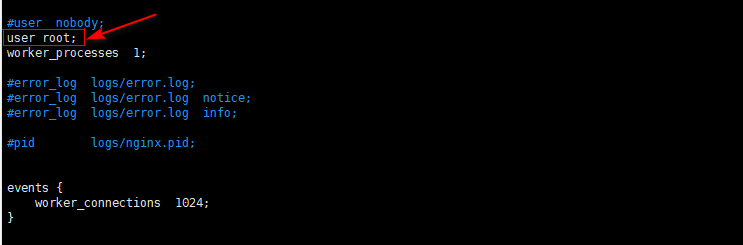
经过多方查资料,发现需要在 /usr/local/nginx/conf/nginx.conf文件最开始处加 user root;即可通过!
编写测试类运行(如果连不上,关掉防火墙再试)


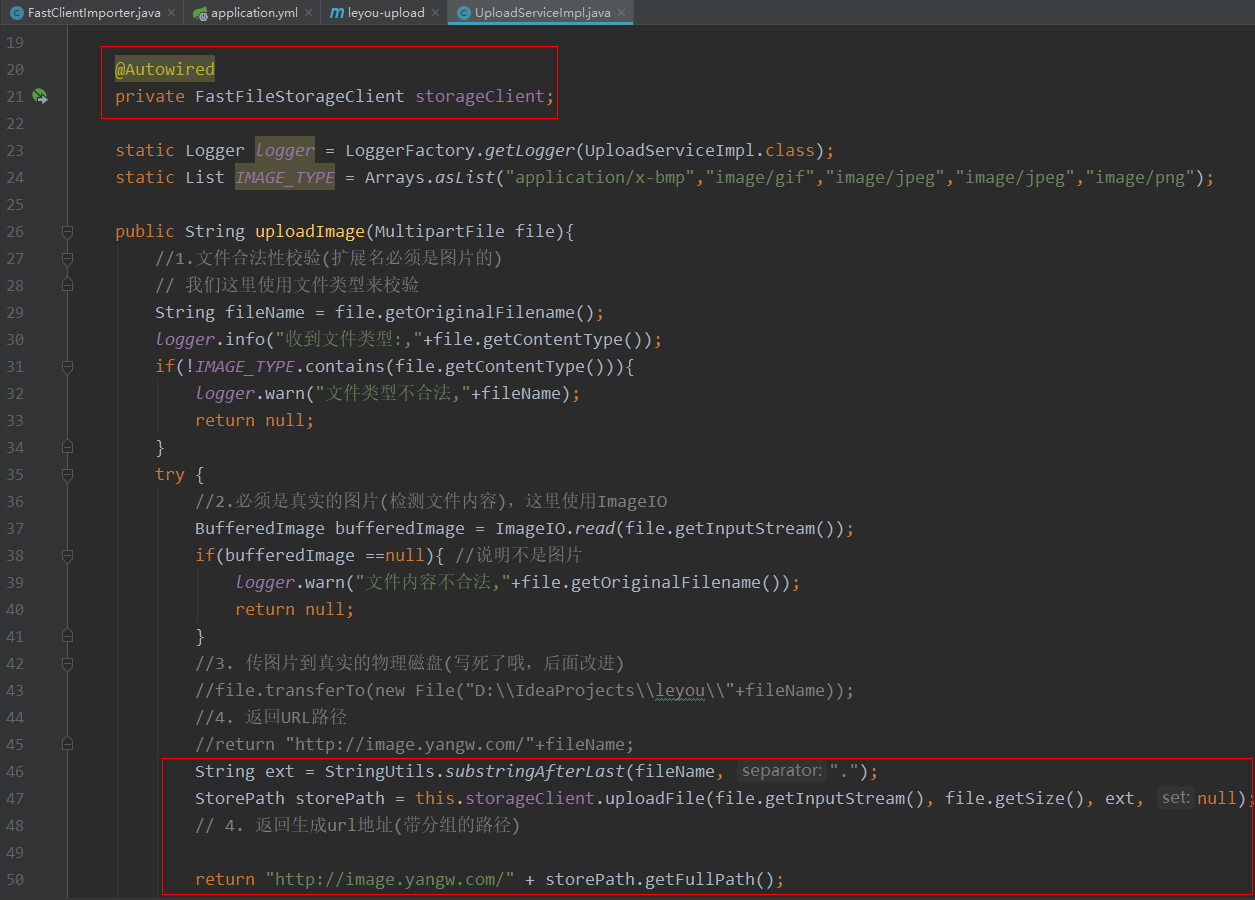
 1 package com.leyou.test;
 2
 3 import com.github.tobato.fastdfs.domain.fdfs.StorePath;
 4 import com.github.tobato.fastdfs.domain.fdfs.ThumbImageConfig;
 5 import com.github.tobato.fastdfs.service.FastFileStorageClient;
 6 import org.junit.Test;
 7 import org.junit.runner.RunWith;
 8 import org.springframework.beans.factory.annotation.Autowired;
 9 import org.springframework.boot.test.context.SpringBootTest;
10 import org.springframework.test.context.junit4.SpringRunner;
11
12 import java.io.File;
13 import java.io.FileInputStream;
14 import java.io.FileNotFoundException;
15
16 @SpringBootTest
17 @RunWith(SpringRunner.class)
18 public class FastDFSTest {
19
20     @Autowired
21     //存储客户端工具类,它既不是FastDFS包的
22     private FastFileStorageClient storageClient;
23
24     @Autowired
25     //缩略图
26     private ThumbImageConfig  thumbImageConfig;
27
28     @Test
29     public void testUploadFile() throws FileNotFoundException {
30         //要上传的文件
31         File file = new File("C:\Users\Administrator\Desktop\timg.jpg");
32         //传文件
33         StorePath storePath = storageClient.uploadFile(new FileInputStream(file), file.length(), "jpg", null);
34         //获取服务器文件路径(带组名)
35         System.out.println("full path:" + storePath.getFullPath());
36         //获取服务器文件路径(不带组名)
37         System.out.println("path:" + storePath.getPath());
38     }
39
40     @Test
41     public void testUploadThumbImage()throws FileNotFoundException {
42
43         //要上传的文件
44         File file = new File("C:\Users\Administrator\Desktop\timg.jpg");
45         //传文件
46         StorePath storePath = storageClient.uploadImageAndCrtThumbImage(new FileInputStream(file), file.length(), "jpg", null);
47         //获取服务器文件路径(带组名)
48         System.out.println("full path:" + storePath.getFullPath());
49         //获取服务器文件路径(不带组名)
50         System.out.println("path:" + storePath.getPath());
51         //获取缩略图
52         System.out.println(thumbImageConfig.getThumbImagePath(storePath.getFullPath()));
53     }
54
55 }
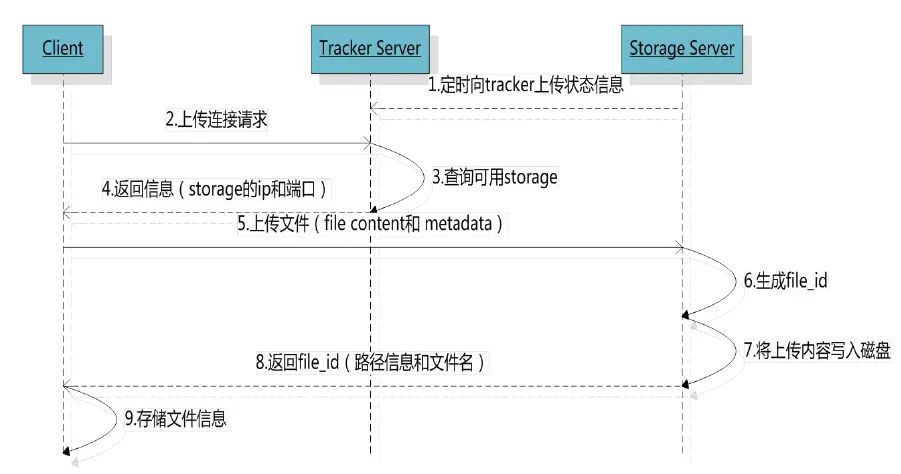
什么是FastDFS
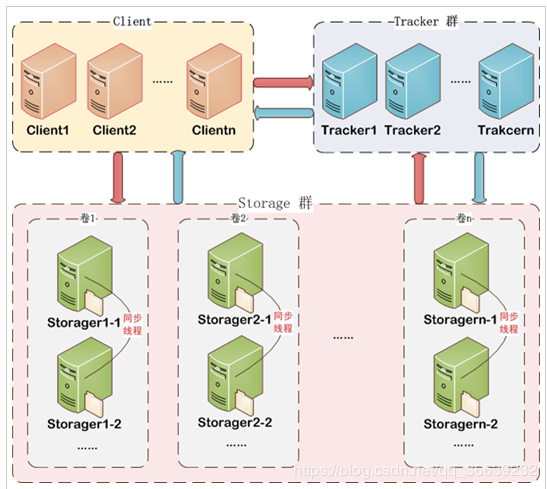
2. 客户端 可以看成是我们的上传文件的程序
3. 服务端有两个角色:
Tracker:
管理集群, tracker也可以实现集群。每个tracker节点地位平等。
作用:引导客户端去哪台服务器存储数据,实际上是客户端与存储服务器直接进行通信的,并不需要通过Tracker进行中转。
Storage:
需要连接tracker端,定期报告自己的情况(是否活着,剩余容量,负载情况)
分为多个组,每个组之间保存的文件是不同的。每个组内部可以有多个成员,组成员内部保存的内容是一样的,组成员的地位是一致的,没有主从的概念。
卷1、卷2、卷n是可以实现横向扩容的,向里面添加组服务器,且同一个组里面的文件是一样的,一台服务器挂了,还有别的服务器可以提供访问。(实现高可用)
一台服务器很忙,可以将访问分配给其他服务器,实现负载均衡
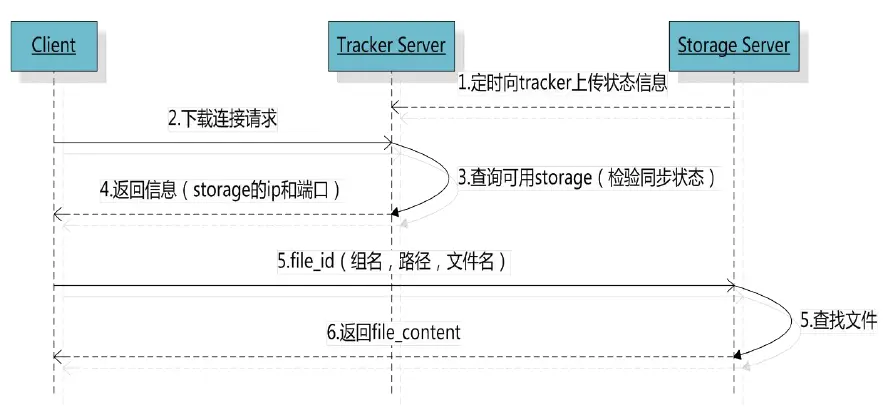
5.文件下载流程(内部流程):
6. 客户端上传文件后存储服务器将文件ID返回给客户端,此文件ID用于以后访问该文件的索引信息。文件索引信息包括:组名,虚拟磁盘路径,数据两级目录,文件名
如: group1/M00/00/00/wKgvgF3lBQOARsxtAAFl-ayq-DA520.png
附录1 参考:
https://www.xuebuyuan.com/2188649.html
https://blog.csdn.net/qq_37495786/article/details/83896530
https://blog.csdn.net/qq_36639232/article/details/92699727
https://www.jianshu.com/p/b56e84912825
附录2 CentOS7防火墙的相关操作:
centos7中的防火墙改成了firewall,使用iptables无作用,开放端口的方法如下:
firewall-cmd --zone=public --add-port=80/tcp --permanent
返回success为成功 --zone #作用域 --add-port=80/tcp #添加端口,格式为:端口/通讯协议 --permanent #永久生效
systemctl restart firewalld.service #重启防火墙
systemctl stop firewalld.service #关闭防火墙
netstat -lntp #查看监听(Listen)的端口
netstat -lnp|grep 8080 #检查端口被哪个进程占用
附录3 Centos7查看是否安装了某个软件
1, rpm包安装的,可以用 rpm -qa 看到,如果要查找某软件包是否安装,用 rpm -qa | grep "软件或者包的名字"。
2, yum方法安装的,可以用yum list installed 查找,如果是查找指定包,命令后加 | grep "软件名或者包名";
yum list installed gcc|grep gcc 如果没有返回值则表示没有安装
3, 如果是以源码包自己编译安装的,例如.tar.gz或者tar.bz2形式的,这个只能看可执行文件是否存在了,
上面两种方法都看不到这种源码形式安装的包。如果是以root用户安装的,可执行程序通常都在/sbin:/usr/bin目录下