一、缓存模块
MyBatis作为一个强大的持久层框架,缓存是其必不可少的功能之一,Mybatis中的缓存分为一级缓存和二级缓存。但本质上是一样的,都是使用Cache接口实现的。缓存位于 org.apache.ibatis.cache包下。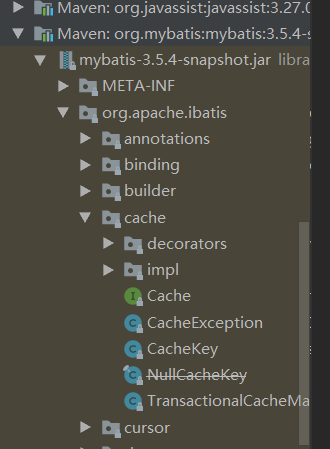
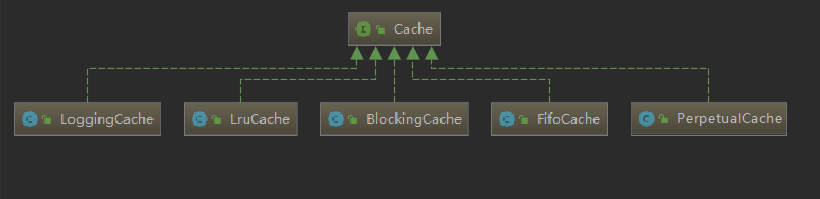
通过结构能够发现Cache其实使用到了装饰器模式来实现缓存的处理。先来看看Cache中的基础类的API;Cache接口的实现类很多,但是大部分都是装饰器,只有PerpetualCache提供了Cache接口的基本实现。
1.1 Cache接口
Cache接口是缓存模块中最核心的接口,它定义了所有缓存的基本行为,Cache接口的定义如下:
public interface Cache {

  /**
   * 缓存对象的 ID
   * @return The identifier of this cache
   */
  String getId();

  /**
   * 向缓存中添加数据,一般情况下 key是CacheKey  value是查询结果
   * @param key Can be any object but usually it is a {@link CacheKey}
   * @param value The result of a select.
   */
  void putObject(Object key, Object value);

  /**
   * 根据指定的key,在缓存中查找对应的结果对象
   * @param key The key
   * @return The object stored in the cache.
   */
  Object getObject(Object key);

  /**
   * As of 3.3.0 this method is only called during a rollback
   * for any previous value that was missing in the cache.
   * This lets any blocking cache to release the lock that
   * may have previously put on the key.
   * A blocking cache puts a lock when a value is null
   * and releases it when the value is back again.
   * This way other threads will wait for the value to be
   * available instead of hitting the database.
   *   删除key对应的缓存数据
   *
   * @param key The key
   * @return Not used
   */
  Object removeObject(Object key);

  /**
   * Clears this cache instance.
   * 清空缓存
   */
  void clear();

  /**
   * Optional. This method is not called by the core.
   * 缓存的个数。
   * @return The number of elements stored in the cache (not its capacity).
   */
  int getSize();

  /**
   * Optional. As of 3.2.6 this method is no longer called by the core.
   * <p>
   * Any locking needed by the cache must be provided internally by the cache provider.
   *  获取读写锁
   * @return A ReadWriteLock
   */
  default ReadWriteLock getReadWriteLock() {
    return null;
  }

}
1.2 PerpetualCache
PerpetualCache在缓存模块中扮演了ConcreteComponent的角色,其实现比较简单,底层使用HashMap记录缓存项,具体的实现如下
/**
 * 在装饰器模式用 用来被装饰的对象
 * 缓存中的  基本缓存处理的实现
 * 其实就是一个 HashMap 的基本操作
 * @author Clinton Begin
 */
public class PerpetualCache implements Cache {

  private final String id; // Cache 对象的唯一标识

  // 用于记录缓存的Map对象
  private final Map<Object, Object> cache = new HashMap<>();

  public PerpetualCache(String id) {
    this.id = id;
  }

  @Override
  public String getId() {
    return id;
  }

  @Override
  public int getSize() {
    return cache.size();
  }

  @Override
  public void putObject(Object key, Object value) {
    cache.put(key, value);
  }

  @Override
  public Object getObject(Object key) {
    return cache.get(key);
  }

  @Override
  public Object removeObject(Object key) {
    return cache.remove(key);
  }

  @Override
  public void clear() {
    cache.clear();
  }

  @Override
  public boolean equals(Object o) {
    if (getId() == null) {
      throw new CacheException("Cache instances require an ID.");
    }
    if (this == o) {
      return true;
    }
    if (!(o instanceof Cache)) {
      return false;
    }

    Cache otherCache = (Cache) o;
    // 只关心ID
    return getId().equals(otherCache.getId());
  }

  @Override
  public int hashCode() {
    if (getId() == null) {
      throw new CacheException("Cache instances require an ID.");
    }
    // 只关心ID
    return getId().hashCode();
  }

}
然后可以来看看cache.decorators包下提供的装饰器。他们都实现了Cache接口。这些装饰器都在PerpetualCache的基础上提供了一些额外的功能,通过多个组合实现一些特殊的需求。
1.3 BlockingCache
这是一个阻塞同步的缓存,它保证只有一个线程到缓存中查找指定的key对应的数据
/**
 * Simple blocking decorator
 *   阻塞版的缓存 装饰器
 * Simple and inefficient version of EhCache's BlockingCache decorator.
 * It sets a lock over a cache key when the element is not found in cache.
 * This way, other threads will wait until this element is filled instead of hitting the database.
 *
 * @author Eduardo Macarron
 *
 */
public class BlockingCache implements Cache {

  private long timeout; // 阻塞超时时长
  private final Cache delegate; // 被装饰的底层 Cache 对象
  // 每个key 都有对象的 ReentrantLock 对象
  private final ConcurrentHashMap<Object, ReentrantLock> locks;

  public BlockingCache(Cache delegate) {
    // 被装饰的 Cache 对象
    this.delegate = delegate;
    this.locks = new ConcurrentHashMap<>();
  }

  @Override
  public String getId() {
    return delegate.getId();
  }

  @Override
  public int getSize() {
    return delegate.getSize();
  }

  @Override
  public void putObject(Object key, Object value) {
    try {
      // 执行 被装饰的 Cache 中的方法
      delegate.putObject(key, value);
    } finally {
      // 释放锁
      releaseLock(key);
    }
  }

  @Override
  public Object getObject(Object key) {
    acquireLock(key); // 获取锁
    Object value = delegate.getObject(key); // 获取缓存数据
    if (value != null) { // 有数据就释放掉锁,否则继续持有锁
      releaseLock(key);
    }
    return value;
  }

  @Override
  public Object removeObject(Object key) {
    // despite of its name, this method is called only to release locks
    releaseLock(key);
    return null;
  }

  @Override
  public void clear() {
    delegate.clear();
  }

  private ReentrantLock getLockForKey(Object key) {
    return locks.computeIfAbsent(key, k -> new ReentrantLock());
  }

  private void acquireLock(Object key) {
    Lock lock = getLockForKey(key);
    if (timeout > 0) {
      try {
        boolean acquired = lock.tryLock(timeout, TimeUnit.MILLISECONDS);
        if (!acquired) {
          throw new CacheException("Couldn't get a lock in " + timeout + " for the key " +  key + " at the cache " + delegate.getId());
        }
      } catch (InterruptedException e) {
        throw new CacheException("Got interrupted while trying to acquire lock for key " + key, e);
      }
    } else {
      lock.lock();
    }
  }

  private void releaseLock(Object key) {
    ReentrantLock lock = locks.get(key);
    if (lock.isHeldByCurrentThread()) {
      lock.unlock();
    }
  }

  public long getTimeout() {
    return timeout;
  }

  public void setTimeout(long timeout) {
    this.timeout = timeout;
  }
}
通过源码我们能够发现,BlockingCache本质上就是在操作缓存数据的前后通过ReentrantLock对象来实现了加锁和解锁操作。
| 缓存实现类 | 缓存实现类 | 作用 | 装饰条件 |
|
基本缓存 |
缓存基本实现类 |
默认是PerpetualCache,也可以自定义比如RedisCache、EhCache等,具备基本功能的缓存类 | 无 |
| LruCache |
LRU策略的缓存 |
当缓存到达上限时候,删除最近最少使用的缓存(Least Recently Use) |
eviction="LRU"(默认) |
| FifoCache |
FIFO策略的缓存 |
当缓存到达上限时候,删除最先入队的缓存 |
eviction="FIFO" |
| SoftCacheWeakCache |
带清理策略的缓存 |
通过JVM的软引用和弱引用来实现缓存,当JVM内存不足时,会自动清理掉这些缓存,基于SoftReference和WeakReference |
eviction="SOFT"eviction="WEAK" |
| LoggingCache |
带日志功能的缓存 |
比如:输出缓存命中率 | 基本 |
| SynchronizedCache |
同步缓存 |
基于synchronized关键字实现,解决并发问题 |
基本 |
| BlockingCache |
阻塞缓存 |
通过在get/put方式中加锁,保证只有一个线程操作缓存,基于Java重入锁实现 |
blocking=true |
| SerializedCache |
支持序列化的缓存 |
将对象序列化以后存到缓存中,取出时反序列化 |
readOnly=false(默认) |
| ScheduledCache |
定时调度的缓存 |
在进行get/put/remove/getSize等操作前,判断缓存时间是否超过了设置的最长缓存时间(默认 |
flushInterval不为空 |
| TransactionalCache |
事务缓存 |
在二级缓存中使用,可一次存入多个缓存,移除多个缓存 |
在TransactionalCacheManager中用Map维护对应关系 |
1.4 缓存的应用
1.4.1 缓存对应的初始化
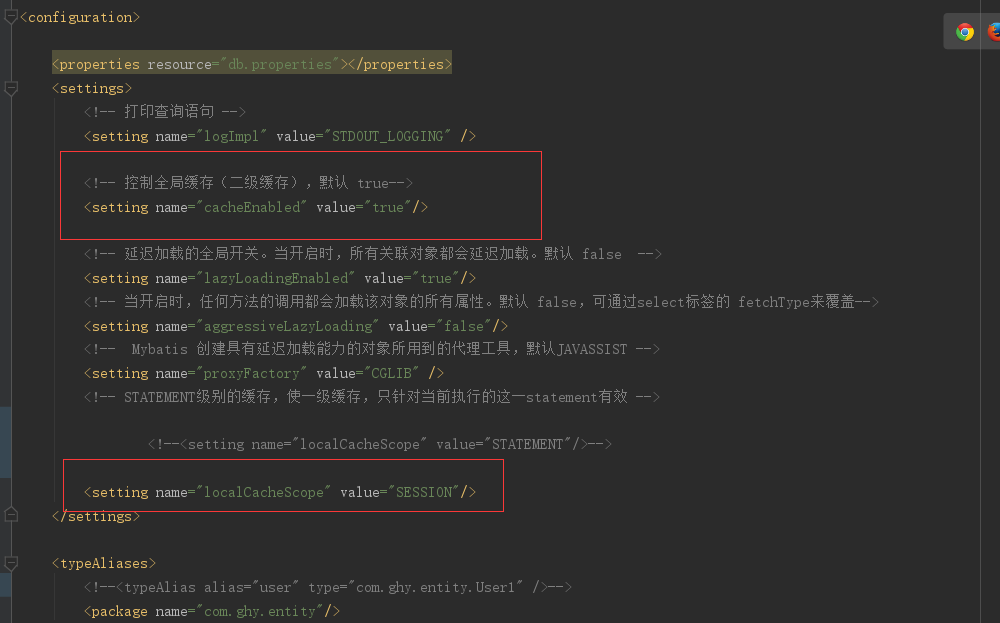
在之前写的代码中断个点看下可能直接点,在断点前说明下要求,如要开启缓存要在配置文件开启一级和二级缓存
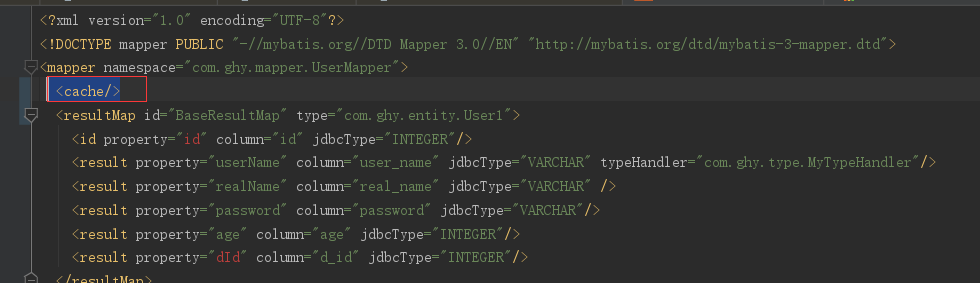
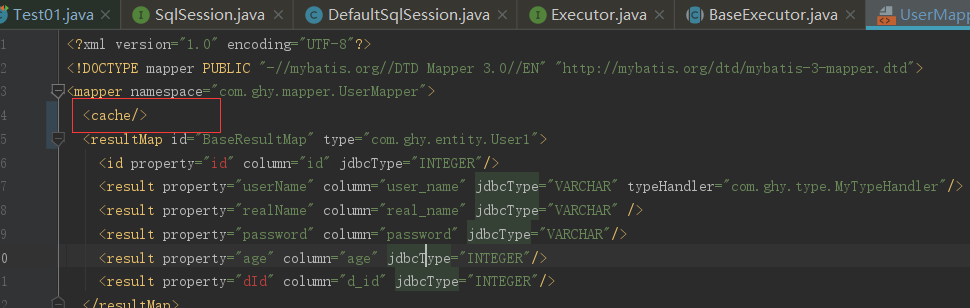
然后呢在mapper.XML文件加入<cache/>标签就可以了
下面来断点看下
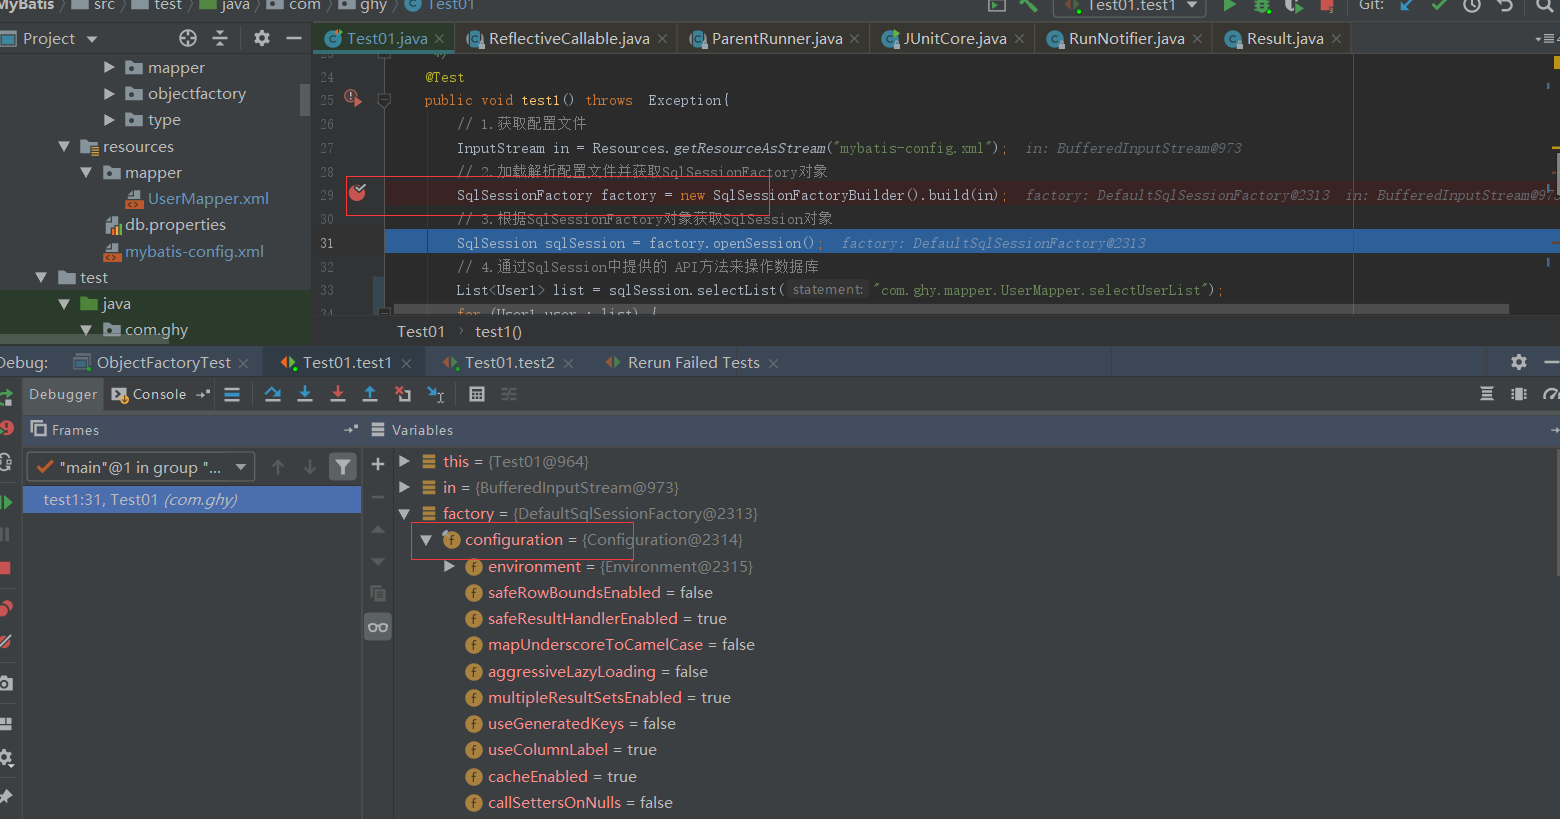
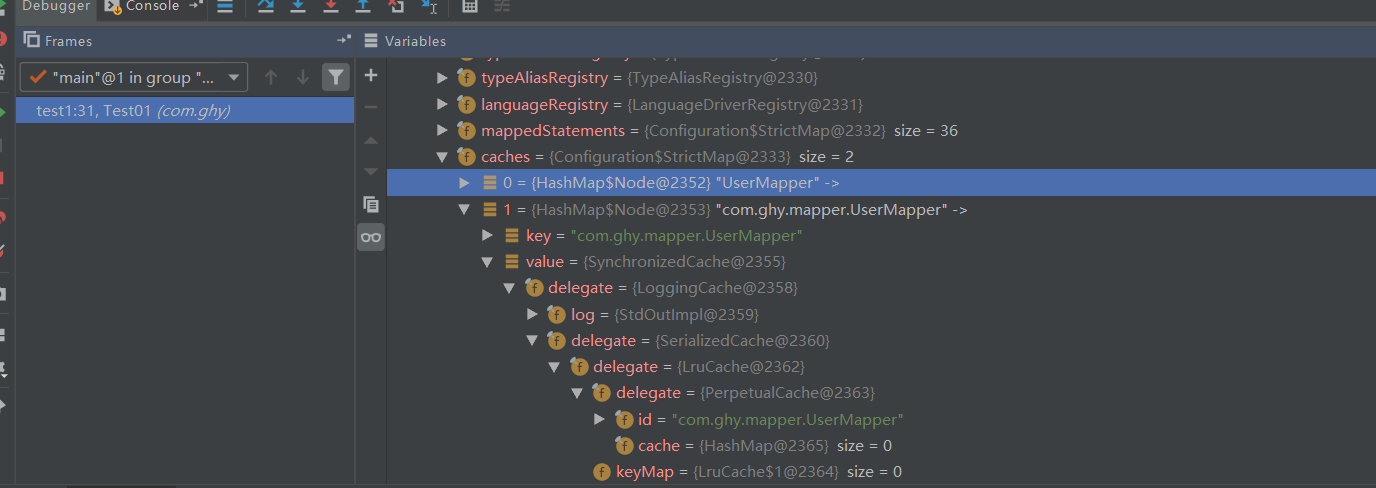
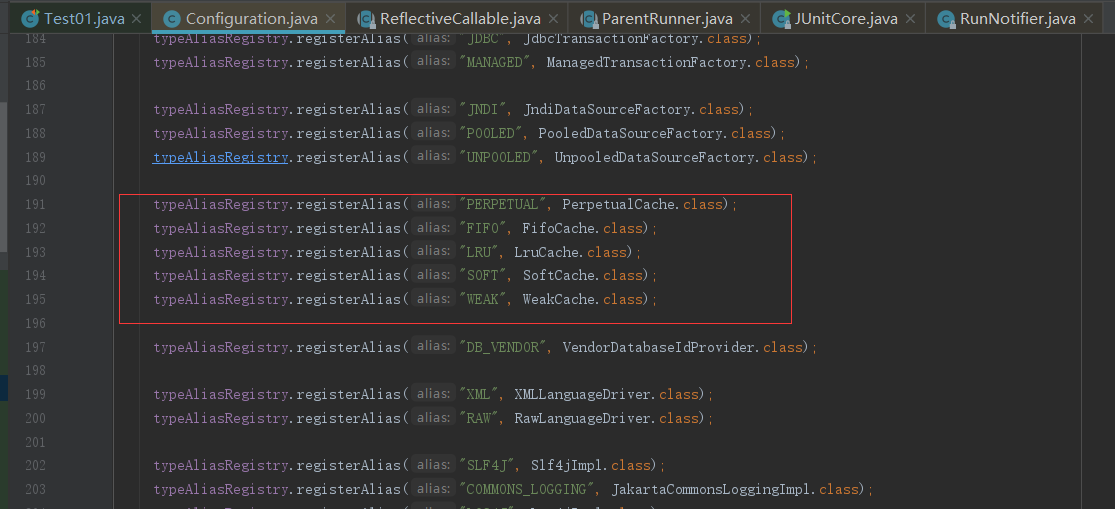
通过上面截图可以很清楚的看到这是一个装饰器过程,接下来看下在Configuration初始化的时候怎么给我们的各种Cache实现注册对应的别名
在解析settings标签的时候,设置的默认值有如下;因为前面源码跟了好多次,这里面我直接进到解析这一段代码了

 public Configuration parse() {
    //检查是否已经解析过了
    if (parsed) {
      throw new BuilderException("Each XMLConfigBuilder can only be used once.");
    }
    parsed = true;
    // XPathParser,dom 和 SAX 都有用到 >>
    parseConfiguration(parser.evalNode("/configuration"));
    return configuration;
  }
private void parseConfiguration(XNode root) {
    try {
      //issue #117 read properties first
      // 对于全局配置文件各种标签的解析
      propertiesElement(root.evalNode("properties"));
      // 解析 settings 标签
      Properties settings = settingsAsProperties(root.evalNode("settings"));
      // 读取文件
      loadCustomVfs(settings);
      // 日志设置
      loadCustomLogImpl(settings);
      // 类型别名
      typeAliasesElement(root.evalNode("typeAliases"));
      // 插件
      pluginElement(root.evalNode("plugins"));
      // 用于创建对象
      objectFactoryElement(root.evalNode("objectFactory"));
      // 用于对对象进行加工
      objectWrapperFactoryElement(root.evalNode("objectWrapperFactory"));
      // 反射工具箱
      reflectorFactoryElement(root.evalNode("reflectorFactory"));
      // settings 子标签赋值,默认值就是在这里提供的 >>
      settingsElement(settings);
      // read it after objectFactory and objectWrapperFactory issue #631
      // 创建了数据源 >>
      environmentsElement(root.evalNode("environments"));
      //解析databaseIdProvider标签,生成DatabaseIdProvider对象(用来支持不同厂商的数据库)。
      databaseIdProviderElement(root.evalNode("databaseIdProvider"));
      typeHandlerElement(root.evalNode("typeHandlers"));
      // 解析引用的Mapper映射器
      mapperElement(root.evalNode("mappers"));
    } catch (Exception e) {
      throw new BuilderException("Error parsing SQL Mapper Configuration. Cause: " + e, e);
    }
  }
在上面的全局配置文件中在settingsElement(settings);的赋值中会做一些默认的处理,点进去看下

通过上面发现cacheEnabled默认为true,localCacheScope默认为 SESSION,在初始化过程中关键的还是映射文件的解析,点击mapperElement(root.evalNode("mappers"));进去看下
 private void mapperElement(XNode parent) throws Exception {
    if (parent != null) {
      for (XNode child : parent.getChildren()) {
        // 不同的定义方式的扫描,最终都是调用 addMapper()方法(添加到 MapperRegistry)。这个方法和 getMapper() 对应
        // package    包
        if ("package".equals(child.getName())) {
          String mapperPackage = child.getStringAttribute("name");
          configuration.addMappers(mapperPackage);
        } else {
          String resource = child.getStringAttribute("resource");
          String url = child.getStringAttribute("url");
          String mapperClass = child.getStringAttribute("class");
          if (resource != null && url == null && mapperClass == null) {
            // resource    相对路径
            ErrorContext.instance().resource(resource);
            InputStream inputStream = Resources.getResourceAsStream(resource);
            XMLMapperBuilder mapperParser = new XMLMapperBuilder(inputStream, configuration, resource, configuration.getSqlFragments());
            // 解析 Mapper.xml,总体上做了两件事情 >>
            mapperParser.parse();
          } else if (resource == null && url != null && mapperClass == null) {
            // url    绝对路径
            ErrorContext.instance().resource(url);
            InputStream inputStream = Resources.getUrlAsStream(url);
            XMLMapperBuilder mapperParser = new XMLMapperBuilder(inputStream, configuration, url, configuration.getSqlFragments());
            mapperParser.parse();
          } else if (resource == null && url == null && mapperClass != null) {
            // class     单个接口
            Class<?> mapperInterface = Resources.classForName(mapperClass);
            configuration.addMapper(mapperInterface);
          } else {
            throw new BuilderException("A mapper element may only specify a url, resource or class, but not more than one.");
          }
        }
      }
    }
  }
直接进入他的关键代码mapperParser.parse();,
 public void parse() {
    // 总体上做了两件事情,对于语句的注册和接口的注册
    if (!configuration.isResourceLoaded(resource)) {
      // 1、具体增删改查标签的解析。
      // 一个标签一个MappedStatement。 >>
      configurationElement(parser.evalNode("/mapper"));
      configuration.addLoadedResource(resource);
      // 2、把namespace(接口类型)和工厂类绑定起来,放到一个map。
      // 一个namespace 一个 MapperProxyFactory >>
      bindMapperForNamespace();
    }

    parsePendingResultMaps();
    parsePendingCacheRefs();
    parsePendingStatements();
  }
上面是映射文件的解析操作,可以看他进了标签的解析,进去看下
  private void configurationElement(XNode context) {
    try {
      String namespace = context.getStringAttribute("namespace");
      if (namespace == null || namespace.equals("")) {
        throw new BuilderException("Mapper's namespace cannot be empty");
      }
      builderAssistant.setCurrentNamespace(namespace);
      // 添加缓存对象
      cacheRefElement(context.evalNode("cache-ref"));
      // 解析 cache 属性,添加缓存对象
      cacheElement(context.evalNode("cache"));
      // 创建 ParameterMapping 对象
      parameterMapElement(context.evalNodes("/mapper/parameterMap"));
      // 创建 List<ResultMapping>
      resultMapElements(context.evalNodes("/mapper/resultMap"));
      // 解析可以复用的SQL
      sqlElement(context.evalNodes("/mapper/sql"));
      // 解析增删改查标签,得到 MappedStatement >>
      buildStatementFromContext(context.evalNodes("select|insert|update|delete"));
    } catch (Exception e) {
      throw new BuilderException("Error parsing Mapper XML. The XML location is '" + resource + "'. Cause: " + e, e);
    }
  }
看到这里好像找到了想找的东西,可以看到上面代码我标的两个地方的标签解析,跟进去看下
 private void cacheElement(XNode context) {
    // 只有 cache 标签不为空才解析
    if (context != null) {
      String type = context.getStringAttribute("type", "PERPETUAL");
      Class<? extends Cache> typeClass = typeAliasRegistry.resolveAlias(type);
      String eviction = context.getStringAttribute("eviction", "LRU");
      Class<? extends Cache> evictionClass = typeAliasRegistry.resolveAlias(eviction);
      Long flushInterval = context.getLongAttribute("flushInterval");
      Integer size = context.getIntAttribute("size");
      boolean readWrite = !context.getBooleanAttribute("readOnly", false);
      boolean blocking = context.getBooleanAttribute("blocking", false);
      Properties props = context.getChildrenAsProperties();
      builderAssistant.useNewCache(typeClass, evictionClass, flushInterval, size, readWrite, blocking, props);
    }
  }
会发现上面开始解析相关的属性信息了,并在最后一步进行了保存,继续跟进去看下
 public Cache useNewCache(Class<? extends Cache> typeClass,
      Class<? extends Cache> evictionClass,
      Long flushInterval,
      Integer size,
      boolean readWrite,
      boolean blocking,
      Properties props) {
    Cache cache = new CacheBuilder(currentNamespace)
        .implementation(valueOrDefault(typeClass, PerpetualCache.class))
        .addDecorator(valueOrDefault(evictionClass, LruCache.class))
        .clearInterval(flushInterval)
        .size(size)
        .readWrite(readWrite)
        .blocking(blocking)
        .properties(props)
        .build();
    configuration.addCache(cache);
    currentCache = cache;
    return cache;
  }
然后可以发现 如果存储 cache 标签,那么对应的 Cache对象会被保存在 currentCache 属性中。
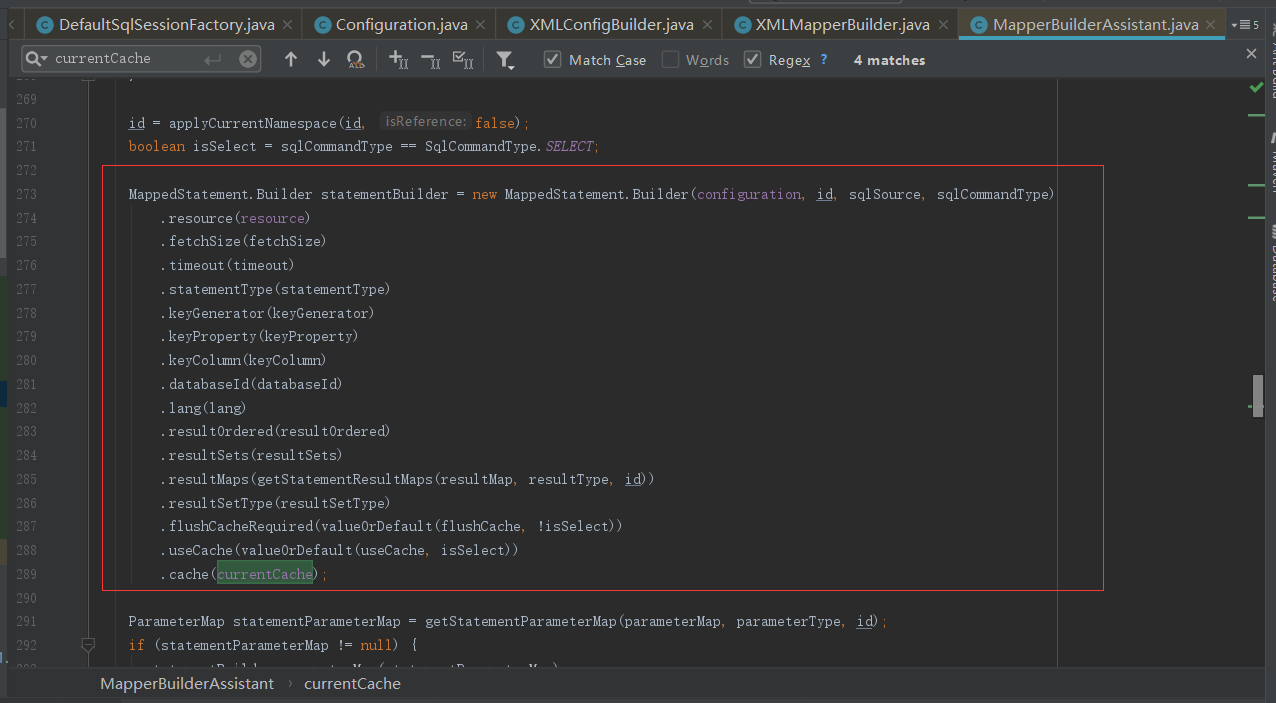
进而在 Cache 对象 保存在了 MapperStatement 对象的 cache 属性中。这就是cache节点创建的整个过程。
1.4.2 一级缓存
一级缓存也叫本地缓存(Local Cache),MyBatis的一级缓存是在会话(SqlSession)层面进行缓存的。MyBatis的一级缓存是默认开启的,不需要任何的配置(如果要关闭,localCacheScope设置为STATEMENT)。在BaseExecutor对象的query方法中有关闭一级缓存的逻辑
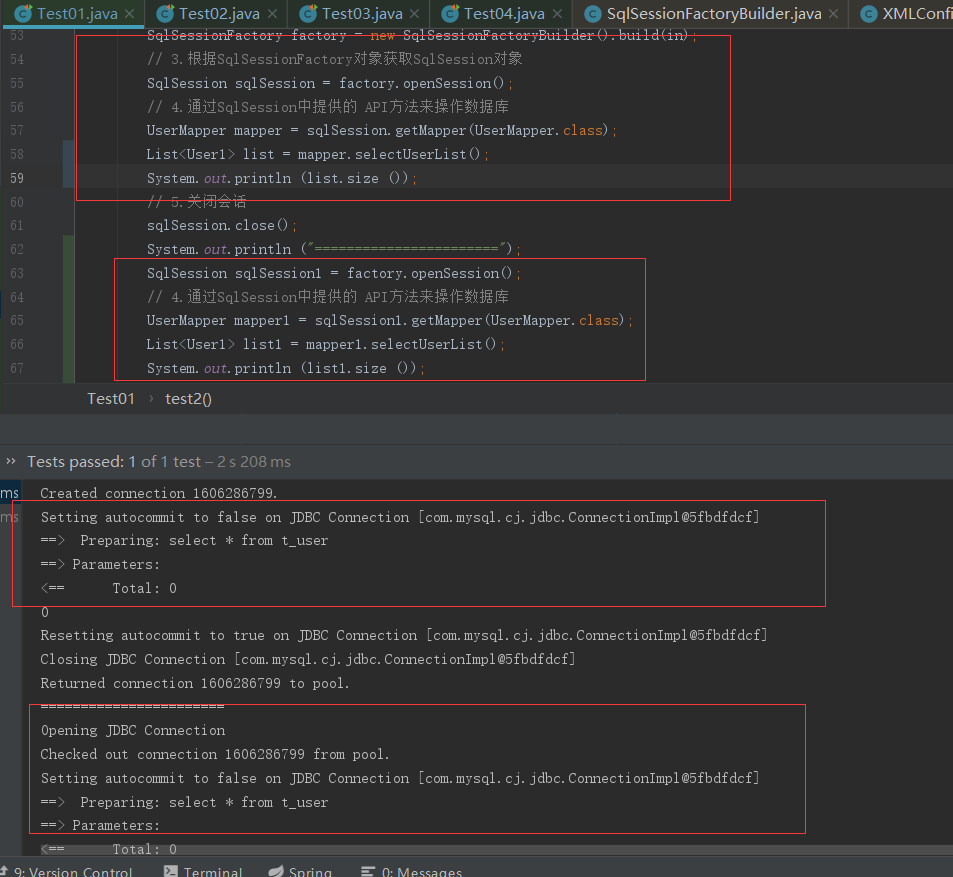
从上面的效果可以很清楚的感受到在一个会话内,第二次查询是直接走缓存的,在不同会话内缓存是不起效的。下面会了解缓存做了啥跟进代码看下。入口从上面演示就可以猜到是从
SqlSession sqlSession = factory.openSession();进入的
  @Override
  public SqlSession openSession() {
    return openSessionFromDataSource(configuration.getDefaultExecutorType(), null, false);
  }
 private SqlSession openSessionFromDataSource(ExecutorType execType, TransactionIsolationLevel level, boolean autoCommit) {
    //事务对象
    Transaction tx = null;
    try {
      final Environment environment = configuration.getEnvironment();
      // 获取事务工厂
      final TransactionFactory transactionFactory = getTransactionFactoryFromEnvironment(environment);
      // 创建事务
      tx = transactionFactory.newTransaction(environment.getDataSource(), level, autoCommit);
      // 根据事务工厂和默认的执行器类型,创建执行器 >>执行SQL语句操作
      final Executor executor = configuration.newExecutor(tx, execType);
      return new DefaultSqlSession(configuration, executor, autoCommit);
    } catch (Exception e) {
      closeTransaction(tx); // may have fetched a connection so lets call close()
      throw ExceptionFactory.wrapException("Error opening session.  Cause: " + e, e);
    } finally {
      ErrorContext.instance().reset();
    }
  }
在创建对应的执行器的时候会有缓存的操作
 public Executor newExecutor(Transaction transaction, ExecutorType executorType) {
    executorType = executorType == null ? defaultExecutorType : executorType;
    executorType = executorType == null ? ExecutorType.SIMPLE : executorType;
    Executor executor;
    if (ExecutorType.BATCH == executorType) {
      executor = new BatchExecutor(this, transaction);
    } else if (ExecutorType.REUSE == executorType) {//针对Statement做缓存
      executor = new ReuseExecutor(this, transaction);
    } else {
      // 默认 SimpleExecutor,每一次只是SQL操作都创建一个新的Statement对象
      executor = new SimpleExecutor(this, transaction);
    }
    // 二级缓存开关,settings 中的 cacheEnabled 默认是 true
    if (cacheEnabled) {
      executor = new CachingExecutor(executor);
    }
    // 植入插件的逻辑,至此,四大对象已经全部拦截完毕;这里面是一个拦截器链
    executor = (Executor) interceptorChain.pluginAll(executor);
    return executor;
  }
从上面代码可以知道如果 cacheEnabled 为 true 就会通过 CachingExecutor 来装饰executor 对象,然后就是在执行SQL操作的时候会涉及到缓存的具体使用。这个就分为一级缓存和二级缓存,通过这个跟踪会发现在创建会话时会创建执行器,而执行器里面跟缓存有关系的是二级缓存,跟我想找的一级缓存没什么关系;那么一级缓存在哪呢,这时候我想一级缓存是跟会话有关,那么他的位置一定在会话内的这段代码里,那我就找下一段代码
 // 4.通过SqlSession中提供的 API方法来操作数据库
        List<User1> list = sqlSession.selectList("com.ghy.mapper.UserMapper.selectUserList");
进入selectList看下
  @Override
  public <E> List<E> selectList(String statement) {
    return this.selectList(statement, null);
  }
  @Override
  public <E> List<E> selectList(String statement, Object parameter, RowBounds rowBounds) {
    try {
      MappedStatement ms = configuration.getMappedStatement(statement);
      // 如果 cacheEnabled = true(默认),Executor会被 CachingExecutor装饰
      return executor.query(ms, wrapCollection(parameter), rowBounds, Executor.NO_RESULT_HANDLER);
    } catch (Exception e) {
      throw ExceptionFactory.wrapException("Error querying database.  Cause: " + e, e);
    } finally {
      ErrorContext.instance().reset();
    }
  }
在上面代码中可以看到一个查询操作,那肯定是要进去看下他在查询前有没有缓存判断,如果没有说明selectList代码是不走缓存的;
在上面代码中发现了一些跟缓存相关的操作CacheKey
 @Override
  public CacheKey createCacheKey(MappedStatement ms, Object parameterObject, RowBounds rowBounds, BoundSql boundSql) {
    if (closed) {
      throw new ExecutorException("Executor was closed.");
    }
    CacheKey cacheKey = new CacheKey();

    cacheKey.update(ms.getId());
    cacheKey.update(rowBounds.getOffset()); // 0
    cacheKey.update(rowBounds.getLimit()); // 2147483647 = 2^31-1
    cacheKey.update(boundSql.getSql());
    List<ParameterMapping> parameterMappings = boundSql.getParameterMappings();
    TypeHandlerRegistry typeHandlerRegistry = ms.getConfiguration().getTypeHandlerRegistry();
    // mimic DefaultParameterHandler logic
    for (ParameterMapping parameterMapping : parameterMappings) {
      if (parameterMapping.getMode() != ParameterMode.OUT) {
        Object value;
        String propertyName = parameterMapping.getProperty();
        if (boundSql.hasAdditionalParameter(propertyName)) {
          value = boundSql.getAdditionalParameter(propertyName);
        } else if (parameterObject == null) {
          value = null;
        } else if (typeHandlerRegistry.hasTypeHandler(parameterObject.getClass())) {
          value = parameterObject;
        } else {
          MetaObject metaObject = configuration.newMetaObject(parameterObject);
          value = metaObject.getValue(propertyName);
        }
        cacheKey.update(value); // development
      }
    }
    if (configuration.getEnvironment() != null) {
      // issue #176
      cacheKey.update(configuration.getEnvironment().getId());
    }
    return cacheKey;
  }
发现上面是一个缓存创建的逻辑,这个东西debugger看一下其实就明白了;其实这写了一堆就是生成一个东西,生成一个缓存的KEY,而且这个KEY是跟我们写的SQL有关;明白了这个key的作用后回退一步跟进query看他拿这个key去做了什么
 @Override
  public <E> List<E> query(MappedStatement ms, Object parameter, RowBounds rowBounds, ResultHandler resultHandler, CacheKey key, BoundSql boundSql) throws SQLException {
    // 异常体系之 ErrorContext
    ErrorContext.instance().resource(ms.getResource()).activity("executing a query").object(ms.getId());
    if (closed) {
      throw new ExecutorException("Executor was closed.");
    }
    if (queryStack == 0 && ms.isFlushCacheRequired()) {
      // flushCache="true"时,即使是查询,也清空一级缓存
      clearLocalCache();
    }
    List<E> list;
    try {
      // 防止递归查询重复处理缓存
      queryStack++;
      // 查询一级缓存
      // ResultHandler 和 ResultSetHandler的区别
      list = resultHandler == null ? (List<E>) localCache.getObject(key) : null;
      if (list != null) {
        //缓存中有数据
        handleLocallyCachedOutputParameters(ms, key, parameter, boundSql);
      } else {
        // 真正的查询流程
        list = queryFromDatabase(ms, parameter, rowBounds, resultHandler, key, boundSql);
      }
    } finally {
      queryStack--;
    }
    if (queryStack == 0) {
      for (DeferredLoad deferredLoad : deferredLoads) {
        deferredLoad.load();
      }
      // issue #601
      deferredLoads.clear();
      if (configuration.getLocalCacheScope() == LocalCacheScope.STATEMENT) {
        // issue #482
        clearLocalCache();
      }
    }
    return list;
  }
从上面就找到了查找一级缓存的位置了,如果list判断是空说明缓存没数据他会走queryFromDatabase去查询并且把数据缓存起来
 private <E> List<E> queryFromDatabase(MappedStatement ms, Object parameter, RowBounds rowBounds, ResultHandler resultHandler, CacheKey key, BoundSql boundSql) throws SQLException {
    List<E> list;
    // 先占位
    localCache.putObject(key, EXECUTION_PLACEHOLDER);
    try {
      // 三种 Executor 的区别,看doUpdate
      // 默认Simple
      list = doQuery(ms, parameter, rowBounds, resultHandler, boundSql);
    } finally {
      // 移除占位符
      localCache.removeObject(key);
    }
    // 写入一级缓存
    localCache.putObject(key, list);
    if (ms.getStatementType() == StatementType.CALLABLE) {
      localOutputParameterCache.putObject(key, parameter);
    }
    return list;
  }

1.4.3 二级缓存
二级缓存是用来解决一级缓存不能跨会话共享的问题的,范围是namespace级别的,可以被多个SqlSession共享(只要是同一个接口里面的相同方法,都可以共享),生命周期和应用同步。二级缓存的设置,首先是settings中的cacheEnabled要设置为true,当然默认的就是为true,这个步骤决定了在创建Executor对象的时候是否通过CachingExecutor来装饰。前面源码中也有说明过;要想看二级缓存效果,</cache>标签要打开
然后把一级缓存配置关闭了,其实由于一级缓存的作用域太小,在实际生产中用的也比较少

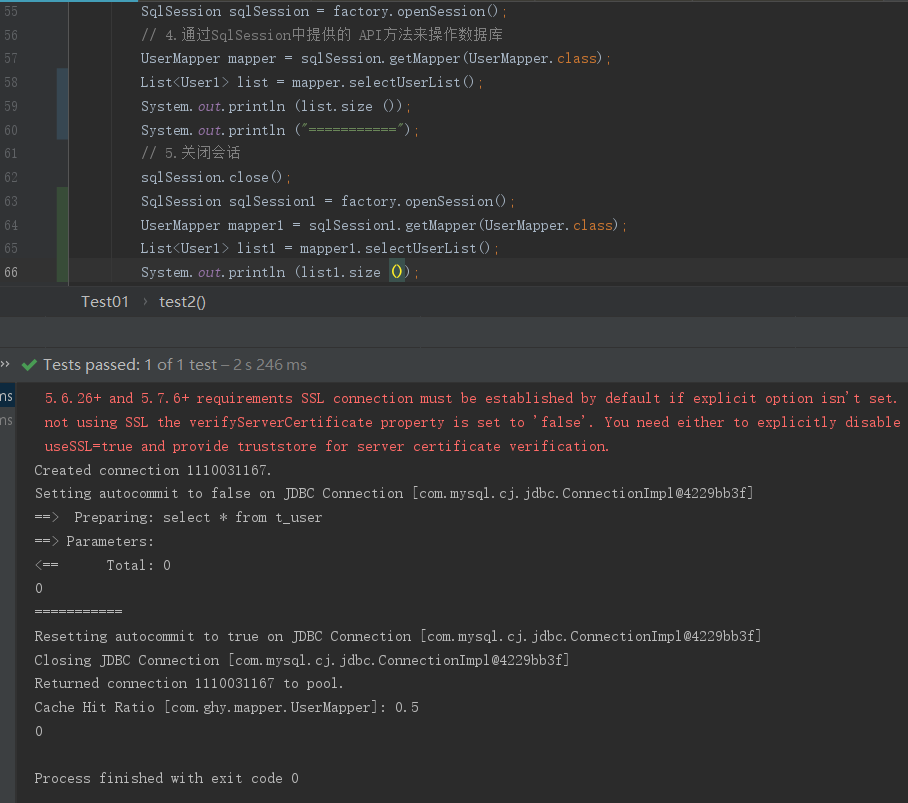
从上面可以发现第二次查询就没走数据库查询,说明二级缓存生效了。接下来看下二级缓存源码,其实在上面已经写出来了,入口是factory.openSession();
  @Override
  public SqlSession openSession() {
    return openSessionFromDataSource(configuration.getDefaultExecutorType(), null, false);
  }
  private SqlSession openSessionFromDataSource(ExecutorType execType, TransactionIsolationLevel level, boolean autoCommit) {
    //事务对象
    Transaction tx = null;
    try {
      final Environment environment = configuration.getEnvironment();
      // 获取事务工厂
      final TransactionFactory transactionFactory = getTransactionFactoryFromEnvironment(environment);
      // 创建事务
      tx = transactionFactory.newTransaction(environment.getDataSource(), level, autoCommit);
      // 根据事务工厂和默认的执行器类型,创建执行器 >>执行SQL语句操作
      final Executor executor = configuration.newExecutor(tx, execType);
      return new DefaultSqlSession(configuration, executor, autoCommit);
    } catch (Exception e) {
      closeTransaction(tx); // may have fetched a connection so lets call close()
      throw ExceptionFactory.wrapException("Error opening session.  Cause: " + e, e);
    } finally {
      ErrorContext.instance().reset();
    }
  }
  public Executor newExecutor(Transaction transaction, ExecutorType executorType) {
    executorType = executorType == null ? defaultExecutorType : executorType;
    executorType = executorType == null ? ExecutorType.SIMPLE : executorType;
    Executor executor;
    if (ExecutorType.BATCH == executorType) {
      executor = new BatchExecutor(this, transaction);
    } else if (ExecutorType.REUSE == executorType) {//针对Statement做缓存
      executor = new ReuseExecutor(this, transaction);
    } else {
      // 默认 SimpleExecutor,每一次只是SQL操作都创建一个新的Statement对象
      executor = new SimpleExecutor(this, transaction);
    }
    // 二级缓存开关,settings 中的 cacheEnabled 默认是 true
    if (cacheEnabled) {
      executor = new CachingExecutor(executor);
    }
    // 植入插件的逻辑,至此,四大对象已经全部拦截完毕;这里面是一个拦截器链
    executor = (Executor) interceptorChain.pluginAll(executor);
    return executor;
  }
从这里可以看到如果判断成立,那么会对executor做一个装饰;后面做查询操作时就要从sqlSession.selectList("com.ghy.mapper.UserMapper.selectUserList");跟踪起了
  @Override
  public <E> List<E> selectList(String statement, Object parameter, RowBounds rowBounds) {
    try {
      MappedStatement ms = configuration.getMappedStatement(statement);
      // 如果 cacheEnabled = true(默认),Executor会被 CachingExecutor装饰
      return executor.query(ms, wrapCollection(parameter), rowBounds, Executor.NO_RESULT_HANDLER);
    } catch (Exception e) {
      throw ExceptionFactory.wrapException("Error querying database.  Cause: " + e, e);
    } finally {
      ErrorContext.instance().reset();
    }
  }
一样,进入query方法看他是怎么执行的

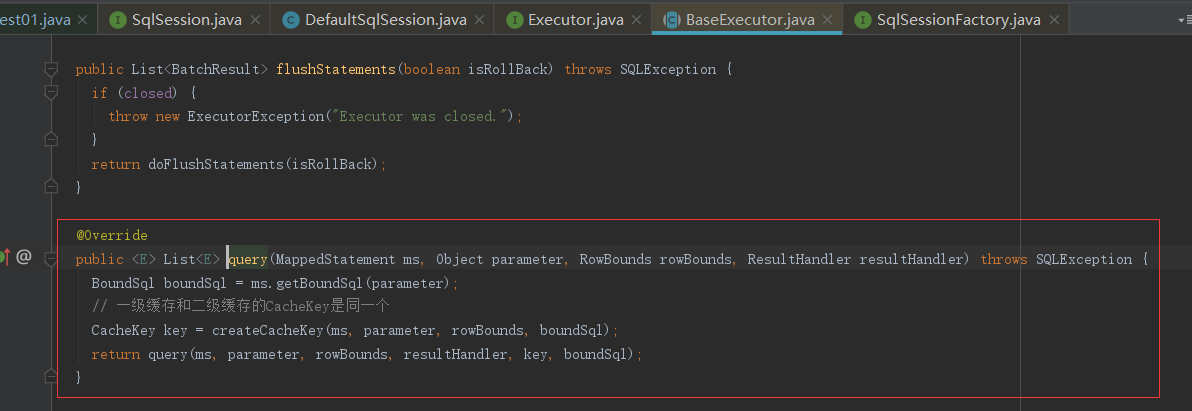
这里要进的就是CachingExecutor里面了,这里面是二级缓存的东西
  @Override
  public <E> List<E> query(MappedStatement ms, Object parameterObject, RowBounds rowBounds, ResultHandler resultHandler) throws SQLException {
    // 获取SQL
    BoundSql boundSql = ms.getBoundSql(parameterObject);
    // 创建CacheKey:什么样的SQL是同一条SQL? >>
    CacheKey key = createCacheKey(ms, parameterObject, rowBounds, boundSql);
    return query(ms, parameterObject, rowBounds, resultHandler, key, boundSql);
  }
这里面创建createCacheKey的过程和一级缓存一样,这里就不想再写一次了;
 @Override
  public <E> List<E> query(MappedStatement ms, Object parameterObject, RowBounds rowBounds, ResultHandler resultHandler, CacheKey key, BoundSql boundSql)
      throws SQLException {
    Cache cache = ms.getCache();
    // cache 对象是在哪里创建的?  XMLMapperBuilder类 xmlconfigurationElement()
    // 由 <cache> 标签决定
    if (cache != null) {
      // flushCache="true" 清空一级二级缓存 >>
      flushCacheIfRequired(ms);
      if (ms.isUseCache() && resultHandler == null) {
        ensureNoOutParams(ms, boundSql);
        // 获取二级缓存
        // 缓存通过 TransactionalCacheManager、TransactionalCache 管理
        @SuppressWarnings("unchecked")
        List<E> list = (List<E>) tcm.getObject(cache, key);
        if (list == null) {
          list = delegate.query(ms, parameterObject, rowBounds, resultHandler, key, boundSql);
          // 写入二级缓存
          tcm.putObject(cache, key, list); // issue #578 and #116
        }
        return list;
      }
    }
    // 走到 SimpleExecutor | ReuseExecutor | BatchExecutor
    return delegate.query(ms, parameterObject, rowBounds, resultHandler, key, boundSql);
  }
这就是二级缓存过程;
cache属性详解:
| 属性 | 含义 | 取值 |
| type |
缓存实现类 |
需要实现Cache接口,默认是PerpetualCache,可以使用第三方缓存 |
| size |
最多缓存对象个数 |
默认1024 |
| eviction |
回收策略(缓存淘汰算法) |
LRU – 最近最少使用的:移除最长时间不被使用的对象(默认)。FIFO |
| flushInterval |
定时自动清空缓存间隔 |
自动刷新时间,单位 ms,未配置时只有调用时刷新 |
| readOnly |
是否只读 |
true:只读缓存;会给所有调用者返回缓存对象的相同实例。因此这些 |
| blocking |
启用阻塞缓存 |
通过在get/put方式中加锁,保证只有一个线程操作缓存,基于Java重入锁实现 |
1.4.4 第三方缓存
在实际开发的时候我们一般也很少使用MyBatis自带的二级缓存,这时我们会使用第三方的缓存工具Ehcache获取Redis来实现 https://github.com/mybatis/redis-cache
添加依赖
        <dependency>
            <groupId>org.mybatis.caches</groupId>
            <artifactId>mybatis-redis</artifactId>
            <version>1.0.0-beta2</version>
        </dependency>
然后加上Cache标签的配置
<cache type="org.mybatis.caches.redis.RedisCache"
eviction="FIFO"
flushInterval="60000"
size="512"
readOnly="true"/>
然后添加redis的属性文件
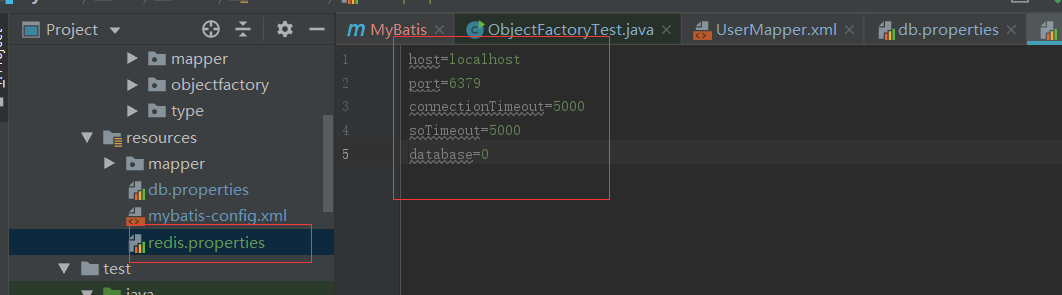
这样缓存就存入redis中了,至于怎么读到redis.properites文件的,这个可以从源码中找下

从上面看到在构造方法中会做一些初始的操作,其中的JedisPool是操作连接去操作redis的;
    public RedisConfig parseConfiguration() {
        return parseConfiguration(getClass().getClassLoader());
    }
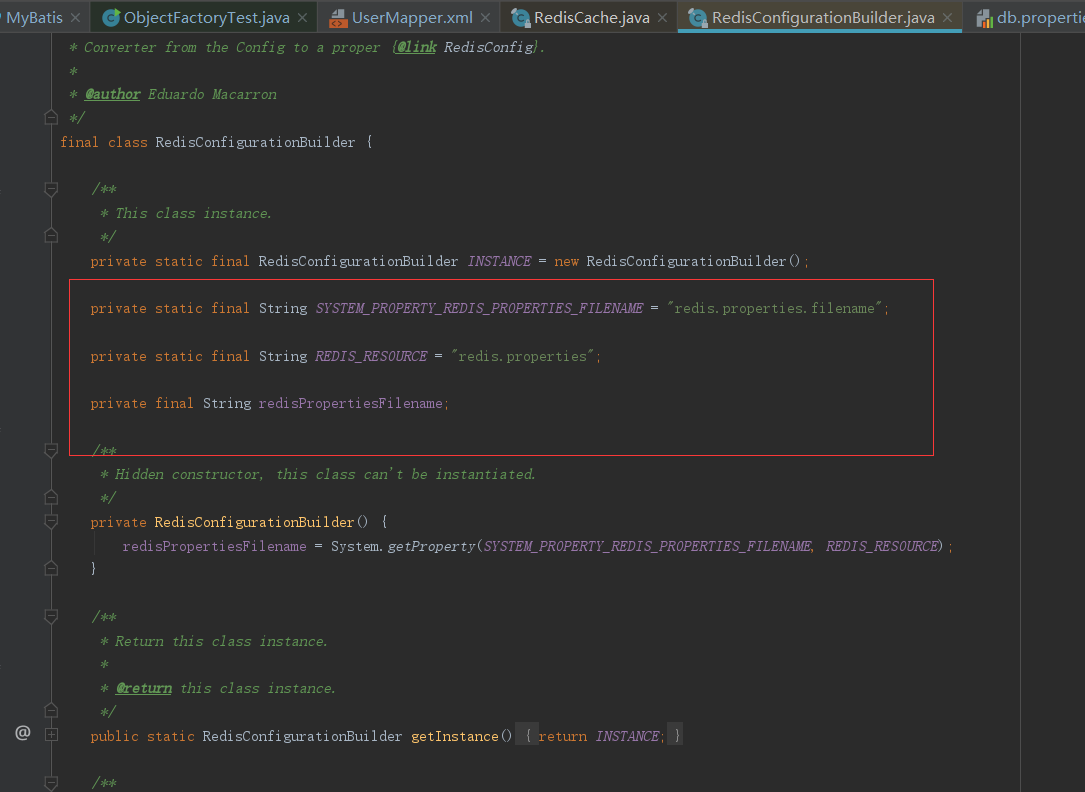
从源码中可以发现他已经做好了redis连接配置文件的默认命名了;