之前写过几篇有关安装lnmp环境的文章,现在回顾感觉有些比较老了或者并不是好的操作,于是更新这篇
1. 安装Nginx
1) 依赖安装
yum install gcc gcc-c++ openssl openssl-devel cyrus-sasl-md5
2)下载nginx
wget http://nginx.org/download/nginx-1.12.0.tar.gz
3)解压并进入安装目录
tar zxvf nginx-1.12.0.tar.gz
cd nginx-1.12.0
4) 编译安装
./configure --prefix=/usr/local/nginx --with-http_ssl_module

make && make install -j2
5) 启动并查看服务
/usr/local/nginx/sbin/nginx


ps -ef | grep nginx
6)加入开机自启动
vim  /etc/rc.local
添加代码如下:
/usr/local/nginx/sbin/nginx -c /usr/local/nginx/conf/nginx.conf &
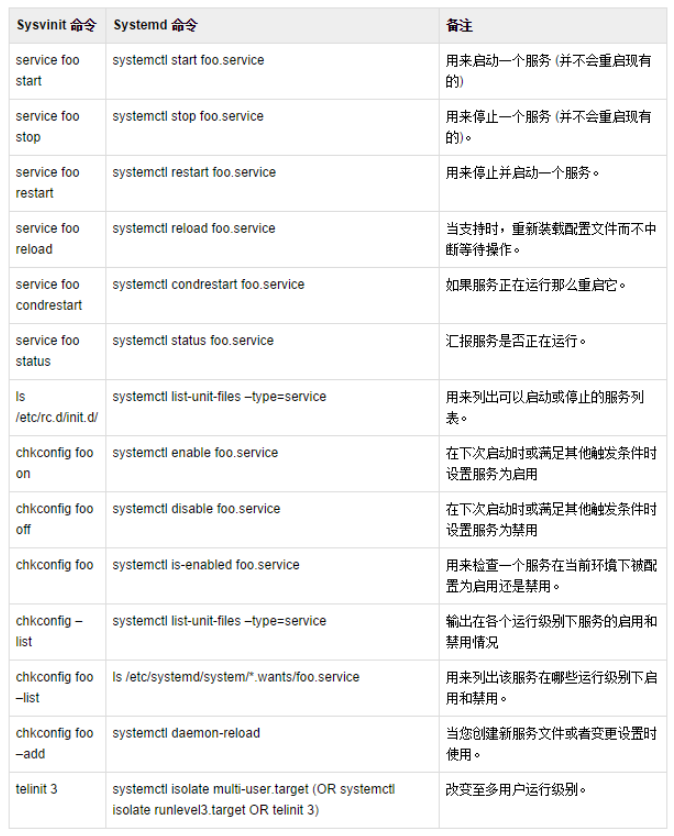
借助systemd进行开机自启动设置
Systemd服务文件以.service结尾,比如现在要建立nginx为开机启动,如果用yum install命令安装的,yum命令会自动创建nginx.service文件,直接用命令
systemcel enable nginx.service

编译安装的需要手动创建nginx.service
1. 在系统服务目录里创建nginx.service文件
vim  /lib/systemd/system/nginx.service

内容:
[Unit]
Description=nginx
After=network.target

[Service]
Type=forking
ExecStart=/usr/local/nginx/sbin/nginx
ExecReload=/usr/local/nginx/sbin/nginx -s reload
ExecStop=/usr/local/nginx/sbin/nginx -s quit
PrivateTmp=true

[Install]
WantedBy=multi-user.target

说明:
[Unit]:服务的说明
Description:描述服务
After:描述服务类别
[Service]服务运行参数的设置
Type=forking是后台运行的形式
ExecStart为服务的具体运行命令
ExecReload为重启命令
ExecStop为停止命令
PrivateTmp=True表示给服务分配独立的临时空间
注意:[Service]的启动、重启、停止命令全部要求使用绝对路径
[Install]运行级别下服务安装的相关设置,可设置为多用户,即系统运行级别为3

保存退出。

2.设置开机启动
systemctl enable nginx.service

3. 其他命令

启动nginx服务
systemctl  start  nginx.service

设置开机自启动
systemctl enable nginx.service

停止开机自启动
systemctl disable nginx.service

查看服务当前状态
systemctl status nginx.service

重新启动服务
systemctl restart nginx.service

查看所有已启动的服务
systemctl list-units --type=service

7)加入全局环境变量
vim /etc/profile

export=$PATH:/usr/local/nginx/sbin

保存退出


立即生效: source /etc/profile
8) 验证环境变量
nginx -v

nginx version: nginx/1.12.0
2. 安装PHP
1) 安装依赖包
yum -y install bzip2
2)下载PHP
wget https://www.php.net/distributions/php-7.2.28.tar.bz2

tar txvf php-7.2.28.tar.bz2

cd php-7.2.28
3) 创建www用户
groupadd  www

useradd -g www -s /sbin/nologin www


# 查看www用户
id www
4)编译安装
./configure --prefix=/usr/local/php7 --with-config-file-path=/usr/local/php7 --enable-sockets --enable-fpm --enable-cli --enable-mbstring --enable-pcntl --enable-soap --enable-opcache --disable-fileinfo --disable-rpath --with-mysqli --with-pdo-mysql --with-iconv-dir --with-openssl --with-fpm-user=www --with-fpm-group=www --with-curl --with-mhash --with-gd --with-jpeg-dir --with-png-dir --with-freetype-dir --enable-zip --with-zlib --enable-simplexml --with-libxml-dir

make && make install
说明:
--prefix=/usr/local/php7 # 配置安装目录
--with-config-file-path=/usr/local/php7 # 配置文件 php.ini 的路径
--enable-sockets # 开启 socket
--enable-fpm # 启用 fpm 扩展
--enable-cli # 启用 命令行模式 (从 php 4.3.0 之后这个模块默认开启所以可以不用再加此命令)
--enable-mbstring # 启用 mbstring 库
--enable-pcntl # 启用 pcntl (仅 CLI / CGI)
--enable-soap # 启用 soap
--enable-opcache # 开启 opcache 缓存
--disable-fileinfo # 禁用 fileinfo (由于 5.3+ 之后已经不再持续维护了,但默认是开启的,所以还是禁止了吧)(1G以下内存服务器直接关了吧)
--disable-rpath  #禁用在搜索路径中传递其他运行库。
--with-mysqli # 启用 mysqli 扩展
--with-pdo-mysql # 启用 pdo 扩展
--with-iconv-dir # 启用 XMLRPC-EPI 字符编码转换 扩展
--with-openssl # 启用 openssl 扩展 (需要 openssl openssl-devel)
--with-fpm-user=www #设定 fpm 所属的用户
--with-fpm-group=www #设定 fpm 所属的组别
--with-curl # 启用 curl 扩展
--with-mhash # 开启 mhash 基于离散数学原理的不可逆向的php加密方式扩展库
# GD
--with-gd # 启用 GD 图片操作 扩展
--with-jpeg-dir # 开启对 jpeg 图片的支持 (需要 libjpeg)
--with-png-dir # 开启对 png 图片支持 (需要 libpng)
--with-freetype-dir # 开启 freetype
# 压缩
--enable-zip # 启用 zip
--with-zlib # 启用对 zlib 支持
# xml
--enable-simplexml # 启用对 simplexml 支持
--with-libxml-dir # 启用对 libxml2 支持
5)设置配置文件
cp /opt/php-7.2.28/php.ini-production /usr/local/php7/php.ini

cp /usr/local/php7/etc/php-fpm.conf.default  /usr/local/php7/etc/php-fpm.conf

cp  /usr/local/php7/etc/php-fpm.d/www.conf.default    /usr/local/php7/etc/php-fpm.d/www.conf
php-fpm.conf修改如下:
[global]
; Pid file
; Note: the default prefix is /usr/local/php7/var
; Default Value: none
# 取消下面的注释
pid = run/php-fpm.pid
6) 配置简单启动命令
# 复制启动脚本到 init.d 目录
$ cp php-7.2.19/sapi/fpm/init.d.php-fpm /etc/init.d/php-fpm
# 增加执行权限
$ chmod +x /etc/init.d/php-fpm
php-fpm操作命令:
/usr/local/php7/sbin/php-fpm.  # 启动
pkill. -9 php-fpm #停止

/etc/init.d/php-fpm start. # 启动
/etc/init.d/php-fpm stop  # 停止
/etc/init.d/php-fpm status # 状态
/etc/init.d/php-fpm restart # 重启
7)添加自启动
/sbin/chkconfig php-fpm on #再次重启即可完成自启动
8)php-fpm服务化
# 在 centos 7 之后我们可以使用 systemctl 更好的管理系统服务
# 所以我们也要让 php-fpm 支持
# 因为 php 7.2 源码包里面含有 systemctl 所需要的脚本文件
# 我们只要复制过去即可,我们来开始配置
# 进入下载的 php源码包
$ cd php-7.2.28/sapi/fpm
# 复制其中的 php-fpm.service 到 /usr/lib/systemd/system/
$ cp php-fpm.service /usr/lib/systemd/system/
# 再次使用 systemctl enable php-fpm 进行配置自启动
$ systemctl enable php-fpm
# 重启测试一下看看自己服务器的 php-fpm 是否成功运行
systemctl enable xxxxxx # 配置自启动
systemctl stop xxxxx # 停止服务
systemctl start xxxx # 开启服务
systemctl status xxxx # 查看状态
9)nginx支持配置
$ vi /usr/local/nginx/conf/nginx.conf
...
http {
...
    server {
...
# 把 [1] 换成 [2]
# 让 nginx 支持 php 文件
#[1]
                location / {
            root   html;
                   index  index.html index.htm;
        }
#[2]
        location / {
            root   html;
                   index  index.php index.html index.htm;
        }
...
# 把 [1] 换成 [2]
# 配置监听 php 端口
# 注意: 要把 /scripts 换成 $document_root
#[1]
        #location ~ .php$ {
        #        root           html;
        #        fastcgi_pass   127.0.0.1:9000;
        #        fastcgi_index  index.php;
        #        fastcgi_param  SCRIPT_FILENAME  /scripts$fastcgi_script_name;
        #        include        fastcgi_params;
        #}
#[2]
        location ~ .php$ {
            root           html;
               fastcgi_pass   127.0.0.1:9000;
            fastcgi_index  index.php;
            fastcgi_param  SCRIPT_FILENAME  $document_root$fastcgi_script_name;
            include        fastcgi_params;
        }
...
}
10)添加PHP全局变量
vim /etc/profile

添加内容如下:
export=$PATH:/usr/local/php7/bin


立即生效
source /etc/profile
常见错误:
configure: error: libxml2 not found. Please check your libxml2 installation.
# 安装 libxml2 库
$ yum -y install libxml2 libxml2-devel

...

configure: error: Cannot find OpenSSL's <evp.h>
# 安装 openssl 库
$ yum -y install openssl openssl-devel

...

checking for cURL 7.10.5 or greater... configure: error: cURL version 7.10.5 or later is required to compile php with cURL support
# 安装 curl 库
$ yum -y install libcurl libcurl-devel

...

configure: error: jpeglib.h not found.
# 安装 libjpeg 顺便 把 libpng 也装上
$ yum -y install libjpeg libjpeg-devel libpng libpng-devel

...

configure: error: freetype-config not found.
# 安装 freetype 库
$ yum -y install freetype freetype-devel
3. 安装mysql
因为编译安装mysql较为复杂,这里先使用yum进行安装,之后会专门开一篇记录编译安装mysql
wget http://repo.mysql.com/mysql57-community-release-el7-8.noarch.rpm
rpm -ivh mysql57-community-release-el7-8.noarch.rpm
yum --installroot=/usr/local/mysql --releasever=/ -y install mysql-server
使用yum安装之后,可以执行使用systemctl命令进行操作
开启MySQL服务器: systemctl start mysqld
关闭MySQL服务器: systemctl stop mysqld
。。。
mysql第一次登录会生成随机密码:
grep "password" /var/log/mysqld.log
登录并重置密码:
alter user 'root'@'localhost' identified by '123456';

flush privileges;
注意: 默认它的密码安全级别为中等,需要使用大小写字母+数字+特殊字符 组合
开启远程连接:
grant all privileges on *.* to root@'%' identified by "password";

flush privileges;