手把手教你搭建SSH框架(Eclipse版)
1、前期准备
- 安装配置JDK1.8
- 安装配置Tomcat9.0
- 安装配置MySql5.7
- 开发工具Eclipse
2、新建动态Web项目
在开发工具中:
File-->New-->Project-->Dynamic Web Project
输入项目名称(本教程项目名:sshDemo),最后点击Finish即可。

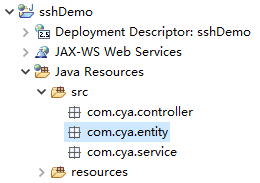
3、补充、完善项目目录
为使得项目符合MVC开发规范,我们需要在src下新建controller、service、entity几个包和resources目录。完成后目录结构如下图:
4、导入所需Jar包
本期教程用最原始的方法手动导入项目所需Jar包。手动导入会存在Jar包版本冲突等很多问题,建议直接下载使用。在公众号【C you again】后台回复“Jar”自行下载,若不能正常下载,请在后台私信。
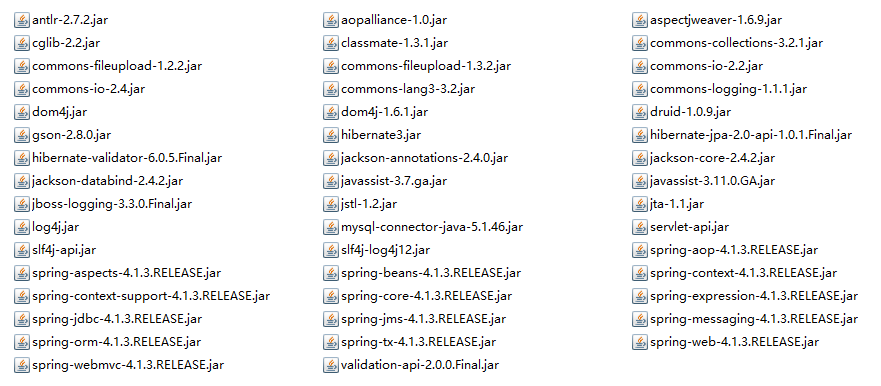
将下载好的Jar包复制到WebContent-->WEB-INF-->lib文件夹下,然后选中所有Jar包-->鼠标右击-->Build Path-->Add to Build Path。
5、添加相关配置文件
完成以上基本步骤后,接下来就是SSH整合的关键步骤了。
首先在项目的WebContent-->WEB-INF下的web.xml文件中加入以下配置,如果没有web.xml文件就需要自己新建一个。
<?xml version="1.0" encoding="UTF-8"?>
<web-app xmlns:xsi="http://www.w3.org/2001/XMLSchema-instance"
    xmlns="http://java.sun.com/xml/ns/javaee"
    xmlns:web="http://java.sun.com/xml/ns/javaee/web-app_2_5.xsd"
    xsi:schemaLocation="http://java.sun.com/xml/ns/javaee http://java.sun.com/xml/ns/javaee/web-app_2_5.xsd"
    id="WebApp_ID" version="2.5">

    <welcome-file-list>
        <welcome-file>test.jsp</welcome-file>
    </welcome-file-list>
    <!-- 加载spring容器 -->
    <context-param>
        <param-name>contextConfigLocation</param-name>
        <param-value>classpath*:application.xml</param-value>
    </context-param>
    <listener>
        <listener-class>org.springframework.web.context.ContextLoaderListener</listener-class>
    </listener>

    <!-- 解决post乱码 -->
    <filter>
        <filter-name>CharacterEncodingFilter</filter-name>
        <filter-class>org.springframework.web.filter.CharacterEncodingFilter</filter-class>
        <init-param>
            <param-name>encoding</param-name>
            <param-value>utf-8</param-value>
        </init-param>

    </filter>
    <filter-mapping>
        <filter-name>CharacterEncodingFilter</filter-name>
        <url-pattern>/*</url-pattern>
    </filter-mapping>


    <servlet>
        <servlet-name>springMvc</servlet-name>
        <servlet-class>org.springframework.web.servlet.DispatcherServlet</servlet-class>
        <init-param>
            <param-name>contextConfigLocation</param-name>
            <param-value>classpath*:springmvc.xml</param-value>
        </init-param>
        <load-on-startup>1</load-on-startup>
    </servlet>
    <servlet-mapping>
        <servlet-name>springMvc</servlet-name>
        <url-pattern>/</url-pattern>
    </servlet-mapping>

</web-app>
完成web.xml的配置后,在前面建好的resources文件夹下新建application.xml,具体解释看文件内部。
<?xml version="1.0" encoding="UTF-8"?>
<beans xmlns="http://www.springframework.org/schema/beans"
       xmlns:xsi="http://www.w3.org/2001/XMLSchema-instance"
       xmlns:context="http://www.springframework.org/schema/context" xmlns:tx="http://www.springframework.org/schema/tx"
       xsi:schemaLocation="http://www.springframework.org/schema/beans
                        http://www.springframework.org/schema/beans/spring-beans-3.1.xsd
                        http://www.springframework.org/schema/context
                        http://www.springframework.org/schema/context/spring-context-3.1.xsd http://www.springframework.org/schema/tx http://www.springframework.org/schema/tx/spring-tx.xsd">
    <!-- 自动扫描 -->
    <context:component-scan base-package="com.cya"/>

    <!-- 引入配置文件 -->
    <bean id="propertyConfigurer"
          class="org.springframework.beans.factory.config.PropertyPlaceholderConfigurer">
        <property name="locations">
                <value>classpath*:dbconfig.properties</value>
        </property>
    </bean>

    <!-- 配置数据库连接池 -->
    <bean id="dataSource" class="com.alibaba.druid.pool.DruidDataSource"
        destroy-method="close">
        <property name="url" value="${jdbc.url}" />
        <property name="username" value="${jdbc.username}" />
        <property name="password" value="${jdbc.password}" />
        <property name="driverClassName" value="${jdbc.driver}" />
        <property name="maxActive" value="10" />
        <property name="minIdle" value="5" />
    </bean>


    <!-- spring与hibernate整合 -->
    <bean id="sqlSessionFactory"
        class="org.springframework.orm.hibernate3.LocalSessionFactoryBean">
        <property name="dataSource" ref="dataSource"></property>
        <!-- hibernate配置信息 -->
        <property name="hibernateProperties">
            <props>
            <prop key="hibernate.dialect">${hibernate.dialect}</prop>
            <prop key="hibernate.show_sql">${hibernate.show_sql}</prop>
            <prop key="hibernate.format_sql">${hibernate.format_sql}</prop>
            <prop key="hibernate.hbm2ddl.auto">${hibernate.hbm2ddl.auto}</prop>
            </props>
        </property>

        <property name="configLocations">
            <list>
                <value> classpath*:hibernate.cfg.xml</value>
            </list>
        </property>
    </bean>

    <!-- 配置hibernateTemplate(可将Hibernate 的持久层访问模板化) -->
    <bean id="hibernateTemplate" class="org.springframework.orm.hibernate3.HibernateTemplate">
        <property name="sessionFactory" ref="sqlSessionFactory"></property>
    </bean>

    <!-- 事务管理 -->
    <bean id="transactionManager"
          class="org.springframework.jdbc.datasource.DataSourceTransactionManager">
        <property name="dataSource" ref="dataSource"/>
    </bean>

    <!--支持事务注解的(@Transactional)-->
    <tx:annotation-driven transaction-manager="transactionManager"/>

</beans>
接着在resources文件夹下新建springmvc.xml,代码如下:
<?xml version="1.0" encoding="UTF-8"?>
<beans xmlns="http://www.springframework.org/schema/beans"
       xmlns:xsi="http://www.w3.org/2001/XMLSchema-instance"
       xmlns:context="http://www.springframework.org/schema/context"
       xmlns:mvc="http://www.springframework.org/schema/mvc"
       xsi:schemaLocation="http://www.springframework.org/schema/beans
       http://www.springframework.org/schema/beans/spring-beans.xsd
       http://www.springframework.org/schema/context
       http://www.springframework.org/schema/context/spring-context.xsd
       http://www.springframework.org/schema/mvc
       http://www.springframework.org/schema/mvc/spring-mvc.xsd">

    <!-- 自动装配 -->
    <context:component-scan base-package="com.cya.controller" />
    <!-- 启用spring mvc 注解 -->
    <mvc:annotation-driven />

    <!--视图解析器-->
    <bean class="org.springframework.web.servlet.view.InternalResourceViewResolver">
        <!--前缀-->
        <property name="prefix" value="/WEB-INF/"/>
        <!--后缀-->
        <property name="suffix" value=".jsp"></property>
    </bean>

    <!-- 文件上传 -->
    <bean id="multipartResolver"
          class="org.springframework.web.multipart.commons.CommonsMultipartResolver">
        <!-- 默认编码 -->
        <property name="defaultEncoding" value="utf-8"/>
        <!-- 文件大小最大值 -->
        <property name="maxUploadSize" value="10485760000"/>
        <!-- 内存中的最大值 -->
        <property name="maxInMemorySize" value="40960"/>
    </bean>

</beans>
同上面的步骤,继续在resources文件夹下新建hibernate.cfg.xml、dbconfig.properties、log4j.properties三个文件。
hibernate.cfg.xml文件:
<?xml version="1.0" encoding="UTF-8"?>
<!DOCTYPE hibernate-configuration PUBLIC
"-//Hibernate/Hibernate Configuration DTD 3.0//EN"
"http://hibernate.sourceforge.net/hibernate-configuration-3.0.dtd">
<hibernate-configuration>
    <session-factory>
    <!-- 设置映射的xml文件  -->

    </session-factory>
</hibernate-configuration>
dbconfig.properties文件:
#database connection config
jdbc.driver = com.mysql.jdbc.Driver
jdbc.url = jdbc:mysql://localhost:3306/test?characterEncoding=utf-8&useSSL=false
jdbc.username = root
jdbc.password = root

#hibernate config
hibernate.dialect = org.hibernate.dialect.MySQLDialect
hibernate.show_sql = true
hibernate.format_sql = true
hibernate.hbm2ddl.auto = update
log4j.properties文件:
# Set root logger level to error
log4j.rootLogger=INFO, Console, File

###### Console appender definition #######

# All outputs currently set to be a ConsoleAppender.
log4j.appender.Console=org.apache.log4j.ConsoleAppender
log4j.appender.Console.layout=org.apache.log4j.PatternLayout
log4j.appender.Console.layout.ConversionPattern=%d{ABSOLUTE} %-5p [%c{3}] %m%n
#log4j.appender.Console.layout.ConversionPattern=%d{ABSOLUTE} %-5p [%c] %m%n

###### File appender definition #######
log4j.appender.File=org.apache.log4j.DailyRollingFileAppender
log4j.appender.File.File=spring.log
log4j.appender.File.Append=false
log4j.appender.File.layout=org.apache.log4j.PatternLayout
log4j.appender.File.layout.ConversionPattern=%d{ABSOLUTE} %-5p [%c] %m%n
至此,所有的整合步骤已经完成了,最后的目录结构如下所示,接下来就是设计测试用例了。

6、测试项目能否正常运行
完成上述步骤后,接下来就测试下整合是否成功吧!
在src-->com.cya.entity下创建Person.java实体类
package com.cya.entity;

public class Person {
	private int id;
	private String name;
	private int age;
	public int getId() {
		return id;
	}
	public void setId(int id) {
		this.id = id;
	}
	public String getName() {
		return name;
	}
	public void setName(String name) {
		this.name = name;
	}
	public int getAge() {
		return age;
	}
	public void setAge(int age) {
		this.age = age;
	}

}
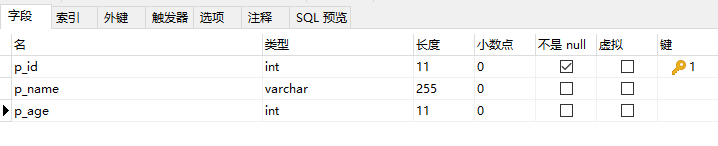
在resources下新建mapping目录,用来保存所有的数据库映射文件。mapping目录下创建映射文件:Person.hbm.xml,具体配置如下:
<?xml version="1.0" encoding="utf-8"?>
<!DOCTYPE hibernate-mapping PUBLIC
"-//Hibernate/Hibernate Mapping DTD 3.0//EN"
"http://hibernate.sourceforge.net/hibernate-mapping-3.0.dtd">
<hibernate-mapping>
    <class name="com.cya.entity.Person" table="t_person">
        <id name="id" type="java.lang.Integer" column="p_id" >
            <generator class="increment"></generator>
        </id>
        <property name="name" type="java.lang.String" column="p_name"></property>
        <property name="age" type="java.lang.Integer" column="p_age"></property>
    </class>
</hibernate-mapping>
修改hibernate.cfg.xml,添加配置:
<?xml version="1.0" encoding="UTF-8"?>
<!DOCTYPE hibernate-configuration PUBLIC
"-//Hibernate/Hibernate Configuration DTD 3.0//EN"
"http://hibernate.sourceforge.net/hibernate-configuration-3.0.dtd">
<hibernate-configuration>
    <session-factory>
    <!-- 设置映射的xml文件  -->
        <mapping resource="mapping/Person.hbm.xml"/>
    </session-factory>
</hibernate-configuration>
修改完成后启动web项目,待项目启动成功以后刷新test数据库,我们发现已经创建好了名为t_person的数据表。
在WebContent文件夹下新建test.jsp。
<%@ page language="java" contentType="text/html; charset=utf-8"
	pageEncoding="utf-8"%>
<!DOCTYPE html>
<html>
<head>
  <meta charset="utf-8">
  <title>测试SSH整合</title>
</head>
<body>
	<h3>
		<a href="addPerson">添加并查看Person信息</a>
	</h3>
</body>
</html>
在src-->com.cya.service下创建IPersonService.java接口。
package com.cya.service;

import java.util.List;

import com.cya.entity.Person;

public interface IPersonService {

	public boolean addPerson(Person person);

	public List<Person> getPerson(String sql);

}
在src下新建com.cya.service.impl包,并创建PersonServiceImpl.java类实现IPersonService.java接口中的getPerson()和addPerson()两个方法。
package com.cya.service.impl;

import java.util.List;

import javax.annotation.Resource;

import org.springframework.orm.hibernate3.HibernateTemplate;
import org.springframework.stereotype.Service;

import com.cya.entity.Person;
import com.cya.service.IPersonService;


@Service
public class PersonServiceImpl implements IPersonService{

	@Resource(name="hibernateTemplate")
	private HibernateTemplate hibernateTemplate;

	@Override
	public boolean addPerson(Person person) {
		// TODO Auto-generated method stub
		boolean result=true;
		try {
			hibernateTemplate.save(person);
		} catch (Exception e) {
			// TODO: handle exception
			result=false;
		}
		return result;

	}

	@Override
	public List<Person> getPerson(String sql) {
		// TODO Auto-generated method stub
		return (List<Person>) hibernateTemplate.find(sql);
	}

}
在src-->com.cya.controller包下新建class,这里取名为Test.java,去调用PersonServiceImpl.java中的方法。
package com.cya.controller;
import java.util.List;
import javax.annotation.Resource;
import org.springframework.beans.factory.annotation.Autowired;
import org.springframework.stereotype.Controller;
import org.springframework.web.bind.annotation.RequestMapping;
import org.springframework.web.bind.annotation.ResponseBody;
import com.cya.entity.Person;
import com.cya.service.IPersonService;
@Controller
@ResponseBody
public class Test {
@Resource
private IPersonService personServiceImpl;
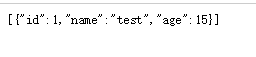
@RequestMapping("addPerson")
public List<Person> getPerson() {
Person person=new Person();
person.setAge(15);
person.setName("test");
boolean status=personServiceImpl.addPerson(person);
if(status)return personServiceImpl.getPerson("from com.cya.entity.Person");
else return null;
}
}
最后检查代码,启动服务,在浏览器地址栏输入:http://localhost:8080/sshDemo/test.jsp查看效果。
7、下载相关
下载项目所需Jar包请在公众号【C you again】回复“Jar”。
下载完整项目源码请在公众号【C you again】回复“ssh”。
本期分享就到这里,因本人技术有限,文章难免会出现一些错误,欢迎指正。创作不易,大家多多转发点赞,感谢。