啊,终于搞成功了,哈哈。
书上说要改tomcat\config\web.xml,要去掉注释,
<!--
<servlet>
<servlet-name>invoker</servlet-name>
<servlet-class>
org.apache.catalina.servlets.InvokerServlet
</servlet-class>
<init-param>
<param-name>debug</param-name>
<param-value>0</param-value>
</init-param>
<load-on-startup>2</load-on-startup>
</servlet>
-->
和
<!--
<servlet-mapping>
<servlet-name>invoker</servlet-name>
<url-pattern>/servlet/*</url-pattern>
</servlet-mapping>
-->
但是 我解了注释后,就出现错误,也不知道怎么改,而在tomcat7里,这个注释都没有,不过我最终找到了解决办法。
以上的是在全局变量里改,我们可以再网站根目录下改,如C:\tomcat6\webapps\ROOT\WEB-INF\web.xml里改
加入如下语句:
<servlet>
<servlet-name>HelloWorld</servlet-name>
<servlet-class>HelloServlet</servlet-class>
</servlet>
<!-- Note: All <servlet> elements MUST be grouped together and
placed IN FRONT of the <servlet-mapping> elements -->
<servlet-mapping>
<servlet-name>HelloWorld</servlet-name>
<url-pattern>/sayhello</url-pattern>
</servlet-mapping>
解释:servlet name:相当于id,两个要一样。
servlet-class 是要执行的class,放在C:\tomcat6\webapps\ROOT\WEB-INF\classes\HelloServlet.class
url-pattern 是网址,只要输入localhost:8080/sayhello 就可以执行servlet了。
我是从这里看到的http://www3.ntu.edu.sg/home/ehchua/programming/howto/tomcat_howto.html
STEP 6: Write a "Hello-world" Java Servlet
A servlet is Java program that runs inside a Java-capable HTTP Server, such as Apache Tomcat. A web user invokes a servlet by issuing an appropriate URL from a web browser (or HTTP client).
Before you proceed, I shall assume that you are familiar with Java Programming and have installed the followings:
- JDK (Read "How to install JDK and Get Started").
- A programming text editor, such as TextPad or Notepad++ (Read "Programming Text Editor"); or a Java IDE such as Eclipse or NetBeans (Read "How to Install Eclipse" or "How to Install NetBeans").
Step 6(a) Install Servlet API Library
Before we can write our first servlet, we need to install the Servlet API. Servlet API is not part of JDK (but belongs to Java EE). Tomcat also includes a copy of Servlets API.
COPY the Tomcat's Servlet API JAR-file located at "<TOMCAT_HOME>\lib\servlet-api.jar", (e.g., "d:\myproject\tomcat\lib\servlet-api.jar") into JDK's extension directory at "<JAVA_HOME>\jre\lib\ext", (e.g., "c:\program files\java\jdk1.7.0\jre\lib\ext").
(For Advanced Users Only) Alternatively, you could include the Servlet API JAR-file in the CLASSPATH. Open "Control Panel" ⇒ System ⇒ (Vista/7 only) Advanced system settings ⇒ Switch to "Advanced" tab ⇒ Environment variables ⇒ Choose "System Variables" (for all users in this system) or "User Variables" (for this login user only) ⇒ Choose "New" or "Edit"⇒ In "Variable Name", enter "classpath" ⇒ In "Variable Value", enter ".;path-to\servlet-api.jar", where "path-to" includes the drive letter and path of the Servlet API jar-file "servlet-api.jar". You can also compile your program using "javac -cp .;path-to\servlet-api.jar ServletName".
Step 6(b) Write a "Hello-world" Java Servlet
A Java servlet is a Java program that runs inside a HTTP server. A web user invokes a servlet by issuing a URL from a browser (or HTTP client).
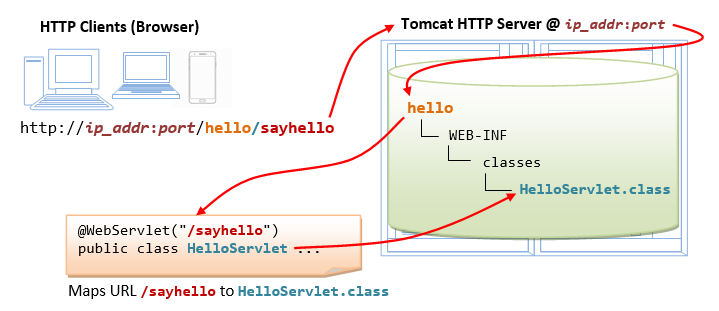
In this example, we are going to write a Java servlet called HelloServlet, which says "Hello, world!". We will then write a configuration such that web users can invoke this servlet by issuing URL http://hostname:port/hello/sayhello from the browser, as illustrated:
Write the following source codes called "HelloServlet.java" and save it under your application "classes" directory (i.e., "<TOMCAT_HOME>\webapps\hello\WEB-INF\classes\HelloServlet.java"). Compile the source into "HelloServlet.class". This servlet says "Hello", echos some request information, and prints a random number upon each request.
1 2 3 4 5 6 7 8 9 10 11 12 13 14 15 16 17 18 19 20 21 22 23 24 25 26 27 28 29 30 31 32 33 34 |
// To save as "<TOMCAT_HOME>\webapps\hello\WEB-INF\classes\HelloServlet.java" import java.io.*; import javax.servlet.*; import javax.servlet.http.*; public class HelloServlet extends HttpServlet { @Override public void doGet(HttpServletRequest request, HttpServletResponse response) throws IOException, ServletException { // Set the response MIME type of the response message response.setContentType("text/html"); // Allocate a output writer to write the response message into the network socket PrintWriter out = response.getWriter(); // Write the response message, in an HTML page try { out.println("<html>"); out.println("<head><title>Hello, World</title></head>"); out.println("<body>"); out.println("<h1>Hello, world!</h1>"); // says Hello // Echo client's request information out.println("<p>Request URI: " + request.getRequestURI() + "</p>"); out.println("<p>Protocol: " + request.getProtocol() + "</p>"); out.println("<p>PathInfo: " + request.getPathInfo() + "</p>"); out.println("<p>Remote Address: " + request.getRemoteAddr() + "</p>"); // Generate a random number upon each request out.println("<p>A Random Number: <strong>" + Math.random() + "</strong></p>"); out.println("</body></html>"); } finally { out.close(); // Always close the output writer } } } |
(Skip Unless...) Read "Common Errors in Compiling Java Servlet".
Step 6(c) Configure Servlet's Request URL in "webapps\hello\WEB-INF\web.xml"
A web user invokes a servlet, which is kept in the web server, by issuing a request URL from the browser. We need to configure this request URL for our HelloServlet.
Create the following configuration file called "web.xml", and save it under "webapps\hello\WEB-INF" (i.e., "<TOMCAT_HOME>\webapps\hello\WEB-INF\web.xml").
1 2 3 4 5 6 7 8 9 10 11 12 13 14 15 16 17 18 19 20 21 |
<?xml version="1.0" encoding="ISO-8859-1"?> <web-app version="3.0" xmlns="http://java.sun.com/xml/ns/javaee" xmlns:xsi="http://www.w3.org/2001/XMLSchema-instance" xsi:schemaLocation="http://java.sun.com/xml/ns/javaee http://java.sun.com/xml/ns/javaee/web-app_3_0.xsd"> <!-- To save as "hello\WEB-INF\web.xml" --> <servlet> <servlet-name>HelloWorld</servlet-name> <servlet-class>HelloServlet</servlet-class> </servlet> <!-- Note: All <servlet> elements MUST be grouped together and placed IN FRONT of the <servlet-mapping> elements --> <servlet-mapping> <servlet-name>HelloWorld</servlet-name> <url-pattern>/sayhello</url-pattern> </servlet-mapping> </web-app> |
In the above configuration, a servlet having a class file "HelloServlet.class" is mapped to request URL "/sayhello" (via an arbitrary servlet-name "HelloWorld"), under this web application "hello". In other words, the complete request URL for this servlet is "http://hostname:port/hello/sayhello".
This configuration file, saved under your web application "hello", is applicable only to this particular web application "hello".
IMPORTANT: For each servlet, you need to write a pair of <servlet> and <servlet-mapping> elements with a common <servlet-name>. Take note that all the <servlet> elements MUST be grouped together and placed IN FRONT of the <servlet-mapping> elements.
Step 6(d) Invoke the Servlet
To run this servlet, start a browser, and issue the request URL configured earlier:
http://localhost:9999/hello/sayhello
You shall see the output of the servlet displayed in your web browser.
Refresh the browser, you shall see a new random number upon each refresh. In other word, the doGet() method of the servlet runs once per request.
Try "View Source" to look at the output received by the web users. Take note that the web users receive only the output of the servlet (generated via the out.println() statements). They have no access to the servlet programs (which may contain confidential information).
<html>
<head><title>Hello, World</title></head>
<body>
<h1>Hello, world!</h1>
<p>Request URI: /hello/sayhello</p>
<p>Protocol: HTTP/1.1</p>
<p>PathInfo: null</p>
<p>Remote Address: 127.0.0.1</p>
<p>A Random Number: <strong>0.3523682325749493</strong></p>
</body>
</html>
(Skip Unless...) The likely errors are "404 File Not Found" and "500 Internal Server Error". Read "How to debug" Section.
完结。原来是新加坡的南阳科技大学,呵呵,总之问题解决了,开心