这是一个图像分类的比赛CIFAR( CIFAR-10 - Object Recognition in Images )
首先我们需要下载数据文件,地址:
http://www.cs.toronto.edu/~kriz/cifar.html
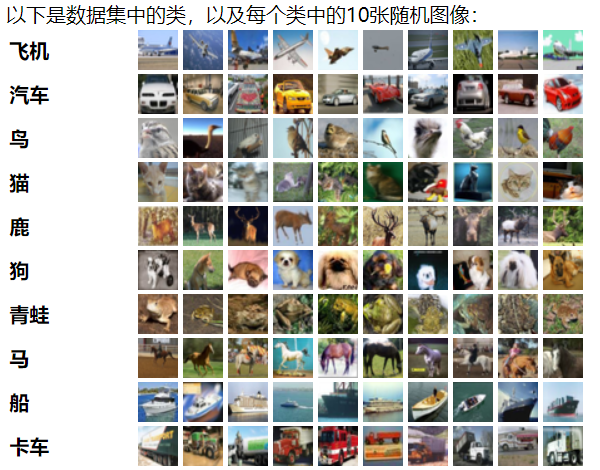
CIFAR-10数据集包含10个类别的60000个32x32彩色图像,每个类别6000个图像。有50000张训练图像和10000张测试图像。
数据集分为五个训练批次和一个测试批次,每个批次具有10000张图像。测试批次包含每个类别中恰好1000张随机选择的图像。训练批次按随机顺序包含其余图像,但是某些训练批次可能包含比另一类更多的图像。在它们之间,培训批次精确地包含每个班级的5000张图像。
这些类是完全互斥的。汽车和卡车之间没有重叠。“汽车”包括轿车,SUV和类似的东西。“卡车”仅包括大型卡车。都不包括皮卡车。
详细代码:
1.导包
 1 import numpy as np
 2
 3 # 序列化和反序列化
 4 import pickle
 5
 6 from sklearn.preprocessing import OneHotEncoder
 7
 8 import warnings
 9 warnings.filterwarnings('ignore')
10
11 import tensorflow as tf
2.数据加载
 1 def unpickle(file):
 2
 3     with open(file, 'rb') as fo:
 4         dict = pickle.load(fo, encoding='ISO-8859-1')
 5     return dict
 6
 7 # def unpickle(file):
 8 #     import pickle
 9 #     with open(file, 'rb') as fo:
10 #         dict = pickle.load(fo, encoding='bytes')
11 #     return dict
12
13 labels = []
14 X_train = []
15 for i in range(1,6):
16     data = unpickle('./cifar-10-batches-py/data_batch_%d'%(i))
17     labels.append(data['labels'])
18     X_train.append(data['data'])
19
20 # 将list类型转换为ndarray
21 y_train = np.array(labels).reshape(-1)
22 X_train = np.array(X_train)
23
24 # reshape
25 X_train = X_train.reshape(-1,3072)
26
27 # 目标值概率
28 one_hot = OneHotEncoder()
29 y_train =one_hot.fit_transform(y_train.reshape(-1,1)).toarray()
30 display(X_train.shape,y_train.shape)
3.构建神经网络
 1 X = tf.placeholder(dtype=tf.float32,shape = [None,3072])
 2 y = tf.placeholder(dtype=tf.float32,shape = [None,10])
 3 kp = tf.placeholder(dtype=tf.float32)
 4
 5 def gen_v(shape):
 6     return tf.Variable(tf.truncated_normal(shape = shape))
 7
 8 def conv(input_,filter_,b):
 9     conv = tf.nn.relu(tf.nn.conv2d(input_,filter_,strides=[1,1,1,1],padding='SAME') + b)
10     return tf.nn.max_pool(conv,[1,3,3,1],[1,2,2,1],'SAME')
11
12 def net_work(input_,kp):
13
14 #     形状改变,4维
15     input_ = tf.reshape(input_,shape = [-1,32,32,3])
16 #     第一层
17     filter1 = gen_v(shape = [3,3,3,64])
18     b1 = gen_v(shape = [64])
19     conv1 = conv(input_,filter1,b1)
20 #     归一化
21     conv1 = tf.layers.batch_normalization(conv1,training=True)
22
23 #     第二层
24     filter2 = gen_v([3,3,64,128])
25     b2 = gen_v(shape = [128])
26     conv2 = conv(conv1,filter2,b2)
27     conv2 = tf.layers.batch_normalization(conv2,training=True)
28
29 #     第三层
30     filter3 = gen_v([3,3,128,256])
31     b3 = gen_v([256])
32     conv3 = conv(conv2,filter3,b3)
33     conv3 = tf.layers.batch_normalization(conv3,training=True)
34
35 #     第一层全连接层
36     dense = tf.reshape(conv3,shape = [-1,4*4*256])
37     fc1_w = gen_v(shape = [4*4*256,1024])
38     fc1_b = gen_v([1024])
39     fc1 = tf.matmul(dense,fc1_w) + fc1_b
40     fc1 = tf.layers.batch_normalization(fc1,training=True)
41     fc1 = tf.nn.relu(fc1)
42 #     fc1.shape = [-1,1024]
43
44
45 #     dropout
46     dp = tf.nn.dropout(fc1,keep_prob=kp)
47
48 #     第二层全连接层
49     fc2_w = gen_v(shape = [1024,1024])
50     fc2_b = gen_v(shape = [1024])
51     fc2 = tf.nn.relu(tf.layers.batch_normalization(tf.matmul(dp,fc2_w) + fc2_b,training=True))
52
53 #     输出层
54     out_w = gen_v(shape = [1024,10])
55     out_b = gen_v(shape = [10])
56     out = tf.matmul(fc2,out_w) + out_b
57     return out
4.损失函数准确率
 1 out = net_work(X,kp)
 2
 3 loss = tf.reduce_mean(tf.nn.softmax_cross_entropy_with_logits_v2(labels=y,logits=out))
 4
 5 # 准确率
 6 y_ = tf.nn.softmax(out)
 7
 8 # equal 相当于 ==
 9 accuracy = tf.reduce_mean(tf.cast(tf.equal(tf.argmax(y,axis = -1),tf.argmax(y_,axis = 1)),tf.float16))
10 accuracy
5.最优化
1 opt = tf.train.AdamOptimizer().minimize(loss)
2 opt
6.开启训练
 1 epoches = 50000
 2 saver = tf.train.Saver()
 3
 4 index = 0
 5 def next_batch(X,y):
 6     global index
 7     batch_X = X[index*128:(index+1)*128]
 8     batch_y = y[index*128:(index+1)*128]
 9     index+=1
10     if index == 390:
11         index = 0
12     return batch_X,batch_y
13
14 test = unpickle('./cifar-10-batches-py/test_batch')
15 y_test = test['labels']
16 y_test = np.array(y_test)
17 X_test = test['data']
18 y_test = one_hot.transform(y_test.reshape(-1,1)).toarray()
19 y_test[:10]
20
21 with tf.Session() as sess:
22     sess.run(tf.global_variables_initializer())
23     for i in range(epoches):
24         batch_X,batch_y = next_batch(X_train,y_train)
25         opt_,loss_ = sess.run([opt,loss],feed_dict = {X:batch_X,y:batch_y,kp:0.5})
26         print('----------------------------',loss_)
27         if i % 100 == 0:
28             score_test = sess.run(accuracy,feed_dict = {X:X_test,y:y_test,kp:1.0})
29             score_train = sess.run(accuracy,feed_dict = {X:batch_X,y:batch_y,kp:1.0})
30             print('iter count:%d。mini_batch loss:%0.4f。训练数据上的准确率:%0.4f。测试数据上准确率:%0.4f'%
31                   (i+1,loss_,score_train,score_test))
这个准确率只达到了百分之80
如果想提高准确率,还需要进一步优化,调参