需求:爬取的是基于文字的网易新闻数据(国内、国际、军事、航空)。
基于Scrapy框架代码实现数据爬取后,再将当前项目修改为基于RedisSpider的分布式爬虫形式。
一、基于Scrapy框架数据爬取实现
1、项目和爬虫文件创建
$ scrapy startproject wangyiPro
$ cd wangyiPro/
$ scrapy genspider wangyi news.163.com    # 基于scrapy.Spider创建爬虫文件
2、爬虫文件编写——解析新闻首页获取四个板块的url
import scrapy

class WangyiSpider(scrapy.Spider):
    name = 'wangyi'
    # allowed_domains = ['news.163.com']
    start_urls = ['https://news.163.com/']

    def parse(self, response):
        lis = response.xpath('//div[@class="ns_area list"]/ul/li')
        # 获取指定的四个列表元素(国内3、国际5、军事6、航空7)
        indexes = [3, 4, 6, 7]
        li_list = []   # 四个板块对应的li标签对象
        for index in indexes:
            li_list.append(lis[index])

        # 获取四个板块中的超链和文字标题
        for li in li_list:
            url = li.xpath('./a/@href').extract_first()
            title = li.xpath('./a/text()').extract_first()   # 板块名称

            print(url + ":" + title)   # 测试
执行爬虫文件,控制台打印输出四个url,说明解析成功:
$ scrapy crawl wangyi --nolog
http://news.163.com/domestic/:国内
http://news.163.com/world/:国际
http://war.163.com/:军事
http://news.163.com/air/:航空
3、爬虫文件编写——对每个板块url发请求,进一步解析
import scrapy

class WangyiSpider(scrapy.Spider):
    name = 'wangyi'
    # allowed_domains = ['news.163.com']
    start_urls = ['https://news.163.com/']

    def parse(self, response):
        lis = response.xpath('//div[@class="ns_area list"]/ul/li')
        # 获取指定的四个列表元素(国内3、国际5、军事6、航空7)
        indexes = [3, 4, 6, 7]
        li_list = []   # 四个板块对应的li标签对象
        for index in indexes:
            li_list.append(lis[index])

        # 获取四个板块中的超链和文字标题
        for li in li_list:
            url = li.xpath('./a/@href').extract_first()
            title = li.xpath('./a/text()').extract_first()   # 板块名称

            """对每一个板块对应url发起请求,获取页面数据"""
            # 调用scrapy.Request()方法发起get请求
            yield scrapy.Request(url=url, callback=self.parseSecond)

    def parseSecond(self, response):
        """声明回调函数"""
        # 找到页面中新闻的共有标签类型,排除广告标签
        div_list = response.xpath('//div[@class="data_row news_article clearfix"]')
        print(len(div_list))   # 非空则验证xpath是正确的
        for div in div_list:
            # 文章标题
            head = div.xpath('.//div[@class="news_title"]/h3/a/text()').extract_first()
            # 文章url
            url = div.xpath('.//div[@class="news_title"]/h3/a/@href').extract_first()
            # 缩略图
            imgUrl = div.xpath('./a/img/@src').extract_first()
            # 发布时间和标签:提取列表中所有的元素
            tag = div.xpath('.//div[@class="news_tag"]//text()').extract()
            # 列表装化为字符串
            tag = "".join(tag)
编写到这里时,再次执行爬虫脚本,会发现print(len(div_list))输出的是4个0,但是xpath表达式却是正确的。
这是由于新浪网的新闻列表信息是动态加载的,而爬虫程序向url发请求无法获取动态加载的页面信息。
因此需要selenium帮忙在程序中实例化一个浏览器对象,由浏览器对象向url发请求,再通过调用page_source属性拿到selenium实例化对象中获取的页面数据,这个数据中包含动态加载的数据内容。
二、将selenium应用到Scrapy项目中
需求分析:当点击国内超链进入国内对应的页面时,会发现当前页面展示的新闻数据是被动态加载出来的,如果直接通过程序对url进行请求,是获取不到动态加载出的新闻数据的。则就需要我们使用selenium实例化一个浏览器对象,在该对象中进行url的请求,获取动态加载的新闻数据。
响应对象response从下载器传给Spiders爬虫文件时,一定会穿过下载中间件。
可以在下载中间件对响应对象进行拦截,对响应对象中存储的页面数据进行篡改,将动态加载的页面数据加入到响应对象中。
通过selenium可以篡改响应数据,并将页面数据篡改成携带了新闻数据的数据。
1、selenium在scrapy中使用原理
当引擎将国内板块url对应的请求提交给下载器后,下载器进行网页数据的下载,然后将下载到的页面数据,封装到response中,提交给引擎,引擎将response在转交给Spiders。
Spiders接受到的response对象中存储的页面数据里是没有动态加载的新闻数据的。要想获取动态加载的新闻数据,则需要在下载中间件中对下载器提交给引擎的response响应对象进行拦截,切对其内部存储的页面数据进行篡改,修改成携带了动态加载出的新闻数据,然后将被篡改的response对象最终交给Spiders进行解析操作。
2、selenium在scrapy中使用流程总结
(1)在爬虫文件中导入webdriver类
from selenium import webdriver
(2)重写爬虫文件的构造方法
在构造方法中使用selenium实例化一个浏览器对象(因为浏览器对象只需要被实例化一次)
class WangyiSpider(scrapy.Spider):
    def __init__(self):
        # 实例化浏览器对象(保证只会被实例化一次)
        self.bro = webdriver.Chrome(executable_path='/Users/hqs/ScrapyProjects/wangyiPro/wangyiPro/chromedriver')
(3)重写爬虫文件的closed(self,spider)方法
在其内部关闭浏览器对象。该方法是在爬虫结束时被调用。
class WangyiSpider(scrapy.Spider):
    def closed(self, spider):
        # 必须在整个爬虫结束后关闭浏览器
        print('爬虫结束')
        self.bro.quit()   # 浏览器关闭
(4)重写下载中间件的process_response方法
让process_response方法对响应对象进行拦截,并篡改response中存储的页面数据。
(5)在配置文件中开启下载中间件
3、项目代码示例
(1)引入selenium定义浏览器开启和关闭
import scrapy
from selenium import webdriver
from wangyiPro.items import WangyiproItem

class WangyiSpider(scrapy.Spider):
    name = 'wangyi'
    # allowed_domains = ['news.163.com']
    start_urls = ['https://news.163.com/']

    def __init__(self):
        # 实例化浏览器对象(保证只会被实例化一次)
        self.bro = webdriver.Chrome(executable_path='./wangyiPro/chromedrive')


    def closed(self, spider):
        # 必须在整个爬虫结束后关闭浏览器
        print('爬虫结束')
        self.bro.quit()   # 浏览器关闭
(2)使用下载中间件拦截settings.py修改
# Enable or disable downloader middlewares
# See https://doc.scrapy.org/en/latest/topics/downloader-middleware.html
DOWNLOADER_MIDDLEWARES = {
    'wangyiPro.middlewares.WangyiproDownloaderMiddleware': 543,
}
(3)在下载中间件中进行拦截
让浏览器对象去发起get请求,获取四大版块对应的页面数据,浏览器对url发送请求,浏览器是可以获取到动态加载的页面数据的。
获取到这部分动态数据后,可以将这部分数据装回到拦截的response对象中去。然后将篡改好的response对象发给Spiders。
Spiders接收到response对象后,将response赋值给回调函数parseSecond的response参数中。
middlewares.py内容如下所示:
# 下载中间件
from scrapy.http import HtmlResponse   # 通过这个类实例化的对象就是响应对象
import time

class WangyiproDownloaderMiddleware(object):
    def process_request(self, request, spider):
        """
        可以拦截请求
        :param request:
        :param spider:
        :return:
        """
        return None

    def process_response(self, request, response, spider):
        """
        可以拦截响应对象(下载器传递给Spider的响应对象)
        :param request: 响应对象对应的请求对象
        :param response: 拦截到的响应对象
        :param spider: 爬虫文件中对应的爬虫类的实例
        :return:
        """
        print(request.url + "这是下载中间件")
        # 响应对象中存储页面数据的篡改
        if request.url in ['http://news.163.com/domestic/', 'http://news.163.com/world/', 'http://war.163.com/', 'http://news.163.com/air/']:
            # 浏览器请求发送(排除起始url)
            spider.bro.get(url=request.url)
            # 滚轮拖动到底部会动态加载新闻数据,js操作滚轮拖动
            js = 'window.scrollTo(0, document.body.scrollHeight)'  # 水平方向不移动:0;竖直方向移动:窗口高度
            spider.bro.execute_script(js)  # 拖动到底部,获取更多页面数据
            time.sleep(2)  # js执行给页面2秒时间缓冲,让所有数据得以加载
            # 页面数据page_text包含了动态加载出来的新闻数据对应的页面数据
            page_text = spider.bro.page_source
            # current_url就是通过浏览器发起请求所对应的url
            # body是当前响应对象携带的数据值
            return HtmlResponse(url=spider.bro.current_url, body=page_text, encoding="utf-8", request=request)
        else:
            # 四个板块之外的响应对象不做修改
            return response   # 这是原来的响应对象
三、爬虫代码完善及item处理
1、爬虫文件
import scrapy
from selenium import webdriver

from wangyiPro.items import WangyiproItem


class WangyiSpider(scrapy.Spider):
    name = 'wangyi'
    # allowed_domains = ['news.163.com']
    start_urls = ['https://news.163.com/']

    def __init__(self):
        # 实例化浏览器对象(保证只会被实例化一次)
        self.bro = webdriver.Chrome(executable_path='/Users/hqs/ScrapyProjects/wangyiPro/wangyiPro/chromedriver')

    def closed(self, spider):
        # 必须在整个爬虫结束后关闭浏览器
        print('爬虫结束')
        self.bro.quit()   # 浏览器关闭

    def parse(self, response):
        lis = response.xpath('//div[@class="ns_area list"]/ul/li')
        # 获取指定的四个列表元素(国内3、国际5、军事6、航空7)
        indexes = [3, 4, 6, 7]
        li_list = []   # 四个板块对应的li标签对象
        for index in indexes:
            li_list.append(lis[index])

        # 获取四个板块中的超链和文字标题
        for li in li_list:
            url = li.xpath('./a/@href').extract_first()
            title = li.xpath('./a/text()').extract_first()   # 板块名称

            """对每一个板块对应url发起请求,获取页面数据"""
            # 调用scrapy.Request()方法发起get请求
            yield scrapy.Request(url=url, callback=self.parseSecond, meta={'title': title})

    def parseSecond(self, response):
        """声明回调函数"""
        # 找到页面中新闻的共有标签类型,排除广告标签
        div_list = response.xpath('//div[@class="data_row news_article clearfix"]')
        # print(len(div_list))   # 非空则验证xpath是正确的
        for div in div_list:
            # 文章标题
            head = div.xpath('.//div[@class="news_title"]/h3/a/text()').extract_first()
            # 文章url
            url = div.xpath('.//div[@class="news_title"]/h3/a/@href').extract_first()
            # 缩略图
            imgUrl = div.xpath('./a/img/@src').extract_first()
            # 发布时间和标签:提取列表中所有的元素
            tag = div.xpath('.//div[@class="news_tag"]//text()').extract()

            # 列表装化为字符串
            tags = []
            for t in tag:
                t = t.strip('
 	')   # 去除空格
换行 	相当于tab
                tags.append(t)   # 重新装载到列表中
            tag = "".join(tags)

            # 获取meta传递的数据值
            title = response.meta['title']

            # 实例化item对象,将解析到的数据值存储到item对象中
            item = WangyiproItem()
            item['head'] = head
            item['url'] = url
            item['imgUrl'] = imgUrl
            item['tag'] = tag
            item['title'] = title

            # 对url发起请求,获取对应页面中存储的新闻内容数据
            yield scrapy.Request(url=url, callback=self.getContent, meta={"item":item})

    def getContent(self, response):
        """新闻内容解析的回调函数"""
        # 获取传递过来的item对象
        item = response.meta['item']

        # 解析当前页码中存储的页面数据
        # 由于新闻的段落可能有多个,每个段落在一个p标签中。因此使用extract()方法
        content_list = response.xpath('//div[@class="post_text"]/p/text()').extract()

        # 列表转字符串(字符串才能保持在item对象中)
        content = "".join(content_list)
        item["content"] = content

        # item对象提交给管道
        yield item
注意:
(1)将解析到的数据值存储到item对象
由于爬虫做了两次解析,因此如何将第一次解析的数据加入item对象是最大的难点。
解决方法:meta属性请求传参。
# 对url发起请求,获取对应页面中存储的新闻内容数据
yield scrapy.Request(url=url, callback=self.getContent, meta={"item":item})
对文章url发起请求,欲获取对应页面中存储的新闻内容数据,调用新的回调函数getContent。
(2)新闻内容解析后将item对象提交给管道
class WangyiSpider(scrapy.Spider):
    """同上省略"""
    def getContent(self, response):
        """新闻内容解析的回调函数"""
        # 获取传递过来的item对象
        item = response.meta['item']

        # 解析当前页码中存储的页面数据
        # 由于新闻的段落可能有多个,每个段落在一个p标签中。因此使用extract()方法
        content_list = response.xpath('//div[@class="post_text"]/p/text()').extract()

        # 列表转字符串(字符串才能保持在item对象中)
        content = "".join(content_list)
        item["content"] = content

        # item对象提交给管道
        yield item
2、items.py文件
import scrapy

class WangyiproItem(scrapy.Item):
    # define the fields for your item here like:
    # name = scrapy.Field()
    head = scrapy.Field()
    url = scrapy.Field()
    imgUrl = scrapy.Field()
    tag = scrapy.Field()
    title = scrapy.Field()
    content = scrapy.Field()
3、管道文件pipeline.py处理
(1)pipelines.py
class WangyiproPipeline(object):
    def process_item(self, item, spider):
        print(item['title']+ ':'+ item['content'])
        return item
(2)settings.py中放开管道
# Configure item pipelines
# See https://doc.scrapy.org/en/latest/topics/item-pipeline.html
ITEM_PIPELINES = {
    'wangyiPro.pipelines.WangyiproPipeline': 300,
}
(3)执行爬虫输出爬取的新闻信息

四、UA池和代理池在Scrapy中应用
1、下载中间件介绍
下载中间件(Downloader Middlewares) 位于scrapy引擎和下载器之间的一层组件。
- 作用:
(1)引擎将请求传递给下载器过程中, 下载中间件可以对请求进行一系列处理。比如设置请求的 User-Agent,设置代理等
(2)在下载器完成将Response传递给引擎中,下载中间件可以对响应进行一系列处理。比如进行gzip解压等。
我们主要使用下载中间件处理请求,一般会对请求设置随机的User-Agent ,设置随机的代理。目的在于防止爬取网站的反爬虫策略。
2、UA池:User-Agent池
-
作用:尽可能多的将scrapy工程中的请求伪装成不同类型的浏览器身份。
-
操作流程:
1.在下载中间件中拦截请求
2.将拦截到的请求的请求头信息中的UA进行篡改伪装
3.在配置文件中开启下载中间件
-
代码实现:
# 在middlewares.py中单独给UA池封装一个下载中间件的类
from scrapy.contrib.downloadermiddleware.useragent import UserAgentMiddleware
import random

class RandomUserAgent(UserAgentMiddleware):   # 继承UserAgentMiddleware
    def process_request(self, request, spider):
        """每次拦截请求,都会从列表中随机抽选一个ua赋值给当前拦截的请求"""
        # 从列表中随机抽选出一个ua值
        ua = random.choice(user_agent_list)
        # 请求头信息设置,赋值随机抽取的ua(当前拦截请求ua写入操作)
        request.headers.setdefault('User-Agent', ua)

user_agent_list = [
        "Mozilla/5.0 (Windows NT 6.1; WOW64) AppleWebKit/537.1 "
        "(KHTML, like Gecko) Chrome/22.0.1207.1 Safari/537.1",
        "Mozilla/5.0 (X11; CrOS i686 2268.111.0) AppleWebKit/536.11 "
        "(KHTML, like Gecko) Chrome/20.0.1132.57 Safari/536.11",
        "Mozilla/5.0 (Windows NT 6.1; WOW64) AppleWebKit/536.6 "
        "(KHTML, like Gecko) Chrome/20.0.1092.0 Safari/536.6",
        "Mozilla/5.0 (Windows NT 6.2) AppleWebKit/536.6 "
        "(KHTML, like Gecko) Chrome/20.0.1090.0 Safari/536.6",
        "Mozilla/5.0 (Windows NT 6.2; WOW64) AppleWebKit/537.1 "
        "(KHTML, like Gecko) Chrome/19.77.34.5 Safari/537.1",
        "Mozilla/5.0 (X11; Linux x86_64) AppleWebKit/536.5 "
        "(KHTML, like Gecko) Chrome/19.0.1084.9 Safari/536.5",
        "Mozilla/5.0 (Windows NT 6.0) AppleWebKit/536.5 "
        "(KHTML, like Gecko) Chrome/19.0.1084.36 Safari/536.5",
        "Mozilla/5.0 (Windows NT 6.1; WOW64) AppleWebKit/536.3 "
        "(KHTML, like Gecko) Chrome/19.0.1063.0 Safari/536.3",
        "Mozilla/5.0 (Windows NT 5.1) AppleWebKit/536.3 "
        "(KHTML, like Gecko) Chrome/19.0.1063.0 Safari/536.3",
        "Mozilla/5.0 (Macintosh; Intel Mac OS X 10_8_0) AppleWebKit/536.3 "
        "(KHTML, like Gecko) Chrome/19.0.1063.0 Safari/536.3",
        "Mozilla/5.0 (Windows NT 6.2) AppleWebKit/536.3 "
        "(KHTML, like Gecko) Chrome/19.0.1062.0 Safari/536.3",
        "Mozilla/5.0 (Windows NT 6.1; WOW64) AppleWebKit/536.3 "
        "(KHTML, like Gecko) Chrome/19.0.1062.0 Safari/536.3",
        "Mozilla/5.0 (Windows NT 6.2) AppleWebKit/536.3 "
        "(KHTML, like Gecko) Chrome/19.0.1061.1 Safari/536.3",
        "Mozilla/5.0 (Windows NT 6.1; WOW64) AppleWebKit/536.3 "
        "(KHTML, like Gecko) Chrome/19.0.1061.1 Safari/536.3",
        "Mozilla/5.0 (Windows NT 6.1) AppleWebKit/536.3 "
        "(KHTML, like Gecko) Chrome/19.0.1061.1 Safari/536.3",
        "Mozilla/5.0 (Windows NT 6.2) AppleWebKit/536.3 "
        "(KHTML, like Gecko) Chrome/19.0.1061.0 Safari/536.3",
        "Mozilla/5.0 (X11; Linux x86_64) AppleWebKit/535.24 "
        "(KHTML, like Gecko) Chrome/19.0.1055.1 Safari/535.24",
        "Mozilla/5.0 (Windows NT 6.2; WOW64) AppleWebKit/535.24 "
        "(KHTML, like Gecko) Chrome/19.0.1055.1 Safari/535.24"
]
3、代理池
-
作用:尽可能多的将scrapy工程中的请求的IP设置成不同的。
-
操作流程:
1.在下载中间件中拦截请求
2.将拦截到的请求的IP修改成某一代理IP
3.在配置文件中开启下载中间件
-
代码实现:
# 在middlewares.py中单独给代理池封装一个下载中间件的类
# 批量对拦截的请求进行Ip更换
class Proxy(object):
    def process_request(self, request, spider):
        # 对拦截到的请求url进行判断(协议头到底是http还是https)
        # 代理IP对协议头有严格区分
        # request.url返回值形式:http://www.xxx.com/
        h = request.url.split(":")[0]   # 切割获取协议头
        if h == "https":
            ip = random.choice(PROXY_https)
            # 利用meta修改代理ip
            request.meta['proxy'] = 'https://' + ip
        else:
            ip = random.choice(PROXY_http)
            request.meta['proxy'] = 'http://' + ip

# 可被选用的代理IP——去www.goubanjia.com获取免费代理IP
PROXY_http = [
    '153.180.102.104:80',
    '195.208.131.189:56055',
]
PROXY_https = [
    '120.83.49.90:9000',
    '95.189.112.214:35508',
]
注意:请求url的协议头到底是http还是https。
4、settings.py中开启ua池、代理池
# Enable or disable downloader middlewares
# See https://doc.scrapy.org/en/latest/topics/downloader-middleware.html
DOWNLOADER_MIDDLEWARES = {
    'wangyiPro.middlewares.WangyiproDownloaderMiddleware': 543,
    'wangyiPro.middlewares.RandomUserAgent': 542,
    'wangyiPro.middlewares.Proxy': 541,
}
5、总结
每发一个请求,这个请求都会被中间件拦截,对当前请求的ip和user-agent进行更换。
目的是攻克网站的反爬机制,因为每发一个请求,它的代理ip和ua都是不一样的,门户网站就很难发现当前爬取的载体是一个爬虫。
五、基于RedisSpider分布式爬虫实现
1、爬虫类代码修改
(1)导包并修改爬虫类父类
from scrapy_redis.spiders import RedisSpider

# class WangyiSpider(scrapy.Spider):
class WangyiSpider(RedisSpider):
注意:这里将爬虫类的父类,修改成RedisSpider。
(2)注释start_urls,以redis_key代替
# start_urls = ['https://news.163.com/']
redis_key = 'wangyi'
redis_key属性:表示调度器队列的名称。
2、redis数据库配置文件redis.conf配置
# 不注释时,只允许本机的客户端连接
# bind 127.0.0.1

# yes改为no,关闭redis的保护模式,客户端可以对服务器进行读写操作
protected-mode  no
3、项目settings.py配置
(1)爬虫程序不在redis本机时,指定redis地址
管道默认会连接且将数据存储到本机的redis服务中,如果想要连接存储到其他redis服务中需要在settings.py中进行如下配置
# 如果redis服务器不在自己本机,则需要做如下配置
REDIS_HOST = '192.168.31.31' # redis数据库所在机器的Ip地址
REDIS_PORT = 6379
# 可选配置
# REDIS_ENCODING = 'utf-8'
# REDIS_PARAMS = {'password':'123456'}   # 如果redis数据库有密码时配置
(2)使用scrapy-redis组件中封装好的管道
使用scrapy-redis组件中封装好的可以被共享的管道。
可以将每台机器爬取到的数据存储通过该管道存储到redis数据库中,从而实现了多台机器的管道共享。
# Configure item pipelines
# See https://doc.scrapy.org/en/latest/topics/item-pipeline.html
ITEM_PIPELINES = {
    # 'wangyiPro.pipelines.WangyiproPipeline': 300,
    'scrapy_redis.pipelines.RedisPipeline': 400,
}
(3)使用scrapy-redis组件中封装好的调度器
使用scrapy-redis组件中封装好的调度器,将所有的url存储到该指定的调度器中,从而实现了多台机器的调度器共享。
以下代码可在settings.py中任意位置粘贴:
# 使用scrapy-redis组件的去重队列
DUPEFILTER_CLASS = "scrapy_redis.dupefilter.RFPDupeFilter"
# 使用scrapy-redis组件自己的调度器
SCHEDULER = "scrapy_redis.scheduler.Scheduler"   # 核心配置
# 是否允许暂停
SCHEDULER_PERSIST = True   # 值为True表示:宕机恢复服务时,从宕机的那个地方开始爬取,不用从头开始
4、项目运行
(1)基于配置文件开启redis服务器
# MAC/Linux
$ pwd
/Users/hqs/redis-5.0.2
$ src/redis-server redis.conf

# windows
$ redis-server.exe redis-windows.conf
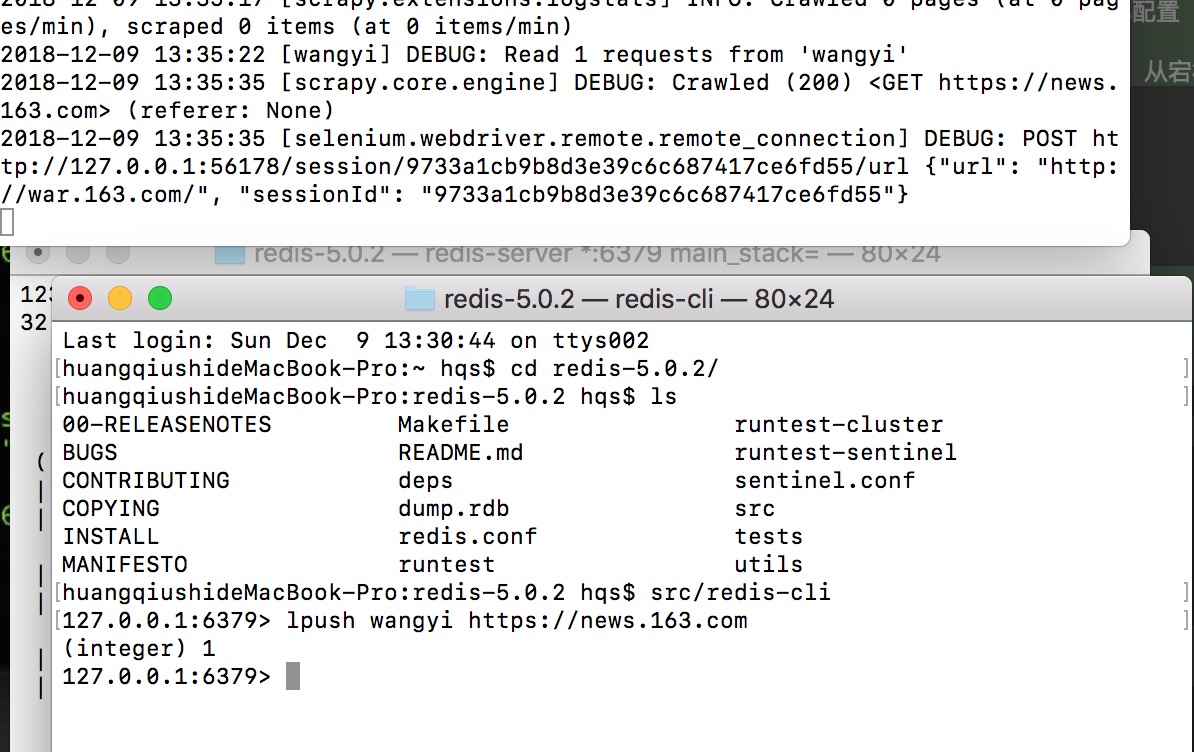
(2)执行爬虫文件
$ pwd
/Users/hqs/ScrapyProjects/wangyiPro/wangyiPro/spiders
$ scrapy runspider wangyi.py
(3)在redis客户端中,将起始url扔到调度器队列
$ src/redis-cli
127.0.0.1:6379> lpush wangyi https://news.163.com
(integer) 1
127.0.0.1:6379> keys *
1) "data"
2) "qiubai:items"
3) "name"
4) "qiubai:dupefilter"
5) "wangyi:items"
127.0.0.1:6379> lrange wangyi:items 0 -1   # 从头到尾查看数据值
提交起始url后,爬虫开始干活: