接上一节。
1、mybatis逆向工程相关文件配置
generatorConfig.xml(8条)
(1)使用classPathEntry指定Mysql驱动的位置。
(2)去掉生成文件中的注释
(3)数据库连接配置
(4)类型解析
(5)javabean生成的位置、mapper接口的位置、mapper.xml文件的位置
(6)指定数据库中的表以及映射成的javabean的名称
<?xml version="1.0" encoding="UTF-8"?>
<!DOCTYPE generatorConfiguration
  PUBLIC "-//mybatis.org//DTD MyBatis Generator Configuration 1.0//EN"
  "http://mybatis.org/dtd/mybatis-generator-config_1_0.dtd">

<generatorConfiguration>
    <classPathEntry location="F:hellomaven
epositorymysqlmysql-connector-java5.1.41mysql-connector-java-5.1.41.jar" />

    <context id="testTables" targetRuntime="MyBatis3">
        <commentGenerator>
            <!-- 是否去除自动生成的注释 true:是 : false:否 -->
            <property name="suppressAllComments" value="true" />
        </commentGenerator>
        <!--数据库连接的信息:驱动类、连接地址、用户名、密码 -->
        <jdbcConnection driverClass="com.mysql.jdbc.Driver"
            connectionURL="jdbc:mysql://localhost:3306/ssm_curd" userId="root"
            password="123456">
        </jdbcConnection>
        <!-- <jdbcConnection driverClass="oracle.jdbc.OracleDriver"
            connectionURL="jdbc:oracle:thin:@127.0.0.1:1521:yycg"
            userId="yycg"
            password="yycg">
        </jdbcConnection> -->

        <!-- 默认false,把JDBC DECIMAL 和 NUMERIC 类型解析为 Integer,为 true时把JDBC DECIMAL 和
            NUMERIC 类型解析为java.math.BigDecimal -->
        <javaTypeResolver>
            <property name="forceBigDecimals" value="false" />
        </javaTypeResolver>

        <!-- targetProject:生成PO类的位置 -->
        <javaModelGenerator targetPackage="com.gong.curd.bean"
            targetProject=".srcmainjava">
            <!-- enableSubPackages:是否让schema作为包的后缀 -->
            <property name="enableSubPackages" value="false" />
            <!-- 从数据库返回的值被清理前后的空格 -->
            <property name="trimStrings" value="true" />
        </javaModelGenerator>
        <!-- targetProject:mapper映射文件生成的位置 -->
        <sqlMapGenerator targetPackage="mapper"
            targetProject=".srcmain
esources">
            <!-- enableSubPackages:是否让schema作为包的后缀 -->
            <property name="enableSubPackages" value="false" />
        </sqlMapGenerator>
        <!-- targetPackage:mapper接口生成的位置 -->
        <javaClientGenerator type="XMLMAPPER"
            targetPackage="com.gong.curd.dao"
            targetProject=".srcmainjava">
            <!-- enableSubPackages:是否让schema作为包的后缀 -->
            <property name="enableSubPackages" value="false" />
        </javaClientGenerator>
        <!-- 指定数据库表 -->
        <table tableName="tbl_emp" domainObjectName="Employee"></table>
        <table tableName="tbl_dept" domainObjectName="Department"></table>

    </context>
</generatorConfiguration>
2、相关数据库表
现有ssm_curd数据库,连接数据库的用户名为root,密码为123456,数据库中有tbl_emp何tbl_dept数据表。相关表结构如下:
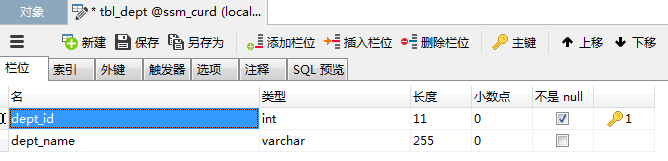
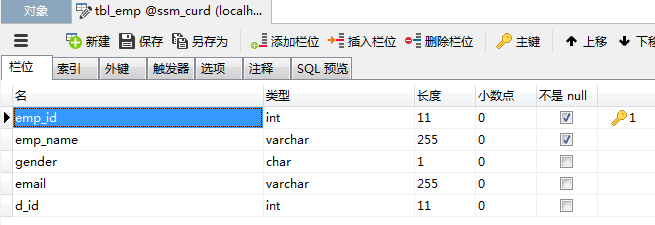
tbl_emp中d_id以外键关联tbl_dept中的dept_id字段:

3、生成相关文件
接下来我们在conm.gong.curd.text新建一个GeneratorSqlmap.java用于生成相关文件
GeneratorSqlmap.java
package com.gong.curd.test;

import java.io.File;
import java.util.ArrayList;
import java.util.List;

import org.mybatis.generator.api.MyBatisGenerator;
import org.mybatis.generator.config.Configuration;
import org.mybatis.generator.config.xml.ConfigurationParser;
import org.mybatis.generator.internal.DefaultShellCallback;

public class GeneratorSqlmap {

    public void generator() throws Exception{

        List<String> warnings = new ArrayList<String>();
        boolean overwrite = true;
        //指定 逆向工程配置文件
        File configFile = new File("generatorConfig.xml");
        ConfigurationParser cp = new ConfigurationParser(warnings);
        Configuration config = cp.parseConfiguration(configFile);
        DefaultShellCallback callback = new DefaultShellCallback(overwrite);
        MyBatisGenerator myBatisGenerator = new MyBatisGenerator(config,
                callback, warnings);
        myBatisGenerator.generate(null);

    }
    public static void main(String[] args) throws Exception {
        try {
            GeneratorSqlmap generatorSqlmap = new GeneratorSqlmap();
            generatorSqlmap.generator();
        } catch (Exception e) {
            e.printStackTrace();
        }

    }

}
可当模板,只需要指定逆向工程配置文件路径即可。
运行之后:会在指定目录下生成相关文件
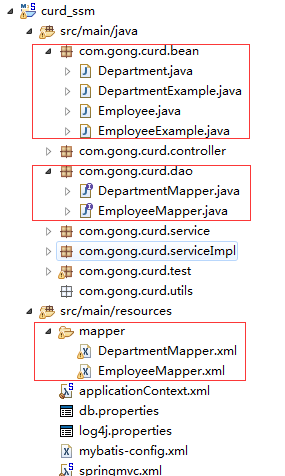
里面的一些方法我们可以直接用,另外的需求需要我们自己进行更改。
4、修改相关文件
(1) 修改Employee.java
- 引用Department:向里面加入private Departmen dept;
- 向里面加入有参构造器和无参构造器用于测试:
-
    public Employee() {
        super();
        // TODO Auto-generated constructor stub
    }

    public Employee(Integer empId, String empName, String gender, String email, Integer dId) {
        super();
        this.empId = empId;
        this.empName = empName;
        this.gender = gender;
        this.email = email;
        this.dId = dId;
    }
(2)修改Department.java(向里面加入有参构造器和无参构造器)
    public Department() {
        super();
    }

    public Department(Integer deptId, String deptName) {
        super();
        this.deptId = deptId;
        this.deptName = deptName;
    }
(3)修改EmployeMapper.java(由于我们关联了Department,因此原来的查询不能满足实际的需求,我们要重新定义两个方法,一个是根据条件查询出员工和部门,一个是根据主键查询员工和部门)
    List<Employee> selectByExampleWithDept(EmployeeExample example);

    Employee selectByPrimaryKeyWithDept(Integer empId);
(4)修改EmployeeMapper.xml
<!--定义自己的resultMap实现关联-->
  <resultMap id="WithDeptResultMap" type="com.gong.curd.bean.Employee">
    <id column="emp_id" jdbcType="INTEGER" property="empId" />
    <result column="emp_name" jdbcType="VARCHAR" property="empName" />
    <result column="gender" jdbcType="CHAR" property="gender" />
    <result column="email" jdbcType="VARCHAR" property="email" />
    <result column="d_id" jdbcType="INTEGER" property="dId" />
    <association property="dept" javaType="com.gong.curd.bean.Department">
        <id column="dept_id" property="deptId"/>
        <result column="dept_name" property="deptName"/>
    </association>
  </resultMap>
<!--定义自己共用的sql-->
  <sql id="With_Dept_Coulumn_List">
      e.emp_id, e.emp_name, e.gender, e.email, e.d_id,d.dept_id,d.dept_name
  </sql>
<!--定义根据条件查询员工和部门信息,使用连接查询-->
  <select id="selectByExampleWithDept" parameterType="com.gong.curd.bean.EmployeeExample"
  resultMap="WithDeptResultMap">
    select
    <if test="distinct">
      distinct
    </if>
    <include refid="With_Dept_Coulumn_List" />
    from tbl_emp e
    left join tbl_dept d on e.`d_id`=d.`dept_id`
    <if test="_parameter != null">
      <include refid="Example_Where_Clause" />
    </if>
    <if test="orderByClause != null">
      order by ${orderByClause}
    </if>
  </select>
<!--定义根据主键查询员工和部门信息-->
  <select id="selectByPrimaryKeyWithDept" parameterType="java.lang.Integer"
  resultMap="WithDeptResultMap">
    select
    <include refid="With_Dept_Coulumn_List" />
    from tbl_emp
    left join tbl_dept d on e.`d_id`=d.`dept_id`
    where e.emp_id = #{empId,jdbcType=INTEGER}
  </select>
5、在com.gong.curd.test下建立DepartmentMapperTest.java和EmployeeMapperTest.java测试相关sql是否可用:
DepartmentMapperTest.java
测试加入两个部门:(注意我们将测试环境转换成spring测试环境,使用Runwith注解标识,同时使用ContextConfiguration指定spring配置文件)
package com.gong.curd.test;

import org.junit.Test;
import org.junit.runner.RunWith;
import org.springframework.beans.factory.annotation.Autowired;
import org.springframework.test.context.ContextConfiguration;
import org.springframework.test.context.junit4.SpringJUnit4ClassRunner;

import com.gong.curd.bean.Department;
import com.gong.curd.dao.DepartmentMapper;

@RunWith(SpringJUnit4ClassRunner.class)
@ContextConfiguration(locations= {"classpath:applicationContext.xml"})
public class DepartmentMapperTest {

    @Autowired
    public DepartmentMapper departmentMapper;

    @Test
    public void testCURD() {

        departmentMapper.insertSelective(new Department(1,"开发部"));
        departmentMapper.insertSelective(new Department(2,"测试部"));
    }

}
运行之后:

EmployeeMapperTest.java(同样的转换成spring测试环境)
package com.gong.curd.test;

import java.util.UUID;

import org.apache.ibatis.session.SqlSession;
import org.junit.Test;
import org.junit.runner.RunWith;
import org.springframework.beans.factory.annotation.Autowired;
import org.springframework.test.context.ContextConfiguration;
import org.springframework.test.context.junit4.SpringJUnit4ClassRunner;

import com.gong.curd.bean.Employee;
import com.gong.curd.dao.EmployeeMapper;

@RunWith(SpringJUnit4ClassRunner.class)
@ContextConfiguration(locations="classpath:applicationContext.xml")
public class EmployeeMapperTest {

    @Autowired
    EmployeeMapper employeeMapper;

    @Autowired
    SqlSession sqlSession;

    @Test
    public void testCURD() {
        employeeMapper.insertSelective(new Employee(1,"tom","M","tom@qq.com",1));
        for(int i=2;i<50;i++) {
            String uid = UUID.randomUUID().toString().substring(0, 5) + i;
            employeeMapper.insertSelective(new Employee(i,uid,"M",uid+"@qq.com",1));
        }
        System.out.println("批量完成");
    }

}
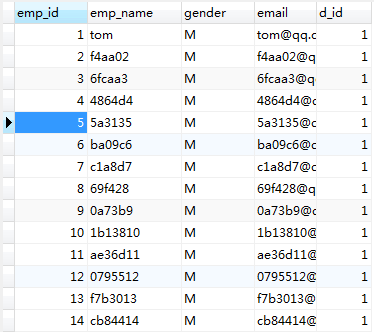
运行之后:我们批量插入了49条数据,当然还可以继续测试其它的sql,这里就不继续测试了:
至此,逆向工程就完成了,下一节进行ssm框架的测试。