Image transformation is a process of rotating and scaling images.
Rotating Images
There are two ways to rotate an image. First option is to use the Rotation property of BitmapImage and second option is use a TransformBitmap image. The TransformBitmap class is use for both scaling and rotating images.
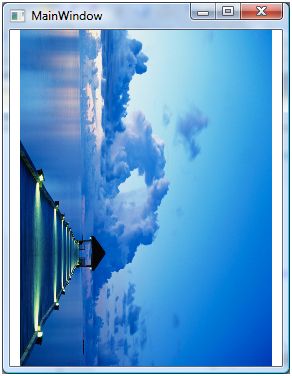
The Rotation property of BitmapImage is a type of Rotation enumeration that has four values Rotate0, Rotate90, Rotate180, and Rotate270. The following code snippet creates a BitmapImage element and set its Rotation attribute to Rotate270.
<Image HorizontalAlignment="Center">
<Image.Source>
<BitmapImage UriSource="Dock.jpg" Rotation="Rotate270" />
</Image.Source>
</Image>
Figure 44 shows the regular image and Figure 45 is the image rotates at 270 degrees.

Figure 45

Figure 46
Alternatively, we can use TransformBitmap and its Transform property to transform an image. The Source attribute of TransformedBitmap is the image name. To rotate an image, we simply need to set the Transform property to RotateTransform and set Angle attribute to the angle of rotation as shown in below code.
<Image >
<Image.Source>
<TransformedBitmap Source="Dock.jpg" >
<TransformedBitmap.Transform>
<RotateTransform Angle="90"/>
</TransformedBitmap.Transform>
</TransformedBitmap>
</Image.Source>
</Image>
The code listed in Listing 42 rotates an image at run-time.
private void RotateImageDynamically()
{
// Create an Image
Image imgControl = new Image();
// Create the TransformedBitmap
TransformedBitmap transformBmp = new TransformedBitmap();
// Create a BitmapImage
BitmapImage bmpImage = new BitmapImage();
bmpImage.BeginInit();
bmpImage.UriSource = new Uri(@"C:ImagesDock.jpg", UriKind.RelativeOrAbsolute);
bmpImage.EndInit();
// Properties must be set between BeginInit and EndInit
transformBmp.BeginInit();
transformBmp.Source = bmpImage;
RotateTransform transform = new RotateTransform(90);
transformBmp.Transform = transform;
transformBmp.EndInit();
// Set Image.Source to TransformedBitmap
imgControl.Source = transformBmp;
LayoutRoot.Children.Add(imgControl);
}
Listing 42
Scaling Images
The ScaleTransform is used to scale an image. The ScaleX and ScaleY properties are used to resize the image by the given factor. For example, value 0.5 reduces the image size by 50% and value 1.50 stretches image by 150%. The CenterX and CenterY properties are used to set the point that is the center of the scaling. By default, CenterX and CenterY values are 0 and 0 that represents the top-left corner.
The following code snippet creates a BitmapImage element and set its ScaleTransform property and its attributes CenterX, CenterY, ScaleX, and ScaleY.
<Image Name="ImageControl" >

<Image.Source>

<TransformedBitmap Source="Dock.jpg" >

<TransformedBitmap.Transform>

<!--<RotateTransform Angle="90"/>-->

<ScaleTransform CenterX="25" CenterY="25" ScaleX="2" ScaleY="2" />

</TransformedBitmap.Transform>

</TransformedBitmap>

</Image.Source>

</Image>
用代码获取资源图片的方法:
public static BitmapImage GetImageIcon(System.Drawing.Bitmap bitmap, double angle)
        {
            BitmapImage bitmapImage = new BitmapImage();

            try
            {

                System.IO.MemoryStream ms = new System.IO.MemoryStream();
                bitmap.Save(ms, bitmap.RawFormat);
                bitmapImage.BeginInit();
                bitmapImage.StreamSource = ms;
                bitmapImage.CacheOption = BitmapCacheOption.OnLoad;
                bitmapImage.EndInit();
                bitmapImage.Freeze();


            }
            catch (Exception ex)
            {
                ShowErrorMessage(ex);
            }

            return bitmapImage;
        }