Android 4.0 布局-->GridLayout 网格布局
以行列单元格的形式展示内部控件排列,可以实现类似计算机键盘效果 ,也可以实现可自动变行的标签群效果
使用GridLayout ,有效减少了布局的深度,渲染速度也是很快的
类似于LinearLayout 的使用,额外添加了一些特有的属性
先来看下GridLayout的一些属性介绍
1、
android:orientation="horizontal|vertical"
内部控件是水平排列的还是竖直排列的
与LinearLayout使用方法一致
2、
android:columnCount="4"
android:rowCount="4"
内部控件 一行或者一列的显示条目个数,即一行/列 最多显示几条,这里是4条,当内部子控件数目多于时,自动换行/列显示 ,使用此功能方便了实现了自动换行标签群的功能
3、子控件属性
android:layout_row = “3”

Android:layout_column = “3”
用于设置该控件的位置 注意从0开始 ,类似于数组,这里即该控件位置 第四行第四 列
4、子控件属性
   android:layout_rowSpan = “2”|  android:layout_columnSpan = “2”

   android:layout_gravity="fill"
设置某控件跨越多行或多列,前一个设置表明该控件跨越的行数或列数,后一个设置表明该控件填满所跨越的整行或 整列。
----------------------------------------------------------------------------------------------------------------
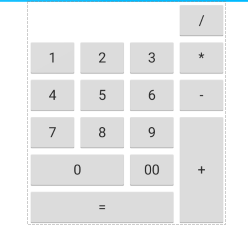
示例(别人的代码 ,直接拿来用了):


 1 <?xml version="1.0" encoding="utf-8"?>
 2 <LinearLayout xmlns:android="http://schemas.android.com/apk/res/android"
 3     android:orientation="vertical" android:layout_width="match_parent"
 4     android:layout_height="match_parent">
 5     <GridLayout
 6         android:layout_width="wrap_content"
 7         android:layout_height="wrap_content"
 8         android:layout_gravity="center"
 9         android:columnCount="4"
10         android:rowCount="4"
11         android:orientation="horizontal" >
12
13         <Button
14             android:layout_column="3"
15             android:text="/" />
16
17         <Button android:text="1" />
18
19         <Button android:text="2" />
20
21         <Button android:text="3" />
22
23         <Button android:text="*" />
24
25         <Button android:text="4" />
26
27         <Button android:text="5" />
28
29         <Button android:text="6" />
30
31         <Button android:text="-" />
32
33         <Button android:text="7" />
34
35         <Button android:text="8" />
36
37         <Button android:text="9" />
38
39         <Button
40             android:layout_gravity="fill"
41             android:layout_rowSpan="3"
42             android:text="+" />
43
44         <Button
45             android:layout_columnSpan="2"
46             android:layout_gravity="fill"
47             android:text="0" />
48
49         <Button android:text="00" />
50
51         <Button
52             android:layout_columnSpan="3"
53             android:layout_gravity="fill"
54             android:text="=" />
55
56     </GridLayout>
57 </LinearLayout>
效果图: