一、 关于Nginx
1.1、一款高性能、轻量级Web服务软件
1.1.1、稳定性高
1.1.2、系统资源消耗低
1.1.3、对HTTP并发连接的处理能力高
1.1.4、单台物理服务器可支持30000~50000个并发请求
二、Nginx模块单元介绍
2.1、ngx_http_access_module模块:实现基于ip的访问控制功能
2.2、ngx_http_auth_basic_module模块:实现基于用户的访问控制,使用basic机制进行用户认证
2.3、ngx_http_stub_status_module模块:用于输出nginx的基本状态信息
2.4、ngx_http_log_module模块:用指定的格式写入请求日志
2.5、ngx_http_gzip_module模块:用gzip算法来压缩数据可以节约带宽,默认nginx不压缩数据,但是压缩会消耗CPU资源,且压缩文本图像类效果较好,能达到30%左右,但压缩音频视频没有多大意义,因为本身音视频就是被压缩过的,很可能对音视频压缩反而会增大其体积
2.6、ngx_http_ssl_module模块:启用https时使用的模块
2.7、ngx_http_rewrite_module模块:重定向模块,可以将客户端的请求基于regex所描述的模式进行检查,而后完成替换。当旧的业务和新的业务不一样,网站更名了,就可以使用此模块。将访问旧的请求重定向成新的
2.8、ngx_http_referer_module模块:可以跟踪链接从哪里跳转过来的,该字段可以用来防止盗链
2.9、ngx_http_headers_module模块:向由代理服务器响应给客户端的响应报文添加自定义首部,或修改指定首部的值
三、不同版本的Nginx区别
2.1、Mainline version:Mainline 是 Nginx 目前主力在做的版本,可以说是开发版
2.2、Stable version:最新稳定版,生产环境上建议使用的版本
2.3、Legacy versions:遗留的老版本的稳定版
四、主配置文件修改
4.1、全局配置
1 #user nobody;           ##指定用户,默认是匿名用户
2 worker_processes 1;   ##工作进程,实现高并发可以增加值
3 #error_log logs/error.log;  ##错误日志文件
4 #pid     logs/nginx.pid;      ##pid文件
4.2、进程数配置
1 events {           ##一个进程包含多个线程
2     use epoll; #能显著提高程序在大量并发连接中只有少量活跃的情况下的系统CPU利用率
3     worker_connections 4096;
4 }
5 连接数4096基于线程数
4.3、http配置
 1 http{}:协议层面;server{}:服务层面;location{}:网页站点目录层面
 2 http {
 3      access_log logs/access.log main;
 4      sendfile     on;        ##发送邮件
 5      keepalive timeout 65;  ##连接超时时间
 6      server {
 7          listen  80;
 8          server_name localhost;    ##域名
 9          charset utf-8;       ##字符集
10          location  / {
11                root  html;     ##网页站点目录名称
12                index index.html index.php; }    ##主页的相对路径
13          error_page  500 502 503 504 /50x.html;    ##提示错误页面(500是服务器出错)
14          location = /50x.html {
15             root  html; }
16     }
17 }
五、Nginx的优化安装
5.1、编译安装
 1 [root@localhost ~]# yum -y install pcre-devel zlib-devel
 2
 3 [root@localhost ~]# tar zxf nginx-1.12.2.tar.gz
 4 [root@localhost ~]# cd nginx-1.12.2/
 5 [root@localhost nginx-1.12.2]# ./configure
 6 > --prefix=/usr/local/nginx
 7 > --user=nginx
 8 > --group=nginx
 9 > --with-http_stub_status_module ###统计状态模块
10
11 [root@localhost nginx-1.12.2]# make && make install
12
13 [root@localhost ~]# useradd -M -s /sbin/nologin nginx  ###创建一个不可登录的程序用户
14
15 [root@localhost ~]# ln -s /usr/local/nginx/sbin/nginx /usr/bin ###优化执行路径
16 [root@localhost ~]# nginx ###启动服务
17 [root@localhost ~]# netstat -anpt | grep nginx ###查看nginx服务是否开启
18 tcp        0      0 0.0.0.0:80              0.0.0.0:*               LISTEN      16429/nginx: master
19
20 [root@localhost ~]# killall -s QUIT nginx ###选项-s QUIT等于-3 停止服务
21 [root@localhost ~]# netstat -anpt | grep nginx
22 [root@localhost ~]# nginx
23 [root@localhost ~]# killall -s HUP nginx ###选项-s HUP等于-1 重新加载
24 [root@localhost ~]# netstat -anpt | grep nginx
25 tcp        0      0 0.0.0.0:80              0.0.0.0:*               LISTEN      16488/nginx: master
26
27 [root@localhost ~]# vi /etc/init.d/nginx ###制作管理脚本
28 #!/bin/bash
29 #chkconfig: 35 20 80
30 #description: nginx server
31 PROG="/usr/local/nginx/sbin/nginx"
32 PIDF="/usr/local/nginx/logs/nginx.pid"
33
34 case "$1" in
35     start)
36        $PROG
37        ;;
38     stop)
39        killall -3 $PROG
40        ;;
41     restart)
42        $0 stop
43        $0 start
44        ;;
45     reload)
46        killall -1 $PROG47        ;;
48     *)
49        echo "Usage: $0 {start|stop|reload|status}"
50        exit 1
51 esac
52 exit 0
53
54 [root@localhost ~]# chmod +x /etc/init.d/nginx
55 [root@localhost ~]# chkconfig --add nginx
5.2、Nginx的访问状态统计
5.2.1、修改主配置文件
 1 [root@localhost ~]# vi /usr/local/nginx/conf/nginx.conf
 2 user  nginx nginx ###修改#user  nobody为user  nginx nginx
 3 error_log  logs/error.log  info ###去除#号
 4
 5 events {
 6         use epoll; ###新增此行,默认使用select/poll
 7     worker_connections  1024; ###表示一个工作进程允许1024个连接
 8 }
 9
10  location ~ /status {  ###配置统计功能
11              stub_status  on;
12              access_log  off;
13              } ###在server模块里的error_page上面增加
14
15 [root@localhost ~]# nginx -t ###检查一下配置文件
16 nginx: the configuration file /usr/local/nginx/conf/nginx.conf syntax is ok
17 nginx: configuration file /usr/local/nginx/conf/nginx.conf test is successful
18
19 [root@localhost ~]# nginx -V ###查看版本号及开启的模块
20 nginx version: nginx/1.12.2
21 built by gcc 4.8.5 20150623 (Red Hat 4.8.5-16) (GCC)
22 configure arguments: --prefix=/usr/local/nginx --user=nginx --group=nginx --with-http_stub_status_module
23
24 [root@localhost ~]# systemctl start nginx ###开启nginx服务
25 [root@localhost ~]# systemctl stop firewalld
26 [root@localhost ~]# setenforce 0 ###关闭防火墙和核心防护
5.2.2、验证
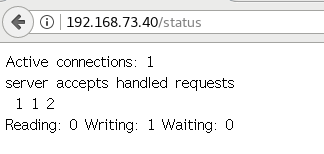
在客户端浏览器输入:http://192.168.73.40/status 验证
5.2.3、nginx status 详解
1 active connections:活跃的连接数量;
2 server accepts handled requests:总共处理n个连接,成功创建n次握手,共处理n个请求;
3 reading:读取客户端的连接数;
4 writing:响应数据到客户端的数量;
5 waiting:开启keep-alive的情况下,这个值等于active-(reading+writing),意思就是Nginx已经处理完正在等候下一次指令的驻留地址。
5.3、Nginx的验证功能
5.3.1、主配置文件
1 [root@localhost ~]# yum -y install httpd-tools
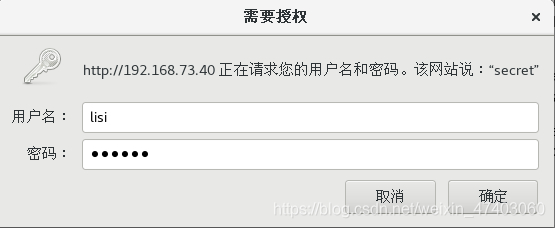
2 [root@localhost ~]# htpasswd -c /usr/local/nginx/passwd.db lisi ###创建访问用户
3 New password:
4 Re-type new password:
5 Adding password for user lisi
6 [root@localhost ~]# vi /usr/local/nginx/conf/nginx.conf
7 location / {
8 root html;
9 index index.html index.htm;
10 allow 192.168.73.40/24; ###允许本机访问
11 deny all; ###拒绝所有
12 auth_basic "secret"; ###验证方式为密码验证
13 auth_basic_user_file /usr/local/nginx/passwd.db; ###密码所在文件
14 }
15 [root@localhost ~]# nginx -t ###验证配置文件是否有错
16 nginx: [warn] low address bits of 192.168.73.40/24 are meaningless in /usr/local/nginx/conf/nginx.conf:48
17 nginx: the configuration file /usr/local/nginx/conf/nginx.conf syntax is ok
18 nginx: configuration file /usr/local/nginx/conf/nginx.conf test is successful
19
20 [root@localhost ~]# systemctl restart nginx ###重启服务
5.3.2、验证
六、配置Nginx虚拟主机
6.1、基于域名
6.1.1、修改配置文件
 1 vi /usr/local/nginx/conf/nginx.conf
 2
 3  server {
 4         listen       80;
 5         server_name  www.aa.com;
 6
 7         charset utf-8
 8
 9         location / {
10             root   /var/www/aa;
11             index  index.html index.htm;
12             }
13         }
14
15      server {
16         listen       80;
17         server_name  www.ab.com;
18
19         charset utf-8;
20
21         location / {
22             root   /var/www/ab;
23             index  index.html index.htm;
24             }
25         }
26
27 [root@localhost ~]# nginx -t ###检查语法
28 nginx: the configuration file /usr/local/nginx/conf/nginx.conf syntax is ok
29 nginx: configuration file /usr/local/nginx/conf/nginx.conf test is successful
30
31 [root@localhost ~]# systemctl restart nginx ###重启nginx服务
32 [root@localhost ~]# systemctl stop firewalld
33 [root@localhost ~]# setenforce 0
34
35 [root@localhost ~]# vi /etc/hosts ###增加映射
36 192.168.73.40 www.aa.com www.ab.com
6.1.2、准备测试页
1 [root@localhost ~]# mkdir -p /var/www/aa
2 [root@localhost ~]# mkdir -p /var/www/ab
3 [root@localhost aa]# vi index.html
4 <html><body><h1>This is test1!</h1></body></html>
5 [root@localhost ab]# vi index.html
6 <html><body><h1>This is test2!</h1></body></html>
6.1.3、客户机测试


6.2、基于IP
6.2.1、新增一张网卡、修改配置文件
 1 [root@www ~]# vi /usr/local/nginx/conf/nginx.conf
 2  server {
 3         listen       192.168.73.40:80; ###修改IP地址
 4         server_name  www.aa.com;
 5
 6         charset utf-8;
 7
 8         #access_log  logs/aa.access.log  main;
 9
10         location / {
11             root   /var/www/aa;
12             index  index.html index.htm;
13             }
14         }
15
16      server {
17         listen       192.168.73.134:80; ###修改IP地址
18         server_name  www.aa.com;
19
20         charset utf-8;
21
22         #access_log  logs/aa.access.log  main;
23
24         location / {
25             root   /var/www/aa;
26             index  index.html index.htm;
27             }
28          }
29
30 [root@www ~]# nginx -t ###检查语法
31 nginx: the configuration file /usr/local/nginx/conf/nginx.conf syntax is ok
32 nginx: configuration file /usr/local/nginx/conf/nginx.conf test is successful
33
34 [root@www ~]# systemctl restart nginx
35
36 [root@www ~]# vi /etc/hosts
37 192.168.73.40 www.aa.com
38 192.168.73.134 www.aa.com
6.2.3、客户机测试


6.3、基于端口
6.3.1、修改配置文件
1 [root@www ~]# vi /usr/local/nginx/conf/nginx.conf
2 server {
3 listen 192.168.73.40:80; ###更改端口号
4 server_name www.aa.com;
5
6 charset utf-8;
7
8 #access_log logs/aa.access.log main;
9
10 location / {
11 root /var/www/aa;
12 index index.html index.htm;
13 }
14 }
15
16 server {
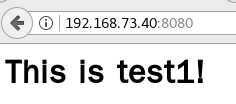
17 listen 192.168.73.40:8080; ###更改端口号
18 server_name www.aa.com;
19
20 charset utf-8;
21
22 #access_log logs/aa.access.log main;
23
24 location / {
25 root /var/www/aa;
26 index index.html index.htm;
27 }
28 }
29
30 [root@www ~]# systemctl restart nginx
6.3.2、客户机测试