1. 路由控制的工作原理
//routes/index.js中的代码
//访问主页时,调用ejs模板引擎,渲染index.ejs模板文件,生成静态页面,并显示在浏览器中。
router.get('/', function(req, res) {   //捕获访问主页的GET请求
  res.render('index', { title: 'Express' });
});
官方给出的写法是在 app.js 中实现了简单的路由分配,然后再去 index.js 中找到对应的路由函数,最终实现路由功能。
我们不妨把路由控制器和实现路由功能的函数都放到 index.js 里,app.js 中只有一个总的路由接口。
修改后的app.js
 1 //通过require()加载express、path模块。以及routes文件夹下的index.js 和user.js路由文件
 2 var express = require('express');
 3 var path = require('path');
 4 var favicon = require('serve-favicon');
 5 var logger = require('morgan');
 6 var cookieParser = require('cookie-parser');
 7 var bodyParser = require('body-parser');
 8 //加载路由文件
 9 var routes = require('./routes/index');
10 var users = require('./routes/users');
11
12 var app = express();  //生成一个express实例app
13
14 app.set('port', process.env.PORT||3000);//第一章  添加
15 // view engine setup
16 app.set('views', path.join(__dirname, 'views'));//设置 views 文件夹为存放视图文件的目录, 即存放模板文件的地方,__dirname 为全局变量,存储当前正在执行的脚本所在的目录。
17 app.set('view engine', 'ejs');// 设置视图模板引擎为 ejs
18
19 // uncomment after placing your favicon in /public
20 //app.use(favicon(__dirname + '/public/favicon.ico'));   //设置/public/favicon.ico为favicon图标
21 app.use(logger('dev'));//加载日志中间件
22 app.use(bodyParser.json());//加载解析json的中间件
23 app.use(bodyParser.urlencoded({ extended: false }));//加载解析urlencoded请求体的中间件
24 app.use(cookieParser());//加载解析cookie的中间件
25 app.use(express.static(path.join(__dirname, 'public')));//设置public文件夹为存放静态文件的目录
26
27 ////路由控制器    第一章  删减
28 //app.use('/', routes);
29 //app.use('/users', users);
30
31 //第一章  添加
32 routes(app);
33 app.listen(app.get('port'),function(){
34     console.log('Express server listening on port' + app.get('port'));
35 });
36
37 // catch 404 and forward to error handler     捕获404错误,并转发到错误处理器。
38 app.use(function(req, res, next) {
39     var err = new Error('Not Found');
40     err.status = 404;
41     next(err);
42 });
43
44 // error handlers
45
46 // development error handler
47 // will print stacktrace
48 //开发环境下的错误处理器,将错误信息渲染error模版并显示到浏览器中。
49 if (app.get('env') === 'development') {
50     app.use(function(err, req, res, next) {
51         res.status(err.status || 500);
52         res.render('error', {
53             message: err.message,
54             error: err
55         });
56     });
57 }
58
59 // production error handler
60 // no stacktraces leaked to user
61 //生产环境下的错误处理器,将错误信息渲染error模板并显示到浏览器中。
62 app.use(function(err, req, res, next) {
63     res.status(err.status || 500);
64     res.render('error', {
65         message: err.message,
66         error: {}
67     });
68 });
69
70 //module.exports = app;//导出app实例并供其它模块使用
index.js
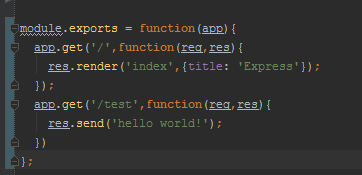
 1 //var express = require('express');
 2 //var router = express.Router();  //创建路由实例
 3 //
 4 ///* GET home page. */
 5 //router.get('/', function(req, res) {   //捕获访问主页的GET请求
 6 //  res.render('index', { title: 'Express' });
 7 //});
 8 //
 9 //module.exports = router;//导出路由,并在app中以app.use('/',routes)加载
10
11
12 module.exports = function(app){
13   app.get('/',function(req,res){
14     res.render('index',{title: 'Express'});
15   });
16   app.get('/test',function(req,res){
17     res.send('hello world!');
18   })
19 };
2. 路由规则
express 封装了多种 http 请求方式,主要使用 app.get() 和app.post()
//第一个参数为请求的路径,第二个参数为回调函数(包括req和res两个参数,分别代表请求信息和响应信息)。
app.get(**,function(req,res){
    ***});

app.post(**,function(req,res){
   ***});
路径请求及对应的获取路径有以下几种形式:
req.query: 处理 get 请求,获取 get 请求参数req.params: 处理 /:xxx 形式的 get 或 post 请求,获取请求参数req.body: 处理 post 请求,获取 post 请求体req.param(): 处理 get 和 post 请求,但查找优先级由高到低为 req.params→req.body→req.query
3. 添加路由规则
浏览器打开http://localhost:3000/ 返回“Welcome to Express”界面
打开http://localhost:3000/test, 返回 “404 Not Found”
此时,添加路由:
在index.js 中,添加响应,如下:
之后,打开http://localhost:3000/test,就可以返回“hello world!”界面了。
【上述test,看完效果还回复原代码】
4. 模板渲染ejs
 //__dirname+'/views'为存放视图文件的目录
app.set('views', __dirname + '/views');

//设置模板引擎为ejs
app.set('view engine', 'ejs');
ejs 的标签系统非常简单,它只有以下三种标签:
- <% code %>:JavaScript 代码。
- <%= code %>:显示替换过 HTML 特殊字符的内容。
- <%- code %>:显示原始 HTML 内容。
这里我们不使用layout进行页面布局,而是使用更为简单灵活的include。include 的简单使用如下:
<%- include a %>
hello,world!
<%- include b %>