爬虫
1、设计
分布式爬虫系统允许位于多个不同主机上的爬虫程序并行爬取提交的爬虫作业,进而协调他们之间的爬取能力。爬取队列由redis管理,每个spider通过修改的调度程序从queue中拉取job。
页面被spider成功爬取后,就交给管线进行进一步处理。如果页面没有成功爬取,重试中间件重新提交页面给后端queue,以备由其他爬虫进行重试爬取。
link spider是分布式爬虫系统的起始点,是用来爬取网页的超链接地址的。
2、Spider
提供的link spider核心设计是在概念上的简单性以及易于扩展到其他应用程序中。Scrapy本身是一个非常强大且可扩展的爬虫框架,他利用扩展和修改的组合来尝试满足基于群集的新爬虫方法。
群集中的每个spider都是独立的,这意味着它可以在群集中充当一个完整的Scrapy Spider,而无需在该计算机上运行任何其Spider或进程。只要spider可以连接到Kafka和Redis集群,那么你就等价于拥有了一个完整的“群集”。当在一台计算机上放置多个爬虫程序或将它们分布在具有不同IP地址的不同计算机上时,可以获得强大的功能。现在,你会得到一个Scrapy蜘蛛背后的处理能力,并在你的抓取作业冗余的利益和并行计算。
提交给群集的每个爬虫作业都被赋予优先级,并被拆分为相应的基于domain的队列。后续级别的优先级降低10的值,对爬虫页面的进一步请求将放入其自己的domain队列中。这使您不仅可以管理爬网作业,还可以管理群集对特定感兴趣域的攻击的难度。
爬虫架构图如下:
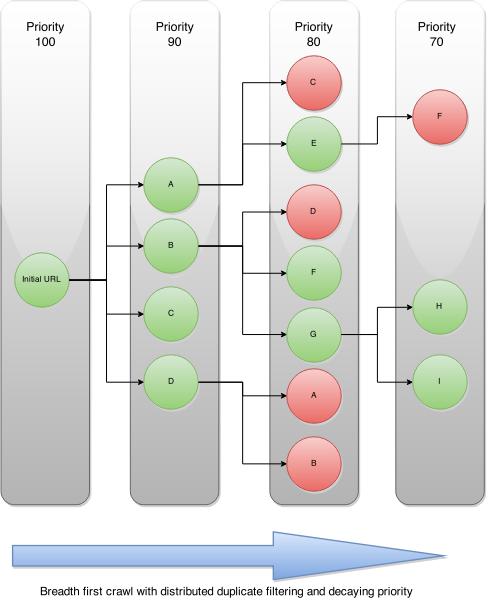
种子url会生成4个链接,集群使用基于redis的优先级队列。因此spider会从每个domain的队列中弹出优先级最高的爬虫请求。在后续请求中找到的新链接在优先级上进行降级,然后put到各自的基于domain的队列中。这可以让具有相同优先级的链接先爬取。
spider如果遇到已经存在的链接时,基于请求crawlid的去重过滤器会将其过滤掉,Spider继续遍历生成的结果图谱,直到到达最大链深或耗尽所有url地址。
当爬虫job提交到集群时,根据特定的spider类型和集群限制策略将请求放入其自己的专用队列中。这样,即使您的Scrapy Spiders位于完全不同的计算机上,您的群集也可以以您想要的速度进行爬行!
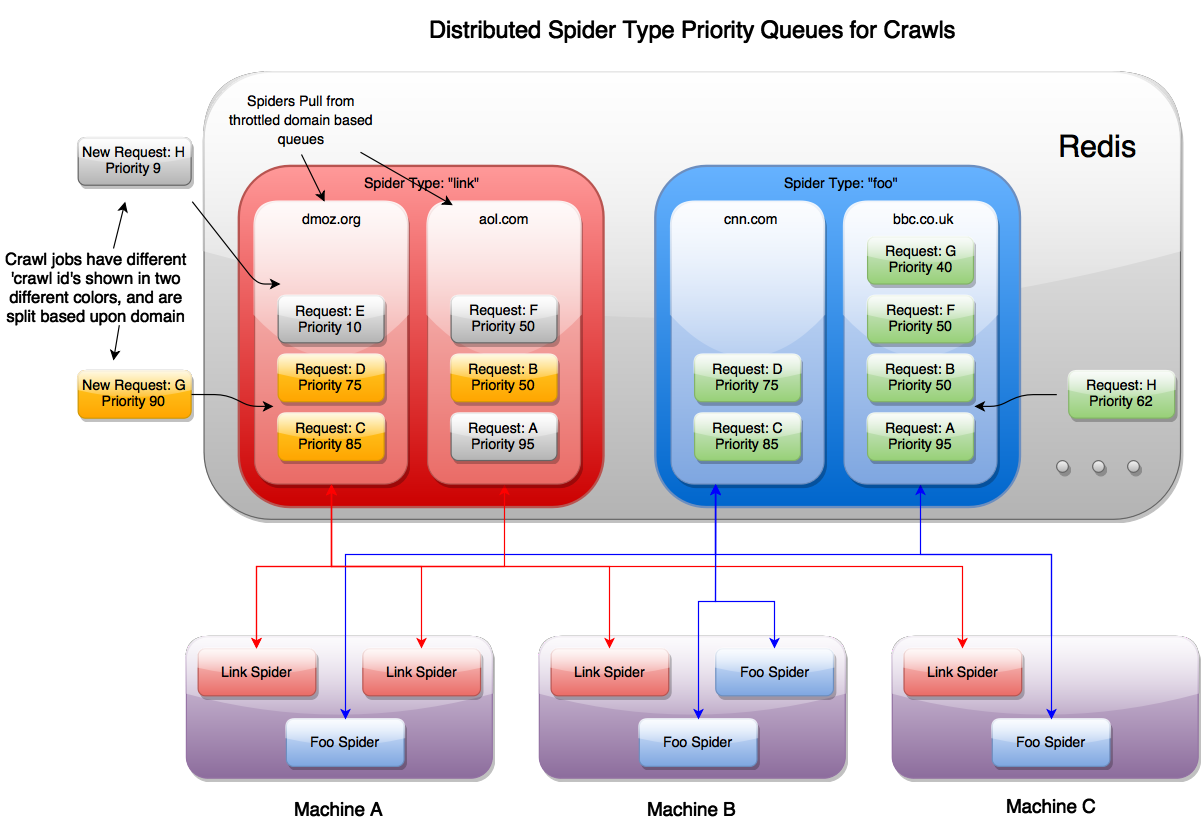
上图显示了运行在同一主机上的多个不同的spider实例,他们均通过redis进行协同。由于每个spider都知道自己的类型,它会使用请求调度器从各自类型的domain queue中拉取新的请求,来自Kafka的新请求以及通过在搜索时发现新链接而生成的请求都被发送回同一优先级队列以进行爬取。
如果用户爬取优先级为70的网页,需要消耗大量资源,但是如果爬取为90的资源,则可以立刻返回。
总体而言,Scrapy Cluster核心抓取组件的设计可实现:
- Scrapy可扩展的爬虫
- 跨任意计算机的分布式爬取工作
- 多个Spider进程逻辑上独立
- 协同,无损边界扩展爬取作业
- 分布式限制和协调,因此您的抓取群集不会使任何特定网站过载
- 能够将爬取作业传递给集群中的其他蜘蛛
3、组件
3.1 custom_cookie.py
耗时spider对收到的cookie不进行缓存,而是在所有请求中进行传递。这会防止spider缓存响应的cookie,并能够使用这些cookie发起后续请求用于完全不同的爬取job。
3.2 distributed_scheduler.py
调度器从redis中和spider名称关联的队列中找出新请求。如果我们使用的是link spider,则搜索的domain队列就是link:
除了has_pending_requests()之外,调度程序具有您期望的所有相同的重写函数。在测试中,我们发现在抓取新条目的函数中返回true时会导致不一致。现在我们返回false,让蜘蛛回到空闲状态,但未来值得进一步研究。
3.3 items.py
爬虫产生的一个基本条目,会进入条目管线中。RawResponseItem对象会返回其他元数据。
- response url
- status code
- status message
- headers
- body text
- links found
- passed through attributes
3.4 log_retry_middleware.py
记录并收集有关Spider接收504超时状态代码的统计信息。这使您可以在Spiders无法连接到所需网页时查看Scrapy Cluster日志。
3.5 meta_passthrough_middleware.py
确保将响应中的最小元数据信息传递给后续请求,以使分发的调度程序工作。
3.6 pipelines.py
管道文件是一个基本的Scrapy项目管道,其中包含三个类。管道类记录以确保我们收到该项目,它已成功发送(成功与否)到Kafka,然后记录该项目的结果。管道还检查以确保在向其发送消息之前存在Kafka主题。
3.7 redis_dupefilter.py
一个非常基本的类,用作使用Redis Set的爬行链接复制过滤器。这允许两个重要的事情:
- 任何独特的crawlid都不会重新抓取它已经看过的网址
- 具有不同的 新爬网请求
crawlid可以抓取这些相同的链接,而不受其他爬网重复过滤器的影响
这允许通过各种链接进行爬网作业,而不会通过爬行相同的东西来浪费资源。如果您想重新抓取这些相同的网址,只需向API提交具有不同抓取标识符的相同网址即可。如果您想继续扩展抓取边界,请提交具有相同标识符的抓取功能。
3.8 lxmlhtml.py
这实际上是Scrapy的自定义版本,LxmlParserLinkExtractor但稍有改动。我们不希望Scrapy在遇到格式错误的HTML或编码错误的网站时抛出链接提取解析错误,因此我们将其更改为忽略错误。这允许即使存在utf编码问题也一直通过流水线继续处理被抓取的页面。
3.9 redis_spider.py
扩展默认Scrapy Spider的基类,以便我们可以在群集模式下连续爬取工作。您需要做的就是实现该parse方法,其他一切都在幕后处理。
快速启动
这是一个完整的爬虫项目。首选创建一个crawling/localsettings.py文件来跟踪本地设置。也可以直接覆盖settings.py文件。文件内容典型如下:
REDIS_HOST = 'scdev'
KAFKA_HOSTS = 'scdev:9092'
ZOOKEEPER_HOSTS = 'scdev:2181'
SC_LOG_LEVEL = 'DEBUG'
1、运行爬虫程序
$>scrapy runspider crawling/spiders/link_spider.py
如果要运行多个爬虫,只需要执行多次以上命令即可。因为爬虫是通过redis进行协同的。
2、典型使用
开启四个终端。
-
终端1
监控kafka输出。
$>python kafkadump.py dump -t demo.crawled_firehose -p
-
终端2
运行kafka监控器
$>python kafka_monitor.py run
-
终端3
运行spider程序。
$>Scrapy runspider crawling/spiders/link_spider.py
-
终端4
feed一个条目。
$>python kafka_monitor.py feed '{"url": "http://dmoztools.net/", "appid":"testapp", "crawlid":"09876abc"}'
执行上述程序后,输出结果如下:
-
终端2输出
2016-01-21 23:22:23,859 [kafka-monitor] INFO: Added crawl to Redis
-
终端3输出
2016-01-21 23:22:35,976 [scrapy-cluster] INFO: Scraped page 2016-01-21 23:22:35,979 [scrapy-cluster] INFO: Sent page to Kafka -
终端1kafka输出
{
    "body": "<body ommitted>",
    "crawlid": "09876abc",
    "response_headers": {
        <headers omitted>
    },
    "response_url": "http://dmoztools.net/",
    "url": "http://dmoztools.net/",
    "status_code": 200,
    "status_msg": "OK",
    "appid": "testapp",
    "links": [],
    "request_headers": {
        "Accept-Language": "en",
        "Accept-Encoding": "gzip,deflate",
        "Accept": "text/html,application/xhtml+xml,application/xml;q=0.9,*/*;q=0.8",
        "User-Agent": "Scrapy/1.0.4 (+http://scrapy.org)"
    },
    "attrs": null,
    "timestamp": "2016-01-22T04:22:35.976672"
}
控制手段
集群需要在不同的爬虫主机之间进行协同以保证达到最大的吞吐量,启用集群管理器来控制访问不同的站点的速度。
集群给出了两种不同的策略来控制spider访问不同domain的速度。该策略由spider类型或IP地址决定,但他们都在不同的domain队列中。
1、域队列
注册的域名通常是指常规的站点,比如google.com,wikipedia.org,amazon.com,scrapy.org等。集群允许你以多快的速度访问每个domain,不会干扰其他domain。每个域都由运行的一组Spiders集合独立协调和限制,也允许对新域进行常规化控制和微调以及以多快的速度进行爬取。
1.1 常规domain控制
以下设置用来控制不同domain的常规行为。
-
QUEUE_WINDOW
集群应该记住特定domain的访问滚动时间窗口(秒数)。
-
QUEUE_HITS
控制在一个window中可以访问domain的次数,相当于在指定时间内的点击量。Scrapy Cluster的限制机制允许蜘蛛协调跨机器的爬行。
默认情况下,Scrapy Cluster 对于它看到的任何域,每60秒都会有非常适度的 10次点击。这可能看起来非常慢,但是当横跨多个IP地址进行水平扩展时,您可以大规模爬行,而不必担心任何单个IP地址被阻止。
-
SCHEDULER_QUEUE_REFRESH
控制Spider检查新域的频率。这是时间密集型的,意味着您的蜘蛛不会爬行,因此建议使用更高但响应更快的时间。
-
QUEUE_MODERATED
确定您是否希望群集的蜘蛛以均匀的间隔到达domain,或者尽可能快地执行爬行,然后暂停。如果您每60秒抓一次10次点击,则一个经过审核的队列将允许您的蜘蛛每6秒抓一次请求(60秒/ 10次点击=每1次点击之间6秒)。关闭此设置将允许您的蜘蛛在60秒窗口内尽快达到他们的6个命中上限。
-
SCHEDULER_QUEUE_TIMEOUT
使您可以控制停滞的域名队列在过期之前在蜘蛛中保留多长时间。这可以防止内存在蜘蛛拥有它在内存中看到的每个域的位置。相反,只有在此窗口中处于活动状态的域才会保留。如果域到期,则可以在为其生成新请求时轻松地重新创建域。
1.2 domain特定配置
使用ZooKeeper添加,删除和更新特定于域的黑名单或特定于域的节流配置。黑名单意味着spider会忽律爬取请求,特定domain限制强制所有spider以特定速率进行爬取(黑名单会将其覆盖)。
-
example.yml
blacklist:
  - <domain3.com>
domains:
  <domain1.com>:
      window: <QUEUE_WINDOW>
      hits: <QUEUE_HITS>
  <domain2.org>:
      window: <QUEUE_WINDOW>
      hits: <QUEUE_HITS>
      scale: 0.5
yaml语法规定了黑名单和一系列域。黑名单是所有蜘蛛应忽略的域列表。可选值scale,值在0到1之间,表示domain选中的比例。
集群读取配置文件不需要重启,使用zookeeper的watcher机制动态接受和更新配置。
-
file_pusher.py
推送文件到zookeeper,不推荐使用。
$>python file_pusher.py -f example.yml -z scdev
2、限速机制
我们已经能够确定群集访问特定域的速度有多快,我们需要确定该域节流如何应用于我们的蜘蛛和爬行机器。下面概述了四种不同节流类型。
-
没有ip,没有类型
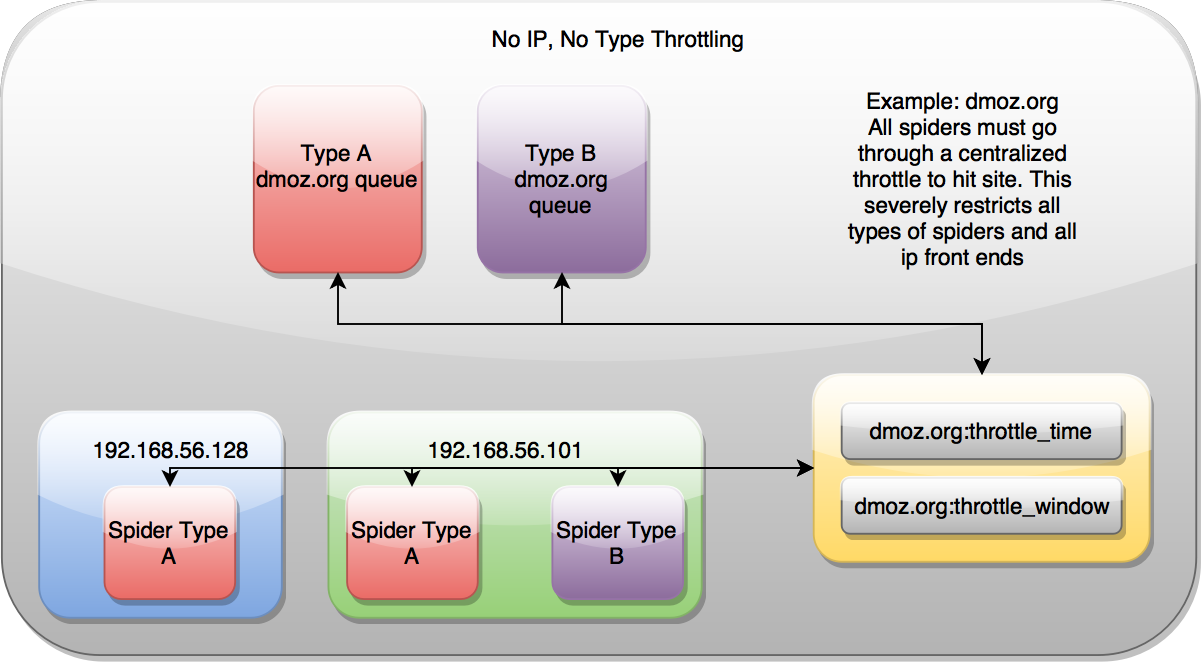
无节流表示domain的协同控制只通过一个地方进行设置完成。对spider和爬取的ip地址无关。确保他们只受一个机制的限制。
-
类型
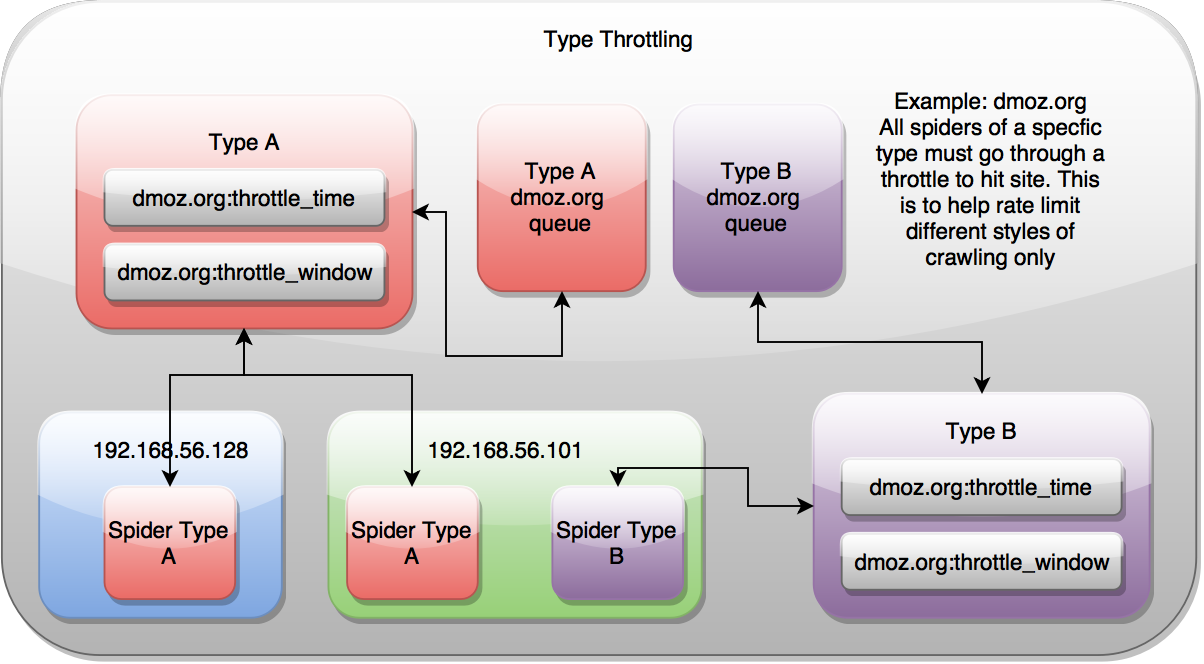
按类型节流意味着对于每个domain,不同类型的spider将自行调节以控制集群对特定domain的访问速度。这忽略了Scrapy请求路由经过的公网IP地址,因此不同主机spider的限速由集群中其他spider对特定domain的访问速率决定。
-
ip地址
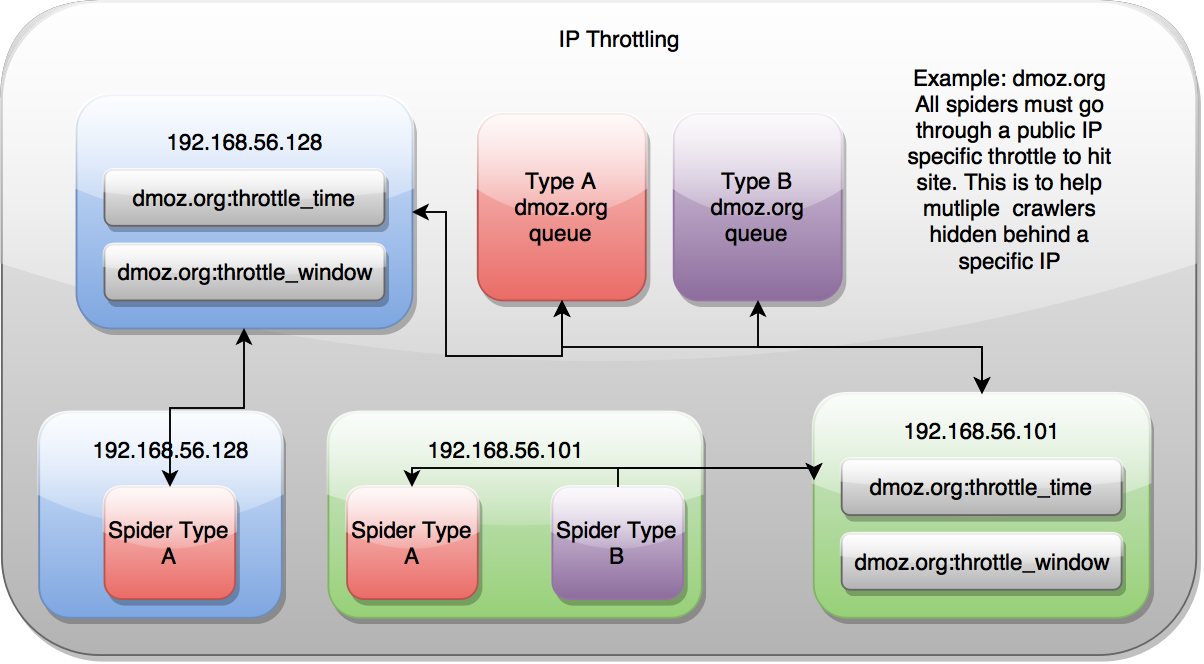
按照ip地址的限流控制是基于spider锁面对的ip地址,但会忽略spider的类型。当在主机上运行多种spider时,这非常有用,只想对特定domain按照固定速率访问。
-
ip地址和类型
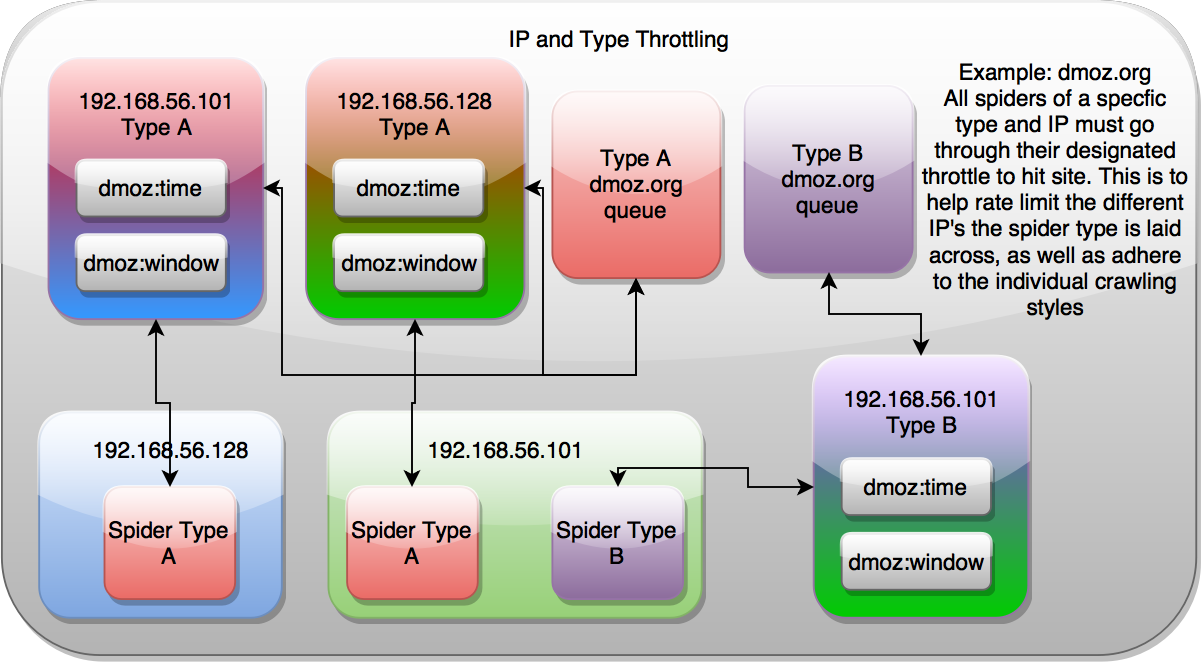
ip和类型的限速是以上两种类型的组合,允许spider基于公网ip和类型进行限速控制。当有多个spider并配置访问不同proxy时较有用。
-
设置
要使用不同的限速机制,可以修改localsettings.py文件。修改文件后,需要重启爬虫使其生效。
-
SCHEDULER_TYPE_ENABLED
启用类型限速
-
SCHEDULER_IP_ENABLED
启用ip限速
3、组合域队列与限速
Scrapy Cluster的核心是Redis优先级队列,它包含特定Spider类型和域的所有请求,例如link:dmoz.org:queue。限制定单个Scrapy进程何时可以从Redis队列接收新请求。只有当限速说“ok”时,Spider才会返回一个链接进行处理。
这导致集群中的Spider不断地轮询所有可用的domain队列以获得新的请求,但是只有当节流机制指示请求限制没有超出最大期望配置时才接收请求。因为限速协助是通过Redis进行控制的,所以它不依赖于任何一个模糊的过程来判断群集能够或不能爬行特定的域。
如果Spider轮询域并拒绝请求,它将循环所有其他已知域,直到找到它能够处理的域为止。这允许非常高的吞吐量,同时爬行许多域。域A每分钟只能允许10次命中,域B允许每分钟30次命中,域C允许每分钟60次命中。在这种情况下,所有的三个域可以在集群中同时爬行,同时仍然尊重特定于域的速率限制。
通过调整你的集群配置你的机器设置和所需的抓取速度,你可以轻松地扩展Scrapy集群过程作为你的网络数据处理。
4、Spider间通信
默认情况下,spider会请求自己的spider类型。这意味着link spider将会爬取其他link spider的请求。如果有一个spider在运行的话,这些请求不会受到干扰。
分布式调度器是非常灵活的,可以请求集群中其他的spider,这要归功于spiderid,他构建了每个爬取请求。
spider的类名位于class的最上方:
class LinkSpider(RedisSpider):
  name = "link"
在redis队列中也会看到同样的名字:
<spiderid>:<domain>:queue
归功于调度器对处理什么样请求并不关心,spider A可以请求Spider B,他们都是用了不同的解析、管线、中间件和其他一切事物。只需要在请求中设置spiderid元字段即可。
response.meta['spiderid'] = 'othername'
虽然这个用例并不经常出现,但您可以设想一些可能有用的场景:
- 您的群集正在使用
linkspider进行大量爬网,但您有特殊的域,您希望切换到不同的爬网方法。当Spider A(进行大型爬网的人)点击目标网站时,它会向Spider B发出请求,该请求会对相关网站进行更详细或自定义的搜索。 - 您正在关注您最喜欢的社交媒体网站上的网络链接,并提交它们以供您的群集抓取。有时,您会收到蜘蛛无法处理的“登录”提示。当检测到该登录提示时,您将获得一个特殊的login蜘蛛,以便处理抓取该特定站点的额外逻辑。
- 您正在抓取购物网站,并且已经知道您想要抓取的所有主要页面。购物网站上的所有链接实际上都是针对产品的,这些产品具有不同的元素集,需要使用不同的中间件或其他逻辑。您的主站点蜘蛛然后向
product蜘蛛发出请求。
那么这与callback 在普通Scrapy Spider中使用参数有什么不同呢?它是不同的,因为这些蜘蛛可能是完全不同的Scrapy项目,具有自己的设置,中间件,项目,项目管道,下载中间件或任何其他你需要来增强你的Scrapy蜘蛛。使用回调要求您要么组合代码,添加额外的逻辑,要么不进行特殊处理,否则您将使用两个不同的Scrapy蜘蛛来完成非常不同的工作。
蜘蛛可以以链或任何其他方式向对方发出请求,以便您的群集成功。
扩展
1、常规
通常,Scrapy Cluster包含Scrapy的扩展和灵活性,同时提供新的钩子和框架以进行高度分布式的爬行和编排。您可以在Scrapy项目中看到一些这样的实例,因为默认情况下Scrapy Cluster需要使用一些中间件和项目管道来将各种东西放在一起。
Scrapy Cluster项目中定制最多的组件涉及分布式调度程序和基本Spider类。这两个类一起工作以允许分布式爬行,但不会干扰正常的Scrapy进程。
2、附加信息
整个项目中都有一个Scrapy Cluster记录器,应该有很多关于如何在Scrapy项目的任何一个部分创建记录器的示例。您应该看到有关如何在pipelines.py文件和log_retry_middleware.py文件中创建记录器的示例。
使用基
RedisSpider类的蜘蛛已经有一个Scrapy Cluster记录器,位于self._logger。
3、spider
from redis_spider import RedisSpider

class MySpider(RedisSpider):
    name = "myspider"

    def __init__(self, *args, **kwargs):
        super(MySpider, self).__init__(*args, **kwargs)

    def parse(self, response):
        # used for collecting statistics about your crawl
        self._increment_status_code_stat(response)

        # process your response here
        # yield Scrapy Requests and Items like normal
4、实例
让我们创建一个集成在Scrapy Cluster中的新Spider。本指南假设您已经有一个工作集群,因此请遵循各种组件的快速入门指南,确保所有内容都已正确连接。
我们将创建一个游荡蜘蛛。这只蜘蛛的目标是偶然发现互联网,只有当它碰到一个没有网址链接的网页时才会停止。我们将从页面上的所有可用链接中随机选择一个链接,并仅生成要由群集抓取的URL。这样,单个爬网作业不会分散,而是从一个页面连续跳转到另一个页面。
[crawling/spiders/wandering_spider.py]
# Example Wandering Spider
import scrapy

from scrapy.http import Request
from lxmlhtml import CustomLxmlLinkExtractor as LinkExtractor
from scrapy.conf import settings

from crawling.items import RawResponseItem
from redis_spider import RedisSpider

import random


class WanderingSpider(RedisSpider):
    '''
    A spider that randomly stumbles through the internet, until it hits a
    page with no links on it.
    '''
    name = "wandering"

    def __init__(self, *args, **kwargs):
        super(WanderingSpider, self).__init__(*args, **kwargs)

    def parse(self, response):
        # debug output for receiving the url
        self._logger.debug("crawled url {}".format(response.request.url))
        # collect stats

        # step counter for how many pages we have hit
        step = 0
        if 'step' in response.meta:
            step = response.meta['step']

        # Create Item to send to kafka
        # capture raw response
        item = RawResponseItem()
        # populated from response.meta
        item['appid'] = response.meta['appid']
        item['crawlid'] = response.meta['crawlid']
        item['attrs'] = response.meta['attrs']
        # populated from raw HTTP response
        item["url"] = response.request.url
        item["response_url"] = response.url
        item["status_code"] = response.status
        item["status_msg"] = "OK"
        item["response_headers"] = self.reconstruct_headers(response)
        item["request_headers"] = response.request.headers
        item["body"] = response.body
        item["links"] = []
        # we want to know how far our spider gets
        if item['attrs'] is None:
            item['attrs'] = {}

        item['attrs']['step'] = step

        self._logger.debug("Finished creating item")

        # determine what link we want to crawl
        link_extractor = LinkExtractor(
                            allow_domains=response.meta['allowed_domains'],
                            allow=response.meta['allow_regex'],
                            deny=response.meta['deny_regex'],
                            deny_extensions=response.meta['deny_extensions'])

        links = link_extractor.extract_links(response)

        # there are links on the page
        if len(links) > 0:
            self._logger.debug("Attempting to find links")
            link = random.choice(links)
            req = Request(link.url, callback=self.parse)

            # increment our step counter for this crawl job
            req.meta['step'] = step + 1

            # pass along our user agent as well
            if 'useragent' in response.meta and
                        response.meta['useragent'] is not None:
                    req.headers['User-Agent'] = response.meta['useragent']

            # debug output
            self._logger.debug("Trying to yield link '{}'".format(req.url))

            # yield the Request to the scheduler
            yield req
        else:
            self._logger.info("Did not find any more links")

        # raw response has been processed, yield to item pipeline
        yield item
运行spider程序:
$>scrapy runspider crawling/spiders/wandering_spider.py
提交给集群:
$>python kafka_monitor.py feed '{"url": "http://dmoz.org", "appid":"testapp", "crawlid":"test123456", "spiderid":"wandering"}'
查看kafka输出:
{
    "body": <omitted>,
    "crawlid": "test123456",
    "response_url": "http://www.dmoz.org/",
    "url": "http://www.dmoz.org/",
    "status_code": 200,
    "status_msg": "OK",
    "appid": "testapp",
    "links": [],
    "request_headers": {
        "Accept-Language": "en",
        "Accept-Encoding": "gzip,deflate",
        "Accept": "text/html,application/xhtml+xml,application/xml;q=0.9,*/*;q=0.8",
        "User-Agent": "Scrapy/1.0.4 (+http://scrapy.org)"
    },
    "attrs": {
        "step": 0
    },
    "timestamp": "2016-01-23T22:01:33.379721"
}
{
    "body": <omitted>,
    "crawlid": "test123456",
    "response_url": "http://www.dmoz.org/Computers/Hardware/",
    "url": "http://www.dmoz.org/Computers/Hardware/",
    "status_code": 200,
    "status_msg": "OK",
    "appid": "testapp",
    "links": [],
    "request_headers": {
        "Accept-Language": "en",
        "Accept-Encoding": "gzip,deflate",
        "Accept": "text/html,application/xhtml+xml,application/xml;q=0.9,*/*;q=0.8",
        "User-Agent": "Scrapy/1.0.4 (+http://scrapy.org)"
    },
    "attrs": {
        "step": 1
    },
    "timestamp": "2016-01-23T22:01:35.566280"
}
请注意,该attrs字段具有我们的步长值,现在我们可以跟踪Scrapy Cluster正在进行的所有跳跃。您的群集现在正在连续处理该特定爬网作业,直到它到达已经看到的页面,或者在响应中找不到任何链接。
您还可以一次启动多个爬网作业,并跟踪作业所执行的步骤。创建更多作业并让集群运行一段时间后,这里是Redis Monitor爬网数据转储的快照。
设置
1、redis
-
redis_host
默认localhost
-
redis_port
默认6379
-
REDIS_DB
默认0
2、kafka
-
KAFKA_HOSTS
默认localhost:9092
-
KAFKA_TOPIC_PREFIX
默认demo
-
KAFKA_APPID_TOPICS
False
-
KAFKA_BASE_64_ENCODE
默认False
-
KAFKA_PRODUCER_BATCH_LINGER_MS
25
-
KAFKA_PRODUCER_BUFFER_BYTES
4 * 1024 * 1024
3、zookeeper
-
ZOOKEEPER_ASSIGN_PATH
默认/scrapy-cluster/crawler/
-
ZOOKEEPER_ID
all
-
ZOOKEEPER_HOSTS
localhost:2181
4、Scheduler
-
SCHEDULER_PERSIST
Default:
TrueDetermines whether to clear all Redis Queues when the Scrapy Scheduler is shut down. This will wipe all domain queues for a particular spider type.
-
SCHEDULER_QUEUE_REFRESH
Default:
10How many seconds to wait before checking for new or expiring domain queues. This is also dictated by internal Scrapy processes, so setting this any lower does not guarantee a quicker refresh time.
-
SCHEDULER_QUEUE_TIMEOUT
Default:
3600The number of seconds older domain queues are allowed to persist before they expire. This acts as a cache to clean out queues from memory that have not been used recently.
-
SCHEDULER_BACKLOG_BLACKLIST
Default:
TrueAllows blacklisted domains to be added back to Redis for future crawling. If set to
False, domains matching the Zookeeper based domain blacklist will not be added back in to Redis.
5、Throttle
-
QUEUE_HITS
Default:
10When encountering an unknown domain, throttle the domain to X number of hits within the
QUEUE_WINDOW -
QUEUE_WINDOW
Default:
60The number of seconds to count and retain cluster hits for a particular domain.
-
QUEUE_MODERATED
Default:
TrueModerates the outbound domain request flow to evenly spread the
QUEUE_HITSthroughout theQUEUE_WINDOW. -
DUPEFILTER_TIMEOUT
Default:
600Number of seconds to keep crawlid specific duplication filters around after the latest crawl with that id has been conducted. Putting this setting too low may allow crawl jobs to crawl the same page due to the duplication filter being wiped out.
-
SCHEDULER_IP_REFRESH
Default:
60The number of seconds to wait between refreshing the Scrapy process’s public IP address. Used when doing IP based throttling.
-
PUBLIC_IP_URL
Default:
'http://ip.42.pl/raw'The default URL to grab the Crawler’s public IP Address from.
-
IP_ADDR_REGEX
Default:
(d{1,3}.d{1,3}.d{1,3}.d{1,3})The regular expression used to find the Crawler’s public IP Address from the
PUBLIC_IP_URLresponse. The first element from the results of this regex will be used as the ip address. -
SCHEDULER_TYPE_ENABLED
Default:
TrueIf set to true, the crawling process’s spider type is taken into consideration when throttling the crawling cluster.
-
SCHEDULER_IP_ENABLED
Default:
TrueIf set to true, the crawling process’s public IP Address is taken into consideration when throttling the crawling cluster.
Note
For more information about Type and IP throttling, please see the throttle documentation.
-
SCHEUDLER_ITEM_RETRIES
Default:
2Number of cycles through all known domain queues the Scheduler will take before the Spider is considered idle and waits for Scrapy to retry processing a request.
6、Logging
-
SC_LOGGER_NAME
Default:
'sc-crawler'The Scrapy Cluster logger name.
-
SC_LOG_DIR
Default:
'logs'The directory to write logs into. Only applicable when
SC_LOG_STDOUTis set toFalse. -
SC_LOG_FILE
Default:
'sc_crawler.log'The file to write the logs into. When this file rolls it will have
.1or.2appended to the file name. Only applicable whenSC_LOG_STDOUTis set toFalse. -
SC_LOG_MAX_BYTES
Default:
10 * 1024 * 1024The maximum number of bytes to keep in the file based log before it is rolled.
-
SC_LOG_BACKUPS
Default:
5The number of rolled file logs to keep before data is discarded. A setting of
5here means that there will be one main log and five rolled logs on the system, totaling six log files. -
SC_LOG_STDOUT
Default:
TrueLog to standard out. If set to
False, will write logs to the file given by theLOG_DIR/LOG_FILE -
SC_LOG_JSON
Default:
FalseLog messages will be written in JSON instead of standard text messages.
-
SC_LOG_LEVEL
Default:
'INFO'The log level designated to the logger. Will write all logs of a certain level and higher.
Note
More information about logging can be found in the utilities Log Factory documentation.
7、Stats
-
STATS_STATUS_CODES
Default:
TrueCollect Response status code metrics
-
STATUS_RESPONSE_CODES
Default:
[
    200,
    404,
    403,
    504,
]
Determines the different Response status codes to collect metrics against if metrics collection is turned on.
-
STATS_CYCLE
Default:
5How often to check for expired keys and to roll the time window when doing stats collection.
-
STATS_TIMES
Default:
[
    'SECONDS_15_MINUTE',
    'SECONDS_1_HOUR',
    'SECONDS_6_HOUR',
    'SECONDS_12_HOUR',
    'SECONDS_1_DAY',
    'SECONDS_1_WEEK',
]
Rolling time window settings for statistics collection, the above settings indicate stats will be collected for the past 15 minutes, the past hour, the past 6 hours, etc.