前言
基本概念
应用主要分为两个方面:功能性和非功能性。
功能性:系统所设计的业务范畴。
非功能性:安全、性能、监控、数据指标(CPU利用率、网卡使用率)
SpringBoot规约大于配置,意思就是大多数组件不需要自行配置,而是自动组装,目的就是为了简化开发。
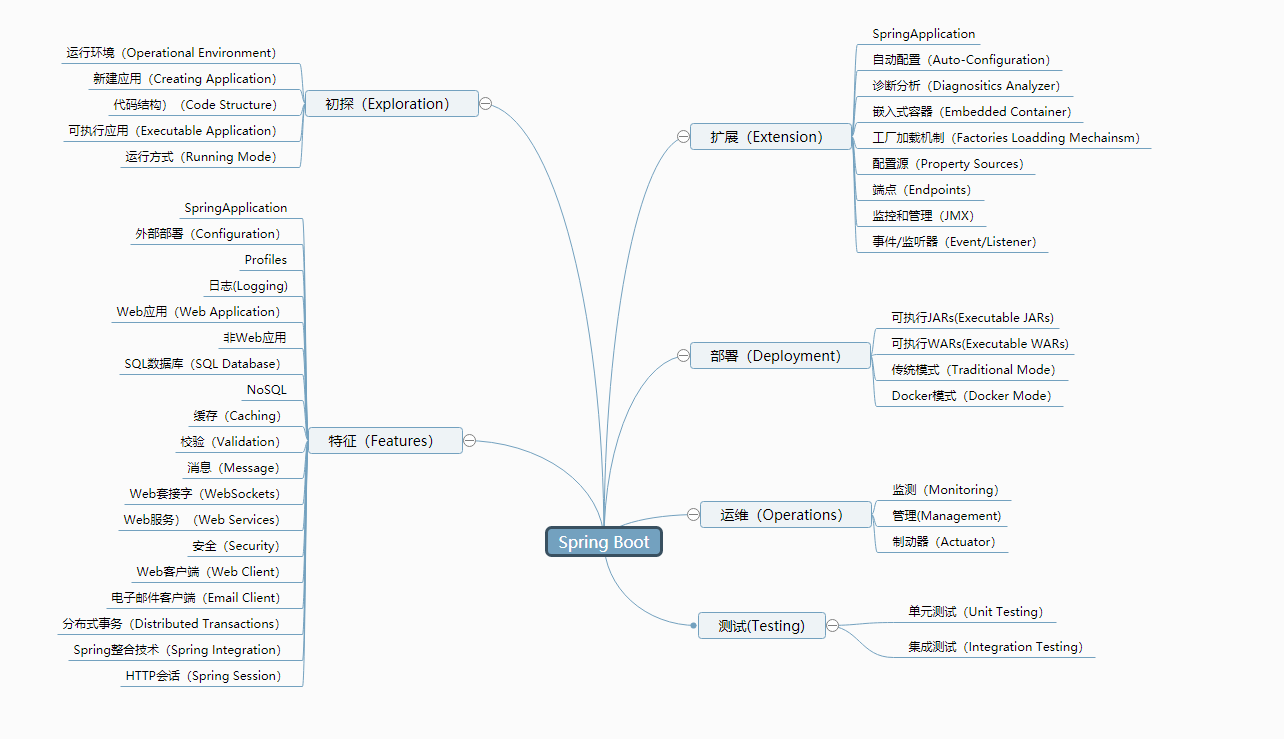
SpringBoot技术体系思维导图
主要议题
创建方式
- 图形化方式(http://start.spring.io/)
- 命令行方式(Maven)
Spring Web Flux
构建多模块应用
构建可执行jar或者war
主体内容
一、项目创建方式
1.图形化方式(这里不做介绍)
2.命令行方式
(1)配置好Maven环境变量后,cmd打开命令行,到要创建的目录下输入以下命令(DinteractiveMode=false为静默安装):
mvn archetype:generate -DgroupId=com.gupao -DartifactId=my-first-springboot -Dversion=1.0.0-SNAPSHOT -DinteractiveMode=false
然后IDE直接导入即可。
(2)接着可以导入springboot依赖,去http://projects.spring.io/spring-boot/选择需要的版本导入相关依赖。
(3)修改启动类App.class
@SpringBootApplication
public class App
{
    public static void main( String[] args ) {
        SpringApplication springApplication = new SpringApplication(App.class);
        springApplication.run(args);
    }
}
二、Spring Web Flux
1.接下来,我们在上述基础上加入webflux依赖包。
<!--spring-webFlux目前不能和spring-webmvc同时使用-->
    <dependency>
      <groupId>org.springframework.boot</groupId>
      <artifactId>spring-boot-starter-webflux</artifactId>
    </dependency>
2.创建一个用户模型User.java
/**
 * 用户模型
 */
public class User {
    private Long id;

    private String name;

    public Long getId() {
        return id;
    }

    public void setId(Long id) {
        this.id = id;
    }

    public String getName() {
        return name;
    }

    public void setName(String name) {
        this.name = name;
    }
}
3.用户仓储UserRespository.java,为什么采用ConcurrentMap,由于默认的单例模式,可能会导致成员变量在多线程下不安全。
/**
 * 用户的仓储
 */
@Repository
public class UserRepository {

    private final ConcurrentMap<Long, User> repository = new ConcurrentHashMap<>();

    private final AtomicLong idGenerator = new AtomicLong();

    public Boolean save(User user){
        //ID从1开始
        long id = idGenerator.incrementAndGet();
        user.setId(id);
        return repository.put(id,user) == null;
    }

    public Collection<User> findAll(){
        return repository.values();
    }
}
4.创建controller包,下UserController.java
import com.gupao.domain.User;
import com.gupao.repository.UserRepository;
import org.springframework.web.bind.annotation.PostMapping;
import org.springframework.web.bind.annotation.RestController;

/**
 * 用户控制器
 */
@RestController
public class UserController {

    private final UserRepository userRepository;

    public UserController(UserRepository userRepository) {
        this.userRepository = userRepository;
    }

    //保存使用Spring Web MVC
    @PostMapping("/user/save")
    public User user(String name){
        User user = new User();
        user.setName(name);
        userRepository.save(user);
        return user;
    }
}
5.然后创建一个config包,包下是WebFluxConfig.java
import com.gupao.domain.User;
import com.gupao.repository.UserRepository;
import org.springframework.beans.factory.annotation.Autowired;
import org.springframework.context.annotation.Bean;
import org.springframework.web.reactive.function.server.RequestPredicates;
import org.springframework.web.reactive.function.server.RouterFunction;
import org.springframework.web.reactive.function.server.RouterFunctions;
import org.springframework.web.reactive.function.server.ServerResponse;
import reactor.core.publisher.Flux;
import reactor.core.publisher.Mono;
import java.util.Collection;

/**
 * Web Flux参数
 */
 @Configuration
public class WebFluxConfig {
    @Bean
    @Autowired//@Autowired可加可不加,加上是便于理解
    public RouterFunction<ServerResponse> responseRouterFunctionUsers(UserRepository userRepository){
        Collection<User> users = userRepository.findAll();
        Flux<User> userFlux = Flux.fromIterable(users);
        //Mono<Collection<User>> mono = Mono.just(users);//二者选一
        RouterFunction<ServerResponse> route = RouterFunctions.route(RequestPredicates.path("/responseRouterFunctionUsers"),
                request->ServerResponse.ok().body(userFlux,User.class));
        return route;
    }
}
6.这里插入讲解一下Mono和Flux
Mono:0-1元素,类似于Java8中的Optional<>
Flux:0-N个元素,类似于Iterable或者Collection
7.启动项目,注意看控制台,用Postman分别测试mvc接口和flux接口。
(1)先访问3次mvc接口,如图展示最后一次结果:

(2)然后访问1次flux接口,结果如下:

三、构建多模块应用
1.修改主工程类型
2.新建web工程,将遗留代码移动到web java目录下。
3.再从web工程,独立出model工程。
4.将web工程依赖model工程。
5.重复步骤3,独立出persistence。
6.再从persistence添加model依赖。
7.最终依赖关系:web->persistence->model
四、构建可执行jar或者war
web-1.0.0-SNAPSHOT.jar中没有注清单属性?
需要一个springboot的插件,那好我们先把他放到主pom中。
<!-- Package as an executable jar -->
	<build>
		<plugins>
			<plugin>
				<groupId>org.springframework.boot</groupId>
				<artifactId>spring-boot-maven-plugin</artifactId>
			</plugin>
		</plugins>
	</build>
jar规范里面,有一个MANIFEST.MF,里面有一个Main-Class的属性,API:
java.uti.jar#Manifest#getAttributes
cmd打开命令行:输入以下maven打包命令并跳过测试;
E:WorkplacesMavenWorkplacemy-first-springboot>mvn -Dmaven.test.skip -U clean package
结果发生了下面的错误:
Execution repackage of goal org.springframework.boot:spring-boot-maven-plugin:2.2.7.RELEASE:repackage failed: Unable to find main class
那么为啥呢?是因为插件懵逼了,到底执行哪个Main-Class呢?于是在插件基础上加上以下内容,整体如下:
<!-- Package as an executable jar -->
  <build>
    <plugins>
      <plugin>
        <groupId>org.springframework.boot</groupId>
        <artifactId>spring-boot-maven-plugin</artifactId>
        <configuration>
          <mainClass>com.gupao.App</mainClass>
        </configuration>
      </plugin>
    </plugins>
  </build>
然后再次打包,又出现以下问题:
[ERROR] Failed to execute goal org.apache.maven.plugins:maven-compiler-plugin:3.8.1:compile (default-compile) on project persistence: Compilation failure: Compilation failure:
[ERROR] /E:/Workplaces/MavenWorkplace/my-first-springboot/persistence/src/main/java/com/gupao/repository/UserRepository.java:[3,24] 程序包com.gupao.domain不存在
[ERROR] /E:/Workplaces/MavenWorkplace/my-first-springboot/persistence/src/main/java/com/gupao/repository/UserRepository.java:[16,39] 找不到符号
[ERROR]   符号:   类 User
[ERROR]   位置: 类 com.gupao.repository.UserRepository
[ERROR] /E:/Workplaces/MavenWorkplace/my-first-springboot/persistence/src/main/java/com/gupao/repository/UserRepository.java:[20,25] 找不到符号
[ERROR]   符号:   类 User
[ERROR]   位置: 类 com.gupao.repository.UserRepository
[ERROR] /E:/Workplaces/MavenWorkplace/my-first-springboot/persistence/src/main/java/com/gupao/repository/UserRepository.java:[27,23] 找不到符号
[ERROR]   符号:   类 User
[ERROR]   位置: 类 com.gupao.repository.UserRepository
[ERROR] -> [Help 1]
[ERROR]
[ERROR] To see the full stack trace of the errors, re-run Maven with the -e switch.
[ERROR] Re-run Maven using the -X switch to enable full debug logging.
[ERROR]
[ERROR] For more information about the errors and possible solutions, please read the following articles:
[ERROR] [Help 1] http://cwiki.apache.org/confluence/display/MAVEN/MojoFailureException
[ERROR]
[ERROR] After correcting the problems, you can resume the build with the command
[ERROR]   mvn <goals> -rf :persistence
这次又为啥?其实我们要把该插件放到web模块的pom中,这次就OK了。
{INFO] Reactor Summary for my-first-springboot 1.0.0-SNAPSHOT:
[INFO]
[INFO] my-first-springboot ................................ SUCCESS [  0.222 s]
[INFO] model .............................................. SUCCESS [  1.781 s]
[INFO] persistence ........................................ SUCCESS [  0.431 s]
[INFO] web ................................................ SUCCESS [  1.072 s]
[INFO] ------------------------------------------------------------------------
[INFO] BUILD SUCCESS
[INFO] ------------------------------------------------------------------------
[INFO] Total time:  3.892 s
[INFO] Finished at: 2020-05-11T23:03:36+08:00
[INFO] ------------------------------------------------------------------------

E:WorkplacesMavenWorkplacemy-first-springboot>
接下来进入target目录
E:WorkplacesMavenWorkplacemy-first-springboot>cd web/target
列表发现有以下文件
E:WorkplacesMavenWorkplacemy-first-springbootweb	arget>dir
 驱动器 E 中的卷是 documents
 卷的序列号是 90A4-C3EA

 E:WorkplacesMavenWorkplacemy-first-springbootweb	arget 的目录

2020/05/11  23:03    <DIR>          .
2020/05/11  23:03    <DIR>          ..
2020/05/11  23:03    <DIR>          classes
2020/05/11  23:03    <DIR>          generated-sources
2020/05/11  23:03    <DIR>          maven-archiver
2020/05/11  23:03    <DIR>          maven-status
2020/05/11  23:03        19,691,419 web-1.0.0-SNAPSHOT.jar
2020/05/11  23:03             4,552 web-1.0.0-SNAPSHOT.jar.original
               2 个文件     19,695,971 字节
               6 个目录 109,520,785,408 可用字节
资源库中显示文件
E:WorkplacesMavenWorkplacemy-first-springbootweb arget>explorer .
点进去web-1.0.0-SNAPSHOT.jar看看目录。
注意
- 有个叫做BOO-INF的目录它是springboot1.4才有的。
- 同时当使用依赖或插件时,如果版本是Milestone时,主pom需要增加:
 <pluginRepositories>
   <pluginRepository>
     <id>spring-snapshots</id>
     <url>http://repo.spring.io/snapshot</url>
   </pluginRepository>
   <pluginRepository>
     <id>spring-milestones</id>
     <url>http://repo.spring.io/milestone</url>
   </pluginRepository>
 </pluginRepositories>

  <repositories>
    <repository>
      <id>spring-milestones</id>
      <name>Spring Milestones</name>
      <url>https://repo.spring.io/libs-milestone</url>
      <snapshots>
        <enabled>false</enabled>
      </snapshots>
    </repository>
  </repositories>
- META-INF/MANIFEST.MF里面有指定两个属性Main-Class、Start-Class
举例
Main-Class: org.springframework.boot.loader.JarLauncher
Start-Class: com.gupao.App
- 除了jar或者war启动的方式,还有目录启动的方式:目录启动方式可以帮助解决过期的jar不支持Spring Boot的新方式。也可以这样,copy Main-Class,照样可以启动,6到爆炸:
E:WorkplacesMavenWorkplacemy-first-springbootweb	argetweb-1.0.0-SNAPSHOT>java org.springframework.boot.loader.JarLauncher

  .   ____          _            __ _ _
 /\ / ___'_ __ _ _(_)_ __  __ _
( ( )\___ | '_ | '_| | '_ / _` |
 \/  ___)| |_)| | | | | || (_| |  ) ) ) )
  '  |____| .__|_| |_|_| |_\__, | / / / /
 =========|_|==============|___/=/_/_/_/
 :: Spring Boot ::        (v2.2.7.RELEASE)

2020-05-11 23:30:12.272  INFO 6484 --- [           main] com.gupao.App                            : Starting App on MSI with PID 6484 (E:WorkplacesMavenWorkplacemy-first-springbootweb	argetweb-1.0.0-SNAPSHOTBOOT-INFclasses started by 66477 in E:WorkplacesMavenWorkplacemy-first-springbootweb	argetweb-1.0.0-SNAPSHOT)
2020-05-11 23:30:12.276  INFO 6484 --- [           main] com.gupao.App                            : No active profile set, falling back to default profiles: default
2020-05-11 23:30:15.324  INFO 6484 --- [           main] o.s.b.web.embedded.netty.NettyWebServer  : Netty started on port(s): 8080
2020-05-11 23:30:15.326  INFO 6484 --- [           main] com.gupao.App                            : Started App in 3.433 seconds (JVM running for 3.85)
这里是jar包,如果是war包,启动的就是java org.springframework.boot.loader.WarLauncher。
如果要打包成war包
1.修改
2.创建“webapp/WEB-INF”目录(相对于src/main)。
3.新建一个空的web.xml[步骤2和步骤3是为了绕过插件的限制
或者使用在启动类的那个模块pom中
<plugin>
    <artifactId>maven-war-plugin</artifactId>
    <configuration>
    	<failOnMissingWebXml>false</failOnMissingWebXml>
    </configuration>
</plugin>
然后启动war包:
E:WorkplacesMavenWorkplacemy-first-springbootweb arget>java -jar web-1.0.0-SNAPSHOT.war
Postman测试一波就ok了。
这里插入一个小知识点,那就是war包启动我可以启动多个相同war包,只是在语句后面加上 --server.port=0即可分配一个随机可用的端口。
Maven方式执行jar包
(1)首先,将父包install。
E:WorkplacesMavenWorkplacemy-first-springboot>mvn -Dmaven.test.skip -U clean install
(2)然后,cd到web模块,执行以下命令:
E:WorkplacesMavenWorkplacemy-first-springboot>cd web
E:WorkplacesMavenWorkplacemy-first-springbootweb>mvn spring-boot:run
五、总结
问题1:WebFluxConfiguration里面的映射路径和controller里面的路径有什么区别吗?
解答:基本上没有区别,但是注意,不能重复定义,或者URL语义有重复!
问题2:webFlux不是不能跟mvc不能一起吗,怎么一起启动了?
解答:spring-boot-starter-webmvc和spring-boot-starter-webflux可以放在同一个应用,课时webflux不会工作,默认使用webmvc,webflux不会被采用。其实webflux是兼容Annotation驱动,比如@RequestMapping。
问题3:webFlux可以定义restFul吗?
解答:可以,支持restFul。
问题4:spring的就项目迁移到springboot,如何操作?
解答:旧的xml方式采用@ImportResource导入。
问题5:嵌入式Tomcat如何调优?
解答:第一种通过application.properties文件调整配置参数。
第二种通过接口回调:
- TomcatConnectirCustomizer
- TomcatContextCustomizer