前言
可能大家用过或者了解过Spring Cloud,本章将简单的介绍一下Spring Cloud。
主要议题
- Spring Cloud技术体系
- Spring/Spring Boot事件机制
- Bootstrap配置属性
- 理解Environment端点
主体内容
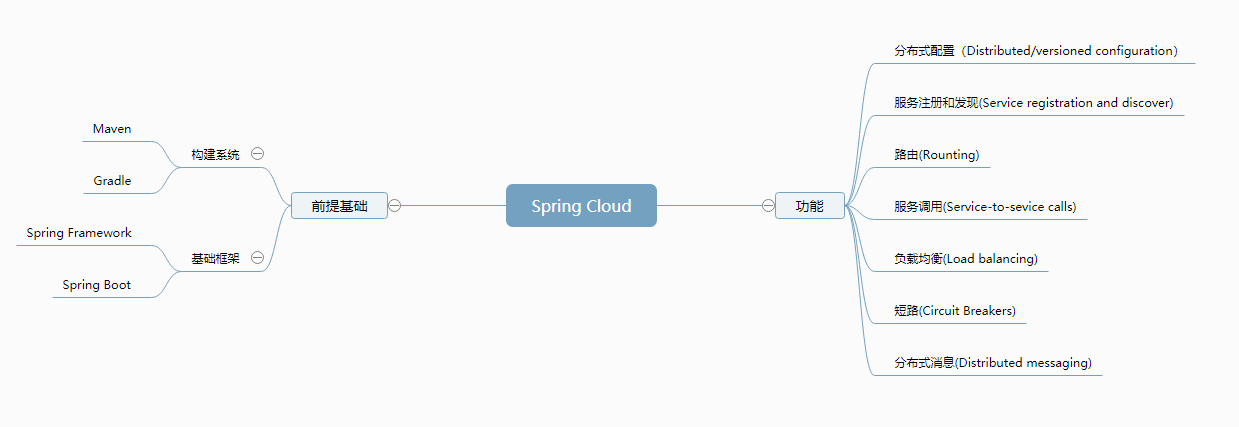
一、Spring Cloud技术体系
思维导图
二、Spring/Spring Boot事件机制
- 设计模式
- 观察者模式
- 事件/监听器模式
- Spring核心接口
- ApplicationEvent
- ApplicationListener
1.观察者模式
java.util.Observable是一个发布者
java.util.Observer是订阅者
发布者和订阅者可以是1:N的关系也可以是N:M的关系。这里抛出一个小的示例,具体了解可以参考其余资料:
import java.util.Observable;
import java.util.Observer;

/**
 * @ClassName ObserverDemo
 * @Description 观察者模式
 * @Author 66477
 * @Date 2020/5/16 14:20
 * @Version v1.0
 **/
public class ObserverDemo {
    public static void main(String[] args) {

        MyObservable myObservable= new MyObservable();
        //增加订阅者(观察者)
        myObservable.addObserver(new Observer() {
            @Override
            public void update(Observable o, Object arg) {
                System.out.println(arg);
            }
        });

        //为什么把数据发给观察者之前要先调用setChanged()?
        //因为数据有时更新得太快,如果想要数据在某一间隔才发给观察者,例如没5秒采集数据一次。逻辑上可以5秒后调用setChanged()一次,才能向观察者发送数据。
        //所以setChanged()用于控制数据的发送时机
        myObservable.setChanged();//说明在这里它已经变化了
        myObservable.notifyObservers("Hello World");//通知订阅者
    }

     private static void echoIterable(){
        List<Integer> values = Arrays.asList(1,2,3,4,5);
        Iterator<Integer> integerIterator = ((List) values).iterator();
        while(integerIterator.hasNext()){//通过循环,主动获取(拉模式)
            integerIterator.next();
        }
    }

    //自己写一个类继承Observable,因为Observable类中的setChanged方法是protected
    public static class MyObservable extends  Observable{

        public  void setChanged(){
            super.setChanged();
        }
    }
}
2.事件/监听模式
java.util.EventObject:事件对象,事件对象总是关联着事件源(source)
java.uitl.EventListener:事件监听接口(标记)
3.Spring事件/监听
- Spring核心接口
- ApplicationEvent
- ApplicationListener
/**
 * @ClassName SpringEventListenerDemo
 * @Description 自定义 事件/监听器
 * @Author 66477
 * @Date 2020/5/16 21:57
 * @Version v1.0
 **/
public class SpringEventListenerDemo {
    public static void main(String[] args) {
        //Annotation 驱动的Spring上下文
        AnnotationConfigApplicationContext context = new AnnotationConfigApplicationContext();
        //1.注册监听器
        context.addApplicationListener(new ApplicationListener<MyApplicationEvent>() {
            /**
             * 3.监听器得到事件
             * @param event
             */
            @Override
            public void onApplicationEvent(MyApplicationEvent event) {
                //打印事件源和事件上下文对象
                System.out.println("接收到事件:"+event.getSource()+"@"+event.getApplicationContext());
            }
        });
        context.refresh();
        //2.发布事件
        context.publishEvent(new MyApplicationEvent(context,"Hello World"));
        context.publishEvent(new MyApplicationEvent(context,1));
        context.publishEvent(new MyApplicationEvent(context,new Integer(100)));
    }

    private static class MyApplicationEvent extends ApplicationEvent{

        private final ApplicationContext applicationContext;
        //添加构造方法参数:上下文对象参数
        public MyApplicationEvent(ApplicationContext applicationContext, Object source) {
            super(source);
            this.applicationContext=applicationContext;
        }
        //设置上下文对象getter方法
        public ApplicationContext getApplicationContext() {
            return applicationContext;
        }
    }

}
其中补充一点:ConfigFileApplicationListener类是管理配置文件的,如:application.properties,以及application.yaml。
它有一个模式:application-{profile}.properties
当profile=dev、test时,
它可能会有加载优先级的顺序,当然,这也不是绝对的,比如:
1.application-{profile}.properties
2.application.properties
Java SPI:ServiceLoader
配置项位置:Spring Boot在相对于ClassPath:/META-INF/spring.factories
Spring SPI:
# Application Listeners
org.springframework.context.ApplicationListener=
org.springframework.boot.ClearCachesApplicationListener,
org.springframework.boot.builder.ParentContextCloserApplicationListener,
org.springframework.boot.cloud.CloudFoundryVcapEnvironmentPostProcessor,
org.springframework.boot.context.FileEncodingApplicationListener,
org.springframework.boot.context.config.AnsiOutputApplicationListener,
org.springframework.boot.context.config.ConfigFileApplicationListener,
org.springframework.boot.context.config.DelegatingApplicationListener,
org.springframework.boot.context.logging.ClasspathLoggingApplicationListener,
org.springframework.boot.context.logging.LoggingApplicationListener,
org.springframework.boot.liquibase.LiquibaseServiceLocatorApplicationListener
那么它是如何控制顺序?
实现Ordered类以及标记@Order,Ordered里面有个getOrder方法。
在Spring里面,数值越小越优先。
4.Spring/SpringBoot事件机制
-
SpringBoot核心事件,事件是用来通知监听事件的监听器某件事情的处理状态,在SpringBoot启动过程中,除了Spring框架的事件外,SpringBoot还会触发其他的一些事件,这些事件按下列顺序触发:
(1)ApplicationStartingEvent:项目刚启动时触发,此时除了注册监听器和初始器之外,其他所有处理都没有开始;
(2)ApplicationEnvironmentPreparedEvent:上下文得到环境信息之后触发,此时上下文创建还没有创建;
(3)ApplicationPreparedEvent:bean的定义信息加载完成之后触发,此时bean还没有初始化;
(4)ApplicationReadyEvent:在所有bean初始化完毕,所有回调处理完成,系统准备处理服务请求时触发;
(5)ApplicationFailedEvent:启动过程出现异常时候触发。
知道SpringBoot启动时发送的时间后,我们就能自定义监听器对这些事件进行监听,从而达到扩展启动流程的目的。我们的自定义监听器需要实现ApplicationListener接口,同时指定需要监听哪个事件。
然后在main方法中,将自定义监听器加入到SpringApplication中。
除了上述代码的方式添加监听器外,还可以通过在classpath下创建META-INF/spring.factories文件,并将自定义监听器通过键值对的形式(org.springframework.context.ApplicationListener = com.example.MyListener)加入到SpringApplication中。
5.Spring Cloud 事件/监听器
配置项位置:Spring Cloud在相对于ClassPath:/META-INF/spring.factories,找到BootstrapApplicationListener类,在IDEA中find usages。内容如下:
# Application Listeners
org.springframework.context.ApplicationListener=
org.springframework.cloud.bootstrap.BootstrapApplicationListener,
org.springframework.cloud.bootstrap.LoggingSystemShutdownListener,
org.springframework.cloud.context.restart.RestartListener
BootstrapApplicationListener:它加载的优先级高于ConfigFileApplicationListener,所以application.properties文件即使定义也配置不到!
原因在于:
BootstrapApplicationListener第六优先
ConfigFileApplicationListener第十一优先
如本体现?
BootstrapApplicationListener类实现了Ordered接口。我这个版本的springboot列出了Ordered的最高优先级和最低优先级:
 int HIGHEST_PRECEDENCE = -2147483648;
 int LOWEST_PRECEDENCE = 2147483647;
然后BootstrapApplicationListener类定义的默认优先级为-2147483643,区块代码如下:
 ...
 public static final String BOOTSTRAP_PROPERTY_SOURCE_NAME = "bootstrap";
 public static final int DEFAULT_ORDER = -2147483643;
 public static final String DEFAULT_PROPERTIES = "springCloudDefaultProperties";
 private int order = -2147483643;
 ...
我们还知道Spring中数字越小,优先级越高,而这里又是负值,则可以说BootstrapApplicationListener优先级距离最高优先级5个数字,那它本身就是第六优先级,同理,看下ConfigFileApplicationListener类,它的默认优先级为 -2147483638,距离最高优先级中间差了10个数字,则可以说ConfigFileApplicationListener为第十一优先级。
private static final String DEFAULT_PROPERTIES = "defaultProperties";
private static final String DEFAULT_SEARCH_LOCATIONS = "classpath:/,classpath:/config/,file:./,file:./config/*/,file:./config/";
private static final String DEFAULT_NAMES = "application";
private static final Set<String> NO_SEARCH_NAMES = Collections.singleton((Object)null);
private static final Bindable<String[]> STRING_ARRAY = Bindable.of(String[].class);
private static final Bindable<List<String>> STRING_LIST = Bindable.listOf(String.class);
private static final Set<String> LOAD_FILTERED_PROPERTY;
public static final String ACTIVE_PROFILES_PROPERTY = "spring.profiles.active";
public static final String INCLUDE_PROFILES_PROPERTY = "spring.profiles.include";
public static final String CONFIG_NAME_PROPERTY = "spring.config.name";
public static final String CONFIG_LOCATION_PROPERTY = "spring.config.location";
public static final String CONFIG_ADDITIONAL_LOCATION_PROPERTY = "spring.config.additional-location";
public static final int DEFAULT_ORDER = -2147483638;
private final DeferredLog logger = new DeferredLog();
private static final Resource[] EMPTY_RESOURCES;
private static final Comparator<File> FILE_COMPARATOR;
private String searchLocations;
private String names;
private int order = -2147483638;
BootstrapApplicationListener类
1.负责加载bootstrap.properties或者bootstrap.yaml。
2.负责初始化Bootstrap ApplicationContext ID="bootstrap"
ConfigurableApplicationContext context = builder.run();
Bootstrap是一个跟Spring上下文,parent=null
联想ClassLoader
ExtClassLoader<-AppClassLoader<-
System ClassLoader->Bootstrap ClassLoader
ConfigurableApplicationContext
标准实现类:AnnotationConfigApplicationContext
三、Bootstrap配置属性
-
Bootstrap配置文件路径
-spring.cloud.bootstrap.location
-
覆盖远程配置属性
-spring.cloud.config.allowOverride
-
自定义Bootstrap配置
-@BootstrapConfiguration
-
自定义Bootstrap配置属性源
-PropertySourceLocator
1.自定义Bootstrap配置属性源
(1)实现PropertySourceLocator
(2)暴露该实现作为一个Spring Bean
(3)实现PropertySource
(4)
@Configuration
@Order(Ordered.HIGHEST_PRECEDENCE)
public static class MyPropertySourceLoator implements PropertySourceLocator{


   @Override
   public PropertySource<?> locate(Environment environment) {
      Map<String,Object> source = new HashMap<>();
      source.put("server.port","9090");
      MapPropertySource propertySource = new MapPropertySource("my-property-souce",source);
      return propertySource;
   }
}
四、理解Environment端点
- Spring Boot Actuator
- endpoint:"/env"
- Spring Framework
- Environment API
1.默认只开放info, health这两个端口,要想开放其他端口,配置如下:
management.endpoints.web.exposure.include=beans,info
关于Env的端点,可以看看EnvironmentEndpoint这个类。
Environment关联多个带名称的PropertySource,可以参考以下Spring Framework的源码AbstractApplicationContext#initPropertySources#子类AbstractRefreshableWebApplicationContext:
 protected void initPropertySources() {
        ConfigurableEnvironment env = this.getEnvironment();
        if (env instanceof ConfigurableWebEnvironment) {
            ((ConfigurableWebEnvironment)env).initPropertySources(this.servletContext, this.servletConfig);
        }
    }
Environment有两种实现方式:
普通类型:StandardEnvironment
Web类型:StandardServletEnvironment
Environment
AbstractEnvironment类StardEnvironment
Environment关联着一个PropertySources实例
PropertySources关联着多个PropertySource,并且有优先级
其中比较常用的PropertySource实现:
Java System#getenv实现:名称“systemProperties”,对应的内容System.getProperties()
Java System#nev实现:名称“systemEnvironment”,对应的内容System.getProperties()
关于SpringBoot优先级顺序可以参考:https://docs.spring.io/spring-boot/docs/2.3.0.RELEASE/reference/htmlsingle/#boot-features-external-config