本文是基于如下两篇博文的学习做最后的总结的:
对上述两篇博文阅读后,先简单介绍一下核心代码(这个是我重新优化后的代码)
绘制一个普通文本:
- (NSAttributedString *)attributedStringWithConfig:(RXCTFrameConfig *)config outRXCTFrame:(RXCTFrame **)outRXCTFrame
{
    NSMutableDictionary *attributes = config.attributes;
    UIColor *textColor = self.textColor;
    if (textColor != nil) {
        attributes[(id)kCTForegroundColorAttributeName] = (id)textColor.CGColor;
    }
    if (self.font != nil) {
        CGFloat fontSize = self.font.pointSize;
        CTFontRef fontRef = CTFontCreateWithName((CFStringRef)self.font.fontName, fontSize, NULL);
        attributes[(id)kCTFontAttributeName] = (__bridge id)fontRef;
        CFRelease(fontRef);
    }
    NSString *content = self.content;
    NSAttributedString *attributedString = [[NSMutableAttributedString alloc] initWithString:content attributes:attributes];
    RXCTTextFrame *rxctFrame = [[RXCTTextFrame alloc] init];
    rxctFrame.rxctData = self;
    *outRXCTFrame = rxctFrame;
    return attributedString;
}
绘制一个超链接
- (NSAttributedString *)attributedStringWithConfig:(RXCTFrameConfig *)config outRXCTFrame:(RXCTFrame **)outRXCTFrame
{
    NSMutableDictionary *attributes = config.attributes;
    UIColor *textColor = self.textColor;
    if (textColor != nil) {
        attributes[(id)kCTForegroundColorAttributeName] = (id)textColor.CGColor;
    }
    if (self.font != nil) {
        CGFloat fontSize = self.font.pointSize;
        CTFontRef fontRef = CTFontCreateWithName((CFStringRef)self.font.fontName, fontSize, NULL);
        attributes[(id)kCTFontAttributeName] = (__bridge id)fontRef;
        CFRelease(fontRef);
    }
    // 添加一条线
    attributes[(id)kCTUnderlineStyleAttributeName] = [NSNumber numberWithInt:kCTUnderlineStyleSingle];
    NSString *content = self.content;
    NSAttributedString *attributedString = [[NSMutableAttributedString alloc] initWithString:content attributes:attributes];
    RXCTLinkFrame *rxctFrame = [[RXCTLinkFrame alloc] init];
    rxctFrame.rxctData = self;
    *outRXCTFrame = rxctFrame;
    return attributedString;
}
绘制一个图片(本地或者网络的)
static CGFloat ascentCallback(void *ref)
{
    RXCTImageData *imageData = (__bridge RXCTImageData *)ref;
    return imageData.height;
}
static CGFloat descentCallback(void *ref)
{
    return 0;
}
static CGFloat widthCallback(void *ref)
{
    RXCTImageData *imageData = (__bridge RXCTImageData *)ref;
    return imageData.width;
}

static void deallocCallback(void *ref)
{
    // Do Nothing
}

#pragma mark - Override
- (NSAttributedString *)attributedStringWithConfig:(RXCTFrameConfig *)config outRXCTFrame:(RXCTFrame **)outRXCTFrame
{
    CTRunDelegateCallbacks callbacks;
    memset(&callbacks, 0, sizeof(CTRunDelegateCallbacks));
    callbacks.version = kCTRunDelegateVersion1;
    callbacks.getAscent = ascentCallback;
    callbacks.getDescent = descentCallback;
    callbacks.getWidth = widthCallback;
    callbacks.dealloc = deallocCallback;
    CTRunDelegateRef delegateRef = CTRunDelegateCreate(&callbacks, (__bridge void *)(self));
    // 使用 0xFFFC 作为空白的占位符
    unichar objectReplacementChar = 0xFFFC;
    NSString *content = [NSString stringWithCharacters:&objectReplacementChar length:1];
    NSDictionary *attributes = config.attributes;
    NSMutableAttributedString *attributedString = [[NSMutableAttributedString alloc] initWithString:content attributes:attributes];
    // 给这个attributedString设置属性
    CFAttributedStringSetAttribute((CFMutableAttributedStringRef)attributedString, CFRangeMake(0, 1), kCTRunDelegateAttributeName, delegateRef);
    CFRelease(delegateRef);
    RXCTImageFrame *rxctFrame = [[RXCTImageFrame alloc] init];
    rxctFrame.rxctData = self;
    *outRXCTFrame = rxctFrame;
    return attributedString;
}
得到一个CTFrameRef
    CTFramesetterRef framesetterRef = CTFramesetterCreateWithAttributedString((CFAttributedStringRef)attributedString);
    // 获得要绘制的区域的高度
    CGSize restrictSize = CGSizeMake(config.width, CGFLOAT_MAX); // 限制的区域
    CGSize coreTextSize = CTFramesetterSuggestFrameSizeWithConstraints(framesetterRef, CFRangeMake(0, 0), nil, restrictSize, nil);
    CGFloat textHeight = coreTextSize.height;
    // 创建 CTFrameRef 实例
    CGMutablePathRef pathRef = CGPathCreateMutable();
    CGPathAddRect(pathRef, NULL, CGRectMake(0, 0, config.width, textHeight));
    CTFrameRef frameRef = CTFramesetterCreateFrame(framesetterRef, CFRangeMake(0, 0), pathRef, NULL);
    CFRelease(pathRef);
    // 将生成好的 CTFrameRef 实例和计算好的绘制高度保存到 CoreTextData 实例中,最后返回CoreTextData实例
    RXCTFrameData *ctFrameData = [[RXCTFrameData alloc] init];
    ctFrameData.frameRef = frameRef;
    ctFrameData.height = textHeight;
    ctFrameData.content = attributedString;
    ctFrameData.attributedArray = array;
    ctFrameData.lineSpace = config.lineSpace;
    CFRelease(frameRef);
    CFRelease(framesetterRef);
使用CTFrameRef绘制整个界面:
- (void)drawRect:(CGRect)rect
{
    // Drawing code
    [super drawRect:rect];
    CGContextRef context = UIGraphicsGetCurrentContext();
    // 将坐标系上下翻转。对于底层的绘制引擎来说,屏幕的左下角是(0, 0)坐标。而对于上层的 UIKit 来说,左上角是 (0, 0) 坐标。所以我们为了之后的坐标系描述按 UIKit 来做,所以先在这里做一个坐标系的上下翻转操作。翻转之后,底层和上层的 (0, 0) 坐标就是重合的了。
    // 这个应该是 以左下角为(0,0)
    CGContextSetTextMatrix(context, CGAffineTransformIdentity);
    CGContextTranslateCTM(context, 0, self.bounds.size.height);
    CGContextScaleCTM(context, 1.0, -1.0);
    if (self.rxctFrameData) {
        CTFrameDraw(self.rxctFrameData.frameRef, context);
    }
    for (RXCTImageFrame *imageFrame in self.rxctFrameData.imageAry) {
        RXCTImageData *imageData = (RXCTImageData *)imageFrame.rxctData;
        UIImage *image = [UIImage imageNamed:imageData.imageName];
        NSLog(@"imagePosition:%@", NSStringFromCGRect(imageFrame.imagePosition));
        if (image) {
            CGContextDrawImage(context, imageFrame.imagePosition, image.CGImage);
        }
    }
    [self updateWithImage];
}
上述就是整个使用CoreText实现图文混排的核心代码.
他的不足之处,里面有很多他自己App的实际情况而列举出的代码,无法做到通用.
我是在此基础上优化了代码了结构重新整理了一下代码和类之间的关系, 做了一个比较通用,比较容易扩展的的一个库.
开放的几个类
#import "RXCTView.h"
#import "RXCTFrameConfig.h"
#import "RXCTFrameData.h"

// 具体的输入数据类
#import "RXCTTextData.h"
#import "RXCTImageData.h"
#import "RXCTLinkData.h"
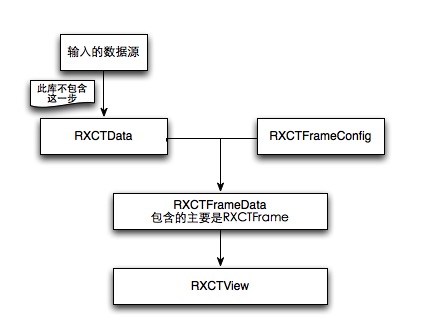
相关的关系图如下:
最后实现的一个效果是:

实现的代码是:
- (void)testRXCTView
{
    CGFloat width = [UIScreen mainScreen].bounds.size.width;
    RXCTFrameConfig *config = [[RXCTFrameConfig alloc] init];
    config.width = width;
    config.lineSpace = 10;
    config.font = [UIFont systemFontOfSize:22];
    config.textColor = [UIColor greenColor];

    // 普通文本
    RXCTTextData *textData = [[RXCTTextData alloc] init];
    textData.textColor = [UIColor redColor];
    textData.font = [UIFont boldSystemFontOfSize:15];
    textData.content = @"此段文本是一个普通文本,可以设置文字的字体,颜色等其他样式";


    // 普通文本,用config的信息
    RXCTTextData *textData2 = [[RXCTTextData alloc] init];
    textData2.content = @"此段文本是一个普通文本,使用默认的配置字体颜色";

    // 图片
    RXCTImageData *imageData = [[RXCTImageData alloc] init];
    // 本地图片地址
    imageData.imageName = @"coretext-image-1.jpg";
    imageData.width = width - 100;
    imageData.height = 100;


    // 可点击文本
    RXCTLinkData *linkData = [[RXCTLinkData alloc] init];
    linkData.textColor = [UIColor blueColor];
    linkData.font = [UIFont boldSystemFontOfSize:15];
    linkData.content = @"此段文字是一个类似于超链接文本,跟普通文本有点类似,只是多了一个下划线和点击事件";

    // 网络图片
    RXCTImageData *imageData2 = [[RXCTImageData alloc] init];
    // 本地图片地址
    imageData2.imageName = @"";
    imageData2.imageUrl = @"http://cloud.yiyizuche.cn/img/1234/56/123456789/201510/20151014_164938_992996-4-3-1.jpg-0.jpg";
    imageData2.imagePlacholder = [UIImage imageNamed:@"coretext-image-2.jpg"];
    imageData2.width = width - 40;
    imageData2.height = 50;

    // 图片
    RXCTImageData *imageData3 = [[RXCTImageData alloc] init];
    // 本地图片地址
    imageData3.imageName = @"coretext-image-2.jpg";
    imageData3.width = width;
    imageData3.height = 60;


    NSArray *ary = @[textData, textData2, imageData, linkData, imageData2, imageData3];

    RXCTFrameData *data = [RXCTFrameData parseWithArray:ary config:config];
    RXCTView *rxctView = [[RXCTView alloc] initWithFrame:CGRectMake(0, 0, width, 0)];
    rxctView.rxctFrameData = data;
    CGRect frame = rxctView.frame;
    frame.size.height = data.height;
    rxctView.frame = frame;
    rxctView.e_RXCT_TapType = kE_RXCT_TapType_Next;
    rxctView.backgroundColor = [UIColor yellowColor];
    rxctView.delegate = self;
    [self.view addSubview:rxctView];
}
可以做的扩充是:
当要添加类似于一个显示规则的时候, 可以添加一个RXCTData的子类.
然后在子类实现:
- (NSAttributedString *)attributedStringWithConfig:(RXCTFrameConfig *)config outRXCTFrame:(RXCTFrame **)outRXCTFrame;
这样就可以直接使用了.
同时在里面定义了点击行间距的时候的几种方式:
typedef enum E_RXCT_TapType {
    kE_RXCT_TapType_None          =       0,  // 当点击文本的行间距的时候,不做任何处理
    kE_RXCT_TapType_Pre           =       1,  // 当点击文本的行间距的时候,默认的是向上一行点击
    kE_RXCT_TapType_Next          =       2,  // 当点击文本的行间距的时候,默认的是向下一行点击
}E_RXCT_TapType;
逻辑都已经实现了.
最后公布一下github地址: