I2C总线驱动相关知识点,一位博主在博客里写的很好,这里就直接贴上链接:
Exynos4412 IIC总线驱动开发(一)—— IIC 基础概念及驱动架构分析
Exynos4412 IIC总线驱动开发(二)—— IIC 驱动开发
1、i2c子系统软件框架
    应用
    ------------------------------------------
    i2c driver:从设备驱动层
         需要和应用层进行交互
         封包数据,不知道数据是如何写入到硬件

    ------------------------------------------
    i2c 核心层:维护i2c 总线,包括i2c driver, i2c client链表
    drivers/i2c/i2c-core.c
    ---------------------------------------------------
    i2c adapter层:i2c控制层,初始化i2c控制器
            完成将数据写入或读取-从设备硬件
            不知道数据具体是什么,但是知道如何操作从设备
    drivers/i2c/busses/i2c-s3c2410.c
在内核编译时,确保i2c core和i2c adatper层必须编译进内核:
    make menuconfig
        Device Drivers  --->
            -*- I2C support  ---> //编译i2c-core.c
                I2C Hardware Bus support  --->
                    <*> S3C2410 I2C Driver // i2c-s3c2410.c
编译后如何确定是否有I2C总线以及i2c adapter控制器:
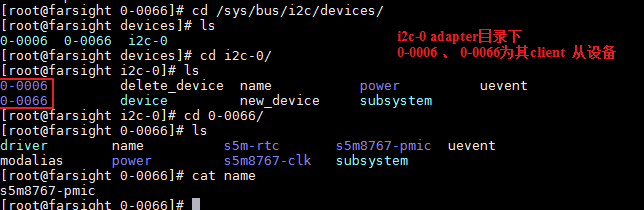
在如下/sys/bus/i2c目录下查看
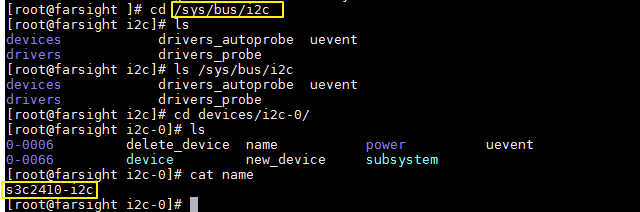
i2c-0 即 i2c控制器
2、I2C总线与平台总线的结合
两者各司其职,平台总线用于平台升级,由s3c2410-i2c.c就可知
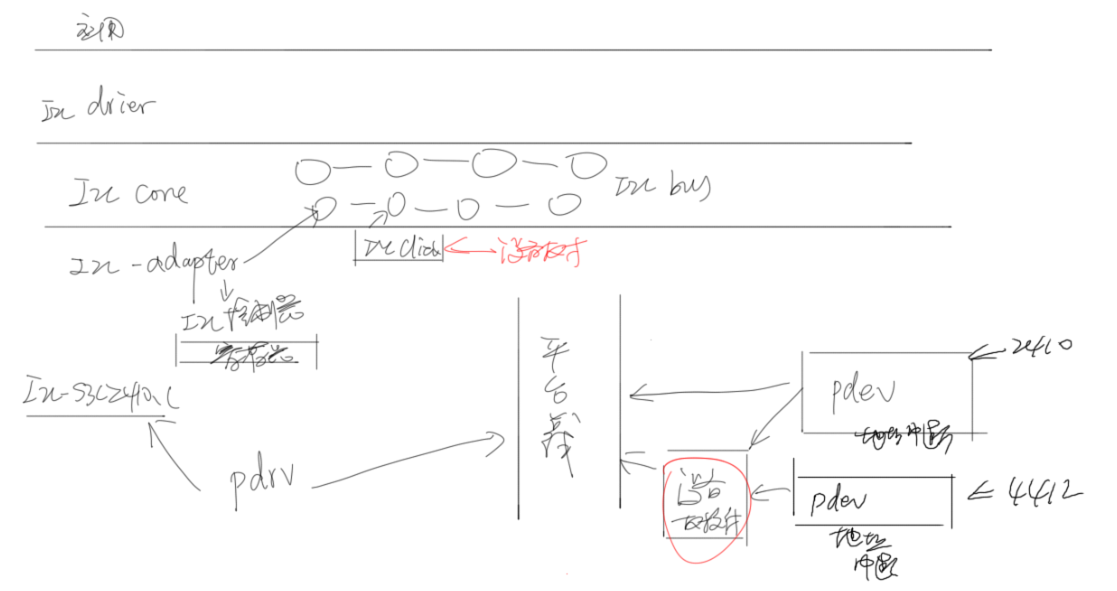
I2C client 和 平台设备pdev都在设备树中描述。
3、在设备树信息添加i2c从设备
i2c信息在设备树的哪个位置?
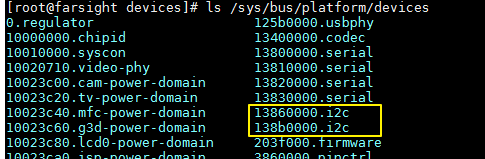
对应在文件目录下有:/sys/bus/platform/devices
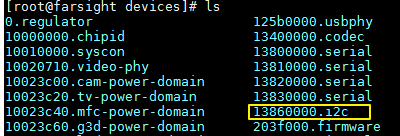
可以看到在内核中默认就有i2c0,那13860000是什么意思,到数据手册看一下
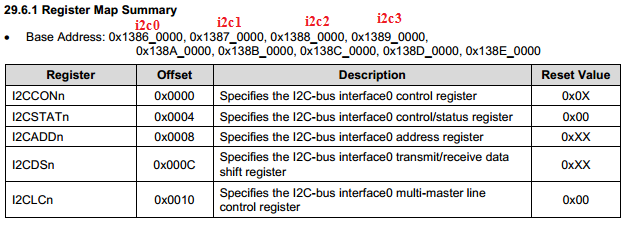
可知,实际上Exynos4412支持9组i2c总线,即有SCL0, SDA0 、SCL1,SDA1... SCL8,SDA8九组i2c总线。
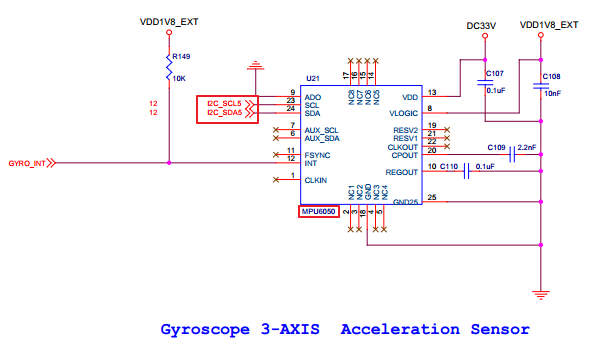
下面以MPU6050为例看一下,i2c从设备与SOC的硬件相关信息
Coreboard
MPU6050对应第6组i2c总线,i2c的控制器基地址为0x138B_0000
MPU6050: 从设备地址是0x68
SOC MPU6050
GPB_3 --- I2C_SCL5
GPB_3 --- I2C_SDA5
GPX3_3 --- GYRO_INT
由于内核中没有i2c5,所以需要人工添加进去
exynos4412-fs4412.dts设备树文件中只包含了一部分i2c信息,在文件开头,dts包含了exynos4412.dtsi文件
逐个打开文件搜索i2c,查看文件包含信息
exynos4412-fs4412.dts -->exynos4412.dtsi-->exynos4x12.dtsi-->exynos4,dtsi
最终在exynos4.dtsi下找到大量i2c信息,其中i2c_0, i2c_5信息如下;
模板:
描述控制器对应的设备树:arch/arm/boot/dts/exynos4.dtsi
 1           i2c_0: i2c@13860000 {
 2                 #address-cells = <1>;
 3                 #size-cells = <0>;
 4                 compatible = "samsung,s3c2440-i2c";
 5                 reg = <0x13860000 0x100>;
 6                 interrupts = <0 58 0>;
 7                 clocks = <&clock 317>;
 8                 clock-names = "i2c";
 9                 pinctrl-names = "default";
10                 pinctrl-0 = <&i2c0_bus>;
11                 status = "disabled";  //状态位disable,
12         };   //在内核中不会自动执行adapter控制器的代码
13
14           i2c_5: i2c@138B0000 {
15                 #address-cells = <1>;
16                 #size-cells = <0>;
17                 compatible = "samsung,s3c2440-i2c";
18                 reg = <0x138B0000 0x100>;
19                 interrupts = <0 63 0>;
20                 clocks = <&clock 322>;
21                 clock-names = "i2c";
22                 status = "disabled";
23         }
status = "disabled"; //状态位disable //在内核中不会自动执行adapter控制器的代码
回到exynos4412-fs4412.dts
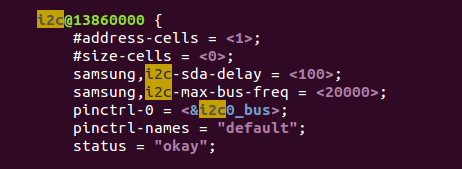
描述从设备信息的设备树的模板 :exynos4412-fs4412.dts
 1 i2c@13860000 {
 2         #address-cells = <1>;
 3         #size-cells = <0>;
 4         samsung,i2c-sda-delay = <100>;
 5         samsung,i2c-max-bus-freq = <20000>;
 6         pinctrl-0 = <&i2c0_bus>;
 7         pinctrl-names = "default";
 8         status = "okay";  //状态okay
 9
10         //子节点:从设备信息--电源管理芯片
11         s5m8767_pmic@66 {
12                 compatible = "samsung,s5m8767-pmic";
13                 reg = <0x66>;
14                //对应/sys/bus/i2c/devices/i2c_0  -->0_0066
15         }
16
17 }
在内核目录/sys/bus/i2c/devices/i2c_0目录下
新增加i2c从设备
在 arch/arm/boot/dts/exynos4412-fs4412.dts 增加i2c5控制器和它包含了从设备
1)确定i2c从设备的从设备号
看到MPU6050数据手册
mpu6050的AD0接地,低电平,故7位的从设备地址为b 110 1000 --> 0x68
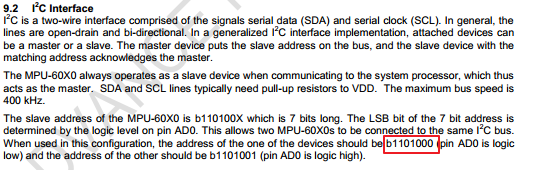
2)确定slave名字 -- 厂商+型号 -- invensense ,mpu6050
 1 i2c@138B0000 {/*i2c adapter5信息*/
 2         #address-cells = <1>;
 3         #size-cells = <0>;
 4         samsung,i2c-sda-delay = <100>;
 5         samsung,i2c-max-bus-freq = <20000>;
 6         pinctrl-0 = <&i2c5_bus>;
 7         pinctrl-names = "default";
 8         status = "okay";
 9
10         mpu6050@68 { /*i2c client信息 查数据手册得从设备号为68*/
11                 compatible = "invensense,mpu6050";
12                 reg = <0x68>;
13         };
14 };
保存后,make dtbs ,更新设备树文件
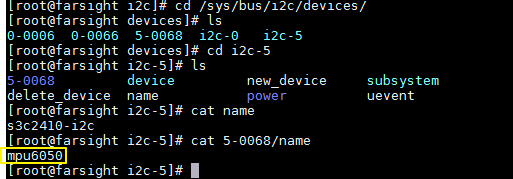
打开内核目录下平台设备的设备文件
进入adapter 138b0000.i2c
再查看i2c总线下是否有从设备
设置好设备树中的硬件信息,就可以开始写驱动了
4、i2c driver驱动的编写
a, 添加i2c client的信息,必须包含在控制器对应的节点中
b,直接编写i2c driver
1,构建i2c driver,并注册到i2c总线
2,实现probe:
|
申请设备号,实现fops
创建设备文件
通过i2c的接口去初始化i2c从设备
几个常用的对象:
 1     struct i2c_driver {//表示是一个从设备的驱动对象
 2         int (*probe)(struct i2c_client *, const struct i2c_device_id *);
 3         int (*remove)(struct i2c_client *);
 4         struct device_driver driver; //继承了父类
 5                     |
 6                     const struct of_device_id    *of_match_table;
 7         const struct i2c_device_id *id_table;//用于做比对,非设备树的情况
 8     }
 9     注册和注销
10         int i2c_add_driver( struct i2c_driver *driver);
11         void i2c_del_driver(struct i2c_driver *);
12
13
14     struct i2c_client {//描述一个从设备的信息,不需要在代码中创建,因为是由i2c adapter帮我们创建
15         unsigned short addr;        //从设备地址,来自于设备树中<reg>
16         char name[I2C_NAME_SIZE]; //用于和i2c driver进行匹配,来自于设备树中compatible
17         struct i2c_adapter *adapter;//指向当前从设备所存在的i2c adapter
18         struct device dev;        // 继承了父类
19     };
20     创建i2c client的函数
21     struct i2c_client *i2c_new_device(struct i2c_adapter *adap, struct i2c_board_info const *info)
22
23
24
25     struct i2c_adapter {//描述一个i2c控制器,也不是我们要构建,原厂的代码会帮我们构建
26         const struct i2c_algorithm *algo; //算法
27                     |
28                     int (*master_xfer)(struct i2c_adapter *adap, struct i2c_msg *msgs,int num);
29
30         struct device dev; //继承了父类,也会被加入到i2c bus
31         int nr; //编号
32
33     }
34     注册和注销:
35     int i2c_add_adapter(struct i2c_adapter * adapter);
36     void i2c_del_adapter(struct i2c_adapter * adap);
37
38
39     struct i2c_msg {//描述一个从设备要发送的数据的数据包
40         __u16 addr;     //从设备地址,发送给那个从设备
41         __u16 flags; //读1还是写0
42         __u16 len;        //发送数据的长度
43         __u8 *buf;        //指向数据的指针
44     };
45     //写从设备
46     int i2c_master_send(const struct i2c_client * client,const char * buf,int count)
47     //读从设备
48     int i2c_master_recv(const struct i2c_client * client,char * buf,int count)
49     以上两个函数都调用了:
50     int i2c_transfer(struct i2c_adapter *adap, struct i2c_msg *msgs, int num)
5,陀螺仪和加速度工作原理,它们的应用
陀螺仪的作用:
    原理:
        小时候玩过陀螺,如果给它一定的旋转速度,陀螺会竖立旋转起来而不会倒,
        主要因为高速旋转有抗拒方向改变的趋向

        陀螺仪就是内部的转子高速旋转,形成一个固定的初始化的参考平面,
        这样就可以通过测量初始的参考平面偏差计算出物体的旋转情况
        陀螺仪的强项在于测量设备自身的旋转运动

    陀螺仪的产生:
        1850年法国的物理学家福柯(J.Foucault)为了研究地球自转,首先发现高速转动中的转子(rotor),
        由于惯性作用它的旋转轴永远指向一固定方向,他用希腊字gyro(旋转)和skopein(看)
        两字合为gyro scopei一字来命名这种仪表

    陀螺仪的基本部件:
        (1) 陀螺转子,转子装在一支架内
        (2)内、外环,它是使陀螺自转轴获得所需角转动自由度的结构
            内环可环绕平面两轴作自由运动
            在内环架外加上一外环架,可以环绕平面做三轴作自由运动
        (3) 附件(是指力矩马达、信号传感器等)。

    陀螺仪的数据获取:
        XYZ分别代表设备围绕XYZ三个轴旋转的角速度,陀螺仪可以捕捉很微小的运动轨迹变化,
        因此可以做高分辨率和快速反应的旋转检测,但不能测量当前的运行方向

    应用:
        1,陀螺仪用于飞行体运动的自动控制系统中,作为水平、垂直、俯仰、航向和角速度传感器
        2,手机上的摄像头配合使用,比如防抖
        3,各类手机游戏的传感器,包括一些第一视角类射击游戏,陀螺仪完整监测游戏者手的位移
           手机中的陀螺仪最早被iphone4应用,所以被大家所熟知
        4,导航,手机配合GPS,导航能力已经可以达到专用的gps导航仪

重力加速度:
    原理:
        重力施加在物体上,使它产生一个加速度,重力大小和此物体的质量成正比
        物体在不同的运行中,会产生不同的重力,从而可以测量出物体的运动情况

    重力加速度的数据获取:
        加速度测量传感器有x、y、z三轴,注意在手机上屏幕的坐标,以左上角作为原点的,而且Y向下。
        注意区分这两个不同的坐标系。
        加速传感器的单位是加速度m/s2。如果手机平放好,x,y在位置为0,
        而z轴方向加速度=当前z方向加速度-g。由于g(重力加速度)垂直向下,
        则g=-9.81m/s2,即z轴 a=0-(-9.81)=9.81m/s2
    应用:
        1,图像自动翻转
        2,游戏控制
        3,计步器功能
6,寄存器:
#define SMPLRT_DIV        0x19 //采样频率寄存器-25 典型值:0x07(125Hz)
                            //寄存器集合里的数据根据采样频率更新
#define CONFIG            0x1A    //配置寄存器-26-典型值:0x06(5Hz)
                                //DLPF is disabled(DLPF_CFG=0 or 7)
#define GYRO_CONFIG        0x1B//陀螺仪配置-27,可以配置自检和满量程范围
                            //典型值:0x18(不自检,2000deg/s)
#define ACCEL_CONFIG        0x1C    //加速度配置-28 可以配置自检和满量程范围及高通滤波频率
                                //典型值:0x01(不自检,2G,5Hz)
#define ACCEL_XOUT_H    0x3B //59-65,加速度计测量值 XOUT_H
#define ACCEL_XOUT_L    0x3C  // XOUT_L
#define ACCEL_YOUT_H    0x3D  //YOUT_H
#define ACCEL_YOUT_L    0x3E  //YOUT_L
#define ACCEL_ZOUT_H    0x3F  //ZOUT_H
#define ACCEL_ZOUT_L    0x40 //ZOUT_L---64
#define TEMP_OUT_H        0x41 //温度测量值--65
#define TEMP_OUT_L        0x42
#define GYRO_XOUT_H        0x43 //陀螺仪值--67,采样频率(由寄存器 25 定义)写入到这些寄存器
#define GYRO_XOUT_L        0x44
#define GYRO_YOUT_H        0x45
#define GYRO_YOUT_L        0x46
#define GYRO_ZOUT_H        0x47
#define GYRO_ZOUT_L        0x48 //陀螺仪值--72
#define PWR_MGMT_1        0x6B //电源管理 典型值:0x00(正常启用)
7、ioctl: 给驱动发送不同指令
     应用程序:
        ioctl(fd, cmd, args);
    ========================================
    驱动中:xxx_ioctl()
    {
            switch(cmd){
            }
    }

    如何定义命令:
        1, 直接定义一个数字
            #define IOC_GET_ACCEL  0x9999
        2, 通过系统的接口
            _IO(x,y)
            _IOR(x,y,z)
            _IOW(x,y,z)

            参数1:表示magic,字符
            参数2:区分不同命令,整数
            参数3:传给驱动数据类型
8,mpu6050的数据
陀螺仪可测范围为 欧拉角格式±250,±500,±1000,±2000°/秒(dps) ,加速度计可测范围为±2,±4,±8,±16g
加速度读取的值为:
AFS_SEL      Full scale rang                  LSB  Sensitivy
    0                +-2g -----------------------16384 LSB/g
    1                +-4g -----------------------8192 LSB/g
    2                +-8g -----------------------4096 LSB/g
    3                +-16g------------------------2048 LSB/g

温度值:
        C = (TEMP_OUT Register Value )/340 + 36.53

陀螺仪值:
    FS_SEL      Full scale rang                  LSB  Sensitivy
    0                +-250 度/s ------------------131 LSB 度/s
    1                +-500 度/s ------------------65.5 LSB 度/s
    2                +-1000 度/s -----------------32.8 LSB 度/s
    3                +-2000 度/s ------------------16.4 LSB 度/s
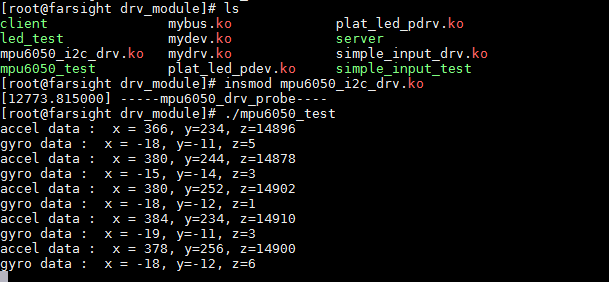
测试代码:


1 #include <linux/init.h> 2 #include <linux/module.h> 3 #include <linux/input.h> 4 #include <linux/interrupt.h> 5 #include <linux/slab.h> 6 #include <linux/of.h> 7 #include <linux/of_irq.h> 8 #include <linux/of_gpio.h> 9 #include <linux/i2c.h> 10 11 #include <asm/io.h> 12 #include <asm/uaccess.h> 13 14 #include "mpu6050.h" 15 16 17 #define SMPLRT_DIV 0x19 //采样频率寄存器-25 典型值:0x07(125Hz) 18 //寄存器集合里的数据根据采样频率更新 19 #define CONFIG 0x1A //配置寄存器-26-典型值:0x06(5Hz) 20 //DLPF is disabled(DLPF_CFG=0 or 7) 21 #define GYRO_CONFIG 0x1B//陀螺仪配置-27,可以配置自检和满量程范围 22 //典型值:0x18(不自检,2000deg/s) 23 #define ACCEL_CONFIG 0x1C //加速度配置-28 可以配置自检和满量程范围及高通滤波频率 24 //典型值:0x01(不自检,2G,5Hz) 25 #define ACCEL_XOUT_H 0x3B //59-65,加速度计测量值 XOUT_H 26 #define ACCEL_XOUT_L 0x3C // XOUT_L 27 #define ACCEL_YOUT_H 0x3D //YOUT_H 28 #define ACCEL_YOUT_L 0x3E //YOUT_L 29 #define ACCEL_ZOUT_H 0x3F //ZOUT_H 30 #define ACCEL_ZOUT_L 0x40 //ZOUT_L---64 31 #define TEMP_OUT_H 0x41 //温度测量值--65 32 #define TEMP_OUT_L 0x42 33 #define GYRO_XOUT_H 0x43 //陀螺仪值--67,采样频率(由寄存器 25 定义)写入到这些寄存器 34 #define GYRO_XOUT_L 0x44 35 #define GYRO_YOUT_H 0x45 36 #define GYRO_YOUT_L 0x46 37 #define GYRO_ZOUT_H 0x47 38 #define GYRO_ZOUT_L 0x48 //陀螺仪值--72 39 #define PWR_MGMT_1 0x6B //电源管理 典型值:0x00(正常启用) 40 41 42 43 44 45 46 //设计一个全局的设备对象 47 struct mpu_sensor{ 48 int dev_major; 49 struct device *dev; 50 struct class *cls; 51 struct i2c_client *client;//记录probe中client 52 }; 53 54 struct mpu_sensor *mpu_dev; 55 56 57 int mpu6050_write_bytes(struct i2c_client *client, char *buf, int count) 58 { 59 60 int ret; 61 struct i2c_adapter *adapter = client->adapter; 62 struct i2c_msg msg; 63 64 msg.addr = client->addr; 65 msg.flags = 0; 66 msg.len = count; 67 msg.buf = buf; 68 69 70 ret = i2c_transfer(adapter, &msg, 1); 71 72 return ret==1?count:ret; 73 74 } 75 76 int mpu6050_read_bytes(struct i2c_client *client, char *buf, int count) 77 { 78 79 int ret; 80 struct i2c_adapter *adapter = client->adapter; 81 struct i2c_msg msg; 82 83 msg.addr = client->addr; 84 msg.flags = I2C_M_RD; 85 msg.len = count; 86 msg.buf = buf; 87 88 ret = i2c_transfer(adapter, &msg, 1); 89 90 return ret==1?count:ret; 91 } 92 93 //读取某个特定寄存器的地址,然后返回值 94 int mpu6050_read_reg_byte(struct i2c_client *client, char reg) 95 { 96 // 先写寄存器的地址, 然后在读寄存器的值 97 98 int ret; 99 struct i2c_adapter *adapter = client->adapter; 100 struct i2c_msg msg[2]; 101 102 char rxbuf[1]; 103 104 msg[0].addr = client->addr; 105 msg[0].flags = 0; 106 msg[0].len = 1; 107 msg[0].buf = ® 108 109 msg[1].addr = client->addr; 110 msg[1].flags = I2C_M_RD; 111 msg[1].len = 1; 112 msg[1].buf = rxbuf; 113 114 ret = i2c_transfer(adapter, msg, 2); 115 if(ret < 0) 116 { 117 printk("i2c_transfer read error "); 118 return ret; 119 } 120 121 return rxbuf[0]; 122 123 } 124 125 int mpu6050_drv_open(struct inode *inode, struct file *filp) 126 { 127 return 0; 128 } 129 int mpu6050_drv_close(struct inode *inode, struct file *filp) 130 { 131 return 0; 132 } 133 134 long mpu6050_drv_ioctl (struct file *filp, unsigned int cmd, unsigned long args) 135 { 136 union mpu6050_data data; 137 138 139 switch(cmd){ 140 case IOC_GET_ACCEL: 141 //读数据 142 data.accel.x = mpu6050_read_reg_byte(mpu_dev->client, ACCEL_XOUT_L); 143 data.accel.x |= mpu6050_read_reg_byte(mpu_dev->client, ACCEL_XOUT_H) << 8; 144 145 data.accel.y = mpu6050_read_reg_byte(mpu_dev->client, ACCEL_YOUT_L); 146 data.accel.y |= mpu6050_read_reg_byte(mpu_dev->client, ACCEL_YOUT_H) << 8; 147 148 data.accel.z = mpu6050_read_reg_byte(mpu_dev->client, ACCEL_ZOUT_L); 149 data.accel.z |= mpu6050_read_reg_byte(mpu_dev->client, ACCEL_ZOUT_H) << 8; 150 break; 151 case IOC_GET_GYRO: 152 data.gyro.x = mpu6050_read_reg_byte(mpu_dev->client, GYRO_XOUT_L); 153 data.gyro.x |= mpu6050_read_reg_byte(mpu_dev->client, GYRO_XOUT_H) << 8; 154 155 156 data.gyro.y = mpu6050_read_reg_byte(mpu_dev->client, GYRO_YOUT_L); 157 data.gyro.y |= mpu6050_read_reg_byte(mpu_dev->client, GYRO_YOUT_H) << 8; 158 159 data.gyro.z= mpu6050_read_reg_byte(mpu_dev->client, GYRO_ZOUT_L); 160 data.gyro.z |= mpu6050_read_reg_byte(mpu_dev->client, GYRO_ZOUT_H) << 8; 161 break; 162 case IOC_GET_TEMP: 163 data.temp = mpu6050_read_reg_byte(mpu_dev->client, TEMP_OUT_L); 164 data.temp |= mpu6050_read_reg_byte(mpu_dev->client, TEMP_OUT_H) << 8; 165 break; 166 default: 167 printk("invalid cmd "); 168 return -EINVAL; 169 } 170 171 //将所有的数据交给用户 172 if(copy_to_user((void __user * )args, &data, sizeof(data)) > 0) 173 return -EFAULT; 174 175 176 return 0; 177 } 178 179 const struct file_operations mpu6050_fops = { 180 .open = mpu6050_drv_open, 181 .release = mpu6050_drv_close, 182 .unlocked_ioctl = mpu6050_drv_ioctl, 183 184 }; 185 186 187 int mpu6050_drv_probe(struct i2c_client *client, const struct i2c_device_id *id) 188 { 189 printk("-----%s---- ", __FUNCTION__); 190 191 /* 192 申请设备号,实现fops 193 创建设备文件 194 通过i2c的接口去初始化i2c从设备 195 */ 196 197 mpu_dev = kzalloc(sizeof(struct mpu_sensor), GFP_KERNEL); 198 199 mpu_dev->client = client; 200 201 mpu_dev->dev_major = register_chrdev(0,"mpu_drv", &mpu6050_fops); 202 203 mpu_dev->cls = class_create(THIS_MODULE, "mpu_cls"); 204 205 mpu_dev->dev = device_create(mpu_dev->cls, NULL, MKDEV(mpu_dev->dev_major, 0), 206 NULL, "mpu_sensor"); 207 208 char buf1[2] = {PWR_MGMT_1, 0x0}; 209 mpu6050_write_bytes(mpu_dev->client, buf1, 2); 210 211 char buf2[2] = {SMPLRT_DIV, 0x07}; 212 mpu6050_write_bytes(mpu_dev->client, buf2, 2); 213 214 char buf3[2] = {CONFIG, 0x06}; 215 mpu6050_write_bytes(mpu_dev->client, buf3, 2); 216 217 char buf4[2] ={GYRO_CONFIG, 0x18}; 218 mpu6050_write_bytes(mpu_dev->client, buf4, 2); 219 220 char buf5[2] = {ACCEL_CONFIG, 0x01}; 221 mpu6050_write_bytes(mpu_dev->client, buf5, 2); 222 223 return 0; 224 225 } 226 227 228 int mpu5060_drv_remove(struct i2c_client *client) 229 { 230 printk("-----%s---- ", __FUNCTION__); 231 device_destroy(mpu_dev->cls, MKDEV(mpu_dev->dev_major, 0)); 232 class_destroy(mpu_dev->cls); 233 unregister_chrdev(mpu_dev->dev_major, "mpu_drv"); 234 kfree(mpu_dev); 235 return 0; 236 } 237 238 239 const struct of_device_id of_mpu6050_id[] = { 240 { 241 .compatible = "invensense,mpu6050", 242 }, 243 {/*northing to be done*/}, 244 245 }; 246 247 248 const struct i2c_device_id mpu_id_table[] = { 249 {"mpu6050_drv", 0x1111}, 250 {/*northing to be done*/}, 251 }; 252 253 struct i2c_driver mpu6050_drv = { 254 .probe = mpu6050_drv_probe, 255 .remove = mpu5060_drv_remove, 256 .driver = { 257 .name = "mpu6050_drv",//随便写,/sys/bus/i2c/driver/mpu6050_drv 258 .of_match_table = of_match_ptr(of_mpu6050_id), 259 }, 260 261 .id_table = mpu_id_table,//非设备树情况下的匹配,在设备树的模式下不需要使用 262 263 }; 264 265 266 static int __init mpu6050_drv_init(void) 267 { 268 // 1,构建i2c driver,并注册到i2c总线 269 return i2c_add_driver(&mpu6050_drv); 270 271 } 272 273 static void __exit mpu6050_drv_exit(void) 274 { 275 i2c_del_driver(&mpu6050_drv); 276 277 } 278 279 module_init(mpu6050_drv_init); 280 module_exit(mpu6050_drv_exit); 281 MODULE_LICENSE("GPL");
 1 #include <stdio.h>
 2 #include <string.h>
 3 #include <stdlib.h>
 4 #include <sys/types.h>
 5 #include <sys/stat.h>
 6 #include <fcntl.h>
 7 #include <unistd.h>
 8 #include <sys/ioctl.h>
 9
10
11 #include "mpu6050.h"
12
13
14 int main(int argc, char *argv[])
15 {
16     int fd;
17
18     union mpu6050_data data;
19
20     fd = open("/dev/mpu_sensor", O_RDWR);
21     if(fd < 0)
22     {
23         perror("open");
24         exit(1);
25     }
26
27     while(1)
28     {
29         ioctl(fd, IOC_GET_ACCEL, &data);
30         printf("accel data :  x = %d, y=%d, z=%d
", data.accel.x, data.accel.y, data.accel.z);
31
32
33         ioctl(fd, IOC_GET_GYRO, &data);
34         printf("gyro data :  x = %d, y=%d, z=%d
", data.gyro.x, data.gyro.y, data.gyro.z);
35
36         sleep(1);
37
38     }
39
40     close(fd);
41
42
43     return 0;
44
45 }
 1 #ifndef __MPU6050_H__
 2 #define __MPU6050_H__
 3
 4 union mpu6050_data{
 5     struct{
 6         short x;
 7         short y;
 8         short z;
 9     }accel;
10
11     struct{
12         short x;
13         short y;
14         short z;
15     }gyro;
16
17     short temp;
18 };
19
20
21 #define IOC_GET_ACCEL  _IOR('M', 0x34,union mpu6050_data)
22 #define IOC_GET_GYRO  _IOR('M', 0x35,union mpu6050_data)
23 #define IOC_GET_TEMP  _IOR('M', 0x36,union mpu6050_data)
24
25
26 #endif
 1 ROOTFS_DIR = /home/linux/source/rootfs
 2
 3 MODULE_NAME = mpu6050_i2c_drv
 4 APP_NAME = mpu6050_test
 5
 6 CROSS_COMPILE = /home/linux/toolchains/gcc-4.6.4/bin/arm-none-linux-gnueabi-
 7 CC = $(CROSS_COMPILE)gcc
 8
 9 ifeq ($(KERNELRELEASE), )
10
11 KERNEL_DIR = /home/linux/kernel/linux-3.14-fs4412
12
13 CUR_DIR = $(shell pwd)
14
15 all :
16     make -C  $(KERNEL_DIR) M=$(CUR_DIR) modules
17
18     $(CC) $(APP_NAME).c  -o $(APP_NAME)
19
20 clean :
21     make -C  $(KERNEL_DIR) M=$(CUR_DIR) clean
22     rm -rf $(APP_NAME)
23
24 install:
25     cp -raf *.ko $(APP_NAME)   $(ROOTFS_DIR)/drv_module
26
27
28 else
29
30 obj-m += $(MODULE_NAME).o
31
32
33 endif
测试·结构