路由嵌套
routes: [
     {
        path: '/apple/:color',//为页面设置路由参数
        component: Apple,
        //路由嵌套
        children: [
            {
              path: 'redapple',
              component: Redapple               注意:在路径上加上‘/’表示从根目录开始跳转
                                                     不加‘/’表示从当前页面进行跳转

            }
        ]
     },
<!-- v-router的使用 -->
     <router-view></router-view>  //展示
     <router-link :to="'apple'"> to apple</router-link> //相当于a标签
     <router-link :to="{path:'/banana',query:{color:'yellow'}}">to banana</router-link>
     <router-link :to="{path:'apple/redapple'}">to applered</router-link>
注意:除了根据path以外,我们还可以为这个路由跳转设置名字,也可以通过名字来进行路由的跳转
 <router-link :to="{name:'myba'}">name router</router-link>
{path: '/banana',
name: 'myba',
component: Banana}
需要特别注意的是,我们在使用v-bind进行路由的路径的绑定的时候,有两种方式,一个是直接以对象的方式进行绑定,类似于
<router-link :to="{path:'/banana',query:{color:'yellow'}}">to banana</router-link>
另外一种就是通过绑定字符串,但是这个字符串必须在data()里面进行设置,类似于
<router-link :to="'apple'"> to apple</router-link>
      data () {
     return {
        apple: '/apple',

       }

    }
routes: [
     {
        path: '/apple/:color',//为页面设置路由参数
        component: Apple,
        //路由嵌套
        children: [
然后在apple.vue这个页面通过$route.params进行获取到所传递的参数
<template>
<div>
{{ msg }}
<p>{{ $route.params.color }}</p>
getparams () {
console.log(this.$route.params);
}
另外一种是直接在页面当中<router-link></router-link>里面通过query进行参数的绑定
<router-link :to="{path:'/banana',query:{color:'yellow'}}">to banana</router-link>
<template>
  <div>
    {{ msg }}
    {{$route.query.color}}
   <button @click="getparams">get params</button>
  </div>
</template>

<script>
export default {
  data () {
    return {
     msg: 'i am banana'
    }
  },
  methods: {
    getparams () {
      console.log(this.$route.query.color);
    }
  }
}
</script>
VUE的地址重定向
我们在网站当中往往是http://localhost:8080访问的是app.vue的界面,这个时候我们想让我们的网站打开的时候,直接是apple.vue的界面,这个时候我们就用到了vue的地址重定向的功能,
我们需要在routers的配置里面加上这个就可以了
    mode: 'history', //去掉地址栏中默认的#hash
   routes: [
   {
     path: '/',//表示根目录
     redirect: '/banana'  //表示你要重定向的位置
   },
{
        path: '/banana',
        component: Banana
     }
}
当你点击 <router-link> 时,这个方法会在内部调用,所以说,点击 <router-link :to="..."> 等同于调用 router.push(...)。
声明式:<router-link :to="...">
编程式:router.push(...)
router.push(location)
除了使用 <router-link> 创建 a 标签来定义导航链接,我们还可以借助 router 的实例方法,通过编写代码来实现。
router.push(location)
想要导航到不同的 URL,则使用 router.push 方法。这个方法会向 history 栈添加一个新的记录,所以,当用户点击浏览器后退按钮时,则回到之前的 URL。
当你点击 <router-link> 时,这个方法会在内部调用,所以说,点击 <router-link :to="..."> 等同于调用 router.push(...)。
声明式:<router-link :to="...">
编程式:router.push(...)
该方法的参数可以是一个字符串路径,或者一个描述地址的对象。
// 字符串
router.push('home')

// 对象
this.$router.push({path: '/login?url=' + this.$route.path});

// 命名的路由
router.push({ name: 'user', params: { userId: 123 }})

// 带查询参数,变成/backend/order?selected=2
this.$router.push({path: '/backend/order', query: {selected: "2"}});

// 设置查询参数
this.$http.post('v1/user/select-stage', {stage: stage})
      .then(({data: {code, content}}) => {
            if (code === 0) {
                // 对象
                this.$router.push({path: '/home'});
            }else if(code === 10){
                // 带查询参数,变成/login?stage=stage
                this.$router.push({path: '/login', query:{stage: stage}});
           }
});

// 设计查询参数对象
let queryData = {};
if (this.$route.query.stage) {
    queryData.stage = this.$route.query.stage;
}
if (this.$route.query.url) {
    queryData.url = this.$route.query.url;
}
this.$router.push({path: '/my/profile', query: queryData});
2.路由使用的部分技巧
(1)我们在路由的跳转当中,可以使用watch来监听路由的跳转变化

watch: {
    changeShowType(value) {
      console.log("-----"+value);
    },
    '$route'(to,from){
      console.log(to);  //去往的界面
      console.log(from); //来自的界面
      if(to.path=="/shop/detail"){
        console.log("商品详情");
      }
    }
  },
2) 我们通常会在页面当中使用到page404的界面,这个时候的路由设置为
{
path: '*',  //这个时候的路径就是*
component: page404
}
注意:这个配置必须放置在路由表的最后,因为*代表所有的,找到*之后下面的不会再去执行了

yyzz因为在路由的配置当中不存在,所以进入的界面为预先设置好的404界面
(3)路由当中mode方式的history和hash的区别
我们知道普通的jquery的跳转界面就是以hash的方式进行,所以每一个地址栏当中会出现默认的#号,例如

而在vue当中我们可以用history来模仿url的连接跳转

附上 history和hsah的区别网址https://www.cnblogs.com/photon-phalanx/p/7452331.html
(3)路由钩子函数
简单的理解钩子函数其实就是告诉服务器客户端正在做什么,比如说,客户端现在要跳转链接到界面,客户端跳转之前,先发起请求告诉服务器我可不可以进行跳转,这个时候服务器必须给到响应告诉客户端说是否可以进行跳转
路由的钩子函数常用到的两种形式:一个是直接写在路由的js当中,一个是写到要跳转的那个vue当中
1.直接写在路由js当中的路由钩子函数(直接写在路由表里面的beforeEnter就不存在afterEnter了)
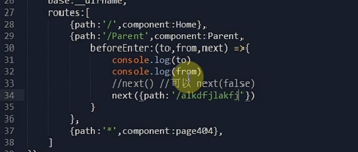
next()表示可以跳转,不能跳转就用next(false)
我们也可以使用next({path:'/st'})来使路由跳转到你自定义的链接上去
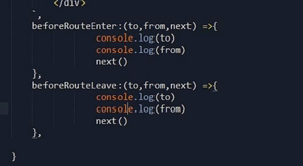
2.路由的钩子函数也可以写在我们将要跳转的vue当中(这个时候就可以同时拥有Enter和Leave了)
methods: {

  },
  components: {
    headTit
  },
  beforeRouteEnter(to, from, next) {
    console.log("可不可以进行跳转");
    next();
  },
  beforeRouteLeave(to, from, next) {
    console.log("可不可以跳走");
    next();
  }
 //注意在beforeRouteLeave当中是没有next({path})这种方式的,只有在Enter的时候才会有,但是同样的Enter里面没有this
  要想离开的时候跳转到别的界面,可以使用this.$router.push的方式或者进行路由判断的形式
beforeRouteLeave(to, from, next) {
console.log("离开详情");
next();
this.$router.push('/uououiu');
}
beforeRouteLeave(to, from, next) {
console.log(to);
if(to.path=='/shop/yyzz'){
next({path:'/shop'});
}
next();
//this.$router.push('/uououiu');
}
具体文档查看
https://www.cnblogs.com/yesu/p/8035518.html