iBeacon介绍
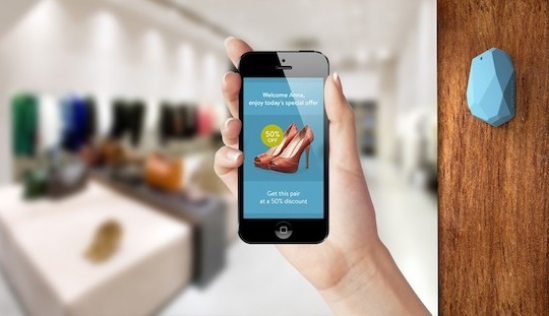
iBeacon是苹果在2013年WWDC上推出一项基于蓝牙4.0(Bluetooth LE | BLE | Bluetooth Smart)的精准微定位技术,当你的手持设备靠近一个Beacon基站时,设备就能够感应到Beacon信号,范围可以从几毫米到50米。因为是一种定位技术,苹果将iBeacon相关的接口放到了CoreLocation.framework。
使用iBeacon的前提条件,是用户开启支持BLE的iOS终端的蓝牙功能,并开启位置信息服务。iOS在接收到iBeacon后,会将UUID告知使用iBeacon的App。在UUID的触发下,App就会被叫醒。
本文转自Migrant的博客,原文:《Can you Smell the iBeacon?》
虽然我们还未看到任何实际生活中的使用案例,但 iBeacon 绝对是 iOS 7 带来的最热门的新话题之一。
上周我收到了我的 Developer Preview Kit from Estimote,为了将其收入我正在写作的新书中,我开始研究 iBeacon。下面是我的发现。
为了理解两种操作模式的不同之处,有两个词你应该知道:
1. Monitoring – 涉及小功率区域监测,接收 didEnterRegion: 和 didExitRegion: 代理消息。
2. Ranging – 意味着大功率活动,此时你能从各个 iBeacon 收到信号强度并能够估计此刻与它们的距离。
iOS 7 之前苹果给我们提供了监测设备将要进入或离开某一个特定区域的能力,其核心是 CLRegion。该技术围绕着地理位置和进入或退出该位置时将要发生的事情。更好的是,如果你在 info.plist 中指定了接收后台位置更新,那么系统可以在区域边界处激活你的应用。
iOS 7 增加了继承自 CLRegion 的 CLBeaconRegion。只要有 iBeacon 被 iOS 检测到,即使信号可能很弱,你就被定义为位于区域之内。这让测试过程令人发疯,因为即使我把我所有的 Estmote beacons 用铝箔包裹起来, iOS 仍然认为我位于该区域内。
一个 iBeacon 通过 3 个值被识别: proximityUUID, Major 和 Minor。第一个是 UUID,后两者是两个 16 位二进制整数。你可以构建 3 个级别的 CLBeaconRegion: 只有 UUID,UUID + Major,UUID + Major + Minor。例如你可能想用一个 UUID 对应整个公司,Major 对应各个店铺。Minor 则可以用来指定每个店铺中的各个货架。
做广告吧
普通的 BTLE (Bluetooth Low Energy) 外设宣传多重服务,iBeacon 不同。iBeacon 自己使用广告信息并且不需要真正的蓝牙链接,因为所有所需信息已存在于 iBeacon 广告中。
以一个简略的例子开始:
- @implementation ViewController
- {
- CBPeripheralManager *_peripheralManager;
- BOOL _isAdvertising;
- }
- - (void)_startAdvertising
- {
- NSUUID *estimoteUUID = [[NSUUID alloc] initWithUUIDString:@"B9407F30-F5F8-466E-AFF9-25556B57FE6D"];
- CLBeaconRegion *region = [[CLBeaconRegion alloc] initWithProximityUUID:estimoteUUID
- major:2
- minor:1
- identifier:@"SimEstimote"];
- NSDictionary *beaconPeripheralData = [region peripheralDataWithMeasuredPower:nil];
- [_peripheralManager startAdvertising:beaconPeripheralData];
- }
- - (void)_updateEmitterForDesiredState
- {
- if (_peripheralManager.state == CBPeripheralManagerStatePoweredOn)
- {
- // only issue commands when powered on
- if (_isAdvertising)
- {
- if (!_peripheralManager.isAdvertising)
- {
- [self _startAdvertising];
- }
- }
- else
- {
- if (_peripheralManager.isAdvertising)
- {
- [_peripheralManager stopAdvertising];
- }
- }
- }
- }
- #pragma mark - CBPeripheralManagerDelegate
- - (void)peripheralManagerDidUpdateState:(CBPeripheralManager *)peripheral
- {
- [self _updateEmitterForDesiredState];
- }
- #pragma mark - Actions
- - (IBAction)advertisingSwitch:(UISwitch *)sender
- {
- _isAdvertising = sender.isOn;
- [self _updateEmitterForDesiredState];
- }
- @end
这个例子有一个 UISwitch 来切换 soft-beacon。这里有一些陷阱。首先它用了若干毫秒来开启蓝牙系统。只有在蓝牙启动时才能使用 CBPeripheralManager。它一这么做你就会收到 peripheralManagerDidUpdateState: 代理回调,如果蓝牙电源此时处于开启状态,你就可以开始广播 beacon。
停止 iBeacon 要简单的多,只需要一个命令。如果 CBPeripheralManager 电源被关闭,则所有的广告也会停止。当应用进入后台而你又没有告诉 iOS 保持蓝牙服务继续运行时就会导致这种情况发生。没记错的话,所有的服务在应用回到前台时会恢复。
Estimote
用何种类型的设备来执行 iBeacon 的功能并无结论,你可以让任何 iOS 设备 (>= iPhone 4S) 和 Mac (>= late 2011) 的蓝牙芯片作为 iBeacon。也有一些硬件公司提供专用的硬件。
Beacon 硬件的初衷是你让你并不需要在墙上粘一个真的 iOS 设备。不是每个人都能在店铺的每一个角落都放上 iPad。标准 iBeacon 硬件的价格是 99 美金 3个。我用这个价格买了 3 个 Estimote beacon。
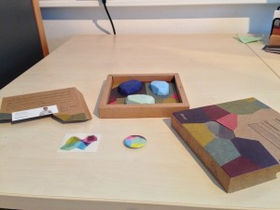
Estimote Developer Preview Kit
Estimote 提供了非常友好的拆箱体验。除了 3 个不同颜色的 iBeacon,还有 1 个按钮,1 张贴纸,1 张 Estimote CEO 和联合创始人 Jakub Krzych 的名片,还有一些警告信息来告知你这些 beacon 目前是手工组装的因此可能存在固件 bug。
收到 beacon 后你要做的第一件事是下载 Estimote 的演示应用,它可以让你像上文描述的那样尝试 Monitoring 和 Ranging。它还允许你链接各个 Estimote 设备来观察它们的电量,固件版本,以及 UUID, Major 和 Minor 的设置值。
此时我很惊讶的得知 Estimote 使用了”烧入”的 UUID。官方声明说这是有意的设计,用来阻止来自越狱设备的黑客和位置欺骗。
UUID 在应用内很明显,也被公布于几个博客中:
- B9407F30-F5F8-466E-AFF9-25556B57FE6D
这也是我上面的例子中使用的 UUID,其实是创建了一个模拟的 Estimote beacon。
Estimote beacon 被完全包裹于橡胶之中因此并没有像 USB 之类的物理硬件接口。所有的设置通过蓝牙和 Estimote 暴露的内部服务来完成。推测未来版本的 official Estimote SDK 会针对担心自己 beacon 安全的人推出 UUID 加密方法。
他们还建议你使用他们包装的 Core Location 和 Core Bluetooth 来代替原生的 iOS 方法。对于系统也提供的功能,我个人比较反感使用第三方 SDK。对于你和你的邻居使用相同的 UUID 所造成的潜在问题的最佳解决方案是使用随机的 Major 值结合 UUID 来监测。一旦范围被发现,你要做额外的检查 — 可能针对于地理位置 — 是否你确实在你自己的店铺里。
监测 iBeacon 区域
如果你已经有了一个 Estimote 或按照上面创建了一个 soft-beacon,下一步就是监测这个区域。下面是一个可行的示例,目的是当你穿过区域边界时,更新文本标签并发出一个本地通知:
- @implementation AppDelegate
- {
- CLLocationManager *_locationManager;
- BOOL _isInsideRegion; // flag to prevent duplicate sending of notification
- }
- - (BOOL)application:(UIApplication *)application didFinishLaunchingWithOptions:(NSDictionary *)options
- {
- // create a location manager
- _locationManager = [[CLLocationManager alloc] init];
- // set delegate, not the angle brackets
- _locationManager.delegate = self;
- NSUUID *estimoteUUID = [[NSUUID alloc] initWithUUIDString:@"B9407F30-F5F8-466E-AFF9-25556B57FE6D"];
- CLBeaconRegion *region = [[CLBeaconRegion alloc] initWithProximityUUID:estimoteUUID
- identifier:@"Estimote Range"];
- // launch app when display is turned on and inside region
- region.notifyEntryStateOnDisplay = YES;
- // isMonitoringAvailableForClass:Returns a Boolean indicating whether the device supports region monitoring using the specified class.
- if ([CLLocationManager isMonitoringAvailableForClass:[CLBeaconRegion class]])
- {
- [_locationManager startMonitoringForRegion:region];
- // get status update right away for UI
- [_locationManager requestStateForRegion:region];
- }
- else
- {
- NSLog(@"This device does not support monitoring beacon regions");
- }
- // Override point for customization after application launch.
- return YES;
- }
- - (void)_sendEnterLocalNotification
- {
- if (!_isInsideRegion)
- {
- UILocalNotification *notice = [[UILocalNotification alloc] init];
- notice.alertBody = @"Inside Estimote beacon region!";
- notice.alertAction = @"Open";
- [[UIApplication sharedApplication] scheduleLocalNotification:notice];
- }
- _isInsideRegion = YES;
- }
- - (void)_sendExitLocalNotification
- {
- if (_isInsideRegion)
- {
- UILocalNotification *notice = [[UILocalNotification alloc] init];
- notice.alertBody = @"Left Estimote beacon region!";
- notice.alertAction = @"Open";
- [[UIApplication sharedApplication] scheduleLocalNotification:notice];
- }
- _isInsideRegion = NO;
- }
- - (void)_updateUIForState:(CLRegionState)state
- {
- ViewController *vc = (ViewController *)self.window.rootViewController;
- if (state == CLRegionStateInside)
- {
- vc.label.text = @"Inside";
- }
- else if (state == CLRegionStateOutside)
- {
- vc.label.text = @"Outside";
- }
- else
- {
- vc.label.text = @"Unknown";
- }
- }
- #pragma mark - CLLocationManagerDelegate
- - (void)locationManager:(CLLocationManager *)manager
- didDetermineState:(CLRegionState)state forRegion:(CLRegion *)region
- {
- // always update UI
- [self _updateUIForState:state];
- if ([UIApplication sharedApplication].applicationState == UIApplicationStateActive)
- {
- // don't send any notifications
- return;
- }
- if (state == CLRegionStateInside)
- {
- [self _sendEnterLocalNotification];
- }
- else
- {
- [self _sendExitLocalNotification];
- }
- }
- @end
本质上,你只是创建了一个 CLBeaconRegion 并让 CLLocationManager 对象去监听它。对于某些设备 beacon 监听会不可用,比如缺少 BT4 芯片,所以你需要通过 isMonitoringAvailableForClass: 来查询。
| 注意: didDetermineState: 在穿越区域边界时和 requestStateForRegion: 方法后都会被调用。所以你可以在这里做关于监听的工作并实现 didEnterRegion 和 didExitRegion: 来保证不会过分干扰用户。 |
剩下的代码用来在应用在后台运行时发送本地通知,并避免对同一状态连续发送多个相同消息。
在我测试时,当我在 iPad 上打开第一个例子中的 soft beacon,我总是会立刻收到 didEnterRegion: 消息。关闭 beacon 后会延迟 43 秒收到 didExit 消息。所以 iOS 在内部做了一些过滤来避免实时触发。
后台
你会发现上面的代码在应用在前台运行时运行的非常好,但是当应用进入后台后不会继续发送/监听。
为了在后台监听区域,你需要将 info.plist 中的 “Location updates” 后台模式开启。”Acts as Bluetooth LE accessory” 则用来使 soft beacon 持久。Xcode 为此提供了很友好的 UI。
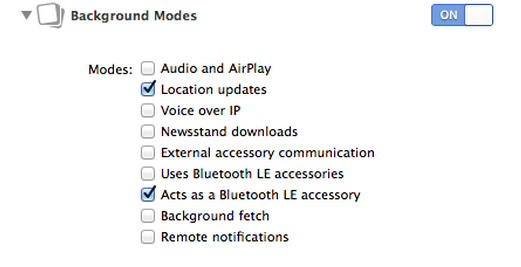
Enabling iBeacon background modes
这里做出的改变最终会体现在 info.plist 文件中的 UIBackgroundModes 下。
增加配件设置要求用户授权蓝牙文件共享。注意用户可能拒绝或者在隐私设置中关闭授权。
集成了兼容 BT4 芯片的 Mac 可以发射 soft-beacon。CoreBluetooth 从 OS X 10.9 开始也可以在 Mac 上使用。2011 年以后生产的 Mac 通常含有该芯片。唯一缺少的是 CLBeaconRegion,不过如果你自己构建用来广播 iBeacon 的字典就可以解决这个问题。至此,你所需要了解的最后一件事是 CoreBluetooth.framework 隐藏在 IOBluetooth.framework 中。
Matthew Robinson 创建了 BeaconOSX sample 来做这件事。
竞争
至写作此文时苹果并未发布官方的 iBeancon 规范。当我询问苹果相关负责人,他告诉我当他们发布时会告知我。所以只能寄希望于它们最终会这么做。与此同时,一些聪明人仍旧跑在前面并且对 iBeacon 进行逆向工程。
几个 iBeacon 硬件已经面世,Estimote 很快就会感受到来自他们的竞争。我粗略的搜索后发现的其他公司有:
1. RedBearLab 出售 Arduino 插件板(也叫做 “shield”),售价 $29,有一个 iBeacon profile。
2. Kontakt.io 出售运行于可人工替换的普通电池上的 beacon,售价 $99 3个,$149 5个, $279 10个。
3. GeoHopper 以 USB 供电的作为 iBeacon 的微型插头: 售价 $39.99 1个,$89.99 3个,192.99 5个。
4. 你还可以[用 Raspberry Pi 和 Bluetooth LE 适配器自己做一个],设备价值 $40 左右,适配器 $10 左右。
以上公司中,Estimote 似乎服务最好。
USB 供电和可更换电池并不是十分必要,低功耗的 BTLE 据说可以维持 2 年。防水橡胶外套和内置的贴纸可以让你很容易的将它粘贴到任何地方而不必害怕它被偷走和损害。
但是竞争从未停止,更多的公司一如既往的进入这个热门领域,下一年的价格一定会降低一半甚至更多。希望 Estimote 在价格上保持竞争力,并且当可以在生产线量产 beacon 的时候进一步降低价格。
只有两个不那么积极的消息。我个人认为自定义 SDK 不应该被当做 USP 使用来锁定用户,并且他们也不打算支持自定义的 UUID,当然也许是出于安全方面的考虑。也许它们最终也会明白过来。目前这些东西可以很容易的工作,”包裹”中其余的东西也非常有价值。
结论
没什么能阻止我们将 iBeacon 技术发扬光大,使应用和服务留意用户需求。要是真有什么的话,可能是担心苹果可能会更新仍然保密的 iBeacon 广告包来包含其它值。不过我提到的所有的硬件设备也可以升级来调整广告值。
唯一的问题是想象力的缺乏以及缓慢的卖家和合作方市场的低采用率。iBeacon 承诺会让进入传统的实体商店再次变得有趣。如此一来,任何这种公司会被很好的宣传以快速采用 iBeacon,以此方法将顾客重新勾住和拉回实体店。
小型商店可以在他们用于 POS 系统的 Mac 或 iPad 上运行一个 iBeacon,避免额外话费。这允许基于 Passbook 的优惠券或当靠近收银台时会员卡自动弹出。
本文摘自:http://www.cocoachina.com/applenews/devnews/2014/0515/8427.html
参考资料
http://blog.csdn.net/meway/article/details/25311753
iBeacon开发:
http://esoftmobile.com/2013/12/15/ibeacons/
http://blog.csdn.net/zengraoli/article/details/19614443
iBeacon是什么 iBeacon怎么用:
http://jingyan.baidu.com/article/4d58d541cb12a59dd4e9c0ef.html
如何使用iOS 7的iBeacons来提高你的应用:
http://www.cocoachina.com/applenews/devnews/2014/0115/7705.html
iOS7的iBeacon技术解析
:http://www.w3c.com.cn/ios7%E7%9A%84ibeacon%E6%8A%80%E6%9C%AF%E8%A7%A3%E6%9E%90
自己动手 IBeacon 室内定位 完整体验(超详细过程):
http://blog.csdn.net/u011341435/article/details/18948137