XML文件具有轻量级、规范统一、支持跨平台、跨语言、跨操作系统等特点,所以广泛被用来传递和处理数据。而.net中也提供了两种处理XML数据的方法:
1、XmlDocument方法,操作XmlElement、XmlAttribute等节点。(网上很多,此处不再累述)
2、XmlSerializer序列化对象和反序列化。
本文主要针对第二中方法(实现起来简单方便),先要引用System.Xml.Serialization,一下步入正题:
利用泛型的特点,写一个用来处理所有类型序列化和反序列化的类SerializaHelper:
 1 using System;
 2 using System.Collections.Generic;
 3 using System.Linq;
 4 using System.Text;
 5 using System.IO;
 6 using System.Xml.Serialization;
 7
 8 namespace SerializaHelper
 9 {
10     public class XmlSerializHelper<T>
11     {
12         //传入T类型对象,序列化成xml
13         public static void SerializToXml(string filePath, T obj)
14         {
15             try
16             {
17                 using (StreamWriter sw = new StreamWriter(filePath))
18                 {
19                     XmlSerializer xs = new XmlSerializer(typeof(T));
20                     xs.Serialize(sw, obj);
21                 }
22             }
23             catch (Exception)
24             {
25                 throw;
26             }
27         }
28
29         //传入xml,反序列化成T类型的对象
30         public static T DeserializFromXml(string filePath)
31         {
32             if (string.IsNullOrEmpty(filePath))
33             {
34                 return default(T);
35             }
36             try
37             {
38                 using (StreamReader sr = new StreamReader(filePath))
39                 {
40                     XmlSerializer xs = new XmlSerializer(typeof(T));
41                     return (T)xs.Deserialize(sr);
42                 }
43             }
44             catch (Exception)
45             {
46                 throw;
47             }
48         }
49     }
50 }
这是用来处理xml和对象之间转换的类,以一下xml为例来演示将xml转换成对象的过程:
 View Code

 1 <?xml version="1.0" encoding="utf-8"?>
 2 <SiteConfig xmlns:xsi="http://www.w3.org/2001/XMLSchema-instance" xmlns:xsd="http://www.w3.org/2001/XMLSchema">
 3   <SiteUrl>http://www.readnovel.com/</SiteUrl>
 4   <SiteName>小说阅读网</SiteName>
 5   <BookList>
 6     <BookInfo>
 7       <Name>龙牙神兵</Name>
 8       <Url>http://www.readnovel.com/partlist/197919.html</Url>
 9       <Author>烟云公子</Author>
10     </BookInfo>
11     <BookInfo>
12       <Name>特种兵在都市</Name>
13       <Url>http://www.readnovel.com/partlist/120040.html</Url>
14       <Author>夜十三</Author>
15     </BookInfo>
16     <BookInfo>
17       <Name>都市之最天才</Name>
18       <QidianBookId>http://www.readnovel.com/partlist/193444.html</QidianBookId>
19       <Author>十九周年</Author>
20     </BookInfo>
21     <BookInfo>
22       <Name>苍天神木诀</Name>
23       <Url>http://www.readnovel.com/partlist/196434.html</Url>
24       <Author>妖姬天下</Author>
25     </BookInfo>
26   </BookList>
27 </SiteConfig>
根据示例xml新建实体类SiteConfig.cs和BookInfo.cs:
 1 namespace XmlSerialzer
 2 {
 3     [Serializable]
 4     public class SiteConfig
 5     {
 6         //[XmlElement]
 7         public string SiteUrl { get; set; }
 8
 9         public string SiteName { get; set; }
10
11         public List<BookInfo> BookList { get; set; }
12     }
13 }
 1 namespace XmlSerialzer
 2 {
 3     [Serializable]
 4     public class BookInfo
 5     {
 6         public string Name { get; set; }
 7
 8         public string Url { get; set; }
 9
10         public string Author { get; set; }
11     }
12 }
转化的过程很简单,只需要调用DeserializFromXml然后指定xml文件的路径即可:
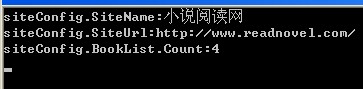
1         static void Main(string[] args)
2         {
3             SiteConfig siteConfig = XmlSerialzer.SerializaHelper<SiteConfig>.DeserialzFromXml(@"C:\Documents and Settings\hp\桌面\XmlSerialzer\xiaoshuo.xml");
4
5             Console.WriteLine("siteConfig.SiteName:" + siteConfig.SiteName);
6             Console.WriteLine("siteConfig.SiteUrl:" + siteConfig.SiteUrl);
7             Console.WriteLine("siteConfig.BookList.Count:" + siteConfig.BookList.Count);
8         }
输出如下图所示:
将对象序列化成xml也很简单:
 1         static void Main(string[] args)
 2         {
 3             SiteConfig siteConfig = new SiteConfig()
 4             {
 5                 BookList = new List<BookInfo>()
 6                 {
 7                     new BookInfo(){Author="天蚕土豆",Name="武动乾坤",Url="http://www.qidian.com/Book/2048120.aspx"},
 8                     new BookInfo(){Author="我吃西红柿",Name="莽荒纪",Url="http://www.qidian.com/Book/2502372.aspx"},
 9                     new BookInfo(){Author="忘语",Name="凡人修仙传",Url="http://www.qidian.com/Book/107580.aspx"}
10                 },
11                 SiteName = "起点小说网",
12                 SiteUrl = "http://www.qidian.com"
13             };
14             XmlSerialzer.SerializaHelper<SiteConfig>.SerializToXml("MyLoveBook.xml",siteConfig);
15         }
查看MyLoveBook.xml文件:
 1 <?xml version="1.0" encoding="utf-8"?>
 2 <SiteConfig xmlns:xsi="http://www.w3.org/2001/XMLSchema-instance" xmlns:xsd="http://www.w3.org/2001/XMLSchema">
 3   <SiteUrl>http://www.qidian.com</SiteUrl>
 4   <SiteName>起点小说网</SiteName>
 5   <BookList>
 6     <BookInfo>
 7       <Name>武动乾坤</Name>
 8       <Url>http://www.qidian.com/Book/2048120.aspx</Url>
 9       <Author>天蚕土豆</Author>
10     </BookInfo>
11     <BookInfo>
12       <Name>莽荒纪</Name>
13       <Url>http://www.qidian.com/Book/2502372.aspx</Url>
14       <Author>我吃西红柿</Author>
15     </BookInfo>
16     <BookInfo>
17       <Name>凡人修仙传</Name>
18       <Url>http://www.qidian.com/Book/107580.aspx</Url>
19       <Author>忘语</Author>
20     </BookInfo>
21   </BookList>
22 </SiteConfig>
xml的结构顺序和SiteConfig中的属性定义的先后顺序一致,且默认情况下,将字段转换成属性(XmlAttribute),现将SiteConfig中的代码稍做修改:
 1 namespace XmlSerialzer
 2 {
 3     [Serializable]
 4     public class SiteConfig
 5     {
 6         public List<BookInfo> BookList { get; set; }
 7
 8         [XmlAttribute]
 9         public string SiteUrl { get; set; }
10
11         [XmlAttribute]
12         public string SiteName { get; set; }
13     }
14 }
转换成的xml中SiteUrl和SiteName都是SiteConfig的属性,如下所示:
 1 <?xml version="1.0" encoding="utf-8"?>
 2 <SiteConfig xmlns:xsi="http://www.w3.org/2001/XMLSchema-instance" xmlns:xsd="http://www.w3.org/2001/XMLSchema" SiteUrl="http://www.qidian.com" SiteName="起点小说网">
 3   <BookList>
 4     <BookInfo>
 5       <Name>武动乾坤</Name>
 6       <Url>http://www.qidian.com/Book/2048120.aspx</Url>
 7       <Author>天蚕土豆</Author>
 8     </BookInfo>
 9     <BookInfo>
10       <Name>莽荒纪</Name>
11       <Url>http://www.qidian.com/Book/2502372.aspx</Url>
12       <Author>我吃西红柿</Author>
13     </BookInfo>
14     <BookInfo>
15       <Name>凡人修仙传</Name>
16       <Url>http://www.qidian.com/Book/107580.aspx</Url>
17       <Author>忘语</Author>
18     </BookInfo>
19   </BookList>
20 </SiteConfig>
XmlSerializer使得xml和Object对象之间的互相转换变得很容易。
==================================================================================
欢迎指正!